

There’s something about the shimmer and sparkle of Funfetti that instantly lifts my mood. I remember as a kid, watching my mom mix up batches of colorful batter for birthday cakes, her kitchen bursting with rainbow sprinkles and the smell of vanilla wafting through the air. Fast forward to today, and I still get that same thrill when I whip up a batch of this magic — it’s like a little celebration in the oven every time. Honestly, I think Funfetti has this uncanny ability to make everything feel special, whether it’s for a kid’s party, a casual coffee date with friends, or just a late-night snack when I need a sugar-infused pick-me-up. This recipe’s incredibly forgiving and so easy to customize; I’ve tested it with almond milk, coconut sugar, you name it, and it always comes out beautifully. Plus, who doesn’t love a dessert that tastes as good as it looks? Trust me, once you try this Funfetti treat, it’ll become your new go-to whenever you want that cheerful pop of color and flavor. Get ready to brighten up your kitchen — and your day!
What is Funfetti?
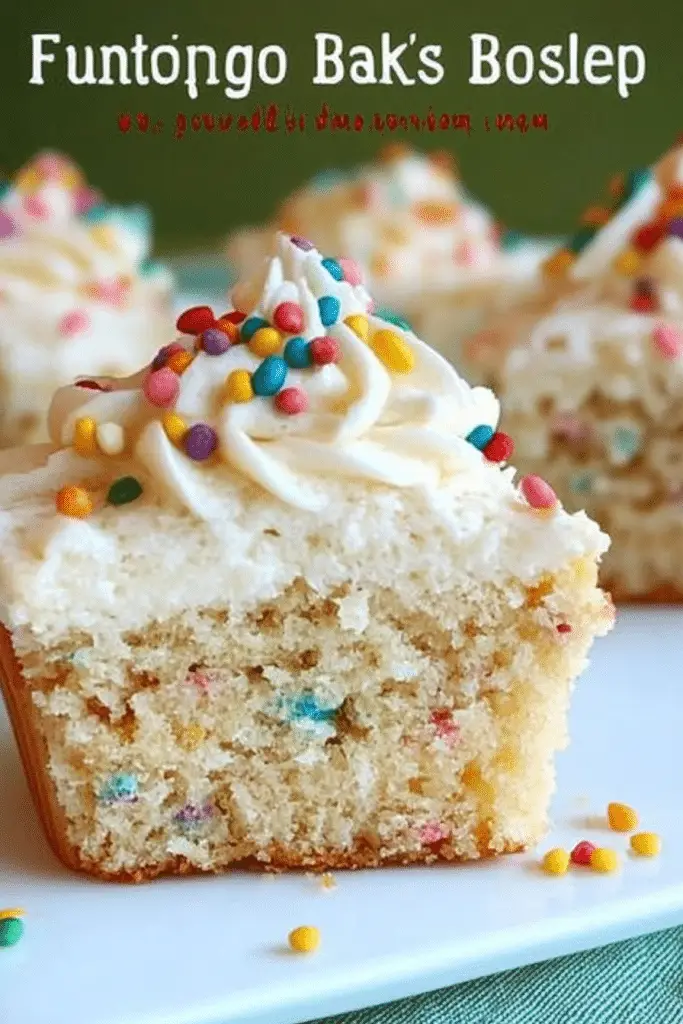
Think of Funfetti as the joyful, playful cousin of classic vanilla cake. It’s essentially a tender, moist vanilla cake or muffin batter sprinkled with bright, colorful sprinkles — the kind that crackle and melt in your mouth as you bite into them. The name “Funfetti” originated from Pillsbury’s popular line of festive cake mixes, and it’s now a household term for any baked good that’s sprinkled with fun, rainbow confetti-like sprinkles. What makes Funfetti so irresistible is its combination of simplicity and celebration. It’s just a straightforward vanilla cake base, but the addition of those colorful sprinkles transforms it into something so visually delightful, it’s impossible to resist. Think of it as bringing a little bit of joy to your plate, making even a Monday feel like a party. Whether you call it a cake, a muffin, or a quick bread — it’s basically an edible hug with a sprinkle crunch, perfect for all ages and all occasions.
How do I make Funfetti?
Quick Overview
This Funfetti recipe is as straightforward as it gets, making it perfect for bakers of all levels. You simply mix dry ingredients, blend in wet ones, fold in the sprinkles, layer with a swirled filling if you like, and bake until golden and fluffy. The best part? It comes together in under an hour, and the smell alone will have everyone asking what’s baking. I recommend pulling out your favorite cake or muffin tins, tossing in a handful of colorful sprinkles, and watching the magic happen. It’s so forgiving; I’ve made it with extra oil or less sugar, and it still comes out amazing. Plus, I love adding a shiny glaze or dusting of powdered sugar to make it look as cheerful as it tastes. Whether you’re making a layer cake or single muffins, this recipe adapts beautifully, making everything feel like a celebration.
Ingredients
For the Main Batter:
- 2 ½ cups all-purpose flour — I like to use unbleached for richer flavor
- 1 ¾ cups granulated sugar — sweet but not overwhelming
- 1 tablespoon baking powder — gives it that perfect rise
- ½ teaspoon salt — enhances all the flavors
- ¾ cup unsalted butter, melted — I tested this with coconut oil once, and it was just as good!
- 4 large eggs — room temperature, please! They mix better
- 1 tablespoon vanilla extract — pure vanilla makes all the difference
- 1 cup whole milk — or almond milk if you’re dairy-free, and it actually made it even creamier!
- ½ cup rainbow sprinkles — don’t skimp on these; they’re the star
For the Filling (Optional but fun):
- ½ cup cream cheese, softened
- ¼ cup powdered sugar
- 1 teaspoon vanilla extract
For the Glaze:
- 1 cup powdered sugar
- 2-3 tablespoons milk or citrus juice for flavor
- Extra sprinkles for garnish
Step-by-Step Instructions
Step 1: Preheat & Prep Pan
Set your oven to 350°F (175°C) and lightly grease your cake pans or muffin tins. I always like to line my pans with parchment paper for easy removal, especially if I’m making layers. A quick spray with non-stick spray and a dusting of flour work wonders — trust me, nothing worse than sticking cakes!
Step 2: Mix Dry Ingredients
In a large bowl, whisk together the flour, baking powder, salt, and sugar. This step is crucial because it distributes everything evenly and helps your cake rise uniformly. I always double-check for lumps, especially in the flour — a fine whisk makes things silky smooth.
Step 3: Mix Wet Ingredients
In a separate bowl, beat the eggs until frothy — this adds air to your batter. Then, stir in melted butter, vanilla, and milk. I like to do this one slowly, checking that everything’s well combined but not overmixed — overmixing can make the cake dense, and nobody wants that!
Step 4: Combine
Gradually pour the wet mixture into the dry ingredients, gently folding with a spatula until just combined. The batter will be a little thick but smooth — that’s what makes it tender. Don’t overstir; just enough to incorporate everything.
Step 5: Prepare Filling
If you’re adding a cream cheese swirl, mix softened cream cheese, powdered sugar, and vanilla until smooth. It adds a little tang and richness, layered in like a secret surprise.
Step 6: Layer & Swirl
If making a layered cake, scoop about half the batter into the pan, spread the filling on top, then dollop the remaining batter over. Use a toothpick or skewer to swirl it beautifully without overmixing. It should look fun and marbled, like a rainbow storm inside.
Step 7: Bake
Pop it into the oven and bake for 25-35 minutes — keep an eye on it around 30 minutes. The cake is done when a toothpick inserted in the center comes out clean, and it’s golden on top. Don’t open the oven too often early on; sudden temperature shifts can cause the cake to sink.
Step 8: Cool & Glaze
Let the cake cool in the pan for about 10 minutes, then transfer to a wire rack. Once completely cooled, drizzle with your glaze — I love adding a splash of lemon juice or vanilla to make it extra flavorful. Sprinkle on some more rainbow sprinkles for a finishing touch.
Step 9: Slice & Serve
Use a sharp serrated knife to get clean, beautiful slices. Serve at room temperature or chilled — either way, it’s delightful. For extra fun, serve with a dollop of whipped cream or a side of fresh berries. Honestly, I’ve seen kids do happy dances just because of how pretty it looks on the plate!
What to Serve It With
This bright, cheerful Funfetti goes great with so many things depending on the occasion. For a quick breakfast treat, pair it with a steaming cup of coffee or a glass of cold milk. It makes a playful brunch centerpiece with fresh fruit and a side of yogurt — my kids love spooning their favorite jam on top. As a dessert, it’s perfect with a scoop of vanilla ice cream or a drizzle of chocolate sauce. Sometimes, I bake it in muffin tins for portable snacks and freeze extras for busy mornings. When I want to make it extra fancy, I add edible flowers or a dusting of powdered sugar — it feels just a little more special that way. Honestly, this Funfetti has become a family tradition; it’s what I turn to when I want to bring some cheer into our busy days or celebrate a small victory like a good report card or just surviving the week!
Top Tips for Perfecting Your Funfetti
Having made this countless times, I’ve picked up a few tricks to make it even better each round. First, when prepping your sprinkles, toss them in a little flour before mixing — this prevents them from sinking to the bottom during baking. I learned this trick after a few batches where the sprinkles hid and didn’t sparkle properly.
Overmixing is a common mistake — I used to go overboard, and the cake would come out dense. Now, I just fold until everything is combined, leaving small lumps if needed. It’s the gentle touch that keeps it light and fluffy.
If you want a more intense rainbow effect, divide the batter into separate bowls, tint each with food coloring, then layer or swirl for a vibrant finish. For a more adult twist, I suggest adding a splash of liqueur or citrus zest to the batter for extra depth.
Adjusting baking time can be tricky depending on your oven. I highly recommend starting to check around 30 minutes and using a toothpick test. If it’s slightly moist but gaps are clean, it’s perfect. I also rotate my pans halfway through baking for even heat distribution.
When it comes to glazing, I’ve learned that thinning your powdered sugar with milk or juice yields a glossy, smooth drizzle. Adding a sprinkle of sea salt or vanilla bean seeds can elevate the flavor, making it taste even more indulgent. Trust me, these little tweaks make a big difference.
This recipe is so forgiving, and once you get comfortable with the process, you’ll find it’s a real surefire hit. Plus, I always keep extra sprinkles around — you never know when a surprise burst of color will brighten someone’s day.
Storing and Reheating Tips
This Funfetti is best enjoyed fresh, but if you have leftovers, here’s how to keep it happy. For short-term storage, cover the cake tightly with plastic wrap or store muffins in an airtight container at room temperature — they’ll stay soft and moist for about 1-2 days. I like to add a paper towel underneath to absorb excess moisture and keep the sprinkles from getting soggy.
If you’re planning to keep it longer, pop it in the fridge for up to a week. Just make sure it’s wrapped well to prevent it from drying out. A quick reheat in the microwave — just 10-15 seconds — brings back that cozy, just-baked feeling. For the best glaze or topping, I recommend adding it after reheating, not before, to keep everything looking fresh and shiny.
For freezing, wrap the entire cake tightly in plastic wrap, then aluminum foil. Thaw overnight in the fridge before serving. Muffins freeze particularly well—grab one in the morning for an instant treat. I’ve found that with proper wrapping, the sprinkles stay vibrant, and the cake remains just as delightful.
Frequently Asked Questions
Final Thoughts
If you’ve never explored the joy of baking with Funfetti, I encourage you to give this recipe a try. It’s more than just a cake; it’s a celebration of color, flavor, and all the little moments that make life sweet. With its simple ingredients, forgiving technique, and endless customization options, I promise it’ll become a go-to in your baking arsenal. Whether you’re baking for kids’ birthdays, a cozy weekend treat, or just because you need a dash of happiness, this Funfetti will always deliver smiles. And the best part? You get to be the one who brings all the magic together — in your own kitchen, in your own way. So go ahead, whisk up that batter, sprinkle on a rainbow, and watch as the oven works its magic. Happy baking, friends! Can’t wait to hear how your colorful creation turns out — tag me in your photos and let’s keep spreading the joy of a good old-fashioned Funfetti snack!
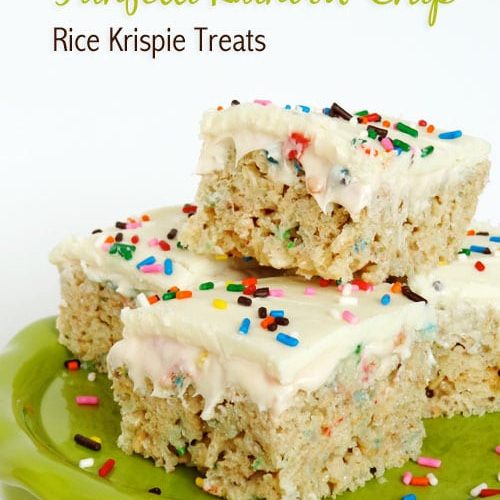
Funfetti
Ingredients
Main Ingredients
- 3 Tbsp butter
- 10 oz marshmallows
- 1 tsp vanilla extract
- 0.5 cup cake mix, toasted
- 6 cups rice krispies
- 1 can Betty Crocker Rainbow Chip Icing
- 1 package white chocolate (or candy melts)
- 4 tsp sprinkles
Instructions
Preparation Steps
- Melt butter in a large pot over low heat.
- Add marshmallows and stir constantly until they are fully melted.
- Stir in the dry cake mix and vanilla. Remove pan from heat.
- Stir in rice krispies cereal until they are completely coated in marshmallow mixture.
- Press into a baking pan that has been sprayed with nonstick spray. Don't press too hard, or your treats will be hard.
- Let the mixture cool.
- Spread on a layer of rainbow chip icing.
- Melt down white chocolate and spread over the icing.
- Top with sprinkles.
Notes
Featured Comments
“I love how Funfetti treats make any celebration brighter—just like your mom’s birthday cakes!”
“I love how rainbow icing adds such a joyful pop to simple treats—it’s like bringing a little party to every bite!”
“I love how rainbow icing makes everything feel more fun—this recipe looks perfect for brightening any celebration!”
“Impressed! Clear steps and crowd-pleaser results. Perfect for busy nights.”
“New favorite here — family favorite. crowd-pleaser was spot on.”
“Super easy and turned out amazing! My family asked for seconds. Saving this one.”


I love how rainbow icing makes everything feel more fun—this recipe looks perfect for brightening any celebration!
I love how rainbow icing adds such a joyful pop to simple treats—it’s like bringing a little party to every bite!
I love how Funfetti treats make any celebration brighter—just like your mom’s birthday cakes!