

There’s something about that first delightful spoonful of Nutella that immediately takes me back to childhood—those lazy Saturday mornings, my mom’s gentle insistence that I eat my toast before indulging in her famous scrambled eggs. But these Nutella bites? They’re a little more grown-up, a lot more fun, and perfect for when you just need a quick, sweet hug in the middle of busy days. I always do this when I need a little pick-me-up or when I have friends dropping by unexpectedly. They’re honestly a lifesaver on hectic weeknights, especially because, let’s be real, who doesn’t love a little bite-sized indulgence? Plus, they come together faster than you can say “dessert,” and they taste like a cross between a fudgy cookie and a creamy truffle. I once made these for a girls’ night and, trust me, they disappeared faster than I could blink. My kids ask for this all the time—they’re perfect for sneaking in a bit of chocolate-love without the guilt. I promise, once you try making these, they’ll become your go-to treat too! Because honestly, what’s better than a tiny, decadent bite of Nutella happiness?
What is Nutella?
Think of Nutella bites as tiny, lush dessert pockets filled with that irresistible, hazelnut-chocolate spread we all adore. They’re essentially mini pastries or fudgy bites, but instead of baking a full cake or big cookies, you get these small, grab-and-go treats that pack a punch of flavor with almost no effort. The name “Nutella bites” just describes exactly what they are—small, indulgent morsels loaded with Nutella, the creamy hazelnut spread that’s beloved worldwide. The concept is simple: a few basic ingredients come together to create this decadence, but the magic happens in how you fill, layer, and chill them. They’re like those little chocolates you buy at the store, but so much better because you made them yourself, and they’re bursting with that rich, nutty flavor. Plus, they’re versatile—change up the fillings or toppings if you’re feeling fancy, or keep it classic for an always-pleasing snack. Trust me, once you get the hang of it, you’ll be tossing these together in no time and loving every bite.
How do you make Nutella Bites?
Quick Overview
This recipe is all about creating a rich, fudgy dough, filling it generously with creamy Nutella, then shaping and chilling these little bites until they’re just right—crispy on the outside, gooey inside. No complicated techniques, just a few steps that come together easily. I love that you can prepare these ahead of time, pop them in the fridge, and then serve later—perfect for busy schedules or unexpected guests. The secret is in not overworking the dough, which keeps them tender and chewy, and in swirling the Nutella just so for that beautiful marbled look. Once baked and cooled, a quick drizzle of glaze or a dusting of powdered sugar takes them from good to wow. Trust me, these Nutella bites are one of those recipes you’ll keep coming back to—great for holidays, potlucks, or even just a cozy night in.
Ingredients
For the Main Batter:
– 1 1/2 cups all-purpose flour (I always use a good quality, unbleached flour because it just tastes better)
– 1/2 cup unsweetened cocoa powder (preferably Dutch-processed for richness)
– 1/4 teaspoon salt (a tiny pinch enhances flavor)
– 1/2 teaspoon baking powder (for just a little lift)
– 1/2 cup unsalted butter, melted (or coconut oil for dairy-free, works beautifully)
– 1/2 cup granulated sugar
– 1 large egg (or a flax seed substitute if you’re vegan)
– 1 teaspoon vanilla extract (makes everything better)
For the Filling:
– About 1 cup Nutella (or any hazelnut spread, but Nutella’s the star)
– Optional: chopped nuts, sea salt flakes, or even mini chocolate chips for extra texture
For the Glaze:
– 1/2 cup powdered sugar
– 1-2 teaspoons milk (dairy or plant-based)
– A splash of vanilla or a little cocoa powder for flavor variation
Step-by-Step Instructions
Step 1: Preheat & Prep Pan
Set your oven to 350°F (180°C). Line a baking sheet with parchment paper or a silicone mat—this is crucial to keep things from sticking. I usually prep a small bowl of cold water nearby because working with dough can get sticky, and a damp fingertip helps smooth things out. Trust me, a little prep makes all the difference when you’re shaping these bites.
Step 2: Mix Dry Ingredients
In a medium bowl, whisk together the flour, cocoa powder, salt, and baking powder. These dry ingredients need a good mix so everything’s evenly distributed. If you see lumps of cocoa, break them apart with your whisk or a fork—no one wants bitter surprises in their bites.
Step 3: Mix Wet Ingredients
In a separate large bowl, whisk together the melted butter, sugar, egg, and vanilla until smooth. My favorite trick is to do this with a fork first, then switch to a whisk—makes for a silky, well-blended mixture. Make sure your butter isn’t too hot; it should be warm but not sizzling, so the egg doesn’t scramble.
Step 4: Combine
Gradually add the dry ingredients to the wet, folding gently until just combined. Overmixing can make the bites tough, so stir until everything just comes together—I like to use a rubber spatula and be gentle. When the dough feels a little stiff but pliable, you’re good to go.
Step 5: Prepare Filling
Open your jar of Nutella and warm it slightly in the microwave—about 10 seconds—so it’s silky and easy to swirl. For an extra touch of indulgence, sprinkle chopped nuts or sea salt on top of the Nutella before folding in, if you like a little crunch or contrast.
Step 6: Layer & Swirl
Roll small balls of dough—about a teaspoon each—and flatten them slightly in your hand. Make a small well in the center, then spoon a generous dollop of Nutella into each. Carefully fold the dough around the filling, pinching the edges to seal. For the marbled effect, I love shaping them into little disks and swirling some Nutella on top, then lightly swirling with a toothpick.
Step 7: Bake
Arrange the bites on your prepared baking sheet, leaving a little space between each. Bake for about 12-15 minutes or until the edges are set but the centers are still soft. They might look a little shiny on top—that’s okay. You want that fudgy texture inside. Every oven is different, so keep an eye on them around the 12-minute mark.
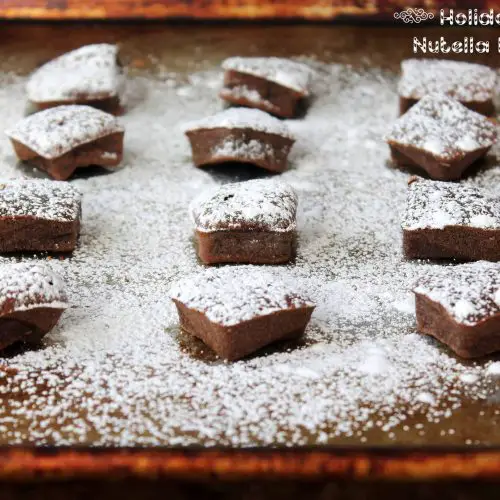
Step 8: Cool & Glaze
Let the bites cool on the pan for 10 minutes—they’ll firm up just enough to handle. Then, transfer to a wire rack if you want to drizzle with glaze. Mix powdered sugar, milk, and vanilla until smooth—thicker for a drizzle, thinner if you want a more fluid look. Drizzle or dip the bites for that shiny, sweet finish. Trust me, a little patience in glazing makes them look store-bought gorgeous!
Step 9: Slice & Serve
If you’ve still got some Nutella on top, give them a gentle press to make sure it’s set. Serve these bites slightly warm or at room temperature—either way, they’re downright addictive. My favorite way? A big glass of milk or a hot cup of coffee. They look adorable on a platter with some crushed nuts sprinkled around, and honestly, they’re hard to resist. I’ve made these so many times, I can almost do it in my sleep—and every time, I get compliments on how lush and rich they taste.
What to Serve It With
These Nutella bites are not shy—they want to be the star of the show, whether that’s a cozy brunch, a holiday gathering, or simply a mid-afternoon treat. For breakfast, pair them with a strong cup of coffee or chai latte to start your day on a sweet note. At brunch, I like to serve them alongside fresh fruit and yogurt, they’re always a hit. As a dessert, they’re perfect with a scoop of vanilla ice cream or a drizzle of warm caramel—think of them as the perfect little chocolate-hazelnut symphony. And when it’s just me craving comfort, I’ll grab a few with a glass of cold milk or a cup of hot tea. Honestly, they’re fantastic when you want a little bit of decadence without the fuss—my kids actually ask for seconds all the time. I love to keep a batch handy in the fridge—they’re my secret weapon for quick, satisfying sweets that look fancy but are foolproof to make. Plus, you can jazz them up with sprinkles, crushed cookies, or a dusting of cocoa powder depending on your mood. No matter how you serve them, these bites always bring that warm, fuzzy feeling.
Top Tips for Perfecting Your Nutella Bites
After making these countless times, I’ve picked up a few tricks that elevate the whole experience. First, don’t overwork your dough—this keeps them tender and chewy; I’ve learned the hard way that overmixing toughens everything up. When it comes to filling, warming the Nutella slightly makes it much easier to swirl and fill evenly—trust me, the gradient marbling looks so pretty, and it’s easier to do when it’s silky. Also, I’ve experimented with different toppings: sea salt flakes add a lovely contrast, while chopped hazelnuts give that crunch for texture lovers. For substitutions, you can swap out the butter for coconut oil or even use a bit of applesauce to cut back on fat—just be aware it might change the texture slightly. Baking at 350°F works perfectly, but if you like your bites softer, try lowering the oven temp to 325°F and bake a minute or two less. Honestly, baking is all about watching and testing; I usually check them around 12 minutes because every oven varies. When glazing, keep your mixture thick enough to drizzle—runny glaze can make a mess, but a thicker one stays put and looks just as pretty. These little tips have turned my humble bites into a showstopper—so don’t be afraid to experiment and find your perfect touch!
Storing and Reheating Tips
These Nutella bites are surprisingly versatile when it comes to storage. If you plan to eat them within a day or two, keep them in an airtight container at room temperature—just avoid direct sunlight or humidity, and they’ll stay soft and delicious for up to two days. For longer storage, I prefer to refrigerate them in a sealed container—it helps preserve their fudgy texture and keeps the Nutella fresh. They’ll last about a week in the fridge, but know that they might get a little firmer; just warm them slightly in the microwave for about 10 seconds before serving to bring back that gooey feel. Freezing is also a great option—wrap each bite tightly in plastic wrap, then store in a freezer bag for up to three months. Thaw at room temperature or microwave for a quick warm-up. If you’ve glazed them, wait until they’re completely cooled to avoid the glaze melting or cracking. From my experience, these bites taste almost better the next day because the flavors meld and intensify, so don’t hesitate to make a batch ahead of time. Just remember to store them properly, and serve at room temperature for best flavor and texture.
Frequently Asked Questions
Final Thoughts
If you’ve read this far, I hope you’re feeling inspired to give these Nutella bites a try. They’re one of those recipes that feels fancy but is actually super simple—an ideal treat for when you want a little bit of chocolate love without spending hours in the kitchen. I love how flexible it is, letting you add your own twist with toppings or fillings, which makes it fun to experiment. Plus, they store beautifully, so I often make a batch on a lazy Sunday and enjoy them all week. Whether you’re baking for a crowd or just looking for a comforting night-in snack, these bites always brighten my day. So, go ahead—grab that jar of Nutella, get rolling, and enjoy every delicious moment. Happy baking! And please, come back and tell me how yours turned out—sharing these little bites is like sharing a warm hug. Enjoy!
Nutella bites
Ingredients
Main Ingredients
- 1 cup Nutella
- 2 whole eggs Eggs
- 0.5 cup Sugar
- 0.25 cup Milk
- 1 teaspoon Vanilla extract
- 0.5 cup All-purpose flour
- to taste Powdered Sugar
Instructions
Preparation Steps
- Preheat the oven to 350°F.
- In a medium mixing bowl, whisk together Nutella, eggs, sugar, milk, and vanilla until smooth.
- Gradually mix in the flour until the batter is creamy and smooth.
- Line a mini cupcake pan with paper liners or grease it lightly.
- Drop spoonfuls of the batter into each cavity, filling about 2/3 full.
- Bake for 14 to 15 minutes, or until a toothpick inserted in the center comes out clean.
- Remove from the oven, invert onto a wire rack, and let cool.
- Dust with powdered sugar before serving.
Notes
Featured Comments
“Impressed! Clear steps and comforting results. Perfect for busy nights.”
“New favorite here — absolutely loved. crowd-pleaser was spot on.”
“Super easy and turned out amazing! My family asked for seconds. Saving this one.”
“This sweet treat was absolutely loved — the light really stands out. Thanks!”
“Made it tonight and wow — so flavorful! Will definitely make Easy Hazelnut Treats for Festive Gatherings again.”
“Packed with flavor and so simple. Exactly what I wanted from Easy Hazelnut Treats for Festive Gatherings.”


