


What is this?How do I make homemade ice cream?. It’s the kind of recipe that feels like a warm hug on a summer evening, or a little rebellion against a crazy busy day when all you want is something sweet and utterly delicious. I remember the first time I stumbled upon a method like this, I was skeptical, I’ll admit. Could I really get that dreamy, creamy texture without a fancy ice cream maker whirring away for hours? Turns out, you absolutely can! This recipe is my go-to when that craving hits hard, usually around 9 PM, and the thought of baking anything feels exhausting. It’s incredibly simple, uses ingredients I almost always have on hand, and the flavor? Pure magic. It honestly rivals anything you’d buy at the fanciest parlor, but with that special something that only comes from something you’ve made yourself. It’s definitely earned a permanent spot in my recipe binder, right next to Grandma’s apple pie.
What is no-churn homemade ice cream?
What exactly is this magical creation we’re talking about? Think of it as the ultimate shortcut to luscious, dreamy, and ehomemade ice cream. It’s essentially a no-churn method that bypasses the traditional churning process, the one that involves constant agitation to prevent ice crystals from forming and create that smooth texture. Instead, we leverage the power of sweetened condensed milk and whipped cream. The condensed milk provides sweetness and a rich, dense base, while the whipped cream incorporates air, giving it that incredibly light and fluffy texture that’s so characteristic of ice cream. It’s not *exactly* the same as traditional churned ice cream, but honestly, for most of us at home, it’s pretty darn close and so much more approachable. The “no-churn” part means you can whip this up even if your ice cream maker is gathering dust in the back of the cupboard!
How to Make Homemade Ice Cream
Quick Overview
Making this homemade ice cream is almost ridiculously simple. You’ll start by whipping some heavy cream until it’s nice and fluffy, then gently fold that into a mixture of sweetened condensed milk and your chosen flavorings. That’s pretty much it for the base! Pour it into a loaf pan, cover it up, and let the freezer do its magic. The key is the texture of the whipped cream and how you gently combine it with the condensed milk base. This method ensures that the air you whip into the cream stays put, giving you that wonderfully light texture without any ice crystals. It’s a foolproof way to get amazing ice cream at home without any special equipment!
Ingredients
For the Main Ice Cream Base:
2 cups (480ml) heavy whipping cream, very cold
1 can (14 oz or 396g) sweetened condensed milk, cold
1 teaspoon Vanilla Extract (or the seeds from half a vanilla bean for extra oomph!)
A pinch of salt (this really balances the sweetness, trust me!)
For Add-ins & Swirls (Optional, but highly recommended!):
1/2 cup chocolate chips or chunks
1/2 cup chopped nuts (pecans, walnuts, almonds)
1/2 cup cookie dough pieces
1/4 cup fruit puree (raspberry, strawberry, mango)
1/4 cup caramel sauce or Hot Fudge Sauce for swirling
1/4 cup peanut butter, slightly warmed for drizzling
Step-by-Step Instructions
Step 1: Chill Your Equipment
This is a small step but it makes a big difference! Before you start, pop your mixing bowl and whisk attachment (if using a stand mixer) into the freezer for about 10-15 minutes. A super cold bowl and whisk help the cream whip up faster and better, giving you those lovely stiff peaks we need for our homemade ice cream base.
Step 2: Whip the Cream
Pour your very cold heavy whipping cream into the chilled mixing bowl. If using a hand mixer, start on low speed and gradually increase to medium-high. If using a stand mixer, start on low and increase to medium-high. Whip the cream until stiff peaks form. This means when you lift the whisk, the cream holds its shape and the peaks stand straight up without flopping over. Be careful not to over-whip, or you’ll end up with butter!
Step 3: Prepare the Condensed Milk Mixture
In a separate, medium-sized bowl, whisk together the cold sweetened condensed milk, vanilla extract, and a pinch of salt. Make sure it’s all well combined. If you’re adding any liquid flavorings like peppermint extract or a splash of liqueur, now’s the time to add them here. Just a little bit goes a long way!
Step 4: Gently Combine
Now comes the crucial part for that perfect homemade ice cream texture. Take about a third of your whipped cream and gently fold it into the sweetened condensed milk mixture. Use a spatula and a gentle folding motion – scooping from the bottom and folding it over the top. This lightens the condensed milk base, making it easier to incorporate the rest of the cream without deflating it. Once that first third is mostly incorporated, gently fold in the remaining whipped cream until just combined. You want it to be smooth with no streaks of condensed milk, but don’t overmix!
Step 5: Add Your Mix-ins (Optional)
If you’re adding solid mix-ins like chocolate chips, nuts, or Cookie Dough, gently fold them in now. Again, use that gentle folding motion to distribute them evenly without crushing them or deflating the mixture.
Step 6: Pour and Swirl (Optional)
Pour the Ice Cream base into a freezer-safe container, like a loaf pan (about 9×5 inches is perfect). If you’re adding swirls of caramel, fudge, or fruit puree, dollop them on top of the base. Then, take a knife or skewer and gently swirl them through the mixture. Don’t over-swirl, you want ribbons of flavor, not a muddy mess!
Step 7: Freeze
Cover the container tightly with plastic wrap, pressing it directly onto the surface of the Ice Cream to prevent ice crystals from forming. Then, cover with a lid or aluminum foil. Place it in the freezer for at least 6 hours, or preferably overnight, until firm and scoopable. This is the hardest part – waiting!
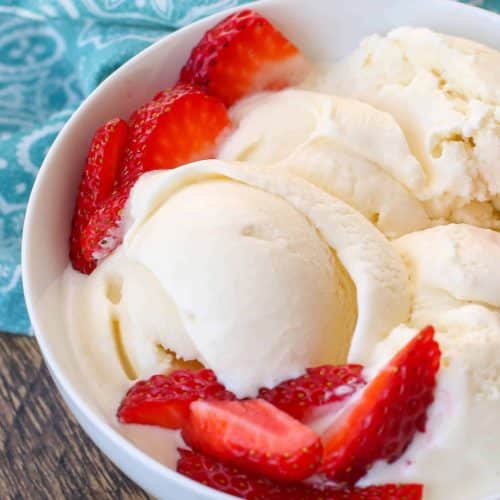
Step 8: Scoop and Enjoy!
Once your homemade ice cream is fully frozen, let it sit at room temperature for about 5-10 minutes before scooping. This makes it much easier to get those perfect scoops. Use a sturdy ice cream scoop, and if it’s really hard, run the scoop under hot water first. Serve immediately and enjoy the fruits (or chocolate chips, or cookie dough!) of your labor!
What to Serve It With
Honestly, this homemade ice cream is so good on its own, it hardly needs anything. But if you’re feeling fancy or want to elevate it, here are some of my favorite ways to serve it, depending on the mood and the occasion:
For Breakfast: Yes, you read that right! A small scoop of this ice cream, especially a vanilla or even a subtle coffee flavor, can be surprisingly decadent on top of warm, fluffy pancakes or waffles. A drizzle of maple syrup and a dollop of ice cream makes a weekend breakfast feel like a special occasion. It’s also divine alongside some fresh fruit. Who says you can’t have ice cream for breakfast sometimes?
For Brunch: For a more elegant brunch, I love pairing a scoop with a slice of my famous banana bread or a rich chocolate cake. The cool, creamy ice cream is the perfect contrast to a warm baked good. A sprinkle of toasted nuts or a drizzle of raspberry coulis adds a beautiful touch. And for drinks? A mimosa or a fancy iced coffee feels just right.
As Dessert: This is its natural habitat, of course! It’s absolutely perfect served alongside a warm apple crumble, a slice of pecan pie, or a rich brownie. For a truly show-stopping dessert, I sometimes serve a scoop with a sprinkle of flaky sea salt and a drizzle of good quality dark chocolate sauce. It’s simple, yet incredibly satisfying.
For Cozy Snacks: On a quiet afternoon or a chilly evening, a bowl of this homemade ice cream is pure comfort. I love it with just a sprinkle of my favorite chocolate chips and a good book. Sometimes, I’ll even warm up a spoonful of peanut butter and drizzle it over the top – pure bliss! It’s the perfect sweet ending to a simple meal or a delightful pick-me-up any time of day.
Top Tips for Perfecting Your Homemade Ice Cream
Over the years, I’ve learned a few tricks that really make this homemade ice cream recipe shine. These are the little things that took me from “pretty good” to “absolutely amazing!”
Heavy Cream is Key: Don’t be tempted to use half-and-half or lighter creams here. You need the fat content of heavy whipping cream to achieve that rich, creamy texture. Make sure it’s really cold; I even chill my whisk and bowl as mentioned earlier. The colder everything is, the better your whipped cream will be, and that’s the backbone of this ice cream.
Don’t Overmix When Combining: This is probably the most critical step for texture. Once you start folding the whipped cream into the condensed milk, be gentle! You want to incorporate everything until there are no visible streaks of condensed milk, but stop there. Overmixing will deflate the whipped cream, resulting in a denser, icier homemade ice cream.
Sweetened Condensed Milk Matters: Make sure you’re using sweetened condensed milk, *not* evaporated milk. They are completely different and evaporated milk won’t provide the necessary sweetness or the specific texture. I also find that using cold condensed milk helps keep the overall mixture cold, which is beneficial for freezing.
Get Creative with Swirls: My kids absolutely love when I swirl in hot fudge or caramel. For a really good swirl, warm the sauce *slightly* so it’s pourable but not hot. Then, dollop it over the ice cream base and use a knife or skewer to make gentle, sweeping motions. Don’t overdo it! You want distinct ribbons of flavor throughout the ice cream, not a uniform color.
Prevent Ice Crystals: The biggest enemy of smooth homemade ice cream is ice crystals. To combat this, cover the surface of the ice cream directly with plastic wrap before you put on the lid or foil. This creates a barrier and minimizes the amount of air that can get to the surface, which is where ice crystals tend to form.
Flavor Variations are Endless: Don’t be afraid to experiment! Add cocoa powder to the condensed milk mixture for chocolate ice cream. Fold in pureed fruits (make sure they’re not too watery, maybe reduce them slightly first). Stir in extracts like almond, mint, or coffee. You can even add a spoonful of instant coffee granules dissolved in a tiny bit of hot water for a coffee kick. The options are truly limitless, and it’s so fun to play around!
Storing and Reheating Tips
One of the best things about this homemade ice cream is how well it stores, allowing you to have a treat ready whenever the mood strikes. However, proper storage is key to maintaining that wonderful creamy texture.
Room Temperature: This isn’t really a “storage” situation, but if you want to soften your ice cream for easier scooping, just let it sit on the counter for about 5-10 minutes. Any longer and it will start to melt too much. You can’t really “reheat” ice cream in the traditional sense, but warming it slightly is the goal!
Refrigerator Storage: Ice cream generally shouldn’t be stored in the refrigerator. It won’t freeze solid there, and it can actually absorb odors from other foods. It’s best to keep it in the freezer.
Freezer Instructions: This is where it lives! Once your homemade ice cream is frozen solid, keep it covered tightly in the freezer. As I mentioned, pressing plastic wrap directly onto the surface before adding the lid is my best tip for preventing freezer burn and ice crystals. It should stay wonderfully scoopable for about 2-3 weeks. After that, while it’s still safe to eat, the texture might start to change slightly, becoming a bit harder and icier.
Glaze Timing Advice: If you’ve swirled in sauces or added mix-ins, they generally store well within the ice cream itself. The cold of the freezer preserves them. I wouldn’t recommend adding any kind of glaze *after* it’s fully frozen and stored, as it would likely just freeze into a hard, unappealing layer. Any sauces or toppings are best drizzled on right before serving.
Frequently Asked Questions
Final Thoughts
So there you have it – my absolute favorite way to whip up incredible homemade ice cream without a fuss. I truly hope you give this a try, especially if you’ve ever been intimidated by making ice cream from scratch. It’s proof that you don’t need fancy gadgets to create something truly special and delicious. This recipe is perfect for those spontaneous cravings, spur-of-the-moment celebrations, or just when you need a little bit of pure joy in a bowl. It’s the kind of dessert that makes people ask, “Wow, you made this yourself?!” and trust me, that’s always a fantastic feeling. I can’t wait to hear about your adventures with it and what amazing flavors you come up with. Let me know in the comments how yours turns out, and if you have any brilliant flavor combinations to share!
Homemade Ice Cream
Ingredients
Main Ingredients
- 1.75 cups heavy cream
- 1.25 cup whole milk
- 0.75 cup granulated sugar
- 0.125 teaspoon fine sea salt
- 1 tablespoon vanilla extract or 1 vanilla bean split in half lengthwise
Instructions
Preparation Steps
- Pour 1 cup of the heavy cream into a saucepan. Add the granulated sugar and fine sea salt. If using a vanilla bean, scrape the seeds into the mixture and add the vanilla pod to the saucepan.
- Warm the mixture over medium heat, just until the sugar dissolves. Remove from heat and add the remaining heavy cream, whole milk, and vanilla extract (if using extract). Whisk to combine and chill thoroughly in the refrigerator.
- When ready to churn, remove the vanilla pod (if used), whisk the mixture again, and pour it into your ice cream maker. Churn according to the manufacturer's instructions.
- Serve immediately for a soft-serve consistency, or transfer the finished ice cream to an airtight container and place it in the freezer until firm and ready to serve.
Notes
Featured Comments
“I love this idea—homemade ice cream feels so special and cozy! How do you keep it from getting too icy?”
“This sounds so comforting! I’ve been wanting to try making ice cream at home—any tips for avoiding icy textures?”
“Impressed! Clear steps and turned out amazing results. Perfect for busy nights.”
“New favorite here — crowd-pleaser. crowd-pleaser was spot on.”
“Super easy and turned out amazing! My family asked for seconds. Saving this one.”
“This sweet treat was absolutely loved — the zingy really stands out. Thanks!”


This sounds so comforting! I’ve been wanting to try making ice cream at home—any tips for avoiding icy textures?
I love this idea—homemade ice cream feels so special and cozy! How do you keep it from getting too icy?