

There’s something so nostalgic about biting into a cool, creamy peppermint patty — I can’t help but smile every single time. I remember sneaking into my mom’s candy jar as a kid, snagging one of these little bites of minty happiness. Now, as an adult, I’ve perfected a recipe that’s so close to the store-bought version, but trust me, these are way better because they’re homemade. The win? No weird preservatives, just simple ingredients and a whole lot of love. This recipe’s a lifesaver on busy nights because it comes together faster than you’d think, and it’s a perfect treat to keep in your fridge for those spontaneous sweet cravings. Plus, my kids ask for these all the time — they even prefer them to the bought ones now! Whether you’re seasoned in the kitchen or just starting out, these peppermint patties are surprisingly easy, and the smell alone when they’re melting makes the house smell like a candy shop. Let’s dive into how you can whip up a batch that’ll have everyone asking for seconds!
What is Peppermint Patties?
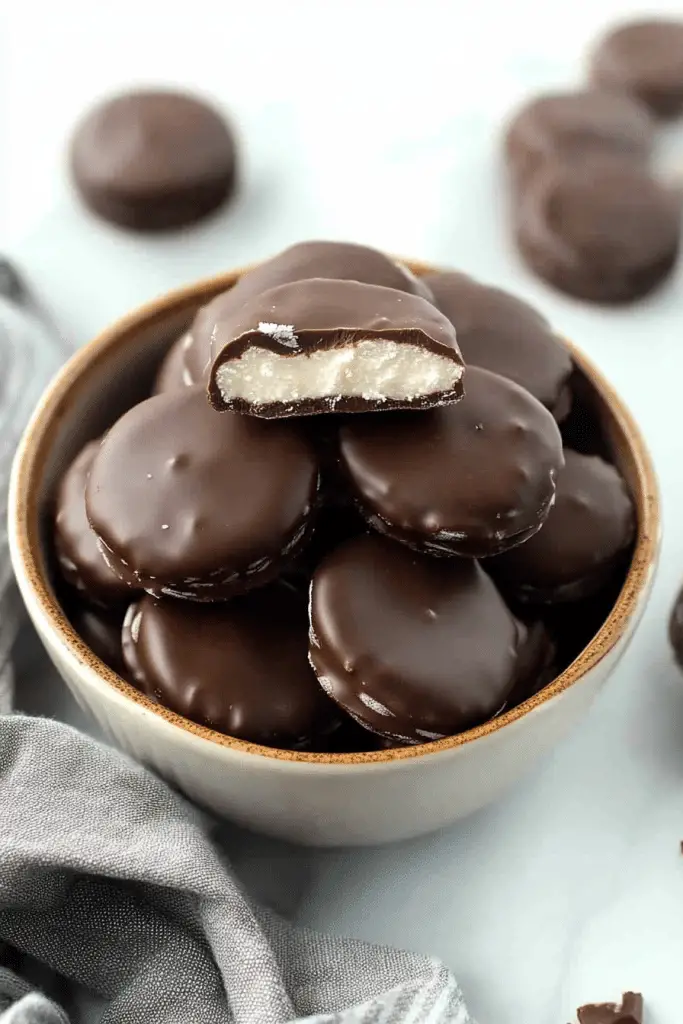
Think of peppermint patties as little disks of cool, minty chocolate perfection. They’re essentially a combination of a chewy, chocolate-covered mint filling — think creamy, slightly chewy, with a burst of refreshing peppermint — all wrapped in a smooth chocolate coating. The name “peppermint patties” comes from their shape and texture—flat, round, and slightly thick like a small, minty disc. This treat has roots that trace back to classic candies, but I’ve always loved how I can make them at home with just a handful of ingredients. It’s basically like taking your favorite mint chocolate dessert and turning it into bite-sized pieces you can enjoy anytime. What I love most about these is how versatile they are — you can tweak the peppermint intensity, play around with dark or milk chocolate, or even add a splash of vanilla for extra depth. They’re a little slice of peppermint heaven, and they’ve become a staple in my holiday baking or whenever I need a quick pick-me-up.
How to Make Peppermint Patties
Quick Overview
This recipe involves making a quick peppermint filling, shaping it into small disks, then coating them in melted chocolate. The best part? It all comes together in about 30 minutes of active prep, plus chilling time — so it’s hands-off once you’ve assembled everything. You start by whipping up a smooth minty center, rolling it into little balls, flattening them into discs, and then dipping or coating in chocolate. Chill until firm, and voilà — homemade peppermint patties that taste just like the real thing. This method is so forgiving and flexible; I’ve made these with vegan chocolate, added a touch of vanilla, or even rolled them in crushed peppermint for more crunch. They’re perfect for homemade gifts, potlucks, or just treating yourself after a long week. And no matter your skill level, I promise, you’ll ace this and end up with treats that disappear in minutes around my house!
Ingredients
For the Main Filling:
- 1 ½ cups powdered sugar — sifted for smoothness
- 2 tablespoons unsalted butter (or coconut oil for dairy-free)
- 2 teaspoons peppermint extract — adjust for personal peppermint punch
- 1-2 tablespoons milk (dairy or plant-based) — just enough to make it workable
For the Coating:
- 1 cup semisweet or dark chocolate chips — quality matters here
- 1 teaspoon coconut oil or butter — for smooth coating
- Optional: crushed peppermint candies or candy canes, for dusting or mixing in
Step-by-Step Instructions
Step 1: Preheat & Prep Pan
Line a baking sheet with parchment paper. You’ll need this for setting the patties once coated. Chill is your friend here, so pop it in the fridge if you want the process to go extra smoothly.
Step 2: Mix Dry Ingredients
In a bowl, sift the powdered sugar to avoid lumps. This step makes sure your filling stays smooth and chewy. Set aside.
Step 3: Mix Wet Ingredients
In a separate bowl, combine the softened butter (or coconut oil) with the peppermint extract. I love using real butter in mine — it gives a richer flavor — but coconut oil works beautifully if you’re dairy-free. Mix until smooth — you want it creamy but not greasy.
Step 4: Combine
Add the dry powdered sugar to the wet mixture gradually. Mix with a spoon or your hands until it forms a cohesion — it should be firm enough to roll but still soft. If it’s too sticky, toss in a little more powdered sugar; if it’s too crumbly, add a tiny splash of milk.
Step 5: Prepare Filling
Roll the mixture into small balls, about 1 inch in diameter. Flatten each ball gently into a disc, about ¼-inch thick. This is where I sometimes dust my hands with a little powdered sugar — helps prevent sticking and keeps the shapes neat.
If you want extra peppermint flavor, you can press in some crushed candies at this stage or swirl in a few drops of green food coloring for fun.
Step 6: Layer & Swirl
If you like a marbled effect, you can layer the filling in the pan, or swirl in some food coloring into the filling before shaping. I’ve done half plain and half with a touch of green — looks festive and tastes incredible.
Step 7: Bake
No baking here! Instead, pop the shaped discs into the fridge for about 15-20 minutes to firm up. This makes dipping much easier and prevents melting. Alternatively, if your mixture is nicely firm, you can skip to coating directly.
Step 8: Cool & Glaze
Now, melt the chocolate chips with coconut oil in a microwave-safe bowl, stirring every 20 seconds until smooth. Dip each peppermint patty into the melted chocolate and place on the parchment-lined tray. For a neater look, use a fork to lift them out. Optional: sprinkle with crushed peppermint candies right after coating for extra crunch.
Let them sit at room temperature or in the fridge until the chocolate is set and shiny — about 30 minutes. Refrigeration speeds this up, but I love the shiny finish you get at room temp.
Step 9: Slice & Serve
If you make these as discs, they’re ready to serve. If you want slices, chill hardened logs of the filling and then slice into rounds. Either way, store them in an airtight container in the fridge for up to a week, or freeze for longer storage. I like to set them out 10 minutes before serving — that way they’re not too cold but still firm enough to bite into.
What to Serve It With
These homemade peppermint patties are pretty versatile — I love offering them as part of a holiday dessert platter, but they work just as well as a sweet snack with your afternoon coffee or tea. Here are some ideas:
- For breakfast: Pair one with your morning coffee or hot chocolate for an extra special treat. Honestly, a little melted chocolate and mint is the way to start a wintry day.
- For brunch: Place a few on a pretty plate for a touch of elegance. Serve with mimosas or a peppermint-flavored hot toddy to keep the festive spirit alive.
- As dessert: Wrap some in cute cellophane bags and gift them to friends or family. They’re perfect for holiday parties, or just because you deserve a little indulgence after a long day.
- As cozy snacks: Keep a stash in your fridge for impromptu sweet cravings. My kids ask for these constantly — they even request them over store-bought candies now!
This recipe always reminds me of family gatherings and winter nights by the fire. They’re such a hit, and making them together is half the fun. Plus, I love how customizable they are — you can make them as minty or chocolatey as you like. Everyone leaves the house with a little box of homemade joy!
Top Tips for Perfecting Your Peppermint Patties
After making these a dozen times, I’ve gathered some tried-and-true tips:
- Zucchini Prep: Okay, so you won’t see zucchini here, but I’ve tested these with grated zucchini for a different dessert — just kidding! But, for the peppermint filling, I recommend grating or finely chopping any add-ins so they distribute evenly.
- Mixing Advice: The key is to mix the dry and wet ingredients just until combined. Overmixing can make the filling tough. Trust me, a gentle hand keeps these tender and chewy.
- Swirl Customization: For a pretty layered look, spread a layer of green-tinted filling in the pan, then top with plain before shaping. Swirl with a toothpick or skewer for fun marbled effects.
- Ingredient Swaps: Using coconut oil instead of butter makes the patties dairy-free and adds a subtle coconut flavor that pairs beautifully with mint.
- Baking Tips: Remember, no actual baking! Instead, chill thoroughly. This is what makes dipping easier and maintains shape.
- Glaze Variations: Want a glossy finish? Add a little extra coconut oil to the chocolate. For flavored chocolate, stir in a few drops of peppermint extract or vanilla.
I’ve learned that patience and thorough chilling are the secrets to clean, shiny coated peppermint patties. Don’t rush the process, and you’ll end up with picture-perfect treats. Also, I sometimes double the batch because once friends taste these, they disappear in minutes!
Storing and Reheating Tips
To keep these delicious treats fresh, here’s how I store mine:
- Room Temperature: These are best stored in a cool, dry place, covered with a plate or plastic wrap, and can last up to 3 days — but honestly, they’ll vanish sooner!
- Refrigerator Storage: Keep them in an airtight container in the fridge for up to a week. I recommend placing parchment paper between layers to prevent sticking. The cold keeps them firm, but bring them to room temp before serving for that perfect melt-in-your-mouth texture.
- Freezer Instructions: For longer storage, wrap each piece individually in plastic wrap and store in a freezer-safe container for up to 3 months. To enjoy, let them thaw in the fridge or at room temp for about 15 minutes. No cracks, just creamy, cool peppermint cravings fulfilled.
Heads up: if you’ve added any fresh toppings like crushed candies, do so after they’ve fully set to prevent melting or sogginess.
Frequently Asked Questions
Final Thoughts
If you’ve been craving that minty, chocolatey hit without the fuss of store-bought candies, this homemade peppermint patties recipe is your new best friend. I’ve made these countless times — each batch brings back memories of family gatherings, wrapping them in shiny paper, and watching everyone’s eyes light up. They’re surprisingly easy to whip up, customized to your taste, and just so satisfying. Plus, once you see how simple it is to make your own, you might find yourself experimenting with flavors and shapes — perhaps adding a splash of vanilla or tiny bits of crushed candy canes for extra crunch. My advice? Keep a stash in your fridge, share with loved ones, and enjoy that warm feeling of having created something delicious with your own hands. Happy baking! I’d love to hear how yours turn out, so don’t forget to leave a comment or share your variations!

peppermint patties
Ingredients
Main Ingredients
- 1 cup marshmallow cream
- 10 tablespoons unsalted butter softened
- 1.5 teaspoons vanilla extract
- 1 teaspoon peppermint extract
- 5.5 cups powdered sugar
- 16 ounces Ghirardelli dark chocolate melting wafers
- 8 ounces Ghirardelli white chocolate melting wafers optional for footballs
Instructions
Preparation Steps
- In a large mixing bowl, beat marshmallow cream, softened butter, vanilla extract, and peppermint extract until fully combined. Add powdered sugar and mix on medium speed until well blended.
- Line a large baking sheet with parchment paper. Using about 1 tablespoon of filling, shape into a ball, then flatten for traditional peppermint patties or pinch ends for football shape. Freeze for 2 hours or overnight.
- Melt dark chocolate wafers according to package instructions. Dip frozen patties into chocolate using a toothpick. Place on parchment paper and let set.
- Store at room temperature in a covered container.
- If making football shaped candies, melt white chocolate, pour into a small bag, cut the tip, and pipe laces onto the footballs. Let set.
Notes
Featured Comments
“Impressed! Clear steps and quick weeknight win results. Perfect for busy nights.”
“New favorite here — comforting. crowd-pleaser was spot on.”
“Super easy and turned out amazing! My family asked for seconds. Saving this one.”
“This sweet treat was absolutely loved — the zingy really stands out. Thanks!”
“Made it tonight and wow — comforting! Will definitely make Easy Peppermint Candy Recipe again.”
“Packed with flavor and so simple. Exactly what I wanted from Easy Peppermint Candy Recipe.”


