

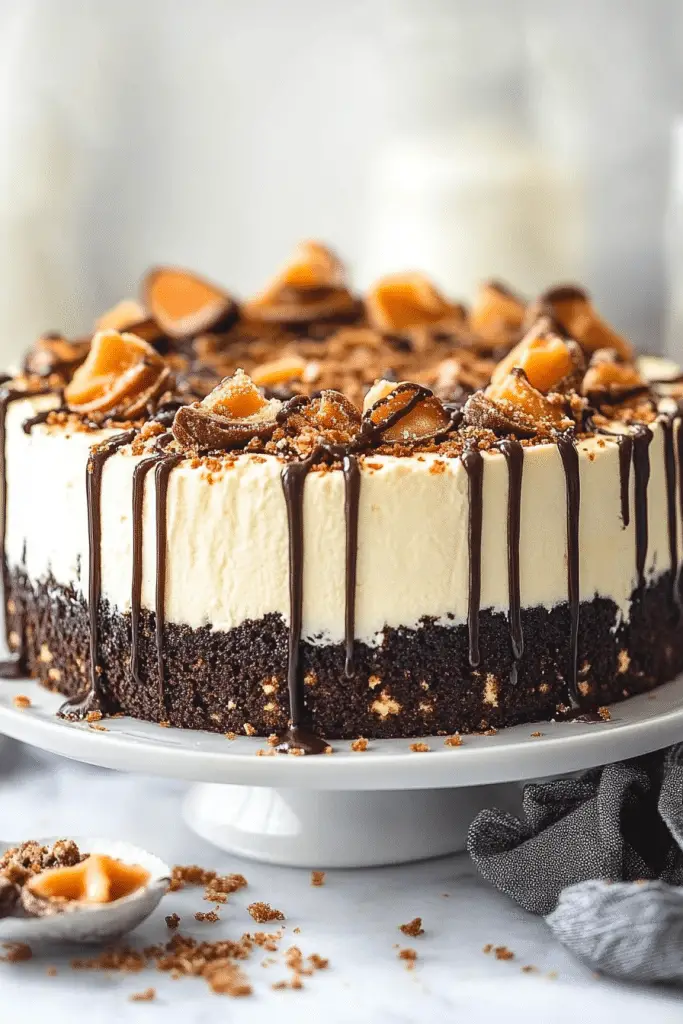
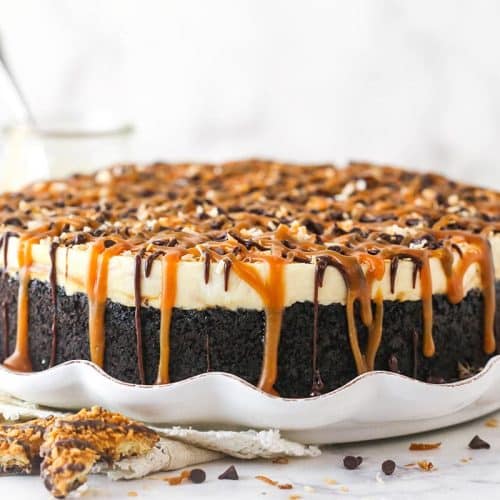
If you’ve ever had a sweet tooth that just won’t quit, let me introduce you to something special — the Samoa Cheesecake. I remember the first time I made this, it was late at night, and I was craving something rich and decadent, but I didn’t want to turn on the oven and spend hours. So, I threw together this little masterpiece, and honestly, it’s become a family favorite ever since. My kids ask for this all the time, especially during birthdays or when we’re just celebrating a little something. The smell alone when it’s baking—oh, it’s pure heaven—like a tropical vacation in my own kitchen. It’s surprisingly simple to make, but the flavors are just next-level indulgent. Think caramel, coconut, a creamy cheesecake layer, and a hint of chocolate—what’s not to love? I promise, once you try it, you’ll be hooked—trust me on this one! This one’s a lifesaver on busy nights when you need a dessert that’s impressive but doesn’t take hours to whip up.
What is a Samoa cheesecake?
The Samoa Cheesecake is basically a dreamy mash-up between your favorite decadent cheesecakes and the classic flavors of Samoa cookies—you know, those irresistible treats loaded with caramel, toasted coconut, and chocolate. Think of it as a tropical twist on the ordinary cheesecake. It’s called “Samoa” because of those iconic cookies, but instead of just eating them plain, I found a way to incorporate those flavors into a luscious, velvety cheesecake. The base is usually a graham cracker crust, but I like to add some toasted coconut to make it even more tropical and crunchy. Then, the creamy filling—think rich, smooth cheese blended with a hint of vanilla—gets layered with a gooey caramel swirl and topped generously with shredded toasted coconut and chocolate drizzle. It’s essentially a dessert that hits all the right notes: sweet, buttery, a little salty, and utterly delicious. And the best part? It tastes like a fancy holiday treat, but honestly, it’s pretty foolproof to make at home.
How do I make Samoa cheesecake?
Quick Overview
This Samoa Cheesecake is honestly much simpler to make than it looks. You start with a buttery graham cracker crust, press it into your pan, and then whip up a smooth cream cheese filling. Swirl in a warm caramel sauce, fold in toasted shredded coconut, pour it all into the crust, and bake until just set. While it’s cooling, you make a quick chocolate ganache to drizzle over the top and sprinkle with more toasted coconut. The whole process takes about 2 hours from start to finish—most of that is baking and cooling—and the result is truly worth every minute. It’s a no-fuss dessert with big, impressive flavors that my family always raves about. Plus, leftovers are fantastic—if there are any!
Ingredients
For the Main Batter:
– 16 oz (450g) cream cheese, softened (full-fat for that rich texture)
– 3/4 cup sugar
– 3 large eggs
– 1 teaspoon vanilla extract
– 1/2 cup sour cream (or Greek yogurt, if you want a little tang)
– 1/2 cup canned coconut milk (for that tropical richness)
For the Filling:
– 1/2 cup caramel sauce (store-bought or homemade—your choice!)
– 1 cup shredded sweetened toasted coconut (frozen or fresh, toasted in a dry skillet)
– 1/4 cup chocolate chips or chopped chocolate (for drizzling)
For the Glaze:
– 1/2 cup dark chocolate or semi-sweet chocolate
– 2 tablespoons coconut oil (for that shiny, smooth finish)
– Extra toasted coconut for topping
Step-by-Step Instructions
Step 1: Preheat & Prep Pan
Set your oven to 325°F (160°C). Butter your springform pan (9-inch is perfect) or line it with parchment paper. To keep the crust from sticking, I always give the bottom a quick spray of non-stick spray. Wrap the outside of the pan with foil; this helps prevent water from seeping in if you’re doing a water bath—which I highly recommend for extra creaminess.
Step 2: Mix Dry Ingredients
For the crust, crush about 1.5 cups of graham crackers into fine crumbs—use a food processor or just put them in a Ziploc and smash with a rolling pin. Mix crumbs with 1/4 cup melted butter and a tablespoon of sugar. Press this mixture evenly into the bottom of your pan, then bake for about 8 minutes until slightly golden. Let it cool while you prepare the filling.
Step 3: Mix Wet Ingredients
In a large bowl, beat your softened cream cheese until smooth—trust me, no lumps here! Add sugar, vanilla, and sour cream, mixing until silky. One at a time, blend in the eggs, making sure each gets incorporated before adding the next. I always love doing this with a handheld mixer on low speed—less mess, more control.
Step 4: Combine
Pour the cheese mixture into your prepared crust. Don’t overmix, or you risk incorporating too much air, which can cause cracks. Gently swirl in half of your caramel sauce using a toothpick or skewer to create lovely ribbons.
Step 5: Prepare Filling
In a small bowl, toast the shredded coconut in a dry skillet over medium heat until golden, about 3-4 minutes. Keep an eye on it—it burns fast! Once cooled, fold it into the batter gently, saving some for topping later. If you want more coconut flavor, add a splash of coconut extract or more toasted coconut on top.
Step 6: Layer & Swirl
Pour the batter into the crust. Drizzle some of the remaining caramel over the surface and use a toothpick to swirl it in a decorative pattern. Then, sprinkle the rest of the toasted coconut evenly over the top. Now, if you want to get fancy, you can do a quick swirl pattern with your spoon or skewer.
Step 7: Bake
Bake in your preheated oven in a water bath (place your springform in a larger baking dish filled with hot water halfway up the sides) for about 50-55 minutes. The cheesecake is done when the edges are set but the center still slightly jiggles. Remove from the water bath carefully and let it cool for at least an hour, then refrigerate for at least 4 hours or overnight for best results.
Step 8: Cool & Glaze
While it’s cooling, melt your chocolate with coconut oil in a double boiler or microwave in 30-second bursts, stirring well. Drizzle this glossy chocolate over your chilled cheesecake and sprinkle with more toasted coconut for that tropical finishing touch. I love doing this just before serving for an extra layer of flavor and crunch.
Step 9: Slice & Serve
Use a sharp knife dipped in hot water to get clean cuts. Wipe it between slices for a crisp look. Serve slices chilled or at room temperature—either way, it’s a showstopper. I love pairing it with a dollop of whipped cream or a side of fresh pineapple for that extra tropical flair.
What to Serve It With
Honestly, this cheesecake is versatile enough to shine at all sorts of occasions. For breakfast, I love pairing a slice with a hot cup of coffee or a Tropical Fruit Smoothie — think pineapple and mango chunks to complement those coconut flavors. It’s such a treat to wake up to its aroma wafting through the house. During brunch, serve it with a splash of rum or a light sparkling wine—it’s fancy enough for special guests but still laid-back. And as a decadent dessert, I always add a sprig of mint or a dusting of powdered sugar—makes it look ready for Instagram, too! When it’s cozy night in, I love a slice with a glass of cold milk or a hot cup of tea. We’ve also done mini muffins instead of a big cheesecake—just adjust the baking time and you’re all set. It’s a crowd-pleaser, and leftovers are always a hit, especially if you store them in an airtight container—that creamy goodness stays fresh for days.
Top Tips for Perfecting Your Samoa Cheesecake
Over the years, I’ve learned a few tricks that help make this cheesecake turn out just right every time. First, always use full-fat cream cheese—nothing beats the rich creaminess it offers. I tried low-fat versions, but honestly, it just wasn’t the same, and it tended to crack more easily. Speaking of cracks, baking in a water bath is a game changer—it keeps the cheesecake moist and helps it bake evenly. When mixing, don’t overdo it—you want just enough to combine everything smoothly, but no aeration that might cause cracks. The swirling step is what makes it pretty—try to make gentle, figure-eight patterns with your skewer for a beautiful marbled effect. For the coconut, I’ve tested both toasted fresh and frozen, and honestly, frozen coconut toasted in a dry skillet turned out crispier and more flavorful. If you’re swapping ingredients, like using almond extract or coconut cream, just remember to adjust the quantities—sometimes less is more. For the glaze, I prefer adding a teaspoon of coconut extract or a pinch of sea salt to enhance the chocolate’s depth. Lastly, let your cheesecake cool completely before glazing or slicing—it’s the secret to preventing cracks and getting clean cuts every time. This recipe, once perfected, is a real joy to make and enjoy—your family will thank you!
Storing and Reheating Tips
Leftover Samoa Cheesecake is a dream, and with proper storage, you can enjoy it for days. If you plan to eat it within a day or two, keep it covered with plastic wrap or in an airtight container in the fridge. It’s best to let it sit at room temperature for about 10 minutes before slicing—trust me, it makes a difference in mouthfeel. To store longer, wrap slices tightly in plastic wrap and store them in an airtight container—cheesecake maintains its creamy texture for up to five days, although I recommend eating it sooner for that freshest flavor. If you want to prepare it in advance, freeze individual slices by wrapping them well in plastic and placing them in a freezer-safe container. When ready to enjoy, thaw slices in the fridge overnight or at room temperature for about 30 minutes. As for reheating, I always prefer cold or slightly softened—warm cheesecake can get a little messy. If you must reheat, do so carefully in the microwave at 10-15 second intervals, just enough to bring it back to warmth without melting away the texture. And if you added a second layer of glaze or toppings, wait until the cheesecake is fully thawed to reschedule the finishing touches. This way, your Samoa Cheesecake stays just as delicious and decadent as on day one.
Frequently Asked Questions
Final Thoughts
This Samoa Cheesecake has become one of those recipes I turn to when I want to indulge myself and share a little happiness with loved ones. Every bite combines creamy, crunchy, sweet, and slightly salty—truly a flavor explosion that transports me straight to a tropical paradise. It’s hearty enough to stand alone as a dessert, but elegant enough to serve at special occasions. Honestly, once you master the swirl and get the hang of that perfect crack-free bake, you’ll be making this for birthdays, picnics, or even just a cozy night in. The best part? Seeing everyone’s face light up when they taste it. I’ve tested this with various tweaks—adding a splash of rum, swapping coconut milk for almond—I’ve never been disappointed. So, grab your ingredients, put some good music on, and let’s get baking! I can’t wait to hear how yours turns out—tag me with your photos and let’s share the love for this tropical twist on cheesecake. Happy baking!
Samoa Cheesecake
Ingredients
Main Ingredients
- 24 oz Cream Cheese
- 0.5 cup Powdered Sugar
- 0.25 cup Mini Chocolate Chips
- 0.75 cup Toasted Coconut Flakes
- 1 cup Heavy Whipping Cream
- 0.25 cup Vanilla Extract
- 1 cup Caramel Sauce
- 5 tbsp Unsalted Butter
- 2.5 cups Oreo Crumbs
- 1 cup Vanilla Wafer Cookies
- 3 oz Semi-Sweet Chocolate Chips
Instructions
Preparation Steps
- Line a 9-inch springform pan with parchment paper in the bottom and grease the sides.
- Combine Oreo crumbs and melted butter in a small bowl. Press the mixture into the bottom of the prepared springform pan. Refrigerate while preparing the filling.
- In a large mixing bowl, beat the cream cheese and powdered sugar until smooth. Add vanilla extract and half of the caramel sauce, mix well.
- Gently fold in toasted coconut flakes and broken vanilla wafers into the cream cheese mixture.
- In a separate bowl, whip the heavy cream until stiff peaks form. Fold into the cream cheese mixture.
- Pour half of the filling onto the crust, drizzle with half of the remaining caramel sauce, and swirl lightly. Repeat with remaining filling and caramel.
- Refrigerate the cheesecake for at least 4 hours or until set. Melt semi-sweet chocolate chips and drizzle over the top.
Notes
Featured Comments
“Impressed! Clear steps and turned out amazing results. Perfect for busy nights.”
“New favorite here — so flavorful. crowd-pleaser was spot on.”
“Super easy and turned out amazing! My family asked for seconds. Saving this one.”
“This sweet treat was absolutely loved — the cozy really stands out. Thanks!”
“Made it tonight and wow — super easy! Will definitely make Easy Samoa Cheesecake Without Baking again.”
“Packed with flavor and so simple. Exactly what I wanted from Easy Samoa Cheesecake Without Baking.”


