

If you’re anything like me, pulled beef is one of those recipes that feels like a warm hug from the oven. It’s tender, flavorful, and downright addictive, especially when you get it just right. I remember the first time I tried making pulled beef — I was skeptical, honestly. How could a tough cut of meat turn into melt-in-your-mouth goodness? But after a bit of experimenting and a few happy accidents, I found my groove. Now, this is my go-to for busy weeknights, lazy weekends, or whenever I want to impress guests without fuss. The smell alone when it’s slow-cooking makes everyone gather in the kitchen, arms stretched out, waiting for that first spoonful. It’s incredible how something so simple can turn into such a showstopper. Trust me on this — once you master pulled beef, it becomes a household secret weapon that everyone asks for. Plus, it’s so versatile—you can pile it onto buns, scoop it over rice, or just eat it straight out of the bowl. Either way, I promise, you’ll fall in love with this one.
What is Pulled Beef?
Think of pulled beef as the slow-cooked, shredded cousin of roast beef, but with an extra dose of flavor and tenderness. The name “pulled” comes from the way you shred the meat into tender, juicy strands after it’s cooked low and slow. It’s essentially a comforting, savory dish that’s been around for generations — a practical way to turn tougher cuts into something heavenly. The beauty of pulled beef is in its simplicity; you grab a good chunk of beef, toss it in some trusty spices and liquids, and let it simmer or cook in the oven for hours. When it’s done, it practically falls apart with a gentle tug. Whether you’re making tacos, sandwiches, or just a plateful on its own, pulled beef is versatile enough to serve in countless ways. It’s like the ultimate blank canvas for flavors — smoky, tangy, spicy, or mellow—you decide! This dish is a real treasure for anyone who loves slow-cooked comfort food with depth.
How do I make Pulled Beef?
Quick Overview
This pulled beef recipe is as straightforward as it gets. You start with a good cut of beef, rub it with spices, then cook it slowly in a flavorful liquid—think broth, wine, or even strong coffee for a twist. After several hours of gentle simmering or oven roasting, the meat becomes so tender that it practically shreds itself. My secret is patience; low and slow is the way to guarantee that melt-in-your-mouth texture. Once cooked, I like to toss it with a quick glaze or sauce, then serve it piled high on buns or over grains. The beauty of this method is that it’s forgiving, so even if you’re a beginner, you’ll be proud of the tender result.
Ingredients
For the main beef:
Chuck roast (about 3-4 pounds), a budget-friendly cut that’s ideal for slow cooking, or brisket if you prefer a richer flavor. Look for good marbling — it’ll help keep the meat juicy. Kosher salt, black pepper, garlic powder, smoked paprika, and a pinch of cumin are my favorite spice blend to give it that savory kick. I always do this when I want a smoky background, but you can tweak the spices to suit your taste.
For the Cooking Liquid:
Beef broth or stock (or even chicken broth if that’s what you have), a splash of red wine or a bit of apple cider vinegar adds brightness, and a couple of bay leaves for depth. Some folks like to toss in sliced onions or carrots at this stage — honestly, it’s all about what you like. The key is to keep the liquid fairly modest so the beef takes up all that flavor.
For the Glaze or Sauce:
Barbecue sauce, honey mustard, or just a simple drizzle of pan juices and a squeeze of fresh lemon for tang. You can get creative and even toss in some hot sauce or Worcestershire for more zing. It all depends on your mood.
Step-by-Step Instructions
Step 1: Preheat & Prep Pan
If you’re using an oven, heat it to 300°F (150°C). Pat your beef dry, then rub it generously with salt, pepper, garlic powder, smoked paprika, and cumin. I like to do this the night before so the spices really soak in. Place the beef in a heavy roasting pan or Dutch oven—make sure it’s big enough so it doesn’t crowd the space. A quick tip: I sometimes sear the beef on all sides in a hot skillet before roasting; it adds a beautiful caramelized crust that’s simply irresistible. However, if you’re short on time, you can go straight to slow cooking.
Step 2: Mix Dry Ingredients
Combine your spices in a small bowl — easy peasy. This helps evenly season the meat. I’ve made the mistake of just sprinkling randomly, and trust me, the flavor isn’t as well-distributed. A good rub makes all the difference, giving that smoky, savory flavor with every bite.
Step 3: Mix Wet Ingredients
In a separate bowl, whisk together your broth, wine or vinegar, and any aromatics like sliced onions. I like to taste the mixture, adjusting the acidity or saltiness before pouring over the beef. It should smell rich and inviting.
Step 4: Combine
Pour the liquid into your pan, making sure not to cover the meat completely—about two-thirds submerged is perfect. Cover tightly with foil or a lid to trap moisture. Then, slide into the oven or turn on your slow cooker. The magic begins here, so set a timer for 3-4 hours and go do something fun!
Step 5: Prepare Filling
If you want a quick glaze, mix a little barbecue sauce with honey or your favorite hot sauce. I often do this while the beef is cooking — it’s a game-changer when it’s time to shred.
Step 6: Layer & Swirl
Once the beef is cooked and super tender, take it out and use two forks to shred it into glorious strands. If you want a beautiful swirl, spread the shredded beef on a platter and gently mix in your glaze or sauce, swirling it through the meat with a fork for a marbled look. Trust me, it’s almost too pretty to eat!
Step 7: Bake
If you prefer, you can return the shredded beef to the oven for an additional 15-20 minutes to let the flavors meld. It’s optional but adds an extra layer of richness. Keep an eye on it so it doesn’t dry out — adding a splash of broth or a drizzle of oil can help keep everything moist.
Step 8: Cool & Glaze
Let the pulled beef rest for about 10 minutes before serving. If you want that glossy, sticky finish, brush on a final coat of your glaze or BBQ sauce and pop it back in for a few minutes. That caramelized sheen is pure heaven.
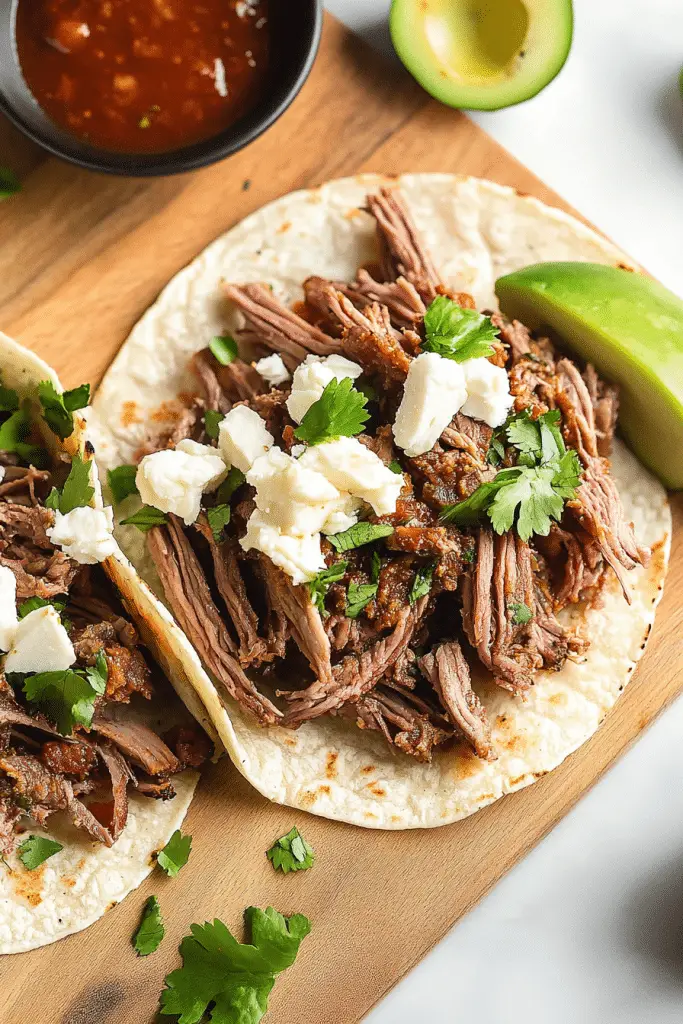
Step 9: Slice & Serve
Serve it piled high on buns with pickles and slaw, spoon it over cauliflower rice for a low-carb twist, or just eat it straight with a fork — my personal favorite. The meat stays juicy, and the strands pull apart so easily. It’s a comfort food that makes people smile every single time.
What to Serve It With
This pulled beef is incredibly versatile. For a casual dinner, I love stuffing it inside soft rolls with a squeeze of lime and some crunchy slaw — kind of like a pulled beef taco, but with a twist. It’s also fabulous served over fluffy rice, topped with chopped herbs and a dollop of sour cream for a simple but flavorful meal. When friends come over, I often set up a taco bar with all the toppings — shredded cheese, diced onions, cilantro, and a squeeze of fresh lime. For a more elegant take, I’ve served it alongside roasted vegetables and a tangy vinegar-based slaw, giving a beautiful balance of smoky and crisp. And honestly, leftovers are a gift. I’ve made into enchiladas, sliders, or just reheated with a splash of broth — it’s like a secret ingredient in my kitchen arsenal. My family loves to eat it straight from the bowl with bread on the side, especially on chilly evenings. Whatever your style, this pulled beef always hits the spot.
Top Tips for Perfecting Your Pulled Beef
Over the years, I’ve learned a few tricks that consistently help me nail this recipe. First, choosing the right cut is key. Chuck roast is my favorite because it’s well-marbled and forgiving, but you can also do brisket or even bottom round. I always do this when I want a more succulent result: I sear the meat first, which adds layers of flavor and a beautiful crust. Honestly, that tricky step is worth the extra minutes because it makes a difference in taste and texture. When I season my beef, I don’t go overboard—simple is often best. I’ve learned that a good balance of spices, plus a splash of acid like vinegar or wine, brightens everything. For swirling in sauce or glaze, I prefer doing it while the beef is still warm — the flavors soak in better. A common mistake I used to make was overcooking or cooking at too high a temperature, leading to dry, stringy meat. Now, I stick to low and slow, which guarantees maximum tenderness. As for the glaze, I love to experiment with honey, sriracha, or even balsamic — just remember to taste as you go. Trust me, patience and a gentle hand are your best friends here. Plus, if you test your oven’s temperature regularly, you’ll get perfect results every single time.
Storing and Reheating Tips
This pulled beef can be stored beautifully and reheated without losing its luscious texture. After cooling at room temperature (but not for more than two hours), transfer it to airtight containers. In the fridge, it stays fresh for up to 4 days — I like to reheat it in the microwave on low power or in a covered skillet with a splash of broth, stirring gently. For longer storage, I freeze leftovers in very tight containers or vacuum-sealed bags — it’s good for up to 3 months. To reheat from frozen, thaw it overnight in the fridge, then warm it slowly on the stove or in the oven. If you’ve glazed or sauced it, reheat it covered to keep the moisture locked in. About the glaze: I recommend waiting to add it until the last minute if you plan to store leftovers, or it might become sticky or soggy during reheating. When reheated properly, pulled beef remains just as tender, juicy, and flavorful as when freshly made — a true comfort for any busy home cook.
Frequently Asked Questions
Final Thoughts
If there’s one thing I hope you take away from this is that pulled beef is one of those recipes that make your kitchen smell like magic and your soul feel warm. It’s humble but luxe, budget-friendly but elegant, and always a hit with my family. Once you get the hang of slow-cooking a cut of beef until it practically shreds itself, you’ll find yourself coming back to this recipe again and again. Plus, it’s so adaptable — tweak the spices, sauces, or serving styles to match your mood. I’ve made this for casual weeknights, holiday feasts, and even last-minute gatherings, and it shines every single time. I’d love to hear how yours turns out or if you’ve added your special touch. Drop a comment below, give it a star rating, and don’t forget to share your variations. Happy baking — or rather, slow-cooking — my friend! Now go grab that beef from the fridge and start your flavorful journey. The best pulled beef of your life is just a few hours away.

pulled beef
Ingredients
Main Ingredients
- 4 pounds beef chuck roast
- 2 limes limes (juiced)
- 0.25 cup apple cider vinegar
- 3 peppers chipotle peppers in adobo sauce just the peppers, not the sauce
- 4 cloves garlic cloves
- 1.5 tablespoons cumin
- 1 tablespoon dried oregano
- 1.5 teaspoons kosher salt
- 1.5 teaspoons ground black pepper
- 0.5 teaspoons ground cloves
- 1 cup chicken broth
- 3 leaves bay leaves
Instructions
Preparation Steps
- In a food processor or blender, combine vinegar, lime juice, chipotle peppers, garlic cloves, cumin, oregano, pepper, salt, and ground cloves. Process on high until smooth.
- Place the roast in a large crockpot. Add the pepper puree, bay leaves, and chicken broth. Cook on low for 6-8 hours.
- Shred the beef and return it to the juices. Remove bay leaves. Serve on tortillas, over rice, or in sandwiches with your favorite toppings.
Notes
Featured Comments
“Impressed! Clear steps and turned out amazing results. Perfect for busy nights.”
“New favorite here — restaurant-level. crowd-pleaser was spot on.”
“Super easy and turned out amazing! My family asked for seconds. Saving this one.”
“This sweet treat was absolutely loved — the fresh really stands out. Thanks!”
“Made it tonight and wow — turned out amazing! Will definitely make Easy Slow Cooker Pulled Beef with Rice again.”
“Packed with flavor and so simple. Exactly what I wanted from Easy Slow Cooker Pulled Beef with Rice.”


