


You know those days when you’re just craving something that feels like a warm hug, something intensely chocolatey but with that bright, refreshing zing? That’s exactly when this chocolate peppermint swirl loaf comes to the rescue. It’s become my go-to when the weather outside gets chilly, or honestly, anytime I need a little pick-me-up. It reminds me of those classic candy canes you get around the holidays, but in a soft, moist, cake-like form. Honestly, it’s even better than a plain chocolate cake because the peppermint cuts through the richness in the most delightful way. I’ve tried a ton of chocolate baked goods over the years, but this one? This one has a special place in my heart, and more importantly, in my baking rotation. It’s got that perfect balance of deep chocolate and cool peppermint that just sings. If you’ve ever had a really good chocolate peppermint cookie, imagine that flavor profile turned into a tender, melt-in-your-mouth loaf, and you’re getting close!
What is chocolate peppermint swirl loaf?
So, what exactly is this magical chocolate peppermint creation? Think of it as a wonderfully moist, tender loaf cake that’s been generously swirled with both rich chocolate and bright, invigorating peppermint. It’s essentially two delicious batters – one deeply chocolatey and the other a classic vanilla (or a lightly peppermint-infused one, depending on how you like it!) – that we then artfully combine to create a beautiful marbled effect. The “swirl” is what gives it that signature look and makes every slice a little bit of an adventure. It’s not a dense pound cake, nor is it super airy like a sponge cake; it sits in that perfect middle ground of soft, yielding crumb that’s just incredibly satisfying to bite into. The name itself, “chocolate peppermint swirl loaf,” really says it all – it’s the comforting familiarity of a loaf cake, elevated with the irresistible combination of chocolate and peppermint. It’s the kind of treat that feels both sophisticated and incredibly homey, all at once.
How do I make chocolate peppermint swirl loaf?
Quick Overview
This recipe is all about creating two distinct batters – one rich chocolate and one light vanilla – and then swirling them together for a beautiful marbled effect before baking. We’ll mix up our dry and wet ingredients separately, then combine them gently to form our main batter. A portion of that batter will then be transformed into the chocolate version with cocoa and a little extra liquid. The key is to layer and gently swirl these two batters in your prepared loaf pan, creating those gorgeous streaks of flavor and color. It bakes up into a moist, tender loaf with that irresistible chocolate peppermint aroma filling your kitchen. It’s genuinely that simple, and the result is stunningly delicious.
Ingredients
For the Main Batter:
1 ½ cups all-purpose flour (spooned and leveled, not scooped!)
1 teaspoon baking soda
½ teaspoon salt
¾ cup unsalted butter, softened (make sure it’s properly softened, not melted!)
1 ½ cups granulated sugar
2 large eggs, at room temperature
1 teaspoon pure vanilla extract
¾ cup buttermilk, at room temperature (if you don’t have buttermilk, a super simple substitute is ¾ cup milk with 2 teaspoons of lemon juice or white vinegar, let it sit for 5-10 minutes)
For the Chocolate Swirl:
⅓ cup unsweetened cocoa powder (good quality makes a difference!)
2 tablespoons milk (any kind works)
For the Peppermint Kick (Optional, but I highly recommend it!):
½ teaspoon peppermint extract (start with this amount, you can always add a touch more if you’re a big peppermint fan!)
A few drops of green food coloring (just for visual appeal, totally optional!)
For the Glaze (Optional, but it elevates it!):
1 cup powdered sugar, sifted
2-3 tablespoons milk or heavy cream
½ teaspoon peppermint extract (or to taste!)
Optional: A few drops of green food coloring
Step-by-Step Instructions
Step 1: Preheat & Prep Pan
First things first, let’s get your oven ready and your pan prepped. Preheat your oven to 350°F (175°C). This is a pretty standard baking temperature, so your oven should be good to go. While it’s heating up, grab a standard 9×5 inch loaf pan. I like to grease it really well with butter or cooking spray, and then dust it with a little flour, tapping out any excess. This extra step ensures that your beautiful loaf doesn’t stick, which is crucial for getting it out in one perfect piece. You can also line the bottom and sides with parchment paper, leaving an overhang on the sides, which makes lifting the loaf out even easier. Trust me, wrestling with a stuck loaf is nobody’s idea of fun!
Step 2: Mix Dry Ingredients
In a medium bowl, whisk together your flour, baking soda, and salt. Whisking them together helps to distribute the leavening agent (the baking soda) evenly, which is super important for a good rise. It also gets rid of any lumps in the flour. You want a nice, uniform mixture here. This step might seem small, but it really contributes to the even texture of the finished loaf. Don’t skip it!
Step 3: Mix Wet Ingredients
Now, in a larger bowl, you’ll cream together your softened butter and granulated sugar. I usually do this with an electric mixer (handheld or stand mixer works great) until it’s light and fluffy. This process, called creaming, incorporates air into the batter, which helps make the cake tender. Next, beat in your eggs, one at a time, making sure each one is fully incorporated before adding the next. Then, stir in the vanilla extract. Finally, you’ll alternate adding the dry ingredients and the buttermilk to the butter-sugar mixture. Start and end with the dry ingredients. So, add about a third of the dry, mix until just combined, then add half the buttermilk, mix, then another third of the dry, the rest of the buttermilk, and finally the last of the dry. Mix until just combined – we’re not going for super smooth here; a few little lumps are totally fine!
Step 4: Combine
As I mentioned in the last step, the key here is to mix until *just* combined. You don’t want to overmix once the flour is added, as this can develop the gluten too much and result in a tough loaf. It’s totally okay if you still see a few streaks of flour or tiny lumps. We’re going to divide this batter, so we want it to be a nice, pliable base to work with. The texture should be thick but pourable. If it seems a little too thick, don’t worry, the buttermilk helps to keep it moist.
Step 5: Prepare Filling
Now for the fun part! Take about half of your prepared batter and scoop it into a separate, smaller bowl. To this portion, add the unsweetened cocoa powder and the 2 tablespoons of milk. Stir it all together until you have a smooth, dark chocolate batter. If you want that lovely peppermint zing, now’s the time to stir in your peppermint extract. I usually add about half a teaspoon here, but honestly, I sometimes add a little more if I’m feeling bold! If you’re using food coloring for the swirl, add a couple of drops to the chocolate batter now and give it a good mix until it’s a uniform color. The extra milk helps to make the chocolate batter the same consistency as the vanilla batter, which is important for a good swirl.
Step 6: Layer & Swirl
This is where the magic happens! Grab your prepared loaf pan. Alternate spoonfuls of the vanilla batter and the chocolate batter into the pan. You can just dollop them in randomly, or you can try to layer them a bit – perhaps a layer of vanilla, then a layer of chocolate, and so on. Once all the batter is in, take a knife or a skewer and gently swirl the two batters together. Don’t over-swirl! You want distinct streaks of chocolate and vanilla, not one uniform muddy color. Just a few gentle passes should do it. You can also tilt the pan a bit to help distribute them. The goal is a beautiful marbled effect.
Step 7: Bake
Pop that beautifully swirled batter into your preheated oven. Bake for about 50-65 minutes. The exact time will vary depending on your oven. You’ll know it’s done when a wooden skewer or toothpick inserted into the center comes out clean, or with just a few moist crumbs attached (no wet batter!). If the top starts to brown too quickly before the inside is cooked, you can loosely tent it with aluminum foil for the last 15-20 minutes of baking. That’s a trick I learned years ago and it’s a lifesaver!
Step 8: Cool & Glaze
Once it’s baked, let the loaf cool in the pan on a wire rack for about 10-15 minutes. This allows it to set up a bit before you try to remove it. Then, carefully invert the pan onto the wire rack to release the loaf. Let it cool *completely* before glazing. If you try to glaze a warm loaf, the glaze will melt right off! For the glaze, whisk together the sifted powdered sugar, milk (start with 2 tablespoons and add more as needed to reach your desired drizzling consistency), and peppermint extract. If you want that festive green tint, add a couple of drops of food coloring. Once the loaf is completely cool, drizzle the glaze over the top, letting it drip down the sides. It looks so pretty and adds an extra layer of pepperminty goodness.
Step 9: Slice & Serve
Once the glaze has set slightly, it’s time to slice and enjoy! I find a serrated knife works best for clean slices on baked goods like this. Serve it at room temperature. The texture is just perfect, and the flavors have had a chance to meld beautifully. You’ll get those lovely swirls of chocolate and peppermint in every bite. It’s really a showstopper, even though it was so easy to make!
What to Serve It With
This chocolate peppermint loaf is so versatile, it’s practically begging to be paired with all sorts of things! For a simple, comforting BREAKFAST treat, I love it toasted just slightly and served with a hot mug of coffee or a creamy latte. The warmth of the coffee really brings out the chocolate notes. For a more elaborate BRUNCH spread, I’ll slice it a little thicker and serve it alongside fresh berries or a dollop of Greek yogurt. It looks so elegant on a brunch table, and the peppermint is a lovely palate cleanser. As a decadent DESSERT, it’s pure magic. A slice of this with a scoop of high-quality vanilla bean ice cream is pure bliss. Sometimes I’ll even add a tiny dusting of cocoa powder or a few crushed candy canes on top for extra flair. And for those COZY SNACKS when you just need something sweet and comforting, it’s perfect just as it is. My kids love it with a tall glass of cold milk after school, and honestly, I often sneak a slice when I need a little late-night treat. My family has a tradition of having it on Christmas morning, alongside some cinnamon rolls – the combination of warm spices and cool mint is just perfect for the holidays.
Top Tips for Perfecting Your Chocolate Peppermint Swirl Loaf
I’ve made this loaf more times than I can count, and over the years, I’ve picked up a few tricks that really make a difference. For the batter consistency, always ensure your butter and eggs are at room temperature. This is crucial for that light, fluffy texture when creaming the butter and sugar. If your butter is too cold, it won’t cream properly, and if your eggs are cold, they might make the batter curdle. When it comes to mixing, remember the golden rule: don’t overmix the flour! Once the dry ingredients are added, mix *just* until they’re incorporated. A few lumps are your friend here; they mean you haven’t developed too much gluten. For the swirl, the key is gentle persuasion. You want those beautiful ribbons of chocolate and vanilla, not a homogenous brown blob. Use a knife or a skewer and make just a few passes through the batter. Think of it as adding artistic flair, not stirring vigorously. If you’re worried about your swirl not showing up enough, make sure your chocolate batter is a nice, deep color by using good quality cocoa powder. For ingredient swaps, if you’re out of buttermilk, the milk-and-acid trick is a lifesaver! And for the peppermint, start small. Peppermint extract can be potent, so it’s easier to add more than to take it away. I’ve learned that the hard way! Baking is often about understanding your oven. If you know yours runs hot, you might want to bake it for a few minutes less, or conversely, if it runs cool, you might need a few extra minutes. Always do the toothpick test to be sure. And for the glaze, if it’s too thick, add milk a teaspoon at a time until it’s pourable. If it’s too thin, add more sifted powdered sugar. Getting the consistency just right makes for a beautiful finish. I once tried to glaze a slightly warm loaf and it was a disaster – the glaze just slid right off! So, patience with cooling is definitely key.
Storing and Reheating Tips
Keeping this chocolate peppermint loaf tasting its best is pretty straightforward. For Room Temperature storage, I usually keep it in an airtight container or well-wrapped in plastic wrap for up to 3 days. It’s usually gone by then anyway! The moisture from the loaf helps it stay fresh. If you’re planning to refrigerate it, do so in an airtight container. It will keep well for about 5-7 days in the fridge. Just be aware that refrigeration can sometimes dry out baked goods a little, so you might want to give it a quick warm-up before serving. For Freezer Instructions, this loaf freezes beautifully! Once it’s completely cooled and unglazed (I find glazing after thawing is best for appearance), wrap it tightly in a layer of plastic wrap, then a layer of aluminum foil. It can stay frozen for up to 2-3 months. To thaw, unwrap it and let it sit at room temperature for a few hours, or gently warm it in a low oven (around 300°F or 150°C) for about 10-15 minutes until it’s warmed through. If you plan to glaze it after thawing, wait until it’s fully at room temperature. The glaze timing advice is really about preserving that beautiful finish. Glazing when the loaf is still warm or not fully thawed can lead to a messy outcome. So, patience really is a virtue here. I’ve found that a loaf that’s been frozen and then thawed at room temperature still tastes incredibly moist and flavorful, like it was baked yesterday!
Frequently Asked Questions
Final Thoughts
So there you have it – my absolute favorite chocolate peppermint swirl loaf! I truly believe this recipe brings a little bit of magic to any kitchen. It’s got that comforting, homemade feel, coupled with a sophisticated flavor combination that’s just so satisfying. It’s the perfect balance of rich chocolate and refreshing peppermint, all wrapped up in a tender, moist loaf that practically melts in your mouth. It’s the kind of treat that makes people say, “Wow, you made this?” and makes you feel like a baking superstar, even though it was remarkably simple to pull off. If you love the classic pairing of chocolate and peppermint, or if you’re just looking for a delicious and impressive-but-easy baked good, you *have* to give this one a try. It’s become a staple in my home, especially during the holidays, but honestly, it’s too good to save just for special occasions. I really hope you enjoy baking it as much as I do! Once you’ve tried it, please come back and leave a comment below to let me know how it turned out, or share any fun variations you tried. I love hearing from you all! Happy baking!
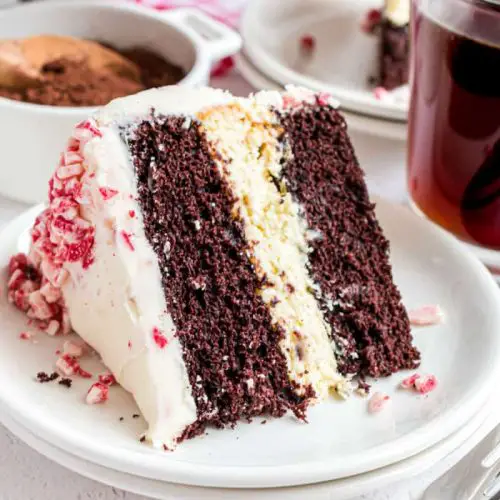
Chocolate Peppermint Cheesecake Cake
Ingredients
For the Cakes
- 1.75 cup all-purpose flour
- 0.5 cup unsweetened dark chocolate cocoa powder
- 0.5 teaspoon kosher salt
- 1 teaspoon baking soda
- 0.5 teaspoon baking powder
- 0.5 cup brewed coffee cooled
- 0.5 cup whole milk
- 0.5 cup unsalted butter softened
- 1.5 cup granulated sugar
- 2 large eggs
For the Cheesecake Layer
- 2 packages cream cheese softened (8 ounce each)
- 0.66 cup granulated sugar
- 1 pinch salt
- 2 large eggs
- 0.25 cup sour cream
- 0.33 cup heavy whipping cream
- 0.5 teaspoon peppermint extract
- 0.5 cup Andes Peppermint Crunch baking chips
For the Frosting
- 1 cup unsalted butter softened
- 5 cups powdered sugar
- 0.5 cup heavy whipping cream
- 1 cup Andes Peppermint Crunch baking chips
Instructions
For the Cakes
- In a small bowl, mix flour, cocoa powder, salt, baking soda, and baking powder. Set aside.
- In a measuring cup, mix together cooled coffee and milk. Set aside.
- Grease two 9-inch round baking pans and line the bottom with parchment paper. Set aside.
- In a mixer, beat butter and sugar for 5 minutes, until smooth. Add eggs, one at a time. Slowly add in dry ingredients alternating with the coffee and milk mixture, about 3 additions of each.
- Pour cake batter evenly into the 2 prepared pans.
- Bake in a 350 degree oven for 25 minutes. Remove and cool on a wire rack. When completely cooled, wrap each layer in plastic wrap and put in the freezer for later assembly!
For the Cheesecake Layer
- Prepare the cheesecake layer. This can be done early in the day, or the night before. If freezing the cheesecake, it can be stored 1-2 weeks in the freezer.
- Preheat oven to 325 degrees. Using a large roasting pan, add 1 inch of water to the pan. Place it on the lowest rack of the oven and allow it to preheat.
- Prepare a 9-inch springform pan by lining the bottom (inside) with a circle of parchment paper.
- Beat cream cheese with granulated sugar for 2-3 minutes until creamy. Add in salt and eggs, one at a time, beating well after each addition.
- Beat in sour cream, heavy cream, and peppermint extract until light and fluffy (about 2 minutes). Fold in peppermint baking chips.
- Pour into the prepared 9-inch springform pan. Place the pan in the center of the preheated oven, with the roasting pan of water on the lowest rack. The cake will not sit in the water but will still get the benefit of a water bath by being in the oven with it.
- Bake cheesecake for 45 minutes. Turn the oven off and let the cheesecake sit in the oven for an additional 30 minutes. Remove and cool completely on the counter.
- When cooled, remove the outside portion of the springform pan and place into the freezer for several hours or overnight. If using within 24 hours, you can refrigerate the cheesecake.
For the frosting
- Beat butter for 3 minutes. Add powdered sugar and heavy cream and beat for an additional 3-5 minutes until fluffy. Add baking chips.
- To assemble the cake, lay one frozen layer of chocolate cake on a cake plate. Top with the frozen cheesecake and the second layer of chocolate cake. Frost the sides and top with a thin layer of frosting for a crumb coat. Refrigerate for 30 minutes to an hour. Remove from the refrigerator and frost the remaining cake. Keep the cake covered in the refrigerator until ready to eat.
- Remove from refrigerator and allow to sit about 15 minutes before slicing. Enjoy!
Notes
Featured Comments
“Impressed! Clear steps and absolutely loved results. Perfect for busy nights.”
“New favorite here — crowd-pleaser. crowd-pleaser was spot on.”
“Super easy and turned out amazing! My family asked for seconds. Saving this one.”
“This sweet treat was absolutely loved — the zingy really stands out. Thanks!”
“Made it tonight and wow — turned out amazing! Will definitely make Festive Mint Chocolate Cheesecake Cake again.”
“Packed with flavor and so simple. Exactly what I wanted from Festive Mint Chocolate Cheesecake Cake.”


