

There are some recipes that just feel like home, aren’t there? This Flag Fruit Pizza is one of those for me. I can still remember the first time my mom made it for the Fourth of July picnic when I was a kid. The vibrant colors, the sweet, tangy Cream Cheese Frosting, and that perfectly chewy cookie crust – it was pure magic! It always felt so special, like a little slice of edible sunshine. Honestly, whenever I see a beautiful display of fresh berries, I get this nostalgic pull to make it. It’s not quite a cake, not quite a cookie, but something wonderfully in between. It’s the perfect crowd-pleaser, and let me tell you, this Flag Fruit Pizza disappears faster than any other dessert I put out. It’s become our go-to for summer holidays, birthday parties, or even just when we need a little burst of cheer.
What is Flag Fruit Pizza?
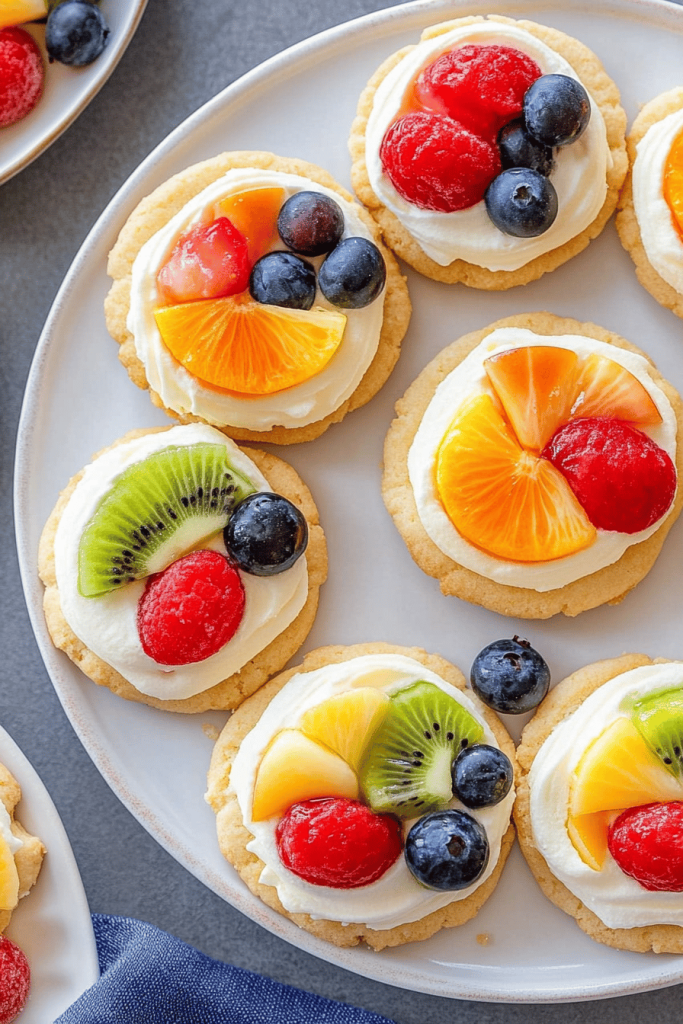
So, what exactly is this magical creation? Think of it as a giant, soft, chewy sugar cookie that’s been transformed into a canvas for a sweet, creamy topping and a rainbow of fresh fruit. It’s called a Flag Fruit Pizza because, when arranged correctly, the berries and frosting mimic the stripes and stars of the American flag – hence the “Flag” part. The “Fruit Pizza” comes from the fact that it’s flat, round (usually!), and topped with a creamy layer and delicious fruits, just like a pizza might be topped with sauce and cheese. It’s super simple in concept, but the execution is what makes it so darn delightful. It’s not meant to be fussy; it’s meant to be fun and delicious!
How do I make [Recipe Name]?
Quick Overview
This Flag Fruit Pizza is surprisingly straightforward. You’ll start by baking a large, soft sugar cookie base. While that’s cooling, you’ll whip up a tangy, sweet Cream Cheese frosting. Once the cookie is completely cooled, you’ll spread that glorious frosting all over it, and then the fun part begins: artfully arranging fresh, colorful fruits to create your edible masterpiece. It’s a dessert that looks as good as it tastes, and it’s perfect for any gathering where you want to impress without stressing.
Ingredients
For the Main Batter:
Here’s what you’ll need to get that perfect cookie crust going:
- 1 cup (2 sticks) unsalted butter, softened: Make sure it’s really soft but not melted. This is key for a tender cookie.
- 1 ½ cups granulated sugar: For that classic sweet cookie flavor.
- 2 large eggs: Room temperature eggs incorporate better.
- 1 teaspoon vanilla extract: A good quality vanilla makes a difference!
- 2 ½ cups all-purpose flour: Spooned and leveled, not scooped, to avoid a dry crust.
- 1 teaspoon baking soda: Helps it rise just enough.
- ½ teaspoon salt: Balances the sweetness.
For the Filling:
This is the luscious layer that holds all the fruit:
- 8 ounces cream cheese, softened: Full-fat for the best creamy texture. Make sure it’s good and soft.
- ½ cup (1 stick) unsalted butter, softened: Again, let it sit out until it’s nice and soft.
- 1 cup powdered sugar: Sifted to avoid any lumps.
- 1 teaspoon vanilla extract: For an extra flavor boost.
For the Glaze:
This adds a beautiful sheen and a little extra sweetness. You can skip it if you prefer, but I think it’s worth it!
- ¼ cup apricot jam or apple jelly: Seedless is best.
- 1 tablespoon water: To thin it out.
For the Topping:
This is where you get creative! Use whatever looks freshest and most colorful.
- Assorted fresh berries: Think strawberries (halved or sliced), blueberries, raspberries, blackberries. You can also add kiwi, mandarin oranges, or grapes if you like!
Step-by-Step Instructions
Step 1: Preheat & Prep Pan
First things first, preheat your oven to 350°F (175°C). You’ll need a large baking sheet or a round pizza pan. If you’re using a baking sheet, I like to line it with parchment paper. This makes cleanup a breeze and ensures your cookie crust doesn’t stick. If you’re using a pizza pan, just make sure it’s well-greased and floured, or lined with parchment paper.
Step 2: Mix Dry Ingredients
In a medium bowl, whisk together the all-purpose flour, baking soda, and salt. Just give them a good stir until they’re well combined. This helps distribute the leavening agent and salt evenly, which means a more consistent cookie. Don’t overthink this step; a quick whisk is all you need.
Step 3: Mix Wet Ingredients
In a large mixing bowl, cream together the softened butter and granulated sugar. I like to use an electric mixer for this – it makes it so much easier to get it light and fluffy. Beat them together until the mixture is pale and creamy. Then, beat in the eggs one at a time, making sure each is fully incorporated before adding the next. Finally, stir in the Vanilla Extract.
Step 4: Combine
Now, gradually add the dry ingredients to the wet ingredients, mixing on low speed (or by hand with a sturdy spoon) until just combined. Be careful not to overmix! Overmixing develops the gluten in the flour, which can lead to a tough cookie, and we definitely don’t want that. You should have a soft, thick dough. If it seems a little too sticky to handle, you can pop it in the fridge for about 15-20 minutes.
Step 5: Layer & Swirl
Using your hands or a spatula, spread the cookie dough evenly onto your prepared baking sheet or pizza pan, forming a large circle about ¼ to ½ inch thick. You can also create a slightly raised edge if you like, to hold in the filling. If you’re making a flag shape, you can press a slightly thicker rectangle onto one side for the “stars” area.
Step 6: Bake
Bake for about 15-20 minutes, or until the edges are golden brown and the center is set. The exact time will depend on your oven and how thick you made the cookie base. You want it cooked through but still soft and chewy. Let it cool on the baking sheet for about 10 minutes before carefully transferring it to a wire rack to cool completely. It *must* be completely cool before you add the frosting, otherwise, it will melt!
Step 7: Prepare Filling
While the cookie is cooling, let’s make that dreamy frosting. In a clean mixing bowl, beat the softened cream cheese and softened butter together until smooth and creamy. Again, an electric mixer is your best friend here. Gradually beat in the sifted powdered sugar and vanilla extract until everything is well combined and has a lovely, smooth consistency. Taste it! You can add a little more powdered sugar if you like it sweeter, or a tiny splash of lemon juice for extra tang.
Step 8: Cool & Glaze
Once the cookie crust is completely cool (this is super important!), spread the cream cheese frosting evenly over the top, reaching almost to the edges. Now for the fun part: decorating! Arrange your fresh berries on top of the frosting. For a flag design, you can place blueberries in a rectangle in one corner for the “stars” and then arrange sliced strawberries and blueberries in alternating stripes to represent the flag. Get creative!
Step 9: Slice & Serve
If you’re using the apricot jam glaze, gently warm the jam with the water in a small saucepan over low heat until it’s pourable. You can brush this lightly over the fruit for a beautiful sheen. Let the Flag Fruit Pizza sit for at least 15-20 minutes in the fridge before slicing so the frosting can set up a bit. Slice it like a pizza and serve! It’s best enjoyed chilled.
What to Serve It With
This Flag Fruit Pizza is such a versatile dessert, you can really serve it with almost anything! For a lovely breakfast treat, I love pairing a slice with a good cup of coffee. The sweetness of the pizza and the warmth of the coffee are just divine together. For brunches, it’s an absolute showstopper. I usually arrange it on a nice platter and serve it alongside some fresh fruit salad or yogurt parfaits. The vibrant colors always add such a festive touch to the table. As a dessert, it’s perfect after a summer barbecue or a casual dinner. It’s lighter than a heavy chocolate cake but still incredibly satisfying. I often serve it with a dollop of whipped cream or even a small scoop of vanilla ice cream if we’re feeling extra indulgent. For those cozy afternoon snacks, it’s just perfect with a glass of milk or a refreshing iced tea. My kids absolutely love it as an after-school treat, and honestly, I’ve been known to sneak a slice myself late at night when a craving strikes! It’s one of those desserts that just makes everyone happy.
Top Tips for Perfecting Your [Recipe Name]
I’ve made this Flag Fruit Pizza more times than I can count, and over the years, I’ve picked up a few tricks that I think really elevate it. For the zucchini (if you choose to use it – see FAQ below!), the key is squeezing out as much moisture as humanly possible. Grate it using the large holes of a box grater, then wrap it in a clean kitchen towel or cheesecloth and wring it out like you mean it! Seriously, get every last drop of water out. This prevents a soggy crust.
When mixing the cookie dough, remember my earlier warning about overmixing. Stop as soon as the flour streaks disappear. A few little lumps are perfectly fine and will actually contribute to a better texture. For the swirls, if you’re doing a marbled effect, don’t overdo it. Gentle swirls create a prettier pattern. You want distinct colors, not a muddy mess.
Ingredient swaps are fun! I’ve experimented a lot. For a creamier frosting, I’ve found that using full-fat cream cheese is non-negotiable. You can try using Greek yogurt for a lighter tang, but it won’t be quite as smooth. For the berries, if you can’t find fresh ones, thawed frozen berries can work in a pinch, but drain them really well to avoid excess moisture.
Baking is where a little attention goes a long way. My oven tends to run a little hot, so I usually bake my cookie crust a minute or two less than the recipe calls for, just to ensure it stays nice and chewy. Always check the edges for golden brown color; that’s your best indicator. If you’re making the flag shape, I find it easier to press the dough into the rectangle shape for the stars *before* you start spreading the main cookie base, so it forms a cohesive unit. For the glaze, a little goes a long way. You don’t want to drown the fruit; just a light brush adds that beautiful, glossy finish without making it too sweet.
Oh, and one more thing: patience is a virtue! Make sure that cookie crust is *completely* cool before frosting. I’ve rushed this before, and the frosting just melts into a sad puddle. A little waiting will save you a lot of disappointment. Trust me on this one – I’ve learned the hard way!
Storing and Reheating Tips
Storing this Flag Fruit Pizza is pretty straightforward, but there are a few things that will help keep it tasting its best. If you happen to have any leftovers (which is rare in my house!), you can store it at room temperature for a few hours, especially if it’s not too warm out. Just cover it loosely with plastic wrap or a cake dome to keep the frosting from drying out.
For longer storage, definitely pop it in the refrigerator. I like to use an airtight container, but sometimes the fruit can get a little mushy if it sits for too long. A good trick is to place parchment paper over the frosting and fruit before sealing the container. It should stay good in the fridge for about 2-3 days. The cookie crust will stay chewy, and the frosting will firm up nicely.
Freezing this is possible, but I usually don’t recommend it for the best texture. If you absolutely must freeze it, I’d suggest baking the cookie crust, letting it cool completely, and then wrapping it tightly in plastic wrap and then foil. You can freeze the unfrosted crust for up to a month. Thaw it overnight in the refrigerator, then frost and top with fruit just before serving. Freezing the frosted and topped pizza can make the fruit watery and the crust a bit soggy upon thawing.
Regarding the glaze, it’s best applied right before serving for that fresh shine. If you store the pizza with the glaze on, it can sometimes make the fruit a little softer than you’d like. If you store the whole thing for a day or two, you can always re-warm and re-brush the glaze just before you serve another slice for that extra sparkle!
Frequently Asked Questions
Final Thoughts
This Flag Fruit Pizza is more than just a dessert to me; it’s a collection of happy memories, a symbol of summer fun, and a reminder of how simple ingredients can come together to create something truly special. It’s the perfect balance of sweet, tangy, chewy, and fresh. I’ve made it for countless birthdays, holidays, and spontaneous get-togethers, and it’s always a hit. It’s the kind of recipe that makes people smile when they see it, and even bigger smiles when they taste it. It’s proof that you don’t need to be a gourmet chef to create something beautiful and delicious for your loved ones.
If you’re looking for other delightful treats to brighten your day, you might also enjoy my [Link to another relevant recipe, e.g., “Easy Berry Crumble”] or my foolproof [Link to another relevant recipe, e.g., “No-Bake Cheesecake Cups”]. They’re all made with love and designed to be enjoyed!
I truly hope you give this Flag Fruit Pizza a try. I can’t wait to hear what you think! Please leave a comment below to share your experience, any variations you tried, or how much your family loved it. Happy baking, and enjoy every delicious bite!

Flag Fruit Pizza
Ingredients
Crust
- 0.5 cup unsalted butter softened
- 0.5 cup granulated sugar
- 1 large egg
- 1 teaspoon vanilla extract
- 1.5 cup all-purpose flour
- 0.25 teaspoon salt
Cream Cheese Frosting
- 8 ounces cream cheese softened
- 0.5 cup unsalted butter softened
- 1 cup powdered sugar
- 1 teaspoon vanilla extract
Toppings
- 2 cups fresh blueberries
- 3 cups sliced strawberries
- 1 cup raspberries
Instructions
Preparation Steps
- Preheat oven to 350°F (175°C). Line a 12-inch pizza pan or a large baking sheet with parchment paper.
- In a large bowl, cream together the softened butter and granulated sugar until light and fluffy. Beat in the egg and vanilla extract.
- In a separate bowl, whisk together the flour and salt. Gradually add the dry ingredients to the wet ingredients, mixing until just combined.
- Press the dough evenly onto the prepared pizza pan to form a crust.
- Bake for 15-20 minutes, or until golden brown and cooked through. Let cool completely on a wire rack.
- While the crust cools, prepare the cream cheese frosting. In a medium bowl, beat together the softened cream cheese and butter until smooth. Gradually beat in the powdered sugar and vanilla extract until well combined and fluffy.
- Spread the cream cheese frosting evenly over the cooled crust.
- Arrange the fresh fruit on top of the frosting to create the flag design. Use blueberries for the stars in a corner, and arrange strawberries and raspberries in stripes.
- Chill for at least 30 minutes before slicing and serving.
Notes
Featured Comments
“Impressed! Clear steps and restaurant-level results. Perfect for busy nights.”
“New favorite here — crowd-pleaser. crowd-pleaser was spot on.”
“Super easy and turned out amazing! My family asked for seconds. Saving this one.”
“This sweet treat was absolutely loved — the cozy really stands out. Thanks!”
“Made it tonight and wow — spot on! Will definitely make Flag Fruit Pizza again.”
“Packed with flavor and so simple. Exactly what I wanted from Flag Fruit Pizza.”


