


Oh, apple fritters. Just saying the words brings back a flood of memories. My absolute favorite was always the ones from the little bakery down the street from my childhood home. They were warm, perfectly golden, and had just the right amount of cinnamon. Whenever I catch that scent of fried dough and sweet apples, I’m transported right back. Now, I’ve spent years trying to recreate that magic at home, and I think I’ve finally nailed it. This recipe isn’t just about making an apple fritter; it’s about capturing that cozy, comforting feeling in every single bite. Forget those dense, greasy versions you sometimes get; this one is light, tender, and bursting with fresh apple flavor. It’s seriously the best apple fritter I’ve ever had, and trust me, I’ve had a few!
What is an Apple Fritter?
So, what exactly makes an apple fritter so special? At its heart, it’s a simple concept: pieces of apple mixed into a sweet batter, then fried until golden brown and puffy. Think of it as a delightful hybrid between a donut and a pancake, but way more exciting! The apples get tender and sweet from the frying process, and the batter puffs up around them, creating these wonderfully irregular, rustic shapes that are just begging to be dipped in glaze. It’s not a perfectly formed pastry; its charm lies in its homemade, slightly messy appearance. This is the kind of treat that feels both comforting and a little bit indulgent, perfect for those moments when you just need a little taste of pure joy. My grandmother used to make a version of these for special occasions, and seeing them come out of the fryer always felt like a little bit of magic happening in our kitchen.
How do I make Apple Fritters?
Quick Overview
This recipe involves mixing up a simple batter, folding in diced apples and spices, then carefully frying spoonfuls until they’re golden and puffed. We’ll finish them off with a lovely, simple glaze. It’s a straightforward process, and the results are so worth it. The key is to not overwork the batter and to maintain a consistent oil temperature for perfectly cooked fritters. You’ll be amazed at how quickly these come together, especially considering how impressive they taste!
Ingredients
For the Main Batter:
This is the foundation of our fritters, so good quality ingredients really make a difference.
- 2 cups All-Purpose Flour: I always use a good unbleached all-purpose flour. It gives the best structure.
- 1/2 cup Granulated Sugar: Just enough to sweeten the batter without making it cloying.
- 2 teaspoons Baking Powder: This is crucial for that light, airy texture. Make sure it’s fresh!
- 1/2 teaspoon Salt: Balances the sweetness and brings out the other flavors.
- 1 teaspoon Ground Cinnamon: You can adjust this to your liking, but this is my sweet spot.
- 1/4 teaspoon Ground Nutmeg: A little pinch adds such wonderful warmth.
- 1 large Egg: Brings everything together.
- 3/4 cup Milk: Whole milk gives the best richness, but I’ve had great success with 2% too.
- 1 teaspoon Vanilla Extract: A must for that classic flavor.
- 1 tablespoon Melted Unsalted Butter: Adds a lovely richness and helps with browning.
For the Filling:
The star of the show! I prefer apples that hold their shape well when cooked.
- 2 medium Apples: I love using Honeycrisp, Fuji, or Gala for their sweetness and a slight tartness. Granny Smith can work if you prefer a tangier fritter.
- 1 tablespoon Lemon Juice: This keeps the apples from browning and adds a tiny bit of brightness.
For the Glaze:
Simple, sweet, and perfectly complements the fritters.
- 1 cup Powdered Sugar: Sifted for the smoothest glaze.
- 2-3 tablespoons Milk: Add gradually until you reach your desired consistency.
- 1/2 teaspoon Vanilla Extract: For extra flavor.
Step-by-Step Instructions
Step 1: Preheat & Prep Pan
First things first, let’s get our frying station ready. You’ll need a heavy-bottomed pot or Dutch oven. Pour in about 2-3 inches of vegetable oil (like canola, sunflower, or peanut oil). We want to heat this oil to around 350°F (175°C). It’s super important to get the temperature right; too cool and your fritters will be greasy, too hot and they’ll burn on the outside before cooking through. I use a kitchen thermometer to be sure. While the oil is heating, get a baking sheet lined with paper towels ready. This is where our golden beauties will land to drain.
Step 2: Mix Dry Ingredients
In a large mixing bowl, whisk together the flour, granulated sugar, baking powder, salt, cinnamon, and nutmeg. Give it a good whisk to make sure everything is evenly distributed. This step is key to making sure your leavening agents are spread throughout, giving you consistently fluffy fritters. You want to see no lumps of baking powder.
Step 3: Mix Wet Ingredients
In a separate medium bowl, whisk the egg until it’s lightly beaten. Then, stir in the milk and vanilla extract. Finally, whisk in the melted butter. Make sure the butter isn’t too hot when you add it, or it might scramble the egg slightly. You want a smooth, homogenous mixture.
Step 4: Combine
Now, pour the wet ingredients into the bowl with the dry ingredients. Using a spatula or a wooden spoon, stir just until combined. Seriously, just until you don’t see any dry streaks of flour anymore. It’s okay if there are a few small lumps; overmixing is the enemy of tender fritters, as it develops the gluten too much, leading to tough results. We want them light and tender!
Step 5: Prepare Filling
While the batter is resting for a moment, let’s prep our apples. Peel, core, and dice your apples into small, bite-sized pieces, about 1/4 to 1/2 inch cubes. Toss them with the lemon juice in a small bowl. This not only prevents them from turning brown but also adds a little zing that cuts through the sweetness. Gently fold these apple pieces into your batter. Make sure they are evenly distributed.
Step 6: Layer & Swirl
Okay, here’s where the magic happens. Carefully drop spoonfuls of the batter into the hot oil. I like to use a tablespoon or a small ice cream scoop for this. Don’t overcrowd the pot; fry in batches (about 3-4 fritters at a time) so the oil temperature stays consistent. They’ll puff up quite a bit as they fry. You’ll see them start to turn golden on the bottom. This is your cue to flip them gently with tongs or a slotted spoon. You want them to be a beautiful, even golden brown on all sides.
Step 7: Bake
You’re not really baking these, but frying them! Fry each batch for about 3-4 minutes per side, until they are puffed up and a deep golden brown. Keep an eye on the temperature of your oil. If it starts to drop too much, give it a minute to reheat. You’re looking for that perfect cooked-through texture – they should feel firm but yield slightly when pressed.
Step 8: Cool & Glaze
Once your fritters are perfectly golden, carefully lift them out of the oil with a slotted spoon and place them on the prepared paper towel-lined baking sheet. Let them drain for a minute or two. While they’re still warm, it’s time for the glaze! In a small bowl, whisk together the sifted powdered sugar, vanilla extract, and milk, adding the milk a tablespoon at a time, until you get a nice, drizzle-able consistency. It should be thick enough to coat but thin enough to drip. Drizzle generously over the warm fritters. The warmth helps the glaze melt slightly and adhere beautifully.
Step 9: Slice & Serve
These are best enjoyed warm, right after they’re glazed. If you’re serving them later, you can gently reheat them in a warm oven for a few minutes. They’re also delicious at room temperature. If you want to cut them to share (though I rarely do!), use a serrated knife for a clean cut. The inside should be tender, moist, and full of those delicious apple chunks. Enjoy every single bite!
What to Serve It With
Honestly, these apple fritters are so incredible, they’re practically a meal on their own! But if you’re looking to round out a meal or create a special experience, here are some ideas that I love. For a classic Breakfast, you can’t beat pairing them with a hot cup of coffee. The rich aroma and comforting warmth of the coffee are just perfect with the sweet fritters. They also go wonderfully with a side of scrambled eggs and some crispy bacon for a hearty start to your day. For a more elegant Brunch, serve them alongside a fresh fruit salad. The bright, refreshing flavors of the fruit are a lovely contrast to the richness of the fritters. You could also present them as part of a brunch buffet, perhaps with a small pitcher of extra maple syrup on the side. As a decadent Dessert, these are heavenly served warm with a scoop of high-quality vanilla bean ice cream. The hot fritter melting the cold ice cream is pure bliss! A sprinkle of extra cinnamon or a drizzle of caramel sauce takes it over the top. And for those perfectly cozy Snacks, these are just divine with a glass of milk, especially for the kids (and okay, for me too!). They’re the ultimate comfort food when you need a little pick-me-up on a chilly afternoon. My kids always ask for seconds when these are around, and they love helping to drizzle the glaze!
Top Tips for Perfecting Your Apple Fritters
I’ve made these apple fritters more times than I can count, and over the years, I’ve picked up a few tricks that I think really elevate them. Here are my top tips to ensure your fritters turn out absolutely perfect every time. When it comes to the Zucchini Prep, make sure you dice your apples small enough. If they’re too large, they might not cook through properly in the batter. I also find that using apples that are firm and a bit tart, like Honeycrisp or Fuji, gives the best flavor and texture. For Mixing Advice, I cannot stress enough the importance of not overmixing the batter. A few lumps are perfectly fine! Overmixing develops the gluten in the flour, which will make your fritters tough instead of tender and light. Just mix until the dry ingredients are incorporated. When it comes to Swirl Customization, I don’t really swirl in this recipe, but if you wanted to add something extra, you could gently fold in a few berries or even some chocolate chips along with the apples. Just be careful not to disturb the batter too much! For Ingredient Swaps, if you don’t have milk, you can use buttermilk for an even richer flavor, or even a non-dairy milk like almond or soy milk; I tested it with almond milk and it actually made it even creamier! For Baking Tips, the most crucial element is oil temperature. Use a thermometer if you have one. If not, you can test the oil by dropping a tiny bit of batter in; it should sizzle immediately and float to the top. If it sinks or cooks too slowly, your oil isn’t hot enough. If it browns too quickly, it’s too hot. Adjust your heat accordingly. For Glaze Variations, if you prefer a less sweet glaze, use a little more milk or a splash of lemon juice. You can also add a tiny bit of cinnamon to the glaze for an extra flavor boost, or even a bit of orange zest if you’re feeling adventurous! Remember, the goal is a smooth, drizzle-able consistency that coats the fritters without being too runny. These little tweaks have made all the difference in my apple fritter journey!
Storing and Reheating Tips
These apple fritters are truly at their best when they’re fresh and warm, but I know sometimes life gets busy, and you might have leftovers. Don’t worry, they store and reheat beautifully with a few simple tricks. For Room Temperature storage, if you find yourself with any leftover fritters (which is rare in my house!), you can keep them in an airtight container at room temperature for up to a day. They might lose a little of their crispness, but they’ll still be delicious. Just make sure they’ve cooled completely before sealing the container. If you need to store them for longer, Refrigerator Storage is your best bet. Place them in an airtight container or wrap them tightly in plastic wrap and then foil. They should keep well in the fridge for about 3-4 days. The quality will be best within the first couple of days. For longer storage, Freezer Instructions are fantastic. Wrap each cooled fritter individually in plastic wrap, then place them in a freezer-safe bag or container. They can be frozen for up to 2-3 months. When you’re ready to enjoy them, you can either thaw them overnight in the refrigerator or reheat them directly from frozen. For Glaze Timing Advice, I always recommend glazing them just before serving, especially if you plan to store or reheat them. If you glaze them and then store them, the glaze can become sticky or melt unevenly. If you’ve frozen them, it’s best to reheat them first, and then re-glaze once they’re warm. Reheating is easy – pop them in a preheated oven at around 300°F (150°C) for 5-10 minutes until warmed through, or even in a toaster oven or air fryer for a few minutes. This helps to bring back a bit of that wonderful crispness!
Frequently Asked Questions
Final Thoughts
So there you have it – my absolute favorite recipe for apple fritters. I truly believe this recipe captures that comforting, nostalgic feeling of a homemade treat, but with a flavor and texture that stands on its own. The combination of tender apples, fluffy batter, and that sweet, simple glaze is just pure happiness. They’re incredibly satisfying to make and even more delightful to eat. If you’re looking for a recipe that’s sure to impress your friends and family, or just want to treat yourself to something truly special, I can’t recommend these apple fritters enough. They’re a labor of love, yes, but one that pays off tenfold in deliciousness. Give them a try, and let me know what you think! I can’t wait to hear how yours turn out! Please share your thoughts and any of your own little twists in the comments below. Happy baking!
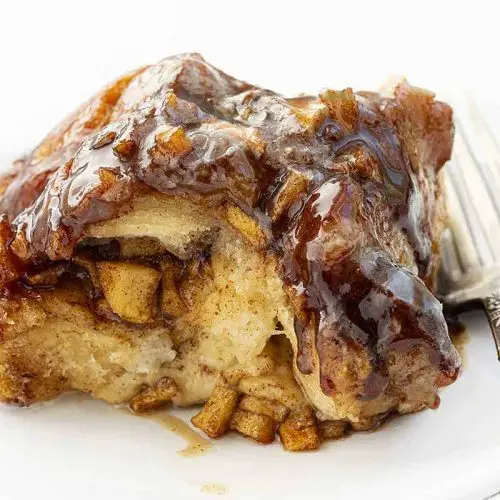
Apple Fritter Monkey Bread
Ingredients
Apple Mixture
- 1 cup light brown sugar packed
- 2 tablespoons ground cinnamon
- 2 medium Granny Smith apples peeled, cored, and diced into small pieces
Bread Mixture
- 1 cup light brown sugar packed
- 0.5 cup unsalted butter melted
- 2 cans refrigerated biscuits 8-count each, flaky
Glaze
- 1 cup confectioners' sugar
- 2 tablespoons whole milk room temperature, add more as needed
Instructions
Prepare Apple Mixture
- Preheat oven to 350°F (175°C). Spray a 10-inch bundt pan with nonstick cooking spray.
- In a medium bowl, whisk together the brown sugar and cinnamon.
- Add the diced apples to the sugar and cinnamon mixture and toss gently to coat. Set aside.
Prepare Bread Mixture
- In a large bowl, combine the brown sugar and melted butter.
- Cut each biscuit into 6 pieces.
- Add the biscuit pieces to the brown sugar and butter mixture and gently toss to coat.
- Add 1/3 of the apple mixture to the prepared bundt pan. Top with half of the coated biscuit pieces. Add another 1/3 of the apple mixture, followed by the remaining biscuit pieces. Finally, top with the remaining apple mixture.
Bake and Glaze
- Bake for 45 minutes.
- Remove from oven and let cool in the pan for 10 minutes.
- While the bread cools, prepare the glaze: In a small bowl, whisk together the confectioners' sugar and milk, adding milk one tablespoon at a time until desired consistency is reached.
- Invert the cooled bread onto a plate and drizzle with the glaze.
Notes
Featured Comments
“Impressed! Clear steps and restaurant-level results. Perfect for busy nights.”
“New favorite here — crowd-pleaser. crowd-pleaser was spot on.”
“Super easy and turned out amazing! My family asked for seconds. Saving this one.”
“This sweet treat was absolutely loved — the balanced really stands out. Thanks!”
“Made it tonight and wow — super easy! Will definitely make Golden Apple Monkey Bread How to Bake again.”
“Packed with flavor and so simple. Exactly what I wanted from Golden Apple Monkey Bread How to Bake.”


