

There’s just something about the smell of crispy hashbrowns sizzling in the morning that instantly makes me nostalgic. Maybe it’s because my mom always cooked them on lazy weekend mornings, or maybe it’s just how perfectly golden and comforting they are. I’ll admit, I used to buy the frozen ones at the store, but honestly? Nothing beats making your own from scratch. It’s surprisingly easy, and the taste? Whole different level—crispy on the outside, tender and flavorful inside. Plus, they’re a total crowd-pleaser, whether it’s breakfast, brunch, or a quick snack. My kids ask for these all the time, and I love how customizable they are—you can add cheese, herbs, or even a little spice. Trust me, once you master this recipe, it’s a go-to for any morning—no more frozen, greasy, forgettable hashbrowns. I always do this when I want a warm hug on a plate, and I promise you, they disappear faster than you’d think!
What is a hashbrown?
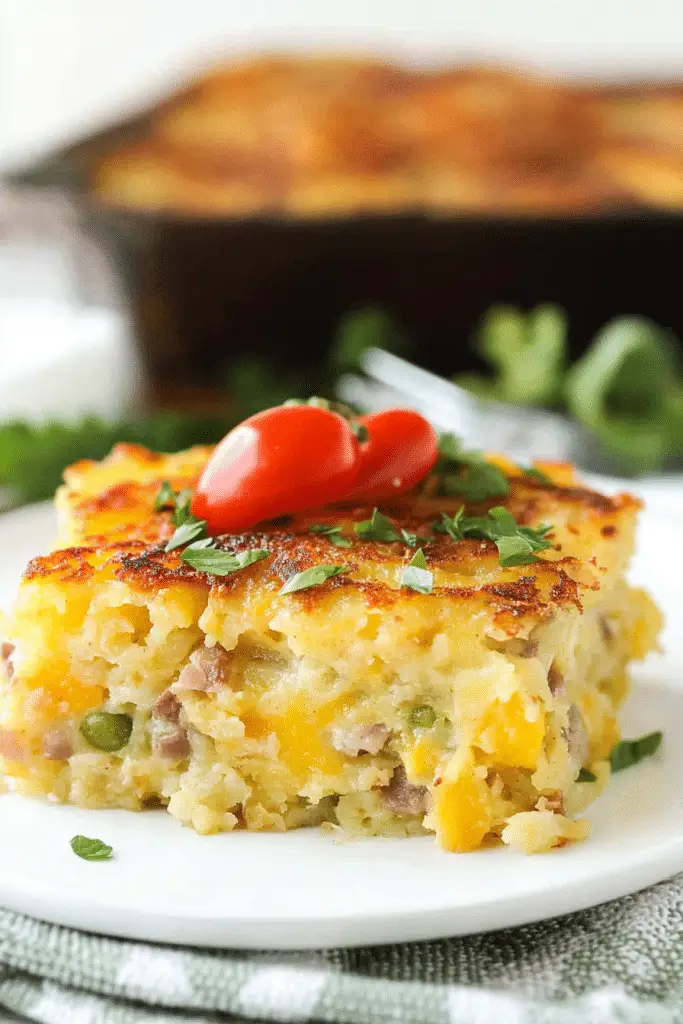
Think of homemade hashbrowns as the crispy, golden cousins of those store-bought, pre-made discs. They’re essentially shredded potatoes cooked until crispy—think of it as a mash-up of crispy hash and shredded potatoes, all cooked in one delicious package. The name comes from the traditional Irish “hash” meaning chopped or diced food, and “brown” referring to the perfect golden color. When I say ‘hashbrown,’ I’m talking about that charming little crispy patty or pile, maybe with some extras. It’s a simple concept: shredded potatoes, a little salt, maybe a dash of onion or garlic powder, and then fried until crisp. Think of it as comfort food at its best—badly kept secret, warm, inviting, and endlessly adaptable. Plus, making hashbrowns yourself means you can avoid weird preservatives and tweak it exactly how you like—more crunch, more seasoning, or even a little cheesy goodness.
How do I make homemade hashbrown?
Quick Overview
This homemade hashbrown recipe is all about simplicity and crunch. You start by shredding potatoes, squeezing out excess moisture like a pro, then mixing in a little salt and seasoning. Once you shape or pile them into a hot skillet, they crisp up beautifully in just a few minutes on each side. No fancy tricks—just crispy, golden perfection. What makes this method special is how it helps those shredded potatoes cling together and gives you that irresistible crust. It’s the kind of dish you can whip up in under 30 minutes, and the smell alone will draw everyone to the table. Plus, it’s flexible—you can make round patties, irregular heaps, or even a big, crispy hash for a hearty brunch.
Ingredients
For the Main Batter:
- 4 large russet potatoes (starchy potatoes work best for crispiness)
- 1 teaspoon salt (or to taste)
- 1/2 teaspoon black pepper
- 1 tablespoon olive oil or vegetable oil (for cooking)
For the Filling (Optional):
- 1/2 cup shredded cheese (cheddar or Monterey Jack are favorites)
- 2 tablespoons chopped fresh herbs (parsley, chives, or thyme)
- 1 small onion, finely chopped (for extra flavor)
For the Glaze (Optional):
- Extra melted butter or olive oil for drizzling
- Fresh herbs or a sprinkle of paprika for added flair
Step-by-Step Instructions
Step 1: Preheat & Prep Pan
Warm your skillet over medium heat and add enough oil to cover the bottom. I like using cast iron for that perfect crisp—just make sure it’s hot enough so the potatoes sizzle as soon as they hit the pan. Patience here is key; don’t rush it. Wait until it’s shimmering, then add your shredded potatoes.
Step 2: Mix Dry Ingredients
In a large bowl, mix your shredded potatoes with the salt, pepper, and any other dry seasonings you like. give everything a good toss. This step ensures every bite is flavorful and seasoned evenly. Trust me, don’t skip the salt—potatoes soak it right up and bring out that incredible flavor.
Step 3: Mix Wet Ingredients
If you want to add extras like cheese or herbs, do so now. You can also dribble a little olive oil into your shredded potatoes to help them crisp up even better. I’ve tested this with a splash of milk or almond milk—makes the hashbrowns a tad creamier inside, but I prefer sticking with oil so they get that perfect crunch.
Step 4: Combine
Add your seasoned, optional extras to the shredded potatoes, then scoop handfuls into your hot skillet. Press down gently to form a flat patty or leave it loose if you prefer crunchier, more rustic heaps. Don’t overstuff your pan; work in batches if needed. Let each side cook undisturbed for about 4-5 minutes until deep golden, then flip carefully.
Step 5: Prepare Filling
If you’re adding cheese or herbs, sprinkle or fold them into the shredded potatoes before shaping. For a cheesy surprise inside, I like to put a little extra cheese in the middle as I flip—so it melts and creates gooey pockets. Just be mindful of how much moisture the filling adds—it can make it harder to get that crisp crust.
Step 6: Layer & Swirl
For stunning visuals, I love swirling a little extra cheese or herbs into the top layer before flipping. Use a spatula or fork to create marbling if you’re feeling artsy. It’s a fun way to make each batch look as good as it tastes.
Step 7: Bake
Once both sides are crispy and golden, transfer them to a paper towel-lined plate to drain. If you want even extra crunch, you can pop them into a preheated oven at 375°F for 10 minutes—this sets the crust and warms everything through.
Step 8: Cool & Glaze
Let them rest for a minute or two so they firm up, then drizzle with melted butter or a sprinkle of fresh herbs. This final touch makes all the difference—trust me on this one. The aroma alone will have folks asking for seconds before you even put the plate down.
Step 9: Slice & Serve
If you’ve made big heaps, use a sharp spatula or knife to carefully cut into squares or wedges. Serve hot, with your favorite condiments or toppings—sour cream, hot sauce, or even a dollop of chunky salsa. They’re best eaten fresh and crispy, but I’ve been known to reheat leftovers in the skillet for that fresh crunch.
What to Serve It With
Honestly, some things are just meant to go together. For breakfast, I love serving crispy hashbrowns alongside scrambled eggs and crispy bacon—oh, and a good splash of hot sauce. My kids adore these with a fried egg on top, drizzled with a little ketchup or salsa for extra flavor. For brunch, a platter with smoked salmon, a dollop of crème fraîche, and a sprinkle of dill is divine. If I want a cozy dinner, I toss these hashbrowns with some roast chicken or serve them alongside a fresh salad with vinaigrette. And if I’m craving comfort food late at night, I’ll top mine with a poached egg and just sprinkle some chopped chives over everything. Family traditions? Absolutely. This dish somehow keeps everyone happy and coming back for more.
Top Tips for Perfecting Your homemade hashbrown
Over the years, I’ve picked up a few tricks that make these hashbrowns totally irresistible. First, always squeeze out as much moisture from the shredded potatoes as possible—they’re the enemy of crispiness. I use a clean dish towel or a cheesecloth wrap and give them a good squeeze—trust me, a super-dry potato is what creates that craggy, golden crust. Second, don’t overcrowd your pan; cook in batches if needed, so each hashbrown gets space to crisp up properly. I’ve found that flipping once—without fussing—is all it takes; patience is key. For fillings, avoid adding too much moisture—cheese is fine, but a lot of veggies or wet ingredients can make the exterior soggy. Instead, layer cheese on top near the end so it melts beautifully. When it comes to baking, if your hashbrowns aren’t crisp enough, crank up the heat for the last few minutes. A little extra salt or seasoning on top before serving really shines through. The best part? I’ve experimented with sweet potatoes, adding a pinch of cinnamon and nutmeg—wow, that’s a game changer! To really make your hashbrowns stand out, try adding fresh herbs or even a dash of smoked paprika. It’s all about making it your own—and trust me, once you get the hang of it, you won’t want store-bought again.
Storing and Reheating Tips
Leftover hashbrowns? No problem! Once cooled completely, pile them into an airtight container and refrigerate for up to 3 days. They lose a little crunch overnight, but I always reheat them in my cast iron skillet on medium-high. Adding a tiny bit of oil or butter helps restore that crispy exterior. If you want to make a big batch in advance, you can freeze cooked hashbrowns—wrap them tightly in foil or store in a freezer-safe container for up to a month. To reheat, just pop them in the oven at 375°F for 10-12 minutes, or again, in your hot skillet. The key is not to cover—they’ll steam instead of crisp. If you like a little extra flavor, sprinkle some fresh herbs or seasoned salt before reheating. As for the glaze—if you want it crispy and fresh-tasting, wait to drizzle any butter or herbs until just before serving. This way, everything stays irresistibly crisp, and you get that wonderful melt-in-your-mouth quality even when reheated.
Frequently Asked Questions
Final Thoughts
There’s something truly comforting about homemade hashbrowns—they’re easy to make but feel fancy enough to serve to guests. Every time I make them, I think of mornings filled with chatter around the table and the satisfying crunch of that crispy crust. This recipe is versatile, forgiving, and exactly what I want for a simple, satisfying breakfast or snack. Once you try it, I bet it’ll become a staple in your kitchen too. Don’t be surprised if you find yourself craving these at all hours—crispy, tender, and packed with flavor. Share your versions in the comments—I love hearing how everyone puts their own spin on it! Happy cooking, and I can’t wait to hear how yours turns out! Maybe next time, try adding a pinch of cayenne or sprinkle some parmesan on top for even more wow factor. Seriously, enjoy every bite—you’ve earned it!
hashbrown
Ingredients
Main Ingredients
- 20 ounces shredded hash browns
- 2 pounds sausage crumbled and drained
- 1 cup diced onion ½ medium onion
- 0.666 cup diced red bell pepper ½ bell pepper
- 0.666 cup diced green bell pepper ½ bell pepper
- 3 cups cheddar cheese divided
- 8 large eggs
- 1.333 cups milk
- 1.25 teaspoons salt
- 0.75 teaspoon black pepper
Instructions
Preparation Steps
- Preheat oven to 350°F and lightly grease a 9x13 inch baking dish.
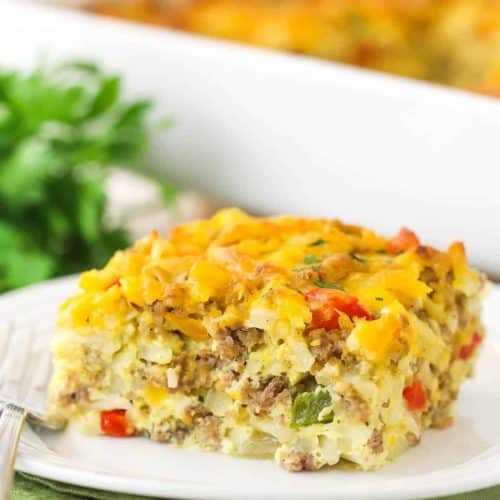
- In a large bowl, combine hash browns, cooked sausage, diced onions, bell peppers, and 2 cups of cheese. Mix gently and spread evenly in the prepared dish.
- In a separate bowl, whisk together eggs, milk, salt, and black pepper until well combined.
- Pour the egg mixture over the hashbrown mixture and top with the remaining 1 cup of cheese.
- Bake uncovered for 55 minutes or until casserole is golden and bubbly around the edges.
Notes
Featured Comments
“Impressed! Clear steps and turned out amazing results. Perfect for busy nights.”
“New favorite here — spot on. crowd-pleaser was spot on.”
“Super easy and turned out amazing! My family asked for seconds. Saving this one.”
“This sweet treat was absolutely loved — the light really stands out. Thanks!”
“Made it tonight and wow — restaurant-level! Will definitely make Golden Potato Breakfast Bake How To again.”
“Packed with flavor and so simple. Exactly what I wanted from Golden Potato Breakfast Bake How To.”


