

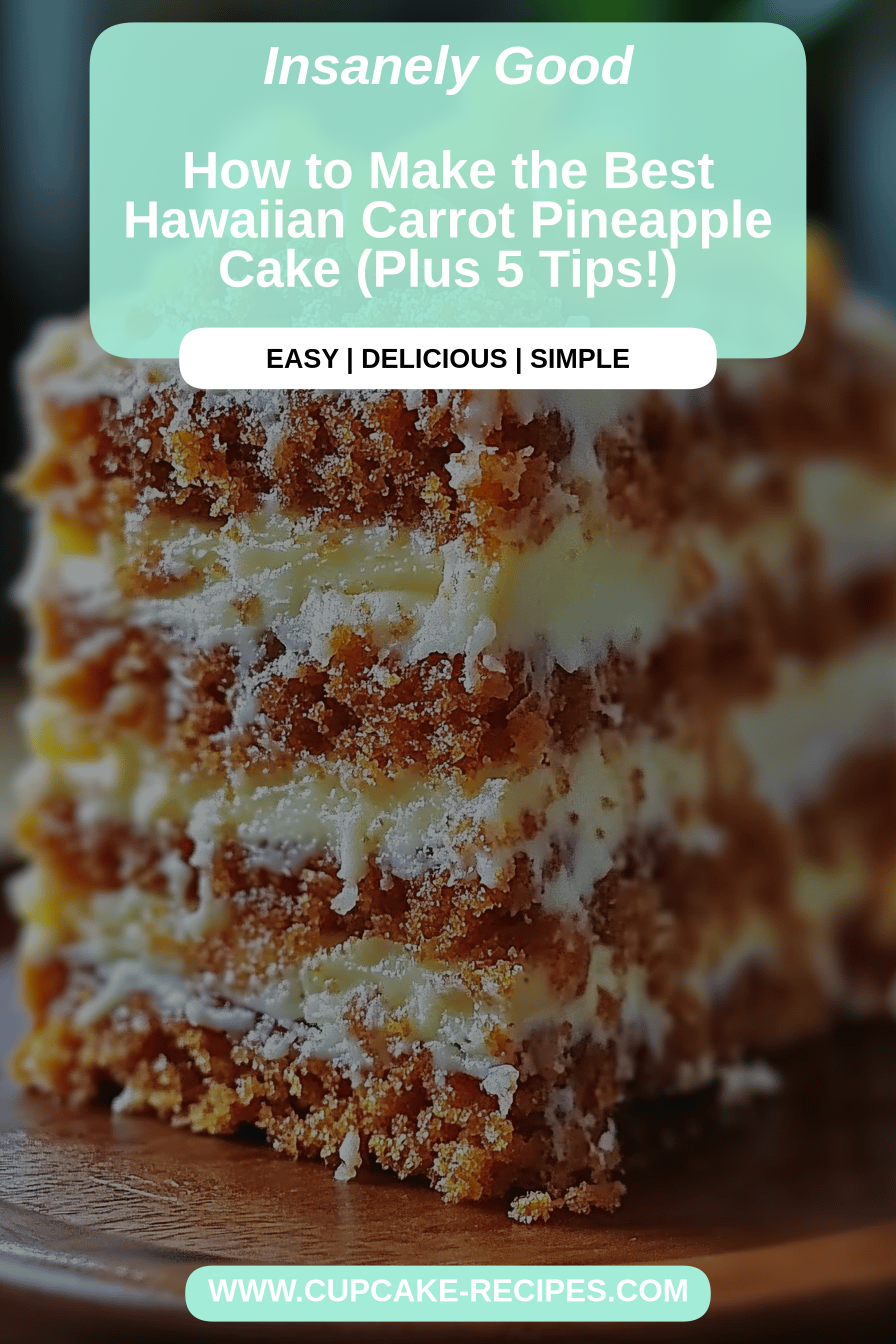
You know, there are some recipes that just feel like a warm hug, a sweet memory, and pure sunshine all rolled into one. This Hawaiian carrot cake is absolutely one of those for me. I can still remember the first time my Grandma introduced me to something similar; it wasn’t quite this recipe, but that hint of tropical sweetness combined with the comforting spice of carrot cake just blew my young mind. It was a revelation! Forget those dense, overly sweet carrot cakes that feel like a chore to get through. This version is light, moist, bursting with flavor, and has this incredible surprise element that makes it totally unforgettable. If you’re a fan of classic carrot cake but are looking for something with a bit more pizzazz, something that transports you straight to a sunny beach with every bite, then you are going to adore this Hawaiian carrot cake. It’s truly a game-changer, and I’ve been perfecting it for years to get it just right.
What is Hawaiian carrot cake?
So, what exactly makes this a “Hawaiian” carrot cake? It’s a really fun twist on the classic, my friends. Think of your favorite, moist, spiced carrot cake – the one with all those lovely warm spices like cinnamon and nutmeg. Now, imagine infusing that with a little bit of paradise. That’s where the “Hawaiian” part comes in! We’re talking about adding a touch of tropical fruitiness that just elevates everything. It’s not overly sweet or cloyingly fruity; it’s more of a subtle, delightful background note that complements the carrots and spices beautifully. It’s essentially a celebration of sunshine and comfort, all baked into one delicious cake. It’s the kind of cake that makes you close your eyes with the first bite and imagine palm trees swaying. It’s familiar enough to be comforting, but exciting enough to be a brand-new adventure for your taste buds.
How do I make Hawaiian Carrot Cake?
Quick Overview
Making this Hawaiian carrot cake is so straightforward, you’ll wonder why you haven’t made it sooner! We’re essentially mixing our dry ingredients, then our wet ingredients, combining them, and folding in our special tropical elements. The magic happens in the oven as it bakes into a beautifully moist and flavorful cake. Then, a simple, dreamy glaze finishes it off. It’s designed for home bakers, with clear steps and foolproof results. No complicated processes, just pure, delicious baking joy.
Ingredients
For the Main Batter:
You’ll need about 2 cups of all-purpose flour – I always like to spoon it into my measuring cup and level it off, rather than scooping directly from the bag. This ensures you don’t pack too much in! Then, 1.5 teaspoons of baking soda and 1 teaspoon of baking powder for a lovely lift. A good teaspoon of ground cinnamon, half a teaspoon of ground nutmeg, and a quarter teaspoon of ground cloves will give it that warm, comforting spice. And don’t forget a pinch of salt to balance all those sweet and spicy notes. I also like to add about 1.5 cups of granulated sugar, but if you’re looking to reduce it slightly, you can get away with 1.25 cups; it will just be a touch less sweet. For richness, we’ll use 3 large eggs, lightly beaten. About 1 cup of a neutral oil, like vegetable or canola oil, is key for that incredible moistness. And then, the star of our carrot component: 2 cups of finely grated carrots. Make sure they’re nice and fine for the best texture. I always grate mine by hand; the food processor can sometimes make them a bit too mushy.
For the Filling:
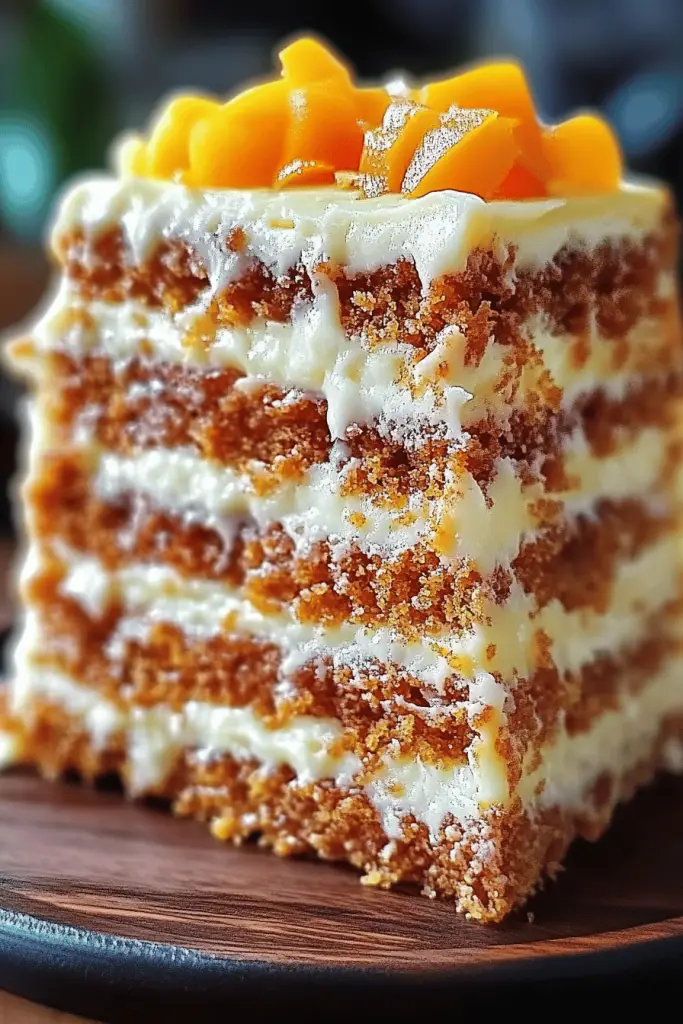
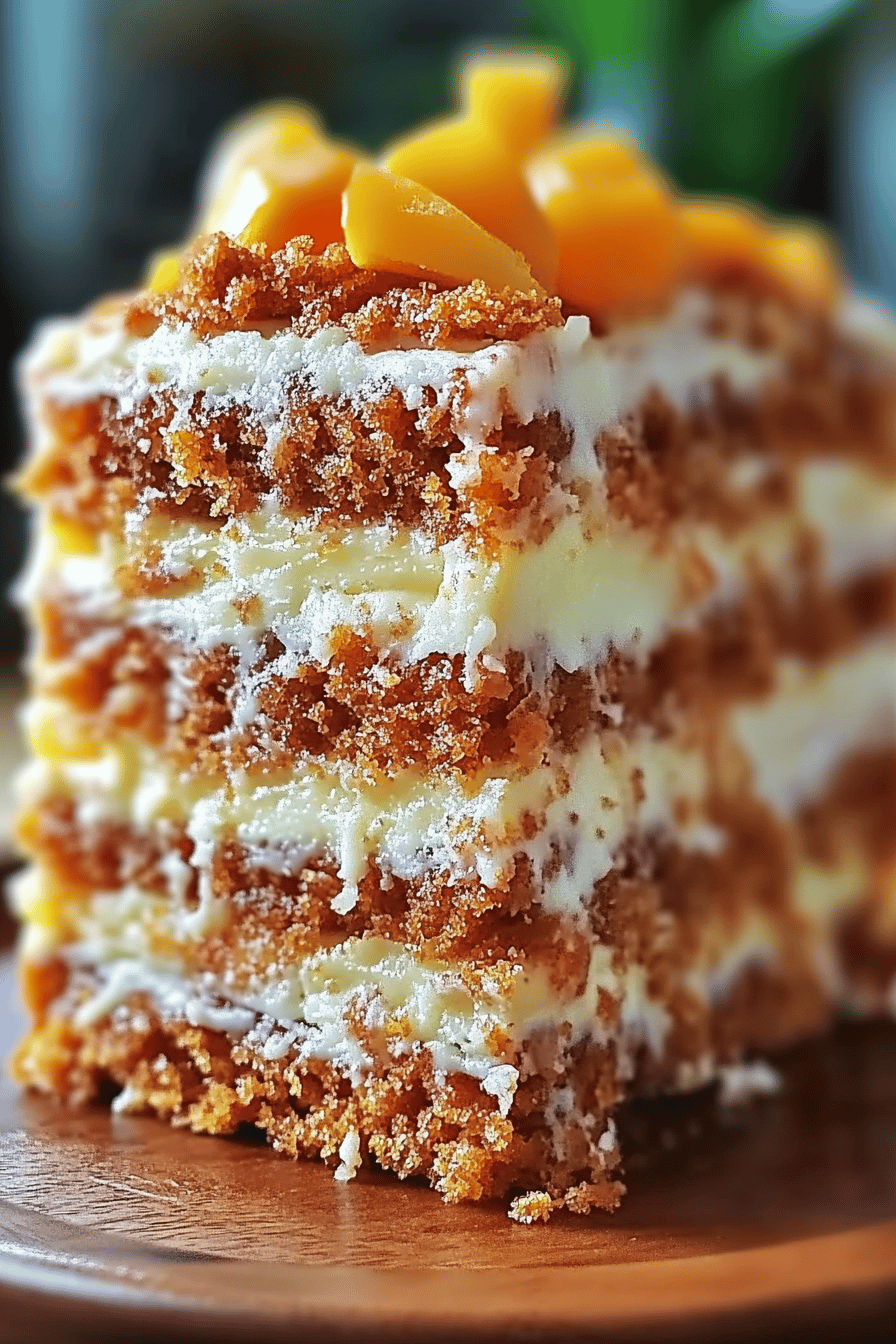
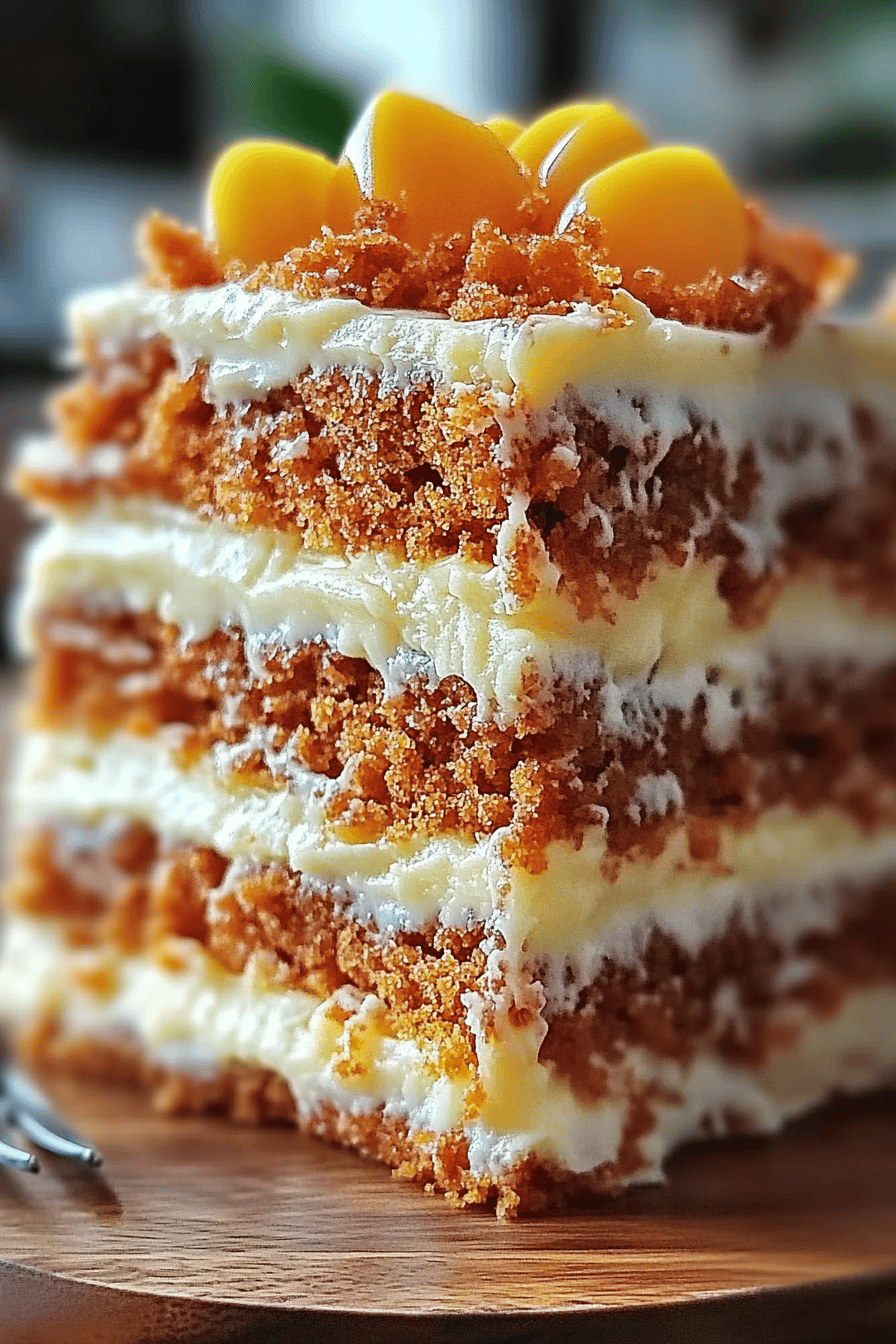
This is where the Hawaiian magic really begins! You’ll need about 1 cup of crushed pineapple, well-drained. Make sure you get out as much liquid as possible so it doesn’t make your batter too wet. I also love to add about half a cup of finely chopped macadamia nuts for that authentic Hawaiian crunch and buttery flavor. If you can’t find macadamia nuts, pecans or walnuts work beautifully too. And for an extra zing, about 1 teaspoon of orange zest. It really brightens everything up!
For the Glaze:
For the glaze, it’s super simple. About 1.5 cups of powdered sugar, sifted if you like it extra smooth. Then, 2-3 tablespoons of milk or cream – I’ve found that using cream makes it a little richer, but milk is perfectly fine. And for that subtle tropical hint, about 1 teaspoon of Vanilla Extract and a tiny squeeze of lime juice, maybe half a teaspoon. It’s optional, but it really does make a difference!
Step-by-Step Instructions
Step 1: Preheat & Prep Pan
First things first, let’s get that oven preheated to 350 degrees Fahrenheit (175 degrees Celsius). This is a pretty standard baking temperature, so most ovens handle it like a pro. Now, grab your baking pan. A 9×13 inch rectangular pan is what I typically use for this recipe, but you could also use two 8 or 9-inch round pans if you prefer to make a Layer Cake. Grease your pan generously with butter or baking spray, and then lightly dust it with flour. Tap out any excess flour. This little step ensures your cake releases beautifully and avoids any frustrating sticking!
Step 2: Mix Dry Ingredients
In a large mixing bowl, whisk together your all-purpose flour, baking soda, baking powder, cinnamon, nutmeg, cloves, and salt. Give it a really good whisk until everything is evenly distributed. This ensures that your leavening agents and spices are spread throughout the batter, so you don’t get any surprise pockets of spice or flatness. It’s also a great way to aerate the flour a bit.
Step 3: Mix Wet Ingredients
In a separate medium bowl, whisk together your granulated sugar and beaten eggs until they’re well combined. Then, slowly drizzle in your neutral oil while whisking continuously. You want to create a smooth, emulsified mixture. Don’t worry if it looks a little glossy; that’s exactly what we’re going for. Stir in your finely grated carrots and the orange zest. Make sure those carrots are nicely coated!
Step 4: Combine
Now, pour the wet ingredients into the bowl with the dry ingredients. Using a spatula or a wooden spoon, gently fold everything together until just combined. Be careful not to overmix! Overmixing develops the gluten in the flour too much, which can lead to a tougher cake. Stop mixing as soon as you don’t see any dry streaks of flour. A few little lumps are perfectly fine; they’ll disappear as the cake bakes.
Step 5: Prepare Filling
This is the fun part! Gently fold your well-drained crushed pineapple and chopped macadamia nuts into the batter. I like to do this right at the end, just before pouring it into the pan. This keeps the pineapple from breaking down too much and ensures you get lovely little pockets of fruit and crunch throughout the cake.
Step 6: Layer & Swirl
Pour the batter evenly into your prepared pan. If you’re making a layer cake, divide the batter equally between the two round pans. Smooth the top with your spatula. For an extra touch of visual appeal, you can add a few extra chopped macadamia nuts sprinkled on top before baking. They’ll toast up beautifully!
Step 7: Bake
Pop your pan into the preheated oven. Bake for about 30-40 minutes for a 9×13 pan, or 25-30 minutes for round pans. The best way to tell if it’s done is by inserting a toothpick into the center of the cake. If it comes out clean, or with just a few moist crumbs attached, it’s ready! If there’s wet batter on it, give it a few more minutes. Oven temperatures can vary, so keep an eye on it towards the end.
Step 8: Cool & Glaze
Once it’s baked, take the cake out of the oven and let it cool in the pan on a wire rack for about 10-15 minutes. Then, carefully invert it onto the wire rack to cool completely. While the cake is cooling, whisk together your powdered sugar, milk or cream, vanilla extract, and lime juice in a small bowl until you have a smooth, pourable glaze. If it’s too thick, add a tiny bit more milk; if it’s too thin, add a bit more powdered sugar. Once the cake is completely cool – and this is important, you don’t want a melted glaze! – drizzle the glaze all over the top. Let the glaze set for a bit before slicing.
Step 9: Slice & Serve
Once the glaze has set, it’s time to slice and serve! I like to use a sharp knife to get clean cuts, especially through the glaze. The aroma alone is incredible. Serve it up and watch it disappear!
What to Serve It With
This Hawaiian carrot cake is so versatile, it’s a welcome guest at pretty much any meal! For breakfast, I love a thick slice with my morning coffee. It’s a little bit of indulgence to start the day, especially on weekends. The bright flavors make it feel lighter than a typical sweet breakfast. For brunch, it’s absolutely divine! I usually serve it alongside fresh fruit salad and maybe some mimosas. It’s elegant enough for guests but still feels wonderfully homey. The colors are so cheerful, too! As a dessert, it’s a stunner. I often serve it with a dollop of freshly whipped cream or a scoop of vanilla bean Ice Cream. The contrast of the warm spices and the cool cream is just heavenly. And for those cozy snack times? Honestly, a simple slice on its own is pure bliss. My family loves it as an after-school treat with a glass of cold milk. It’s just that perfect balance of sweet, spicy, and fruity that satisfies any craving without being too heavy. My personal tradition is to always have a slice with a cup of strong, black tea – it really brings out the spices!
Top Tips for Perfecting Your Hawaiian Carrot Cake
Okay, let’s talk about getting this Hawaiian carrot cake absolutely perfect, every single time. I’ve made this cake so many times, and I’ve learned a few tricks along the way that I just have to share! First, about the zucchini prep – wait, I mean carrots! I always, always grate my carrots finely. Using the small holes on a box grater is my go-to. This ensures they integrate beautifully into the cake batter and become tender without being chunky. If you use the large holes, you can end up with noticeable pieces, which some people don’t mind, but I prefer that super-moist, almost melt-in-your-mouth texture that fine grating provides. I also try to use fresh, vibrant carrots for the best flavor and sweetness. When it comes to mixing, my biggest piece of advice is: do NOT overmix. Seriously. Once you add the dry ingredients to the wet, just fold until they’re *just* combined. You’ll see a few lumps, and that’s okay! Overmixing is the quickest way to a tough, dense cake, and we want tender and light here. For the pineapple filling, the draining is crucial. I cannot stress this enough. I usually give the crushed pineapple a really good squeeze in a fine-mesh sieve or even wrap it in a clean kitchen towel to get out as much liquid as possible. Too much moisture will make your cake soggy and prevent it from baking up properly. When it comes to the swirl, if you were to make a more marbled cake, you’d want to reserve a portion of batter and swirl it in. With this version, the pineapple and nuts are folded in, giving you delicious pockets of flavor and texture throughout, which I find much easier and just as delightful. For baking, trust your oven but also trust the toothpick test! Ovens can be notoriously finicky. I’ve learned to start checking a few minutes before the suggested time, especially if my oven tends to run hot. And if you’re using convection, you might need to reduce the temperature slightly or shorten the baking time. For ingredient swaps, I’ve tested this with almond milk in the glaze, and it worked out beautifully, making it slightly less rich but still delicious. If you’re out of macadamia nuts, chopped pecans or even walnuts are fantastic substitutes. They still provide that lovely crunch. Lastly, for the glaze consistency, it’s all about feel. Start with the lower amount of liquid and add more by the teaspoon until you reach that perfect pourable but not watery consistency. It should coat the back of a spoon nicely.
Storing and Reheating Tips
Keeping this Hawaiian carrot cake tasting amazing is pretty simple, thankfully! If you’re lucky enough to have leftovers (which is rare in my house!), you can store it at room temperature for about 2-3 days, as long as it’s covered tightly. I usually use plastic wrap or an airtight container. This is especially true if the glaze hasn’t fully set or if you’re in a cooler climate. If your kitchen tends to be warm, or if you want it to last a bit longer, the refrigerator is your best friend. Wrap the cake well in plastic wrap, then place it in an airtight container. It should stay fresh in the fridge for up to a week. When you want to serve it, I find it’s best to let it come back to room temperature for about 30 minutes to an hour; this really brings out the flavors and softens the texture. For freezing, this cake does wonderfully! It’s best to freeze it *before* glazing, if possible, or make sure the glaze is fully set and hardened. Wrap the cooled cake (or individual slices) very tightly in a layer of plastic wrap, then a layer of aluminum foil, or place it in a freezer-safe airtight container. It will keep well in the freezer for up to 2-3 months. To thaw, transfer the cake to the refrigerator overnight, and then let it sit at room temperature for a bit before serving. If you freeze it before glazing, you can whip up a fresh batch of glaze once it’s thawed. The key for any storage is ensuring it’s well-sealed to prevent it from drying out or absorbing other odors from the fridge or freezer.
Frequently Asked Questions
Final Thoughts
Honestly, this Hawaiian carrot cake is more than just a recipe to me; it’s a little slice of happy. It’s the kind of cake that brings smiles to faces, sparks conversations, and makes any ordinary day feel a bit more special. It’s proof that you don’t need complicated techniques or fancy ingredients to create something truly delicious and memorable. The blend of warm spices with that subtle tropical fruitiness is just pure magic, and the incredibly moist texture makes it an absolute joy to eat. If you’re someone who loves the comfort of a classic carrot cake but is looking for that extra something to make it sing, I really hope you’ll give this one a try. It’s become a staple in my baking repertoire, and I’m so excited for you to experience it too! If you bake it, please let me know how it turns out in the comments below! I’d love to hear about your own little twists or family reactions. And if you enjoyed this tropical twist, you might also love my recipe for Tropical Mango Bread – it’s got that same sunny vibe!

Hawaiian Carrot Cake
Ingredients
Main Ingredients
- 2 cups all-purpose flour
- 2 teaspoons baking soda
- 1 teaspoon ground cinnamon
- 0.5 teaspoon ground nutmeg
- 0.5 teaspoon salt
- 1.5 cups granulated sugar
- 1 cup vegetable oil
- 4 large eggs
- 1 teaspoon vanilla extract
- 2 cups grated carrots
- 1 cup crushed pineapple, drained
- 1 cup chopped pecans or walnuts
Cream Cheese Frosting
- 8 oz cream cheese, softened
- 0.5 cup unsalted butter, softened
- 1 teaspoon vanilla extract
- 4 cups powdered sugar
Instructions
Preparation Steps
- Preheat oven to 350°F (175°C). Grease and flour a 9x13 inch baking pan.
- In a large bowl, whisk together the flour, baking soda, cinnamon, nutmeg, and salt.
- In another bowl, whisk together the granulated sugar, vegetable oil, eggs, and vanilla extract until well combined.
- Gradually add the wet ingredients to the dry ingredients, mixing until just combined. Do not overmix.
- Fold in the grated carrots, crushed pineapple, and chopped nuts.
- Pour the batter into the prepared baking pan and spread evenly.
- Bake for 30-35 minutes, or until a wooden skewer inserted into the center comes out clean.
- Let the cake cool in the pan for 10 minutes before inverting it onto a wire rack to cool completely.
- While the cake is cooling, prepare the cream cheese frosting. In a medium bowl, beat together the cream cheese and butter until smooth.
- Beat in the vanilla extract. Gradually add the powdered sugar, mixing until smooth and creamy.
- Once the cake is completely cooled, spread the cream cheese frosting evenly over the top.
Notes
Featured Comments
“This cake sounds like pure joy! I can already imagine the tropical vibes and cozy warmth it must bring to any table.”
“This sounds absolutely delicious! I can already imagine the flavors—so comforting and perfect for any occasion.”
“Impressed! Clear steps and super easy results. Perfect for busy nights.”
“New favorite here — turned out amazing. crowd-pleaser was spot on.”
“Super easy and turned out amazing! My family asked for seconds. Saving this one.”
“This sweet treat was absolutely loved — the buttery really stands out. Thanks!”


This sounds absolutely delicious! I can already imagine the flavors—so comforting and perfect for any occasion.
This cake sounds like pure joy! I can already imagine the tropical vibes and cozy warmth it must bring to any table.