

Okay, I have to tell you about something that has seriously become a lifesaver in my kitchen, especially on those nights when everyone’s rushing around and I still want to put something wholesome on the table. You know those days, right? The ones where homework is piling up and the question “What’s for dinner?” hangs heavy in the air. This is my secret weapon: my ultimate nourishing bowls. Honestly, they’re so versatile and packed with goodness, they feel like a hug in a bowl. I’ve made them for picky eaters, busy weeknights, and even for when friends pop over unexpectedly. They remind me a little bit of those fancy restaurant grain bowls, but with the warmth and comfort of something I’ve made myself, with love. It’s the kind of meal that satisfies on so many levels – it’s delicious, it’s good for you, and you can totally customize it to whatever you have in your fridge. Forget complicated recipes; this is all about fresh, vibrant ingredients coming together in the most delightful way. If you love a good Buddha bowl or a hearty salad, you’re going to fall head over heels for these nourishing bowls.
What are nourishing bowls?
So, what exactly *are* these magical nourishing bowls I keep raving about? Think of them as your personalized, perfectly balanced meal, all assembled right there in one bowl! The concept is super simple: you build your bowl with a base, a protein, a bunch of fresh veggies, some healthy fats, and a killer dressing. It’s not just about throwing random things together, though. The magic is in how the flavors and textures complement each other. For me, the “nourishing” part is key – it means it’s not just tasty, but it’s also going to leave you feeling energized and satisfied, not weighed down. It’s the kind of meal that truly fuels your body and soul. I call them nourishing bowls because they’re designed to provide a complete nutritional profile, hitting all the right notes with carbs, protein, healthy fats, and fiber. It’s essentially a really smart, really delicious way to eat well without a lot of fuss. It’s like a culinary blank canvas where you get to be the artist!
How do I make nourishing bowls?
Quick Overview
The beauty of these nourishing bowls lies in their assembly-line nature. You’ll prepare a few core components – a hearty grain base, your protein, a colorful medley of veggies, and a vibrant dressing. Once those are ready, it’s simply a matter of layering everything into a bowl. The key is to have your elements prepped so you can just scoop and go. It’s all about efficiency and deliciousness coming together. This method is a lifesaver when you’re short on time but don’t want to compromise on a healthy, satisfying meal. Trust me, you’ll be amazed at how quickly you can put together such a beautiful and nourishing meal.
Ingredients
For the Base:
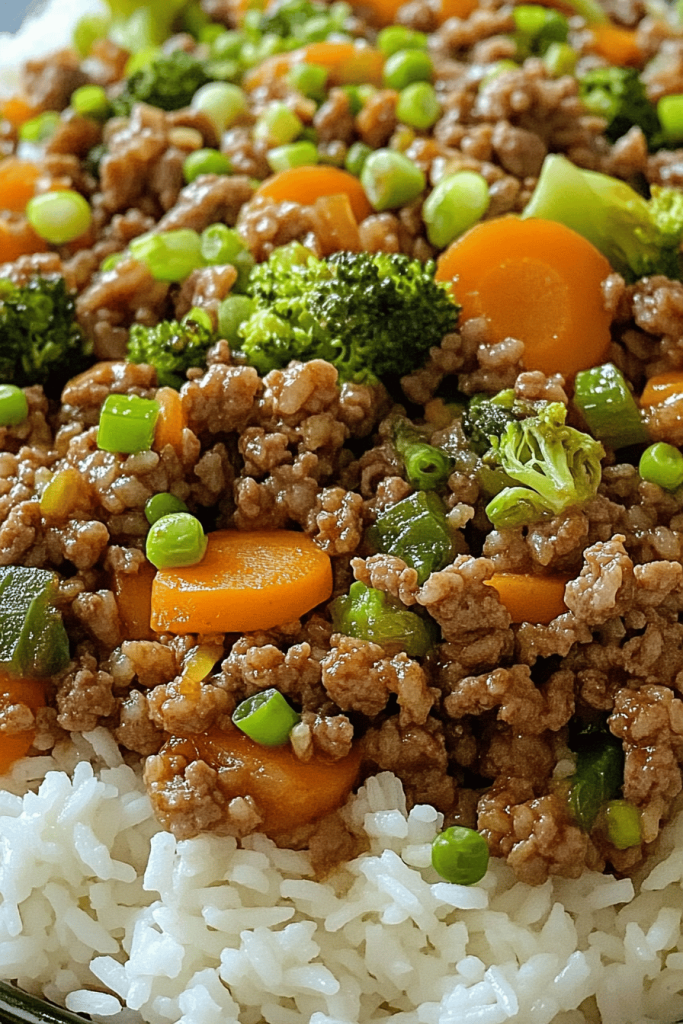
Think of this as the hearty foundation of your bowl. I love using quinoa because it’s a complete protein and has a wonderful, slightly nutty flavor. Brown rice is another excellent, budget-friendly option, though it takes a bit longer to cook. Farro offers a lovely chewy texture, and even couscous works in a pinch if you’re really pressed for time. The key is to cook it until it’s tender but still has a bit of chew to it. I usually cook mine with vegetable broth instead of water for an extra layer of flavor. A good rule of thumb is about 1/2 cup of dry grain per person.
For the protein:
This is where you can really get creative! My absolute favorite for a quick and easy protein is roasted chickpeas. They get wonderfully crispy and are so satisfying. You can toss them with olive oil, salt, pepper, and maybe some smoked paprika or garlic powder before roasting. Grilled Chicken or fish are also fantastic options, as is pan-seared tofu or tempeh for a plant-based powerhouse. If I’m in a super hurry, I’ll even grab a can of high-quality tuna or salmon. Just make sure your protein is well-seasoned; it makes a big difference to the overall flavor of the bowl.
For the Veggies & Toppings:
This is the fun part where you add color, crunch, and all those essential nutrients! I love a mix of raw and lightly cooked or roasted veggies. Some of my go-to’s include:
- Leafy Greens: Spinach, kale, or mixed greens as a base layer.
- Crunchy Veggies: Shredded carrots, thinly sliced bell peppers (any color!), cucumber, radishes.
- Something Roasted or Cooked: Broccoli florets, sweet potato cubes, or Brussels sprouts roasted until tender.
- Creamy Element: Avocado slices or a dollop of hummus.
- Flavor Boosters: Pickled red onions (so easy to make!), a sprinkle of toasted seeds (sunflower or pumpkin are great), a few olives, or some fresh herbs like parsley or cilantro.
The more variety, the better! Don’t be afraid to mix and match whatever looks good to you.
For the Dressing:
A good dressing ties everything together! My current obsession is a simple Lemon-Tahini dressing. It’s creamy, tangy, and uses just a few ingredients. Whisk together 1/4 cup tahini, 2 tablespoons fresh lemon juice, 1 tablespoon olive oil, 1-2 tablespoons water (to thin), a pinch of garlic powder, and salt to taste. If you don’t have tahini, a simple vinaigrette made with olive oil, vinegar (balsamic or red wine), Dijon mustard, and honey works beautifully too. You can also experiment with a peanut dressing or a creamy avocado dressing.
Step-by-Step Instructions
Step 1: Cook Your Base Grain
First things first, get your chosen grain cooking according to package directions. I usually start this when I’m prepping my other ingredients. For quinoa, it’s typically a 1:2 ratio of grain to liquid and about 15 minutes of simmering. For brown rice, it’s longer, closer to 40-45 minutes. Once it’s cooked, I like to fluff it with a fork and let it sit covered for a few minutes. This helps it achieve that perfect texture.
Step 2: Prepare Your Protein
If you’re roasting chickpeas, preheat your oven to 400°F (200°C). Drain and rinse canned chickpeas really well, then pat them thoroughly dry with a paper towel – this is key for crispiness! Toss them with a tablespoon of olive oil, salt, pepper, and your favorite spices. Spread them on a baking sheet and roast for 20-30 minutes, or until they’re golden and slightly crunchy, shaking the pan halfway through. If using chicken or tofu, cook it up according to your preferred method.
Step 3: Chop and Prep Your Veggies
While the grains are cooking and the chickpeas are roasting, wash and chop all your vegetables. Shred the carrots, thinly slice the bell peppers and cucumber, chop any herbs, and cube any sweet potatoes or broccoli you plan to roast. If you’re roasting other veggies along with the chickpeas, toss them in a separate bowl with a little oil and seasoning and add them to the oven for the last 15-20 minutes, depending on what they are.
Step 4: Whisk Up Your Dressing
In a small bowl or a jar, combine all the ingredients for your dressing. Whisk vigorously until smooth and emulsified. Taste and adjust seasonings – more lemon juice for tang, more water to thin, more salt and pepper. If it’s too thick, add a tiny bit more water until it reaches your desired consistency. I often make a little extra dressing to drizzle over the top or to use for another meal.
Step 5: Assemble Your Bowls
Now for the fun part! Grab your favorite bowls. Start by placing a generous scoop of your cooked grain at the bottom. Then, artfully arrange your protein, your various veggies, and any other toppings around the bowl. Think about creating little sections for each ingredient so they stand out visually. Don’t overthink it; make it look appealing to you!
Step 6: Drizzle and Enjoy!
Generously drizzle your delicious dressing over everything. You can do a light drizzle or really drench it – whatever makes you happy! Give it a gentle toss with your fork if you like, or just dig in as is. The goal is to enjoy every single component in harmony. It’s that simple!
What to Serve It With
These nourishing bowls are practically a meal in themselves, but they also pair wonderfully with a few other things depending on the vibe you’re going for! For breakfast, a simple bowl topped with some Greek yogurt and berries can be a fantastic start. Or, if you’re having them for a more substantial brunch, serve them alongside a freshly squeezed juice or a light sparkling water with lemon. As a dessert, it’s a bit unconventional, but if you’ve made a sweeter variation of the bowl (think quinoa with cinnamon, roasted apples, and a drizzle of maple syrup), a small scoop can be surprisingly satisfying and light. For those cozy snack times when you just need something good for you, I often just enjoy a smaller portion of a particularly veggie-heavy bowl on its own. It’s the perfect way to get that much-needed boost of energy without feeling heavy. My family also loves these bowls with a side of warm, crusty bread for dipping into any extra dressing, or sometimes I’ll make a batch of simple homemade pickles to add an extra pop of flavor and crunch. It’s all about creating a complete and satisfying experience!
Top Tips for Perfecting Your Nourishing Bowls
Okay, let’s talk about leveling up your nourishing bowl game. I’ve made these countless times, and I’ve picked up a few tricks along the way that I just have to share! First, for your grain base, don’t be afraid to cook it in broth instead of water – it adds so much more depth of flavor without any extra effort. And a pro tip for grains like quinoa or rice: toast them lightly in the pot with a tiny bit of oil before adding the liquid. It really brings out their nutty flavor and gives them a better texture. When it comes to your veggies, mix it up! I always aim for a combination of raw and cooked. Roasting vegetables like broccoli, sweet potatoes, or Brussels Sprouts brings out their natural sweetness and adds a lovely caramelization. A little bit of char is a good thing! For the raw veggies, focus on crunch. Thinly sliced radishes, crisp bell peppers, and crunchy cucumber add a refreshing contrast to softer elements. For your protein, make sure it’s seasoned well. Bland protein is a bowl-killer! A simple marinade for chicken or tofu, or well-spiced roasted chickpeas, makes all the difference. Don’t shy away from herbs either – fresh cilantro, parsley, or mint can really brighten things up. My biggest secret for dressings? Make a little extra! It’s so handy to have a stash in the fridge for quick lunches or to add to other meals. If your tahini dressing is too thick, a splash of warm water works wonders. If it’s too thin, a bit more tahini will thicken it right up. And don’t be afraid to experiment with flavor combinations in your dressing – a little chili flake, ginger, or a dash of soy sauce can transform it! For visual appeal, think about color. Try to include a rainbow of ingredients in your bowl – it not only looks beautiful but also ensures you’re getting a wide range of nutrients. Finally, organization is key! I often prep my grains, roast my veggies and chickpeas, and make my dressing on a Sunday. Then, during the week, it’s just a matter of assembling. This makes weeknight meals a breeze and helps avoid that dreaded “what do I have to eat?” panic.
Storing and Reheating Tips
One of the best things about nourishing bowls is how well they store, making them perfect for meal prep! If you’ve assembled a whole bowl and want to store it for later, cover it tightly with plastic wrap or put it in an airtight container. It will keep well in the refrigerator for about 2-3 days. The grains and cooked components tend to hold up best. For components, like cooked grains, roasted veggies, or protein, store them separately in airtight containers in the fridge. They should last for about 3-4 days. This allows you to mix and match throughout the week for fresh bowls. If you’re planning to freeze components, grains like quinoa and brown rice freeze beautifully. Let them cool completely, then store them in freezer-safe bags or containers for up to 2-3 months. Roasted vegetables also freeze okay, though they might be a bit softer when thawed. For the dressing, it will keep in an airtight container in the fridge for about a week. I find it’s best to store any assembled bowls *without* the dressing on them, and then add it right before serving. This prevents the greens from wilting and keeps everything nice and fresh. When reheating, you can gently warm the grains and protein in the microwave or on the stovetop, or enjoy them cold if you prefer! If you’ve included avocado or fresh greens, it’s always best to add those just before eating.
Frequently Asked Questions
Final Thoughts
So there you have it – my ultimate guide to creating those fantastic, adaptable nourishing bowls that have become such a staple in my home. I really hope you’re feeling inspired to give them a try! They’re more than just a meal; they’re a canvas for your creativity, a way to pack in all sorts of goodness, and a seriously delicious solution for busy days. I’ve made these for so many people, and the reactions are always the same: surprised by how easy it is, and delighted by how satisfying and tasty it is. If you’re looking for other equally wholesome and delightful recipes, you might also enjoy my recipe for [Link to another relevant recipe, e.g., “Hearty Lentil Soup”] or my guide to [Link to another relevant recipe, e.g., “Quick and Easy Stir-fries”]. These often use similar principles of fresh ingredients coming together harmoniously. I can’t wait to hear how your nourishing bowls turn out! Please feel free to share your own favorite ingredient combinations or dressing ideas in the comments below. Your feedback always inspires me, and I love seeing how you put your own spin on things. Happy building, and even happier eating!
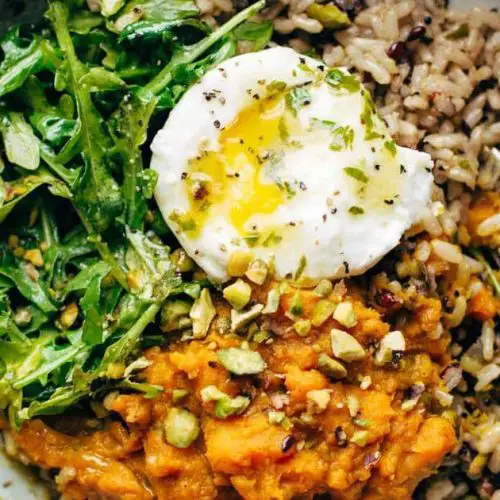
Nourishing Bowls with Turmeric Sweet Potatoes and Lemon Dressing
Ingredients
Turmeric Mashed Sweet Potatoes
- 2 large sweet potatoes cut into chunks
- 0.5 swish olive oil
- 2 teaspoons turmeric
- 2 cloves garlic minced
- 2 cups vegetable broth
Lemon Dressing
- 0.25 cup lemon juice
- 0.33 cup olive oil
- 1 small clove garlic
- 2 teaspoons agave
- 0.25 cup parsley leaves
- 0.25 teaspoon salt more to taste
For Serving
- poached or scrambled eggs
- brown rice or quinoa
- arugula or spinach or greens
- pistachios or other nuts for topping
Instructions
Preparation Steps
- TURMERIC MASHED SWEET POTATOES: Heat the sweet potatoes with olive oil in a skillet over medium high heat. Add the turmeric and toss to coat. Add the garlic and vegetable broth. Simmer until the potatoes are soft and the liquid is almost all absorbed. Transfer to a small bowl and mash. Season with salt and pepper and/or a touch of cream if you want to be lush about it.
- DRESSING: Pulse all ingredients in a blender or food processor. Season to taste.
- BOWLS: Toss the greens with a little dressing. You can also stir a little dressing into the sweet potatoes – that’s yummy. Serve each bowl with the mashed sweet potatoes, brown rice, greens, and a scrambled or poached or fried egg. Top with more dressing and a handful of pistachios.
Notes
Featured Comments
“I totally get it—those busy nights are the hardest! This bowl idea is such a game-changer for quick, healthy meals.”
“Impressed! Clear steps and spot on results. Perfect for busy nights.”
“New favorite here — absolutely loved. crowd-pleaser was spot on.”
“Super easy and turned out amazing! My family asked for seconds. Saving this one.”
“This sweet treat was absolutely loved — the hearty really stands out. Thanks!”
“Made it tonight and wow — spot on! Will definitely make Healing Bowls Nourish Your Body again.”


I totally get it—those busy nights are the hardest! This bowl idea is such a game-changer for quick, healthy meals.