

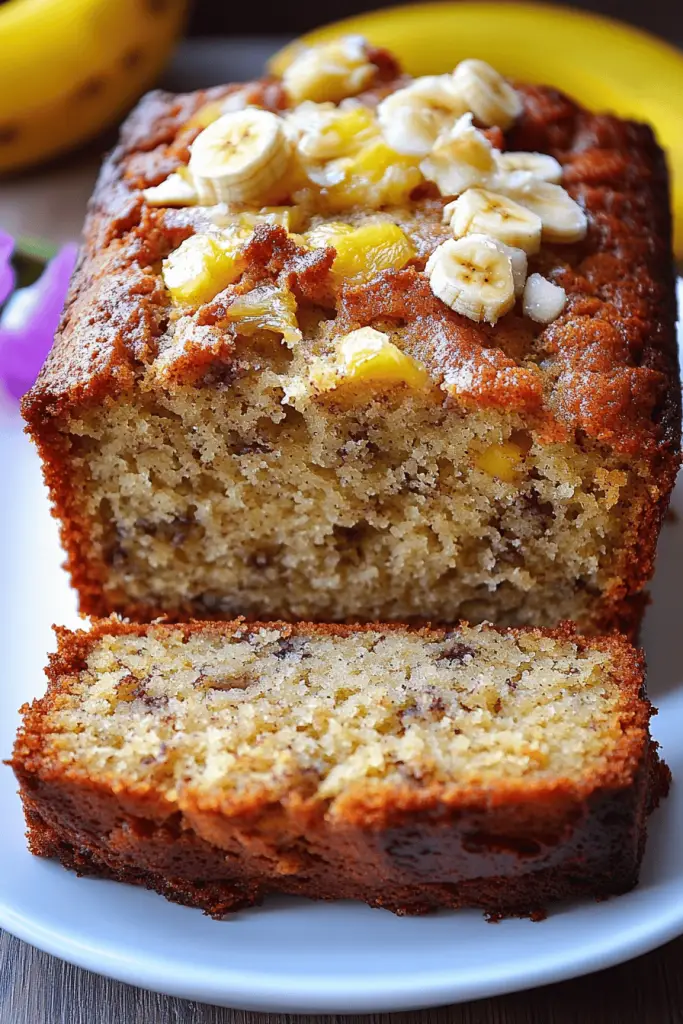
There’s something magical about the scent of Banana Bread wafting through a kitchen. It takes me back to weekend mornings at grandma’s house, when the window caught a breeze just right and the oven hummed like a cozy little engine. I’d hover by the counter, watching the batter turn silky as I mashed the brown bananas with a fork, listening to the clink of measuring cups and the soft clatter of spoons. This version—my healthy banana bread—has all that warmth, but with a lighter touch. Think moist, banana-forward sweetness, wrapped in a wholesome hug of oats, yogurt, and a hint of cinnamon. It’s not just a treat; it’s a loaf I actually reach for on busy days, since it handles my morning rush and still tastes like a well-loved dessert. If you’ve ever compared banana bread to a familiar, comforting friend, this one is the saner, morning-ready cousin who still brings the nostalgia. And yes, I’ve tested it countless times, adjusting sweetness and balance until it felt exactly right—a loaf that can sit proudly on the table, or slip into lunchboxes with ease. This healthy banana bread is the kind of recipe you keep coming back to, again and again.
What is healthy banana bread?
Healthy Banana Bread is essentially a gentler, more fiber-friendly take on the classic loaf. Think of it as a banana-forward cake that leans on oats, whole-wheat flour, and yogurt for moisture and structure, rather than loads of butter or refined sugar. The result is a loaf that’s still rich and comforting, with a crumb that stays tender without feeling heavy. The name says it all: you can enjoy that familiar banana sweetness, but with smarter swaps that keep you satisfied longer. For me, the concept is simple—use ripe bananas as the natural sweetness, boost the texture with oats for a bit of chew, and balance sugars with a touch of honey or maple syrup. The feel is homey, the flavor deeply banana-y, and the aroma is the kind that makes your kitchen feel instantly inviting. It’s essentially the same appeal as a traditional banana bread, just with a healthier spin that doesn’t skimp on flavor. If you’re looking for a bake that your kids will request again and again, this is the one you’ll reach for when you want a little indulgence that doesn’t derail the day.
How to Make Healthy Banana Bread
Quick Overview
This healthy banana bread comes together in a snap: whisk the dry ingredients, whisk the wet ingredients, then fold them together just until they’re combined. The key is to not overmix—stir just enough to bring the batter together and keep that tender crumb. If you’re feeling fancy, you can swirl in a little cream cheese or Peanut Butter for a luscious filling, then bake until the edges begin to pull away from the pan. The loaf is done when a toothpick inserted into the center comes out with a few moist crumbs clinging to it. It’s a loaf you can bake early in the day and have ready to slice by teatime, or freeze in slices for quick breakfasts. It’s not only forgiving, it’s forgivingly delicious.
Ingredients
For the Main Batter:
- 2 cups mashed ripe bananas (about 4 medium bananas)
- 1 3/4 cups whole wheat flour
- 1/2 cup old-fashioned rolled oats
- 1/2 cup plain Greek yogurt (full-fat or 2% works best for moisture)
- 1/3 cup honey or maple syrup (adjust to taste)
- 2 large eggs, room temperature
- 1/4 cup melted coconut oil or neutral oil
- 1 teaspoon vanilla extract
- 1 teaspoon baking soda
- 1/2 teaspoon baking powder
- 1/2 teaspoon salt
- 1 teaspoon ground cinnamon
- Optional: 1/2 cup chopped walnuts or dark chocolate chips
For the Filling:
- Optional swirl of cream cheese: 4 oz light cream cheese, softened, whisked with 1–2 tablespoons honey
- Optional peanut butter swirl: 3 tablespoons natural peanut butter whisked with 1 teaspoon honey
For the Glaze:
- 2 tablespoons Greek yogurt
- 1–2 teaspoons maple syrup or honey
- Optional splash of milk to reach desired consistency
- Optional lemon zest for brightness
Step-by-Step Instructions
Step 1: Preheat & Prep Pan
Heat the oven to 350°F (175°C). Lightly grease a standard 9×5-inch loaf pan or line it with parchment for easy removal. If you’ve got parchment, a quick spray helps the edges release with no tearing. This is the moment I drizzle a little oil on the pan and press in a skinny strip of parchment so I can lift the loaf out in one piece after cooling. It’s a tiny ritual, but it saves a lot of crumbling when you slice.
Step 2: Mix Dry Ingredients
In a large bowl, whisk together the whole wheat flour, oats, baking soda, baking powder, salt, and cinnamon. I like to whisk until everything is nicely distributed—catching little pockets of flour matters here so you don’t end up with dense, floury bites. The oats give a subtle chew that keeps the crumb from feeling too cake-like, which is exactly how I like my banana bread to feel.
Step 3: Mix Wet Ingredients
In another bowl, mash the bananas until mostly smooth but with a few small lumps for texture. Whisk in the eggs, yogurt, melted oil, honey, and vanilla. The warmth of the eggs and the yogurt helps keep everything moist, and you’ll notice the batter coming together with a glossy, inviting sheen. If you’re using a darker banana batch, you’ll see a richer brown color—this often translates to deeper banana flavor, which I’m a fan of.
Step 4: Combine
Pour the wet ingredients into the dry and fold gently with a spatula until just combined. It’s okay if there are a few streaks of flour; a few gentle turns is all it takes. Overmixing is a surefire way to a dense loaf, and nobody wants that. If you’re adding chocolate chips or nuts, fold them in now so they distribute evenly without breaking apart the batter.
Step 5: Prepare Filling
If you’re going for a swirl, mix your filling ingredients in a small bowl and have it ready. A cream cheese swirl adds a tangy creaminess that contrasts beautifully with the ripe banana sweetness. A peanut butter swirl gives a nutty, savory contrast. I’ll often swirl in half the batter with the filling, then layer the rest on top for a pretty marble effect. If you’re not using a filling, you can skip this step entirely and simply bake as-is for a straightforward loaf that still sings with flavor.
Step 6: Layer & Swirl
Pour half the batter into the prepared pan, then drop spoonfuls of your swirl in a few places. Gently swirl with a knife to create ribbons, being careful not to overdo it—you want a delicate marbling, not a completely muddled mix. Top with the remaining batter and do a final gentle swirl. The goal is to have visible streaks of filling peeking through the surface for that inviting, homemade look.
Step 7: Bake
Bake for 55–65 minutes, or until a toothpick inserted into the center comes out with a few moist crumbs. Oven temperatures can vary, so if your loaf starts browning too quickly, cover loosely with foil after the first 25–30 minutes. I’ve learned to watch for that perfect moment when the crust is golden and the middle is set but still a touch springy. If you have a thermometer, 205–210°F (96–98°C) in the center is a good target. The aroma alone is a sign you’ve got something comforting in the works.
Step 8: Cool & Glaze
Let the loaf cool in the pan for about 15 minutes, then transfer to a rack to finish cooling. Patience at this stage is key—the crumb needs to settle before you slice, otherwise it tends to crumble. If you’re glazing, whisk together the yogurt, maple, and a splash of milk to reach a pourable consistency. Drizzle once cooled and set, or serve with the glaze on the side for dipping. The glaze adds a bright contrast without making the loaf feel heavy, and it’s easy to adjust sweetness to your liking.
Step 9: Slice & Serve
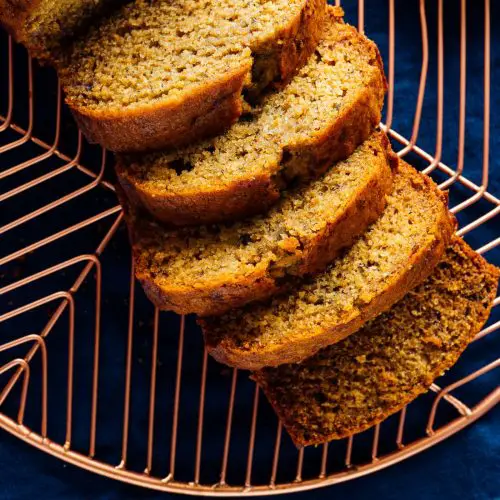
Use a sharp serrated knife to slice cleanly. I like a thickness that feels substantial but not bulky—about 1/2 inch slices. This loaf shines at room temperature, but I’ll happily toast a slice for a warm treat at breakfast or a bedtime snack. If you’ve got leftovers, wrap tightly in parchment and store in the refrigerator for up to four days, or freeze individual slices for quick breakfasts during the week. Toasted lightly, the flavors wake up in a wonderfully comforting way, and the texture remains moistened by the yogurt and banana—proof this healthy banana bread travels well in any season.
What to Serve It With
This loaf pairs with so many things, it’s almost unfair. It’s gentle enough for breakfast, luxe enough for a brunch, and comforting as a dessert when you want something not-too-sweet. Here are a few ideas I’ve tested and loved with this healthy banana bread.
For Breakfast: Serve a warm slice with a cup of strong coffee or a glass of cold milk. Top with a thin smear of almond butter and a few banana slices for an extra nourishing start. I like a sprinkle of cinnamon on top for a morning aroma that lingers all the way to the commute.
For Brunch: Plate with a dollop of Greek yogurt, a handful of berries, and a drizzle of maple syrup. Add a small fruit salad on the side and a hot pot of tea for a light, comforting spread that feels special without being fussy.
As Dessert: A light dusting of powdered sugar plus a teaspoon of lemon zest makes it subtly fruity and bright. Pair with vanilla ice cream for a quick, elegant finish, or keep it dairy-free with coconut yogurt and toasted nuts for texture contrast.
For Cozy Snacks: Slice thinly and toast until the edges are crisp. A warm slice partnered with a mug of cocoa or chai tea turns a simple snack into a little family moment. I keep a loaf on the counter for those late-night cravings—this healthy banana bread is my stash-safe treat that never feels wrong to reach for.
Top Tips for Perfecting Your Healthy Banana Bread
These little tricks have saved me more times than I care to admit, and they make a noticeable difference in texture and flavor. The first few loaves taught me that patience and small tweaks can elevate a humble loaf into something that feels special.
Banana Prep: Use very ripe bananas with a sweet nose and dark spots. The natural sugars will deepen the flavor and keep the loaf moist. If your bananas are underdone, you can bake them a little longer or rely on yogurt to bring moisture back into balance. I always mash until mostly smooth with a few small lumps for texture; that balance keeps the batter from feeling too uniform.
Mixing Mastery: Don’t overmix. A few streaks of flour left in the bowl are perfect. Overmixing develops gluten too much, which makes the crumb tougher. I fold with a gentle hand and stop as soon as the batter looks cohesive. If you’re adding mix-ins like walnuts or chips, sprinkle them in last and give a few gentle turns to distribute.
Swirl Customization: The swirl is optional, but I adore it for extra visual appeal and a little creaminess. Keep your fillings cold until ready to use so they don’t melt into the batter too quickly. For a lighter swirl, use a thinner filling and create more delicate ribbons.
Ingredient Swaps: If you’re out of yogurt, a bit of milk mixed with a teaspoon of lemon juice can stand in for tang. Oats add texture but you can swap some of the flour for more oats if you want a heartier bite. For a dairy-free version, use a neutral oil and dairy-free yogurt alternatives, like almond or soy yogurt; the crumb stays tender, and you still get that banana-driven flavor.
Baking Tips: Every oven is a little different, so start checking at 55 minutes and use the toothpick test as your guide. If the top browns too quickly, tent with foil. If your loaf sinks in the center after you pull it from the oven, that’s usually a sign the center needed a few extra minutes—give it 5–7 minutes more and test again. Position the rack in the center of your oven so heat circulates evenly around the loaf.
Glaze Variations: For a thicker glaze, use more yogurt and less milk; for a glaze you can drizzle, thin it with a splash of milk and a pinch of zest. A lemon or orange zest adds brightness that pairs nicely with the banana’s sweetness. If you prefer a dairy-free glaze, whisk maple syrup with almond milk until you reach your desired drizzled consistency.
In practice, these tweaks have transformed how I bake this loaf. I’ve swapped in almond butter for part of the oil, tested Greek yogurt in place of a portion of the banana, and even experimented with a cocoa-streaked version for a chocolatey twist. The core remains the same: a moist, banana-forward loaf that’s approachable, forgiving, and deeply comforting. This isn’t just a recipe; it’s a little ritual I repeat when I want the house to smell like a hug and the day to slow down a notch.
Storing and Reheating Tips
Proper storage can mean the difference between a loaf that tastes fresh and one that dries out. I keep a loaf tightly wrapped at room temperature for a couple of days, and if the weather is humid, I pop it into the fridge to maintain moisture. Slices freeze beautifully, which is how I usually handle extra loaves—wrapped individually in parchment, then placed in a freezer bag for quick future breakfasts. Thaw at room temperature or toast lightly to wake up the flavors again. If you glaze, keep the glaze separate until serving; it’s easy to warm the slices and let the glaze melt over for a glossy finish.
Room Temperature: 2–3 days wrapped tightly in parchment or stored in an airtight container. Keep away from direct sunlight to preserve moisture. If your kitchen runs warm, consider refrigerating after day two to prevent the loaf from becoming overly soft.
Refrigerator Storage: Up to 5 days sealed in a container. The loaf stabilizes and the flavors meld a bit more, which some people actually prefer. Bring to room temperature or warm gently before serving for a comforting texture.
Freezer Instructions: Freeze individual slices or the whole loaf wrapped well in plastic wrap, then in foil or a sturdy freezer bag. It will keep for up to 3 months. Thaw in the fridge or on the counter, then reheat in the toaster oven or a quick 5-minute warm-up in a low oven. The banana flavor actually intensifies a touch after freezing, which I find absolutely delicious.
Glaze Timing Advice: If you’re freezing the loaf, skip glazing until you plan to serve. A light glaze can be added after thawing for a fresh finish, or you can pair a glaze with the warm, toasted aroma of the bread as you plate it for serving. Either way, the bread remains tender and the flavors stay vibrant.
Frequently Asked Questions
Final Thoughts
This healthy banana bread isn’t just a recipe; it’s a small ritual that I reach for when I want something that feels like a hug from the inside out. It’s forgiving, flavorful, and deeply comforting without tipping into dessert territory. The balance of moist crumb, banana sweetness, and cinnamon warmth makes it feel like a home-cooked treasure that everyone can enjoy, from the teen who loves it after school to visiting friends who need a little sweetness in their day. If you’re chasing a loaf that’s satisfying but not indulgent, this is the one you’ll reach for again and again. I hope you’ll try it, tweak it to suit your pantry, and make it your own. And I’d love to hear how yours turns out—share your variations, your favorite fillings, or your go-to glaze in the comments. Happy baking!
Love this kind of comfort? If you enjoyed this healthy banana bread, you might also like my wholesome apple swirl loaf or my almond-berry breakfast loaf—both share the same cozy vibe and simple, real-food approach. And as always, thank you for letting me share a piece of my kitchen with you. Your feedback, your tweaks, and your own family memories are what make these recipes even brighter.
Note: If you’re reading this on a phone, you can save the recipe card by tapping the image below and keeping a little batch of goodness ready for the week ahead.

Want to stay in the loop for more cozy, practical recipes? Subscribe for updates, or share your own banana-bread moments in the comments. I can’t wait to hear how your loaf turns out and what little twists you discover along the way.
Healthy Banana Bread
Ingredients
Main Ingredients
- 3 large ripe bananas
- 0.5 cup unsweetened applesauce
- 0.33 cup melted coconut oil
- 0.5 cup maple syrup
- 1 teaspoon vanilla extract
- 2 large eggs
- 1.5 cups whole wheat flour
- 1 teaspoon baking soda
- 0.5 teaspoon salt
- 1 teaspoon cinnamon
- 0.5 cup chopped walnuts or pecans optional
Instructions
Preparation Steps
- Preheat oven to 350 degrees F (175 degrees C). Grease and flour a 9x5 inch loaf pan.
- In a large bowl, mash the ripe bananas with a fork until mostly smooth.3 large ripe bananas
- Stir in the unsweetened applesauce, melted coconut oil, maple syrup, and vanilla extract. Mix well.3 large ripe bananas
- Whisk in the eggs, one at a time, until fully incorporated.3 large ripe bananas
- In a separate bowl, whisk together the whole wheat flour, baking soda, salt, and cinnamon.3 large ripe bananas
- Add the dry ingredients to the wet ingredients and stir until just combined. Do not overmix.
- Fold in the chopped nuts, if using.3 large ripe bananas
- Pour the batter into the prepared loaf pan and spread evenly.
- Bake for 55-65 minutes, or until a wooden skewer inserted into the center comes out clean.
- Let the banana bread cool in the pan for 10 minutes before transferring it to a wire rack to cool completely.
Notes
Featured Comments
“This banana bread recipe sounds amazing—I can almost smell it baking! It brings back such warm, nostalgic feelings.”
“Impressed! Clear steps and crowd-pleaser results. Perfect for busy nights.”
“New favorite here — restaurant-level. crowd-pleaser was spot on.”
“Super easy and turned out amazing! My family asked for seconds. Saving this one.”
“This sweet treat was absolutely loved — the light really stands out. Thanks!”
“Made it tonight and wow — crowd-pleaser! Will definitely make healthy banana bread again.”


This banana bread recipe sounds amazing—I can almost smell it baking! It brings back such warm, nostalgic feelings.