


I still remember the first time I bit into a soft, warm bun that felt like a little pillow for my burger. The aroma of milk, butter, and a hint of sweetness filled the kitchen, and my heart did a little happy dance. These days, I reach for homemade burger buns on busy weeknights because they’re forgiving, surprisingly quick, and they make every burger feel special. There’s something about the crust giving way to a fluffy interior that makes toppings sing. This is one of those recipes that travels from my grandmother’s blue enamel pot to my own countertop, and now it travels straight to your kitchen too. If you’ve ever been disappointed by store-bought buns that collapse the moment the sauces hit them, you’re going to love how sturdy and tender these are. This is homemade burger buns, done with heart and a little bit of kitchen magic. I make them with a splash of milk for richness, a touch of sugar for color, and plenty of patience for that perfect rise—and I promise you, the payoff is worth it.
What is a burger bun?
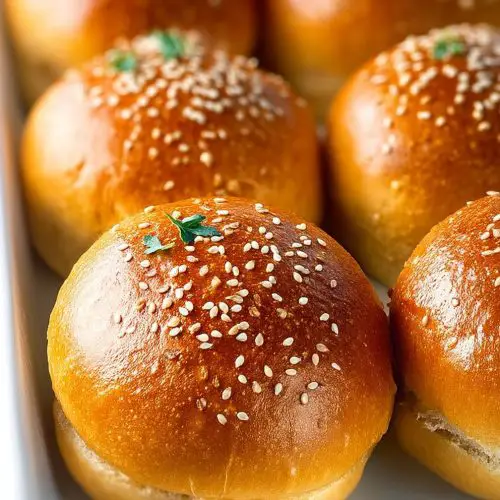
Think of homemade burger buns as the soft, sturdy cradle for your burger dreams. It’s essentially a enriched yeasted bread, lightly sweet and beautifully airy, with a glossy crust that stays tender rather than getting hard or hollow like some store variants. The name is simple: you’re baking buns at home specifically to cradle a juicy patty, crisp lettuce, a slice of cheddar, and all the sauces you love. The idea behind these buns is to give you a reliable, everyday roll that stands up to toppings without crumbling. I love that they’re versatile enough for slider-sized versions or larger for full‑size burgers. They’re not intimidating, and with a gentle knead and a patient rise, you’re rewarded with bread that smells like Sunday mornings and tastes like childhood nostalgia—plus you can customize the toppings and even the glaze to your mood. This is home cooking at its coziest: a simple dough, a warm kitchen, and a bun that makes your patty feel treasured.
How to Make Homemade Burger Buns
Quick Overview
This method is all about ease and reliability. You’ll mix dry ingredients, whisk wet ones, combine into a soft dough, let it rise until puffy, shape into rounds, and bake until the crust just blushes golden. The result is buns with a tender crumb, a gentle sweetness, and enough sturdiness to hold saucy toppings without breaking apart. If you’ve got a busy evening ahead, you’ll be surprised at how quickly these come together once you’ve got your mise en place set. Remember, the key is a light touch when shaping and a patient rise—that’s where the magic happens. This is the moment where your kitchen smells like Sunday, even on a Thursday.
Ingredients
For the Main Batter:
- 2 1/4 cups (280 g) all-purpose flour or bread flour, plus extra for dusting
- 1 tablespoon granulated sugar
- 1 teaspoon instant yeast
- 1/2 teaspoon fine sea salt
- 3/4 cup (180 ml) warm milk, ideally 100–110°F (38–43°C)
- 1 large egg, room temperature
- 2 tablespoons unsalted butter, melted (or extra-virgin olive oil) and cooled
For the Filling:
- Optional: 2 tablespoons sesame seeds or poppy seeds for topping
- Optional: 1 tablespoon grated Parmesan or hard cheese for a savory crust
- Optional: 1 teaspoon garlic powder or minced fresh herbs folded into the dough for extra aroma
For the Glaze:
- 1 large egg, beaten with 1 tablespoon water for an egg wash (or use milk for a softer finish)
- Optional: extra sesame seeds or black sesame for topping
Step-by-Step Instructions
Step 1: Preheat & Prep Pan
Heat your oven to 375°F (190°C). Line a rimmed baking sheet with parchment paper or a silicone mat. This is the stage where you’re already smelling the bakery magic, and it’s a good reminder that you’re about to treat your patty like a star. If you have a kitchen scale, weigh your flour and milk for accuracy, but cups work just fine for a home cook in a pinch. Have a clean bench or countertop ready for shaping, and keep a little extra flour nearby to prevent sticking.
Step 2: Mix Dry Ingredients
In a large bowl, whisk together flour, sugar, yeast, and salt. The texture should look a little sandy and feel like soft, dry sand between your fingers. I like to run my finger along the rim to ensure there’s no clumping of salt or yeast—salt can slow the yeast if it meets it directly, so mixing is your friend here. If you’re using instant yeast, you can skip a separate activation step; it’ll wake up as soon as it touches the warm wet ingredients.
Step 3: Mix Wet Ingredients
In a separate bowl, whisk warm milk, egg, and melted butter until smooth. The milk should be warm, not hot (you shouldn’t scramble the egg). The butter lends a soft crumb and a rich aroma that makes these buns feel indulgent, even though they’re comfort food through and through.
Step 4: Combine
Pour the wet mixture into the dry ingredients and stir with a wooden spoon or your hands until a shaggy dough forms. Scrape the bowl, then knead gently on a lightly floured surface for about 4–6 minutes, just until it comes together and becomes smoother. You want a dough that’s tacky but not sticky. If it’s sticking, dust with a touch more flour; if it’s dry, a teaspoon of milk at a time. Overkneading makes the crumb tight, so keep it kind and brief.
Step 5: Prepare Filling
If you’re adding toppings or flavors, this is the moment to incorporate them. A pinch of garlic powder folded into the dough, a handful of cheese, or sesame seeds mixed into the surface before shaping can elevate the crust without changing the dough’s integrity. I sometimes swirl in a teaspoon of finely chopped chives for a next-level bite. You can also skip this completely for a clean, classic bun that shines with your chosen toppings at the table.
Step 6: Layer & Swirl
Divide the dough into 8 equal pieces (or 10 for smaller slider buns). Roll each piece into a tight ball and place on the prepared sheet, spacing them about 2 inches apart. Gently press the tops to shape a smooth surface. If you like seeds on top, brush the buns with a little water and sprinkle sesame or poppy seeds before baking. For a subtle swirl of flavor, you can roll a small strip of dough with a pinch of cheese or herbs and tuck it into the top to create a marbled surface as it rises. The key is an even surface so they bake uniformly and don’t spread too wide.
Step 7: Bake
Bake for 15–18 minutes, until the buns are a deep golden brown and the crust has a gentle bite. If your oven runs hot, check at the 12-minute mark and rotate the pan for even browning. The internal temperature should hover around 190°F (88°C) when tested with a quick thermometer. I love the moment when the kitchen fills with that warm bread aroma—my stomach always leads the parade first. If you want an even glossier finish, brush the hot buns with a thin layer of melted butter as soon as they come out of the oven.
Step 8: Cool & Glaze
Let the buns rest on the pan for about 5 minutes, then transfer to a rack to cool slightly. This is when the crust softens just a touch and your patience pays off. If you’re using an egg wash, brush lightly while they’re still warm so the glaze can set and shine. If you prefer a softer crust, brush with a dab of melted butter or a touch of milk. A light glaze on the top helps the sesame seeds adhere and gives that bakery sheen we all crave on a burger bun.
Step 9: Slice & Serve
When the buns are fully cooled, slice horizontally with a serrated knife. The first bite should reveal a tender crumb with just enough structure to hold your patty and toppings. I like to toast the cut sides for a minute or two in a dry skillet or under the broiler for a minute to deepen the flavor and create that little crunch that makes burgers sing. These buns stay soft for a day or two if kept in a breathable bag, and they freeze beautifully in an airtight container for quick weeknight meals.
What to Serve It With
These homemade burger buns aren’t just for towering beef burgers; they’re a versatile canvas for comfort, breakfast, or party bites. Here are some crowd-pleasing pairings and ideas that feel like an invitation to linger at the table.
For Breakfast: Toasted halves brushed with a light honey butter, a spread of jam or Cream Cheese, and a hot mug of coffee or cocoa. My family loves a morning “slider” with egg, bacon, and a hint of chive cream cheese tucked inside. The warmth from the bun elevates a simple breakfast into something you’d crave again tomorrow.
For Brunch: Build-your-own sliders with mini patties, avocado smash, and a zingy pickled onion. Serve with a sparkling lemonade or a cold brew coffee on the side. The soft crumb of the bun makes every bite feel indulgent, and the slight sweetness makes savory toppings pop without overpowering them.
As Dessert: A playful take is to halve the buns, fill with vanilla ice cream, and press them together for mini ice cream sandwiches. A sprinkle of cinnamon sugar on the outside before toasting adds a touch of warmth that pairs beautifully with chilly scoops.
For Cozy Snacks: Cut into circles and toast until crisp around the edges; dip in a garlicky aioli or a tangy tomato-basil dip. These buns are sturdy enough to stand up to sauces, yet soft enough to be comforting when you’re craving something simple and satisfying.
Personally, I love sharing a tray of warm buns with family at the end of the day. The kids cluster around the kitchen island, sniffing that doughy perfume, while I tell them how these buns were born out of a Sunday afternoon kitchen experiment that stuck. It’s a small ritual that makes a big difference in how the meal feels—cozy, grounded, and absolutely doable for any home cook.
Top Tips for Perfecting Your Homemade Burger Buns
These tips come from years of tweaking and tasting with friends and family. They’re small adjustments that add up to noticeably better buns.
Dough Prep: Use room-temperature ingredients when possible, especially the egg and milk. Cold dairy slows yeast and can stall the rise. If your fridge is chilly, warm the milk to a gentle bath—just check the temperature with your finger before you mix.
Mixing Advice: Don’t overwork the dough. You want a soft, cohesive ball, not a stiff, tight one. If you overdo the kneading, the crumb can turn dense. A light touch keeps the gluten supple and gives you a tender bite that’s perfect for burgers.
Shaping & Proofing: After shaping, let the dough rest under a clean towel in a warm spot until it doubles. This can take 30–45 minutes depending on the room temperature. If you’re short on time, you can give the dough a quick rise in a warm oven (low heat, then off) for about 15–20 minutes, and then bake as usual.
Ingredient Swaps: Use half bread flour and half all-purpose flour for a chewier bite. You can substitute milk with almond milk for a dairy-free version, but I’ve found the buns still stay tender with a touch of extra fat or a teaspoon of olive oil to mimic the dairy richness. For a richer crumb, add an extra tablespoon of butter. If you’re avoiding eggs, replace with a small amount of applesauce or a flax egg—the buns will still be fluffy, though the texture shifts slightly.
Baking Tips: If you notice doming on top, make sure the dough isn’t rising too high in a humid kitchen. A lower oven temperature for longer bake time helps maintain a flat top for neat burger patties. You can also gently press the centers of the dough balls to create a small indent that helps hold toppings and sauces.
Glaze Variations: Egg wash gives shine, but you can finish with melted butter for a softer crust or brush with milk for a pale, airy crust. For a nutty twist, a light sprinkle of sesame seeds after egg wash adds both flavor and texture. If you want a non-dairy glaze, brush with a little olive oil and a pinch of flaky salt for a savory crust.
My personal lessons learned? If you’re rushed, you can chill the dough briefly after the first rise and shape later. The second rise will give you those pillowy buns that hold up to a juicy patty. And if you’re baking for kids, a touch more sugar in the dough makes the crumb even softer and the aroma even more irresistible. Trust me on this one—it makes a big difference when you’re feeding a bunch of hungry mouths after school.
Storing and Reheating Tips
Storing homemade burger buns properly keeps their texture and flavor intact so you can enjoy them long after you bake. Here are practical ways to keep them fresh and tasty.
Room Temperature: Store any unused buns in a paper bag at room temperature for 1–2 days. The air in the bag helps preserve the crust’s texture while keeping the interior soft. If you’ll have them longer, move them to the fridge or freezer to preserve quality.
Refrigerator Storage: Place buns in a breathable container or wrap loosely in parchment and seal with a bag. They’ll stay nice for up to 4 days in the fridge, though I almost always slice and toast them before serving to revive that bakery-crisp exterior.
Freezer Instructions: Wrap each bun individually in plastic wrap or aluminum foil, then place in an airtight bag. They’ll keep for up to 3 months. Thaw at room temperature and toast the cut sides to restore a little bite. If you want to freeze them pre-sliced, that’s even faster for a weeknight burger night.
Glaze Timing Advice: If you’re freezing, skip the glaze and apply it after thawing and just before toasting. Glazes and toppings can soften the crust in the freezer, so I recommend fresh glaze and a hot pan when you’re ready to serve. This gives you the same glossy finish you’d get from a fresh bake.
Frequently Asked Questions
Final Thoughts
These homemade burger buns aren’t just a side note to your burger; they’re part of the meal’s warmth and memory. The process is forgiving, the results are comforting, and the aroma invites everyone to the table long before the burger is ready. If you’re chasing a reliable, everyday bread that tastes like it came from a beloved bakery, you’ll find it here. I’ve shared these buns with friends who claim they’ll never buy store buns again—my kids have even declared them worthy of a standing ovation after a long game night. You’ve got this. Gather your ingredients, roll up your sleeves, and give these a try. I’d love to hear how yours turn out—what toppings you sprinkled, whether you played with a cheese twist, or which glaze you chose. Happy baking!
homemade burger buns
Ingredients
Main Ingredients
- 3.5 cups all-purpose flour plus extra for dusting
- 0.25 cup whole milk warm (about 110°F)
- 0.25 cup unsalted butter melted and slightly cooled
- 2 tablespoons honey
- 1 large egg room temperature
- 1 teaspoon salt
- 2.25 teaspoons instant yeast
- 1 teaspoon sesame seeds for topping
Instructions
Preparation Steps
- In a large mixing bowl, combine warm milk, melted butter, honey, and egg. Whisk until smooth.
- Add 2 cups of flour, yeast, and salt. Mix until a shaggy dough forms.
- Gradually add remaining 1.5 cups flour, 0.5 cup at a time, until dough is soft but not sticky. Knead 5–7 minutes by hand or mixer.
- Place dough in a lightly oiled bowl, cover with a damp cloth, and rise for 1.5 hours or doubled in size.
- Punch down dough and divide into 8 equal pieces. Shape each into a tight ball and place on a parchment-lined baking sheet.
- Cover loosely and rise for 45–60 minutes until puffy.
- Preheat oven to 375°F. Brush buns with milk and sprinkle with sesame seeds.
- Bake for 18–20 minutes until golden brown. Cool before slicing.
Notes
Featured Comments
“This post made my mouth water! Nothing beats that soft, pillowy texture of homemade burger buns—so much better than store-bought.”
“Impressed! Clear steps and perfect for busy nights results. Perfect for busy nights.”
“New favorite here — comforting. crowd-pleaser was spot on.”
“Super easy and turned out amazing! My family asked for seconds. Saving this one.”
“This sweet treat was absolutely loved — the balanced really stands out. Thanks!”
“Made it tonight and wow — comforting! Will definitely make homemade burger buns again.”


This post made my mouth water! Nothing beats that soft, pillowy texture of homemade burger buns—so much better than store-bought.