

You know those days when a craving hits, and it’s not just any craving? It’s a craving for something truly special, something that feels like a decadent treat but you can enjoy without feeling like you’ve completely derailed your day? That’s exactly how I feel about these Homemade cruffins. They’re this magical hybrid, a flaky, buttery croissant meets a tender, fluffy muffin top, all rolled into one glorious bite. I remember the first time I tried a cruffin at a fancy bakery – I was completely blown away. It was so delicate, so airy, and then that sweet filling! I thought, “There’s no way I can make this at home.” But oh, was I wrong! After a bit of tinkering and a whole lot of delicious experimenting, I’ve finally landed on a recipe that’s not just doable, but downright joyful to make. It’s my go-to when I want to impress friends, or honestly, just to make a Tuesday feel a little more like a celebration. Think of them as your secret weapon for moments that call for something extraordinary.
What is Cruffin?
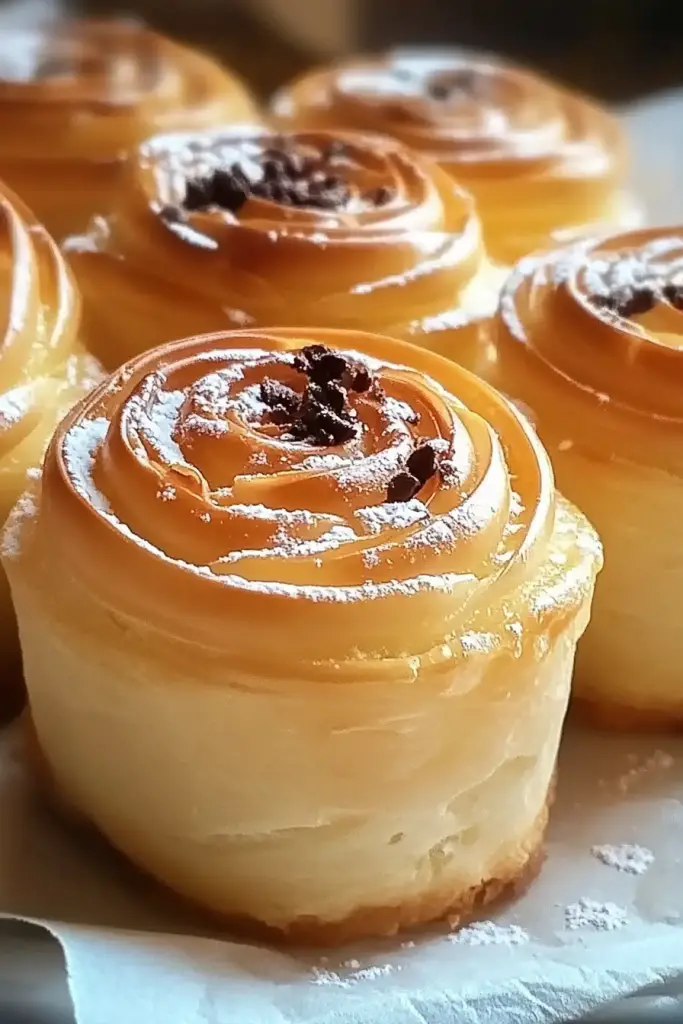
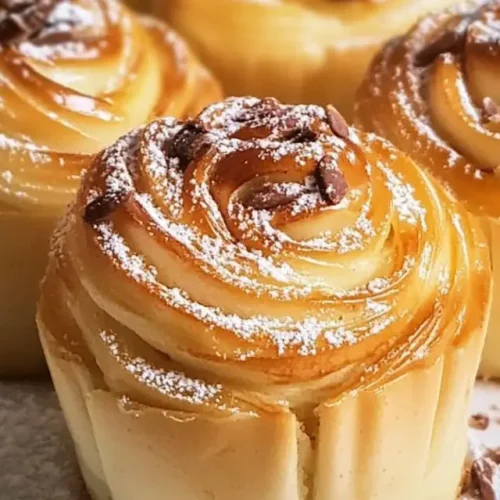
So, what exactly is this delightful concoction? Imagine the rich, laminated layers of a croissant, that gorgeous, flaky texture that shatters when you bite into it. Now, picture the comforting, soft interior and the lovely domed top of a muffin. A cruffin is basically the delicious love child of these two pastry powerhouses. We take that croissant dough, layer it with butter, roll it up, slice it, and then bake it in a muffin tin. The magic happens in the oven, where the layers puff up and crisp, creating those signature folds and that irresistible, slightly chewy, slightly crisp texture. The name itself, cruffin, is just a portmanteau of “croissant” and “muffin,” and it perfectly captures the essence of what you get. It’s not quite a croissant, not quite a muffin, but something entirely new and utterly scrumptious.
How do I make homemade cruffins?
Quick Overview
This recipe involves a few key steps: making a simple dough, laminating it with butter (don’t let that word scare you!), preparing a delightful filling, shaping the cruffins, and then baking them to golden perfection. The dough needs a bit of chilling time, which actually makes it easier to handle and develops those wonderful layers. The result is a pastry that’s both flaky and tender, with a lovely crust and a soft, flavorful center. It’s a process that rewards patience with an absolutely show-stopping treat!
Ingredients
For the Dough:
3 cups all-purpose flour, plus more for dusting.
1/4 cup granulated sugar
1 teaspoon salt
1 packet (2 1/4 teaspoons) active dry yeast
3/4 cup warm milk (about 105-115°F)
1/4 cup warm water (about 105-115°F)
1 large egg, at room temperature
1/2 cup (1 stick) unsalted butter, melted and slightly cooled
For the Lamination (Butter Block):
1 cup (2 sticks) unsalted butter, cold and cut into cubes
For the Filling:
1/2 cup brown sugar, packed
2 tablespoons ground cinnamon (or adjust to your liking!)
1/4 cup melted unsalted butter
*(Optional: 1/2 cup finely chopped chocolate chips, or a swirl of jam)*
For the Glaze:
1 cup powdered sugar
2-3 tablespoons milk (or cream for richer glaze)
1/2 teaspoon Vanilla Extract
Step-by-Step Instructions
Step 1: Preheat & Prep Pan
Get your muffin tins ready! Lightly grease 12 cups of a standard muffin tin. If you’re feeling fancy, you can also line them with paper liners, but I find they bake up a bit more beautifully without them, getting those lovely crispy edges. Pop them aside while you get started on the dough.
Step 2: Mix Dry Ingredients
In a large bowl, whisk together the flour, sugar, and salt. In a separate small bowl or jug, combine the warm milk, warm water, and yeast. Give it a gentle stir and let it sit for about 5-10 minutes until it gets foamy. This tells you your yeast is alive and ready to work its magic! If it doesn’t foam, your yeast might be old or the liquid too hot/cold, so grab a fresh packet and try again.
Step 3: Mix Wet Ingredients
Once the yeast is foamy, add it to the bowl with your flour mixture, along with the egg and the melted butter. Use a spatula or a wooden spoon to mix everything until a shaggy dough forms. Don’t overmix at this stage; we just want it all to come together.
Step 4: Combine
Turn the dough out onto a lightly floured surface. Knead it for about 8-10 minutes until it’s smooth, elastic, and bounces back when you gently poke it. It’ll be a bit sticky at first, but resist the urge to add too much extra flour – just a tiny bit if it’s unmanageable. Place the dough in a lightly greased bowl, cover it with plastic wrap or a clean kitchen towel, and let it rise in a warm spot for about 1 to 1.5 hours, or until it has doubled in size. This is where the gluten starts to develop, giving us that lovely chewiness.
Step 5: Prepare Filling
While the dough is rising, let’s make the filling! In a small bowl, mix together the brown sugar and cinnamon until well combined. Have your melted butter ready to go.
Step 6: Layer & Swirl
Once the dough has risen, punch it down gently to release the air. Turn it out onto a lightly floured surface and roll it into a rectangle, about 12×18 inches. Now, for the lamination: take your cold butter cubes and arrange them on half of the dough rectangle, leaving a small border. Fold the other half of the dough over the butter, like you’re closing a book. Press the edges to seal. Gently roll this package out again into a long rectangle, about 12×18 inches. Fold it into thirds, like a letter. This is your first ‘turn.’ Wrap it tightly in plastic wrap and refrigerate for at least 30 minutes. Repeat this rolling, folding, and chilling process two more times (for a total of three turns). After the last chill, roll the dough into a final rectangle, about 10×20 inches. Brush the entire surface with the melted butter for the filling, then sprinkle evenly with the cinnamon-sugar mixture. If using chocolate chips or jam, sprinkle those over now. Starting from one of the long sides, tightly roll up the dough like a jelly roll. Slice this log into 12 equal pieces. Place each piece, cut-side up, into your prepared muffin cups.
Step 7: Bake
Cover the muffin tin loosely with plastic wrap and let the cruffins rest and puff up for about 30-45 minutes. Meanwhile, preheat your oven to 375°F (190°C). Bake the cruffins for 20-25 minutes, or until they’re beautifully golden brown and puffed. You’ll know they’re done when they sound hollow when tapped lightly.
Step 8: Cool & Glaze
Let the cruffins cool in the muffin tin for about 10 minutes, then carefully transfer them to a wire rack to cool completely. Once they’re mostly cool, whisk together the powdered sugar, milk, and vanilla extract until smooth and pourable. Drizzle generously over the cooled cruffins. Let the glaze set a bit before serving.
Step 9: Slice & Serve
These are best served fresh, warm if you can manage it! They’re a little delicate, so use a gentle hand when removing them from the tin and slicing. Enjoy the flakiness!
What to Serve It With
Honestly, these homemade cruffins are pretty spectacular on their own, but I love pairing them with different things depending on the occasion. For a simple breakfast, a good strong cup of coffee is non-negotiable. The richness of the coffee cuts through the sweetness of the glaze beautifully. If I’m feeling a bit extra, I might add a side of fresh berries, like raspberries or blueberries, to add a burst of freshness. For a lovely brunch spread, I’ll arrange them on a pretty platter alongside other goodies like mini quiches or a fruit salad. They look so elegant! As a dessert, they’re fantastic served slightly warm with a dollop of whipped cream or a scoop of vanilla bean Ice Cream – talk about indulgence! And for those cozy afternoon snack attacks, they’re perfect with a glass of milk. My family absolutely devours them this way!
Top Tips for Perfecting Your Homemade Cruffins
Over the years, I’ve learned a few tricks that really help make these cruffins shine. First, when you’re rolling out the dough for lamination, don’t be afraid of a little flour on your surface, but brush off any excess before you fold. Too much flour can make the layers tough. The key to flaky layers is keeping that butter cold! If your kitchen is warm, don’t hesitate to pop the dough back in the fridge for an extra 15 minutes between turns if it feels too soft. For the filling, I find that packing the brown sugar firmly ensures you get a good sweet layer throughout. And a little tip for that cinnamon-sugar swirl: make sure you spread it fairly evenly all the way to the edges. I learned that one the hard way after some unevenly spiced bites! When you’re slicing the log, a sharp, clean knife is your best friend. A serrated knife works wonders here to get a clean cut without squishing the layers. For baking, ovens can be so different! Keep an eye on them towards the end of the baking time; they should be a deep golden brown. If one muffin tin bakes faster than another, rotate them halfway through. And for the glaze, I like it to be thick enough to coat but still drizzleable. If it’s too thick, add milk a teaspoon at a time until you get the consistency you like. If it’s too thin, add more powdered sugar. It’s all about that perfect balance!
Storing and Reheating Tips
These cruffins are undeniably at their best when they’re fresh, but they store surprisingly well! If you have leftovers (which is rare in my house!), you can keep them at room temperature, uncovered, for up to a day. They’ll start to lose a bit of their crispness, but they’re still delicious. For longer storage, I like to put them in an airtight container in the refrigerator. They’ll stay good for about 3-4 days, though again, the texture changes a bit. If you want to freeze them, that’s totally doable! Wrap each cruffin individually in plastic wrap, then place them in a freezer-safe bag or container. They can last in the freezer for up to 2 months. To reheat, I usually pop them in a toaster oven at around 300°F (150°C) for a few minutes until warmed through and a little crispy again. If they’re glazed, be aware the glaze might melt slightly. I find that for the best results, it’s often better to glaze them *after* reheating if you’re taking them from frozen. Otherwise, if they’re just room temperature, the glaze usually holds up fine.
Frequently Asked Questions
Final Thoughts
I really hope you give these homemade cruffins a try. They’re more than just a recipe to me; they’re a little bit of joy, a reminder that delicious, impressive treats are absolutely within reach for any home baker. They embody that perfect balance of flaky, buttery perfection and comforting sweetness. If you love a good croissant and a tender muffin, you’re going to fall head over heels for these. They’re fantastic for weekend mornings, special occasions, or just because. If you end up making them, I’d absolutely love to hear about it! Tag me on social media or leave a comment below with your thoughts and any fun variations you tried. Happy baking, and enjoy every flaky, sweet bite!
Homemade Cruffins
Ingredients
Dough Ingredients
- 4.5 cups all-purpose flour
- 0.25 cups granulated sugar
- 2.25 teaspoons instant yeast
- 1.5 teaspoons salt
- 1.5 cups milk, lukewarm
- 0.5 cups unsalted butter, softened
Butter Layer
- 1 cup unsalted butter, cold and cut into cubes
Optional Glaze
- 1 cup powdered sugar
- 2 tablespoons milk
- 0.5 teaspoons vanilla extract
Instructions
Dough Preparation
- In a large bowl, whisk together flour, sugar, yeast, and salt.
- Add lukewarm milk and softened butter. Mix until a shaggy dough forms.
- Turn the dough out onto a lightly floured surface and knead for 8-10 minutes until smooth and elastic. Place in a greased bowl, cover, and let rise in a warm place for 1-2 hours, or until doubled in size.
Butter Layering (Laminating)
- Punch down the dough. Roll it out into a large rectangle (about 12x18 inches).
- Scatter the cold butter cubes evenly over two-thirds of the dough rectangle. Fold the unbuttered third over the middle third, then fold the remaining buttered third over that, like folding a letter. You should have three layers of dough with butter in between.
- Rotate the dough 90 degrees and roll it out again into a long rectangle. Fold it into thirds again. Repeat this process 2 more times, ensuring you chill the dough for 30 minutes in between each set of folds. This creates the flaky layers.
Shaping and Baking
- Roll the final dough into a rectangle (about 10x16 inches). Cut it into 12 equal strips.
- Roll each strip up loosely, starting from one end, to form a spiral. Place each rolled cruffin into a greased muffin tin.
- Cover the muffin tin and let the cruffins rise for another 30-60 minutes.
- Preheat oven to 375°F (190°C). Bake for 18-22 minutes, or until golden brown and puffed.
Glazing (Optional)
- While the cruffins are cooling slightly, whisk together powdered sugar, milk, and vanilla extract until smooth. Drizzle over the warm cruffins.
Notes
Featured Comments
“Impressed! Clear steps and quick weeknight win results. Perfect for busy nights.”
“New favorite here — family favorite. crowd-pleaser was spot on.”
“Super easy and turned out amazing! My family asked for seconds. Saving this one.”
“This sweet treat was absolutely loved — the silky really stands out. Thanks!”
“Made it tonight and wow — family favorite! Will definitely make Homemade Cruffins again.”
“Packed with flavor and so simple. Exactly what I wanted from Homemade Cruffins.”


