


Oh, hello there! Come on in, grab a mug of something warm. I’ve been SO excited to share this recipe with you. You know how some nights, you just stare into the fridge, completely drained, and the thought of making a “proper” meal feels like climbing Mount Everest? Yeah, me too. But then, there are these nights when I pull out the ingredients for these Honey Garlic Chicken kabobs, and suddenly, dinner feels not just manageable, but genuinely *exciting*. They’re a total game-changer. Seriously, they’re like a flavor explosion on a stick, but so ridiculously easy that they feel like cheating. Forget those complicated marinades that take hours; this is the real deal for busy humans who still want delicious, homemade food. They remind me a bit of those fancy appetizers you get at restaurants, but you can totally make them in your own backyard (or kitchen!).
What is Honey Garlic Chicken Kabobs?
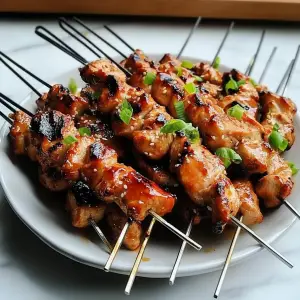
So, what exactly are these magical little things? At their heart, Honey Garlic Chicken kabobs are exactly what they sound like: tender chunks of chicken threaded onto skewers with vibrant veggies, all coated in a luscious, sticky, sweet-and-savory honey garlic sauce. Think of it as your favorite takeout stir-fry flavor, but grilled to perfection and served in a fun, interactive way. The “honey garlic” part is where all the magic happens – a simple, yet powerful combination that just works. It’s the kind of sauce that coats everything beautifully, giving you that perfect balance of sweet from the honey and savory, umami-rich depth from the garlic. It’s essentially the flavor combination that makes grown adults, and my very picky kids, dive in with enthusiasm. No complicated techniques, just pure, unadulterated deliciousness on a stick!
How do I make Honey Garlic Chicken Kabobs?
Quick Overview
This recipe is all about bringing together simple ingredients for maximum flavor impact with minimal fuss. You’ll marinate chicken chunks in a quick, irresistible honey garlic sauce, thread them onto skewers with your favorite veggies, and then grill or bake them until they’re perfectly cooked and slightly caramelized. It’s a straightforward process that delivers impressive results, making it perfect for both beginner cooks and seasoned pros looking for an easy yet delicious meal. The beauty is in its simplicity – marinate, skewer, cook, and enjoy!
Ingredients
For the Chicken & Marinade: For the Chicken & Marinade: For the Chicken & Marinade: For the Chicken & Marinade
1.5 pounds boneless, skinless chicken thighs or breasts, cut into 1-inch cubes. (I personally love chicken thighs here; they stay so much more tender and flavorful, but breasts work great too if that’s what you have!)
1/4 cup soy sauce (low sodium is fine, just adjust if needed)
1/4 cup honey. (Use a good quality honey; it makes a difference!)
2 tablespoons olive oil
4 cloves garlic, minced. (Don’t be shy with the garlic; it’s key!)
1 tablespoon rice vinegar (or apple cider vinegar in a pinch)
1 teaspoon grated fresh ginger (optional, but adds a lovely zing!)
1/4 teaspoon Black Pepper
For the Kabobs (Veggies):
1 large red bell pepper, cut into 1-inch pieces
1 large green bell pepper, cut into 1-inch pieces
1 large red onion, cut into 1-inch pieces
1 cup cherry tomatoes (leave whole or halve if large)
1 cup broccoli florets (bite-sized pieces)
For the Extra Glaze (Optional, but recommended!):
2 tablespoons honey
1 tablespoon soy sauce
1 teaspoon sesame oil (optional)
Step-by-Step Instructions
Step 1: Preheat & Prep Pan
If you’re grilling, get your grill fired up to medium-high heat. If you’re baking, preheat your oven to 400°F (200°C) and line a baking sheet with parchment paper for easy cleanup – trust me, this is a lifesaver! If you’re using wooden skewers, make sure to soak them in water for at least 30 minutes beforehand to prevent them from burning. I usually do this while I’m prepping the other ingredients.
Step 2: Mix Dry Ingredients
In a medium bowl, combine the soy sauce, honey, olive oil, minced garlic, rice vinegar, grated ginger (if using), and black pepper. Whisk it all together until it’s well combined. This is your magic potion! The aroma of the garlic and honey already starts to smell incredible at this stage.
Step 3: Mix Wet Ingredients
This is where the chicken comes in. Add your cubed chicken pieces to the bowl with the marinade. Give everything a good toss with your hands (gloves are your friend here!) or a spoon, making sure every single piece of chicken is coated in that glorious honey garlic mixture. Let it marinate for at least 20 minutes at room temperature, or pop it in the fridge for up to 2 hours. Any longer and the acid in the vinegar can start to break down the chicken too much, making it mushy. Twenty minutes is usually plenty for this flavor bomb!
Step 4: Combine
While the chicken is marinating, toss your chopped vegetables (bell peppers, red onion, broccoli florets) with a tablespoon of olive oil and a pinch of salt and pepper. You don’t want to marinate the veggies in the chicken marinade, as they’ll cook differently and can get a bit soggy. We just want them lightly seasoned to complement the chicken. If you’re using cherry tomatoes, they don’t need much – just toss them in with the other veggies.
Step 5: Prepare Filling
Now for the fun part: threading the skewers! Take your soaked wooden skewers or your metal skewers. Start by threading on a piece of chicken, then a piece of bell pepper, then some red onion, another piece of chicken, a broccoli floret, and so on. Try to alternate the ingredients to make them visually appealing and to ensure even cooking. Don’t pack them too tightly, as this can prevent heat from circulating properly and the chicken won’t cook evenly. Leave a little space between each piece.
Step 6: Layer & Swirl
This isn’t really a ‘layer and swirl’ step like a cake, but it’s all about how you arrange your ingredients on the skewer! Aim for a vibrant mix. I usually try to end with a piece of chicken so that it’s easy to handle when serving. If you have any leftover marinade, you can set it aside for brushing later, or discard it if it’s been in contact with raw chicken for a while (food safety first, always!).
Step 7: Bake
Place the assembled kabobs on your prepared baking sheet or directly on the grill grates. If grilling, cook for about 10-15 minutes, flipping occasionally, until the chicken is cooked through and the veggies are tender-crisp. If baking, bake for 20-25 minutes, flipping halfway through, until the chicken is cooked through and nicely browned. You’ll know the chicken is done when it’s no longer pink inside and the juices run clear. A meat thermometer inserted into the thickest part of the chicken should read 165°F (74°C).
Step 8: Cool & Glaze
Once the kabobs are cooked, remove them from the grill or oven. If you want an extra punch of flavor and shine, now is the time to brush them with the optional glaze. In a small bowl, whisk together the extra honey, soy sauce, and sesame oil. Gently brush this mixture over the hot kabobs. The heat will help it become wonderfully sticky and glossy. Let them rest for just a few minutes before serving. This is crucial for juicy chicken!
Step 9: Slice & Serve
Serve the honey garlic chicken kabobs hot off the grill or out of the oven. They are fantastic on their own, but I love serving them with a side of fluffy white rice, quinoa, or a simple green salad. You can also serve them with some extra sauce on the side for dipping. The smell alone will have everyone gathering around the table!
What to Serve It With
These honey garlic chicken kabobs are so versatile, they truly fit into any meal occasion! For a quick and easy **breakfast** (yes, breakfast!), I sometimes make mini versions and serve them alongside scrambled eggs. It’s a surprisingly hearty and flavorful start to the day, especially if you’ve got a busy morning ahead. For a more relaxed **brunch**, I like to serve them alongside a big fruit salad, some crispy home fries, and maybe a mimosa. They add a touch of something special without requiring a ton of effort. As a delightful **dessert** option, they might seem unconventional, but I’ve found that a smaller, slightly sweeter version served with a dollop of Greek yogurt or a light fruit salsa can be a surprisingly refreshing end to a meal, especially in the summer. And for those **cozy snack** moments, especially when you’re craving something savory and satisfying, they’re perfect. I’ll often make a batch just for us to graze on while watching a movie, alongside some crunchy sweet potato fries or a simple coleslaw. My family also loves when I make a big platter of these for a casual weeknight dinner, served with some steamed broccoli or a big bowl of noodles. It’s always a crowd-pleaser!
Top Tips for Perfecting Your Honey Garlic Chicken Kabobs
Over the years, I’ve picked up a few tricks that I think make these honey garlic chicken kabobs even better. For the vegetables, I always aim for a good mix of colors and textures. Red and green bell peppers give a lovely sweetness and crunch, red onion adds a bit of sharpness that balances the sweet glaze, and cherry tomatoes burst with flavor as they cook. Broccoli florets are great too, but make sure they’re not too large, or they might not cook through by the time the chicken is done. When it comes to mixing the marinade, don’t rush it. Giving the garlic and ginger time to mingle with the honey and soy sauce really deepens the flavor. And for the love of all that is delicious, don’t overcook the chicken! Chicken thighs are definitely more forgiving than breasts, as they have more fat, which keeps them tender. If you’re using breasts, keep a close eye on them. My personal secret for an extra-glossy, irresistible glaze is to make that small batch of extra glaze to brush on at the end. It just takes them to the next level. I’ve also experimented with swapping out the honey for maple syrup, and while it’s delicious, it has a slightly different caramelization point, so watch it closely. Another tip: If you don’t have skewers, you can just marinate the chicken and veggies and roast them together on a baking sheet. It won’t look as fancy, but it will taste just as amazing!
Storing and Reheating Tips
Okay, so sometimes we have leftovers, which is always a good problem to have! If you find yourself with some extra honey garlic chicken kabobs, here’s how I like to store and reheat them to keep them tasting as good as possible. For storing, the best method is to let them cool down completely, then place them in an airtight container. They’ll keep nicely in the refrigerator for up to 3-4 days. Make sure they’re fully cooled before sealing the container to prevent any condensation build-up. I usually don’t glaze them until they’re almost done cooking, so the glaze is less likely to become sticky and weird during storage. If you know you’ll be storing them, you can skip the final glaze step and add a drizzle of honey or a touch of soy sauce when reheating. For reheating, my preferred method is to gently warm them up in a skillet over medium-low heat, adding a tiny splash of water or chicken broth to prevent them from drying out. You can also reheat them in the oven at around 300°F (150°C) for about 10-15 minutes, or until heated through. Microwaving is an option, but I find it can sometimes make the chicken a little chewier, so I tend to avoid it if I can. If you’re planning to freeze them, I would recommend taking the chicken and veggies off the skewers first, storing them in a freezer-safe bag or container for up to 2-3 months. Thaw them overnight in the refrigerator before reheating using one of the methods above, and you might want to add a fresh drizzle of honey and soy sauce to revive the flavor.
Frequently Asked Questions
Final Thoughts
So there you have it – my absolute favorite honey garlic chicken kabobs! I really hope you give these a try. They’re honestly one of those recipes that just makes life a little easier and a lot tastier. The combination of sweet honey, savory garlic, tender chicken, and perfectly cooked veggies on a skewer is just unbeatable. It’s the kind of meal that makes everyone happy, from the little ones to the grown-ups, and it’s so forgiving, even if you’re not usually a confident cook. If you love this recipe, you might also enjoy my Teriyaki Salmon Skewers or my Lemon Herb Grilled Chicken. Both are packed with flavor and perfect for grilling season! I can’t wait to hear what you think. Let me know in the comments below how yours turn out, or if you have any fun variations you tried! Happy cooking!
honey garlic chicken kabobs
Ingredients
Marinade
- 0.5 cup honey
- 0.25 cup soy sauce
- 4 cloves garlic minced
- 1 tablespoon sesame oil
- 1 teaspoon ginger grated
- 0.5 teaspoon red pepper flakes optional
Kabobs
- 1.5 lbs chicken breast cut into 1-inch cubes
- 1 medium red bell pepper cut into 1-inch pieces
- 1 medium green bell pepper cut into 1-inch pieces
- 1 medium red onion cut into 1-inch pieces
- sesame seeds for garnish
- chopped parsley for garnish
Instructions
Preparation Steps
- In a medium bowl, whisk together all the marinade ingredients: honey, soy sauce, minced garlic, sesame oil, grated ginger, and red pepper flakes (if using).
- Add the cubed chicken breast to the marinade, toss to coat, and let it marinate for at least 30 minutes, or up to 2 hours in the refrigerator.
- While the chicken is marinating, prepare the vegetables by cutting them into 1-inch pieces. If using wooden skewers, soak them in water for at least 30 minutes to prevent burning.
- Preheat your grill to medium-high heat or preheat your oven to 400°F (200°C).
- Thread the marinated chicken pieces and the cut vegetables onto the skewers, alternating them for an attractive presentation.
- Grill the kabobs for 10-15 minutes, turning occasionally, until the chicken is cooked through and the vegetables are tender-crisp. If baking, place the kabobs on a baking sheet and bake for 15-20 minutes, flipping halfway through.
- In the last few minutes of cooking, you can brush any leftover marinade over the kabobs.
- Remove from grill or oven, garnish with sesame seeds and chopped parsley, and serve hot.
Notes
Featured Comments
“Impressed! Clear steps and comforting results. Perfect for busy nights.”
“New favorite here — comforting. crowd-pleaser was spot on.”
“Super easy and turned out amazing! My family asked for seconds. Saving this one.”
“This sweet treat was absolutely loved — the rich really stands out. Thanks!”
“Made it tonight and wow — creamy! Will definitely make honey garlic chicken kabobs again.”
“Packed with flavor and so simple. Exactly what I wanted from honey garlic chicken kabobs.”


