You know those nights? The ones where you’re staring into the fridge, desperately hoping for inspiration to strike, but all you’re met with is… well, leftovers. Or worse, you’re *starving*, and the thought of a complicated recipe feels like climbing Everest in flip-flops. Yeah, I’ve been there more times than I care to admit. That’s precisely why I’m practically bursting to share this honey garlic chicken thighs recipe with you. It’s the kind of dish that sounds fancy but is ridiculously easy, and trust me, the aroma that fills your kitchen while it’s baking? Pure magic. It’s the ultimate weeknight savior, a guaranteed crowd-pleaser, and honestly, it’s the reason my kids will actually eat dinner without a fight. Forget those bland, boring chicken recipes; this one is a flavor explosion waiting to happen. If you thought baked chicken was just… baked chicken, prepare to have your mind (and your taste buds) completely blown. This isn’t just chicken; it’s an experience, a hug in food form, and the best darn honey garlic chicken thighs you’ll ever make. I’ve tried a million variations over the years, but this one? This is the one. It’s my go-to, my emergency dinner plan, my “what can I make that’s quick and delicious” answer, every single time.
What is honey garlic chicken thigh?
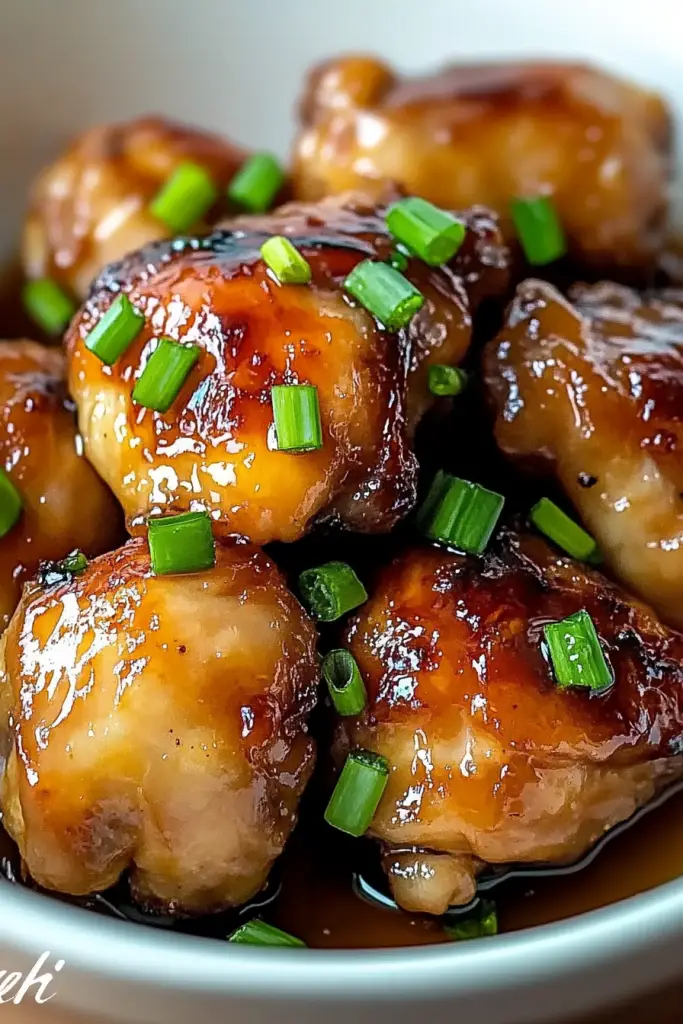
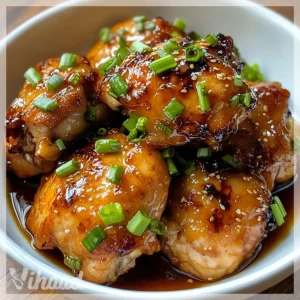
So, what exactly are these magical honey garlic chicken thighs we’re talking about? Think of it as your favorite savory and sweet flavor combination, but elevated to an art form, all happening in your oven with minimal fuss. It’s essentially chicken thighs that have been coated in a luscious, sticky glaze made primarily from honey and garlic, then baked until they’re incredibly tender, juicy, and the glaze has caramelized into a beautiful, irresistible sheen. It’s a classic pairing, sure, but what makes this particular version so special is the balance. It’s not just sweet; there’s a savory depth that keeps you coming back for more. It’s comfort food at its finest, but it also feels a little bit special, perfect for a casual weeknight dinner or even when you have friends over and want to impress them without breaking a sweat. It’s that satisfying bite where you get the tender chicken, the slightly crispy edges, and that sticky, sweet, garlicky goodness all at once. It’s the kind of dish that makes you close your eyes and savor every single mouthful.
How do I make Honey Garlic Chicken Thighs?
Quick Overview
This recipe is wonderfully straightforward. We’re talking about a quick mix of ingredients for the glaze, tossing your chicken thighs in it, and then letting the oven work its magic. You’ll end up with incredibly tender, fall-off-the-bone chicken coated in a sticky, sweet, and savory honey garlic sauce. It’s designed for busy lives, requiring minimal active cooking time and maximum flavor payoff. The secret lies in getting that beautiful caramelization on the chicken without overcooking it, and this method ensures just that.
Ingredients
What is the recipe for the Honey Garlic Chicken Thighs?
You’ll want to grab about 1.5 to 2 pounds of bone-in, skin-on chicken thighs. I always go for bone-in and skin-on because they have the most flavor and stay incredibly moist. If you’re really in a pinch or prefer less fat, boneless, skinless will work, but you might need to adjust cooking time slightly and they won’t be quite as decadent. Make sure they’re patted super dry with paper towels – this is key for getting that lovely sear and crispy skin later!
For the Glaze:
This is where all the magic happens! You’ll need about half a cup of honey. Use a good quality honey; it makes a difference in flavor. Then, we need about 4-5 cloves of garlic, minced. Please, please, please use fresh garlic, not the jarred stuff if you can help it. The flavor is just incomparable. I also add about 1/4 cup of soy sauce (or tamari for gluten-free). This brings in that essential savory, umami depth. A tablespoon of apple cider vinegar or rice vinegar adds a nice little tang to cut through the sweetness. And for a touch of heat, a pinch of red pepper flakes, or more if you’re brave like me! A tablespoon of olive oil or avocado oil helps everything emulsify and prevents the glaze from burning too quickly.
Optional for Serving:
Freshly chopped parsley or green onions for a pop of color and freshness. Sesame seeds for a little crunch. Everything tastes better with a garnish, right?
Step-by-Step Instructions
Step 1: Preheat & Prep Pan
First things first, let’s get that oven preheated to 400°F (200°C). This higher temperature is crucial for getting that lovely caramelization on the chicken skin. Grab a baking dish or a rimmed baking sheet. If you’re using a baking sheet, you might want to line it with parchment paper for super easy cleanup – a trick I learned after one too many sticky messes! If you’re using a baking dish, no need to grease it; the chicken will release its own juices.
Step 2: Mix Dry Ingredients
This step is more about prepping the chicken itself. Make sure those chicken thighs are really, really dry. I cannot stress this enough! Pat them down thoroughly with paper towels. This is your secret weapon for achieving crispy skin and preventing the dreaded “steamed chicken” texture. Get into all the nooks and crannies. Nobody likes soggy chicken skin, right?
Step 3: Mix Wet Ingredients (The Glaze!)
In a medium bowl, whisk together the honey, minced garlic, soy sauce (or tamari), vinegar, red pepper flakes (if using), and olive oil. Give it a really good whisk until it’s all beautifully combined. You’ll notice the garlic really starting to perfume the mixture. Oh, the smell already! This is the heart and soul of our honey garlic chicken thighs.
Step 4: Combine Chicken and Glaze
Now, here’s where the fun really begins. Place your super-dry chicken thighs directly into the bowl with the glaze. Use your hands (this is the best way to ensure every piece is coated!) or a sturdy spatula to toss the chicken. Make sure each thigh is thoroughly coated in that glorious honey garlic mixture. Get it all under the skin if you can for extra flavor.
Step 5: Arrange Chicken for Baking
Arrange the glazed chicken thighs in a single layer in your prepared baking dish or on the baking sheet. Try not to crowd them too much. If they’re overlapping, they’ll steam instead of roast, and we want that beautiful crispy skin. Make sure the skin side is facing up. This helps it get nice and golden brown.
Step 6: Bake Until Golden and Glossy
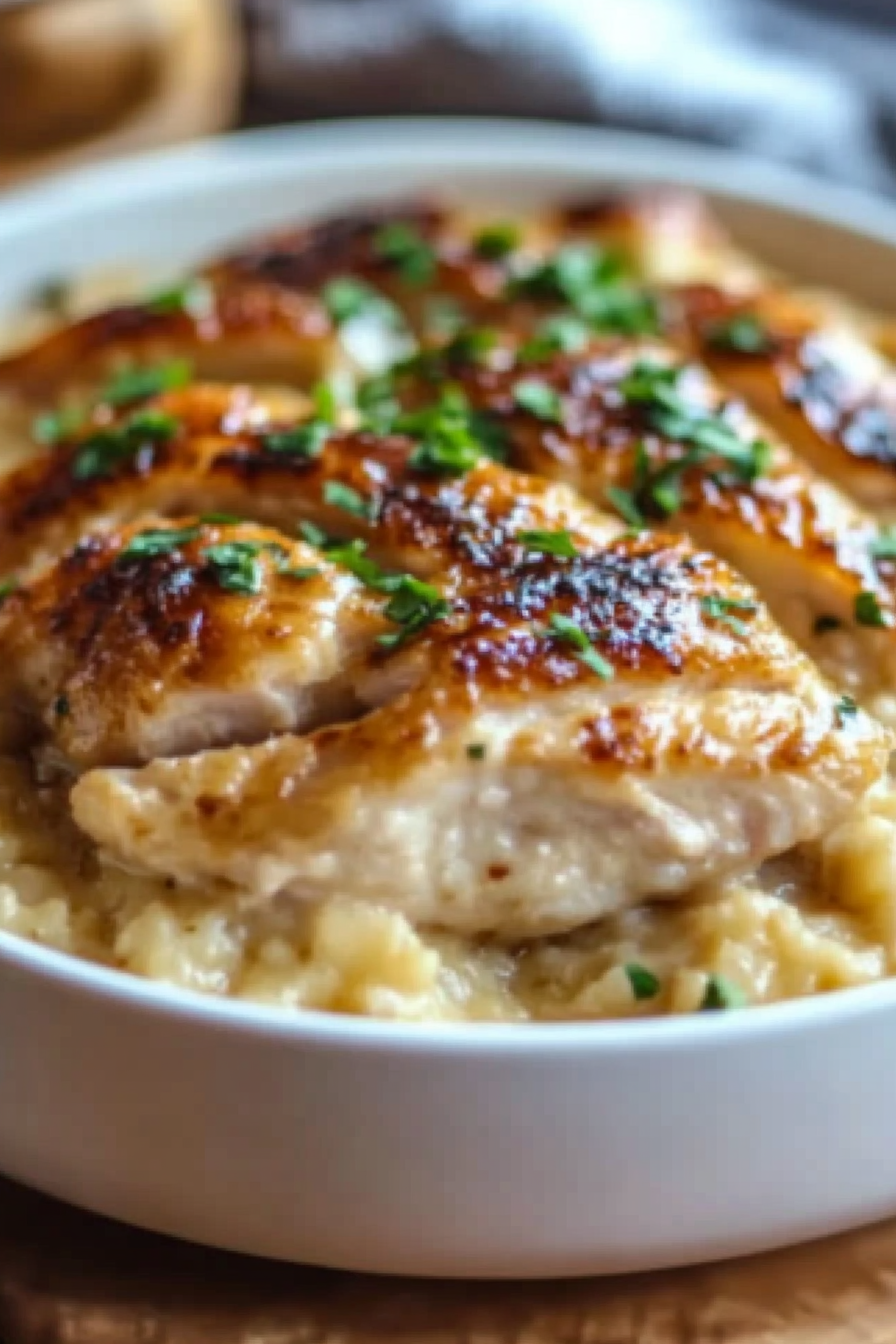
Slide that dish into your preheated oven. Now, let it bake for about 30-40 minutes. The exact time will depend on the size of your chicken thighs and your oven, but you’re looking for the chicken to be cooked through (internal temperature should reach 165°F or 74°C) and the glaze to be bubbling and beautifully caramelized. If the glaze starts to look like it’s getting too dark too quickly, you can loosely tent the dish with foil for the last 10 minutes or so.
Step 7: Rest and Glaze (Optional but Recommended!)
Once the chicken is done, carefully remove it from the oven. Let it rest in the pan for about 5-10 minutes. This is super important for juicy chicken! It allows the juices to redistribute throughout the meat. If you want an extra boost of glaze, you can spoon some of the pan juices over the chicken while it’s resting.
Step 8: Garnish and Serve
For that final restaurant-worthy touch, sprinkle with fresh chopped parsley or green onions and a few sesame seeds if you have them. It just elevates the whole dish!
Step 9: Slice and Serve
Serve your glorious honey garlic chicken thighs hot! They are incredibly flavorful on their own, but pair them with your favorite sides for a complete meal.
What to Serve It With
This honey garlic chicken thighs recipe is so versatile, it practically begs to be paired with a variety of delicious accompaniments. For a classic, comforting meal, you absolutely can’t go wrong with a big scoop of fluffy white rice. It’s the perfect vehicle to soak up all that incredible sticky glaze. If you’re feeling a bit more health-conscious, steamed or roasted broccoli or asparagus are fantastic choices. They add a nice freshness and a bit of crunch to balance the richness of the chicken. I also love serving this with a simple side salad dressed with a light vinaigrette – it’s a great way to lighten things up.
My personal family favorite, especially on a chilly evening, is to serve it alongside some creamy mashed potatoes. The smooth texture of the potatoes with the sticky, savory chicken is just heavenly. On a weekend, if I’m feeling a little more ambitious, I’ll roast some root vegetables like sweet potatoes and carrots alongside the chicken; the sweetness from the vegetables complements the honey glaze beautifully. And for those super casual nights, we’ve even stuffed the shredded chicken into soft dinner rolls for amazing little sliders. It’s a recipe that truly adapts to whatever you have on hand and whatever you’re craving.
Top Tips for Perfecting Your Honey Garlic Chicken Thighs
Okay, let’s dive into some of the wisdom I’ve gathered over the years of making these honey garlic chicken thighs. These are the little things that have taken this recipe from “really good” to “absolutely spectacular.”
Chicken Prep is Key: I know I keep harping on this, but seriously, patting your chicken thighs *bone dry* with paper towels is non-negotiable for crispy skin. Moisture is the enemy of crispiness! I usually do this a good 15-20 minutes before I plan to glaze and bake, letting them sit uncovered on a wire rack over a baking sheet in the fridge if I have time. This really helps dry out the skin.
Don’t Skimp on the Garlic: Fresh garlic is a must. And while the recipe calls for a few cloves, if you’re a garlic lover like me, feel free to add a couple more! Mince it finely so it infuses the glaze beautifully without becoming overpowering or burning easily. I also find that if I let the glaze sit for about 10-15 minutes before tossing the chicken, the garlic has more time to meld its flavor into the honey mixture.
The Glaze Balance: The ratio of honey to soy sauce is crucial. Too much honey can make it overly sweet and prone to burning. Too much soy sauce can make it too salty. The recipe as written is a great starting point, but taste your glaze before you coat the chicken. If it tastes too sweet, add a tiny splash more vinegar or soy sauce. If it’s not sweet enough, a touch more honey. Remember, it will concentrate as it bakes.
Oven Temperature and Time: A hot oven (400°F/200°C) is your friend here for achieving that nice caramelization and crisp skin. However, ovens can be finicky! Keep an eye on your chicken. If you notice the glaze is getting dark very quickly, especially around the edges, it’s fine to loosely tent the pan with foil for the last 10-15 minutes of baking. This will allow the chicken to finish cooking through without burning the sugars in the glaze.
Resting is Essential: I know it’s tempting to dive right in, but letting the chicken rest for 5-10 minutes after it comes out of the oven is a game-changer for juiciness. It allows the meat fibers to relax and reabsorb the juices. If you skip this, you’ll lose a lot of that delicious moisture when you cut into it.
Ingredient Swaps: If you don’t have apple cider vinegar, rice vinegar or even white wine vinegar will work in a pinch. For soy sauce, tamari is a great gluten-free alternative. If you’re out of honey, maple syrup can work, but the flavor profile will be slightly different. Red pepper flakes are optional, but they really do add a lovely little kick that balances the sweetness so well – don’t skip them if you can!
Storing and Reheating Tips
One of the things I love most about this honey garlic chicken thighs recipe is how well it stores and reheats. It’s almost as good the next day, which is a huge win in my book!
Refrigerator Storage: Once the chicken has cooled down to room temperature, transfer any leftovers to an airtight container. It will keep well in the refrigerator for up to 3-4 days. Make sure it’s fully cooled before sealing the container to prevent condensation, which can make the skin less crispy. I usually store any remaining glaze separately if I have extra, or just make sure to get a good amount of the sticky sauce from the pan into the container with the chicken.
Reheating: My absolute favorite way to reheat this is in a skillet over medium-low heat. Add a tiny splash of water or broth to the pan, add the chicken, and cover it. This helps to steam and rehydrate the chicken gently while warming the glaze. You can also reheat it in the oven at around 300°F (150°C) for about 10-15 minutes, or until heated through. For a quick microwave reheat, use a lower power setting and cover the chicken to prevent it from drying out. Just be aware that the skin won’t be as crispy after microwaving, but it will still be delicious!
Freezer Instructions: While I generally prefer to eat these fresh or within a few days, you can freeze them if you need to. Let the chicken cool completely, then wrap individual pieces tightly in plastic wrap, followed by a layer of aluminum foil or place them in a freezer-safe bag. They should last for about 2-3 months. To thaw, transfer them to the refrigerator overnight. Reheat as you would refrigerated leftovers, keeping in mind the texture might be slightly softer after freezing and thawing.
Glaze Timing Advice: If you know you’ll be storing leftovers, it’s best to glaze the chicken again *after* reheating. If you add a little extra honey and soy sauce to the pan while reheating, you can create a fresh, sticky glaze right before serving. This really helps bring back that beautiful sheen and concentrated flavor.
Frequently Asked Questions
Final Thoughts
So there you have it – my absolute favorite honey garlic chicken thighs recipe! It’s a dish that has truly earned its spot in my regular rotation because it consistently delivers on flavor, ease, and that comforting, home-cooked goodness. The combination of sweet honey, pungent garlic, and savory soy sauce creates a sticky glaze that’s just utterly irresistible. It’s the kind of meal that makes everyone in the family happy, even the pickiest eaters, and honestly, the smell alone as it bakes is enough to make your stomach rumble with anticipation.
If you love this recipe, you might also enjoy exploring other easy chicken dishes that use similar flavor profiles. For instance, my sticky sesame chicken wings are always a hit for game day, or if you’re looking for something baked, my lemon herb roasted chicken is equally delicious. This recipe truly proves that you don’t need a lot of fancy ingredients or complicated techniques to make something truly spectacular.
I really hope you give these honey garlic chicken thighs a try. I can’t wait to hear what you think! Let me know in the comments below how yours turned out, if you tried any variations, or what you served them with. Your feedback and stories always make my day! Happy cooking!
Honey Garlic Chicken Thighs
Ingredients
Main Ingredients
- 1.5 lbs boneless, skinless chicken thighs
- 2 tbsp olive oil
- 4 cloves garlic minced
- 0.5 cup honey
- 0.25 cup soy sauce
- 1 tbsp apple cider vinegar
- 0.5 tsp red pepper flakes optional
- salt to taste
- black pepper to taste
- 2 tbsp sesame seeds for garnish
- 1 tbsp green onions chopped, for garnish
Instructions
Preparation Steps
- Pat the chicken thighs dry with paper towels and season with salt and pepper.
- Heat olive oil in a large skillet over medium-high heat.1.5 lbs boneless, skinless chicken thighs
- Add the chicken thighs to the skillet and sear for 4-5 minutes per side until golden brown.1.5 lbs boneless, skinless chicken thighs
- Push the chicken to the sides of the skillet and add the minced garlic to the center. Cook for about 30 seconds until fragrant.1.5 lbs boneless, skinless chicken thighs
- In a small bowl, whisk together honey, soy sauce, apple cider vinegar, and red pepper flakes (if using). Pour the sauce over the chicken in the skillet.1.5 lbs boneless, skinless chicken thighs
- Bring the sauce to a simmer and let it thicken, stirring occasionally, for about 5-7 minutes, or until the chicken is cooked through and coated in the glaze. Reduce heat if the sauce is thickening too quickly.
- Remove from heat. Garnish with sesame seeds and chopped green onions before serving.1.5 lbs boneless, skinless chicken thighs
Notes
Featured Comments
“Impressed! Clear steps and quick weeknight win results. Perfect for busy nights.”
“New favorite here — so flavorful. crowd-pleaser was spot on.”
“Super easy and turned out amazing! My family asked for seconds. Saving this one.”
“This sweet treat was absolutely loved — the light really stands out. Thanks!”
“Made it tonight and wow — perfect for busy nights! Will definitely make honey garlic chicken thighs again.”
“Packed with flavor and so simple. Exactly what I wanted from honey garlic chicken thighs.”