

There’s something about a perfectly crafted banana split that takes me right back to summer afternoons at my grandma’s house. I remember the first time I watched her layer those bright, fresh bananas with dollops of whipped cream and heaping spoons of chocolate syrup—my eyes widened with excitement. Honestly, it’s like a trip down memory lane with every bite. I’ve tested countless versions over the years, and I swear, nothing beats the classic combo of rich ice cream, sweet fruit, and that delightful crunch of nuts. This banana split is my go-to when I want to indulge in something decadent but easy to throw together. It’s surprisingly simple, with ingredients I usually have on hand, and it’s totally loved by my family. My kids ask for this all the time, especially in the summer—trust me, it disappears faster than you can say “banana”!
What is banana split?
A banana split isn’t just a dessert; it’s an experience—a fun, colorful, and creamy treat that feels downright festive. Think of it as an indulgent crown jewel of ice cream desserts. It’s essentially a boat-shaped dish filled with scoops of vanilla, chocolate, and strawberry ice cream, nestled between ripe bananas sliced lengthwise. Topped with everything from whipped cream and colorful sprinkles to gooey fudge and crunchy nuts, it’s a show-stopper that hits all the right notes. The name “banana split” sounds straightforward, but it actually captures the playful way you split the banana and Arrange the toppings. It’s one of those desserts you remember from childhood, but it’s just as special to make for friends or to treat yourself after a long week. Honestly, it’s one of the easiest crowd-pleasers—you don’t even need fancy ingredients, just good-quality ice cream and a little love!
How do you make banana split?
Quick Overview
This banana split is all about assembling layers—slice the bananas, scoop the ice cream, and top with your favorite toppings. I like to keep it straightforward: vanilla, chocolate, and strawberry for the ice cream, but feel free to mix it up. The process is so simple I can do it in my sleep—literally, it’s a lifesaver on busy nights or when friends drop by unexpectedly. The trick is in the toppings, which can be personalized to your taste. That’s what makes it fun and special. And if you want to get fancy, you can add fruit, caramel sauce, or even a splash of liqueur for an adult twist. Trust me, once you try this, it’s going to be your new go-to dessert for any occasion!
Ingredients
For the Main Assembly:
- 3 large ripe bananas
- 3 scoops of your favorite ice cream (vanilla, chocolate, strawberry, or whatever you love)
- Whipped cream (homemade or store-bought)
- Chocolate syrup
- Strawberry or raspberry sauce
- Chopped nuts (peanuts, almonds, or pecans)
- Maraschino cherries
Optional Extras:
- Crushed cookies or graham crackers
- Shredded coconut
- Mini marshmallows
- Fresh berries for garnish
Step-by-Step Instructions
Step 1: Preheat & Prep Pan
Actually, no oven prep needed here! Just grab a nice long sundae dish or a shallow bowl—something that showcases the layers. Before assembling, I like to have all my toppings ready so I can work quickly. Keep the whipped cream chilled until ready to serve—makes a big difference in texture and freshness!
Step 2: Slice the Bananas
Peel the bananas and slice them lengthwise, creating two whole halves. I always do this right before assembly to prevent browning; but if you want to take a step ahead, a quick brush with lemon juice keeps them bright and fresh. Place the banana halves in the center of your dish, side by side to form that classic split look.
Step 3: Scoop the Ice Cream
Now, scoop three generous scoops—one vanilla, one chocolate, one strawberry—about the size of a tennis ball each. I use an ice cream scoop for clean, round scoops, but a generous spoon works too. Set each scoop between the banana halves, or on top if you prefer a more modern style. This part is fun—feel free to get creative with flavors, especially if you’re making a sundae for each person.
Step 4: Add the Toppings
This is where the magic happens! Drizzle chocolate syrup over the chocolate ice cream, a splash of strawberry sauce for the pink one, and some whipped cream on top of each scoop. Add sprinkles, chopped nuts, and a cherry on each. I always do a big swirl of whipped cream on top for that classic look. My kids ask for extra nuts and sprinkles — it’s all about making it colorful and fun!
Step 5: Final Touches
Finish with a dollop of whipped cream, a cherry, and maybe some crushed cookies or coconut if you’re feeling fancy. I like to serve this immediately because the whipped cream can wilt if left too long, but honestly, it’s just as good if you save a drizzle of chocolate or sauce for last-minute drizzle before serving.
Step 6: Serve & Enjoy!
That’s it! Grab a spoon, dig in, and enjoy every sweet, cold, creamy bite. This always disappears in minutes at my house, and I love watching everyone’s faces light up with every bite. Perfect for a summer treat or when you’re craving something nostalgic and delicious.
What to Serve It With
This banana split is perfect on its own, but if you’re looking to round out your dessert spread, here are some ideas:
For Breakfast: Serve it with a strong coffee or a cold glass of milk—because why not start the day with something sweet? Sometimes I top mine with sliced almonds and a sprinkle of granola for a breakfast-inspired twist.
For Brunch: Add a side of fresh fruit—pineapple, berries, or even a handful of cherries—and maybe some homemade muffins for a more substantial morning feast.
As Dessert: This is the star of any dinner party or family gathering. Pair it with a light sparkling wine or a sweet dessert wine. I love adding extra fresh berries and maybe some mini brownies on the side for a decadent touch.
For Cozy Snacks: When I want something comforting, I serve this with a warm blanket and a good movie. Sometimes I sprinkle a little cinnamon or drizzle caramel sauce over the top, depending on my mood. My kids also love having a mini version in cups—they call it “banana boat” and call dibs on the toppings.
Top Tips for Perfecting Your Banana Split
After making this a hundred times, I’ve picked up a few tricks to make it even better:
Zucchini Prep: Okay, I meant bananas! But really, if you want to keep those bananas from browning, toss them with a little lemon juice right after slicing. It’s a game-changer for presentation.
Mixing Advice: When scooping ice cream, don’t rush—use a hot spoon dipped in warm water to make clean, perfect balls. Overmishing can make the scoops melty faster, so work quickly and confidently.
Swirl Customization: For a prettier look, you can use a piping bag with a decorative tip to swirl whipped cream or sauces. Alternately, drizzle different sauces in zigzags for a fun, colorful presentation.
Ingredient Swaps: Love caramel? Use caramel sauce instead of chocolate or strawberry for a richer, more decadent flavor. Or try coconut ice cream for a tropical twist. I’ve tested all these and they’re all delicious!
Baking Tips: If you’re using frozen berries or toppings, add them just before serving to keep everything fresh and vibrant. Also, keep your toppings within reach—assembly goes faster that way.
Glaze Variations: Want to switch up the toppings? Try a drizzle of honey, peanut butter, or even a dusting of cocoa powder. Just a little sprinkle makes a big visual and flavor difference.
This recipe is such a versatile classic—I’ve learned that with a little creativity, it can be tailored to whatever mood or season you’re in. My biggest lesson? Don’t stress over perfection; just make sure it’s delicious and fun to eat!
Storing and Reheating Tips
If you happen to have leftovers (a rare thing, but hey, it happens!), here’s what I do:
Room Temperature: Honestly, this dessert is best enjoyed fresh, but in a pinch, you can keep it covered at room temp for about an hour. It might melt a bit, but it’s still tasty.
Refrigerator Storage: If you’ve already assembled your banana split, cover it tightly with plastic wrap or store it in an airtight container. It’s good for up to a day, but the whipped cream might not look as pretty.
Freezer Instructions: I wouldn’t recommend freezing the assembled banana split because bananas and whipped cream don’t freeze well—melty, watery texture is a dealbreaker. Instead, freeze the ice cream separately if needed and reassemble before serving.
Glaze Timing: If you want the toppings to stay fresh and vibrant, add chocolate or caramel drizzle right before serving rather than before refrigeration. If you’re making it for later, keep the sauces in squeeze bottles or small jars to add fresh at serving time.
Basically, this dessert is best enjoyed immediately, but with a few tweaks, you can make it work for leftovers. Just remember—nothing beats the original fresh assembly!
Frequently Asked Questions
Final Thoughts
If you ask me, the beauty of a banana split is in its charm—bright, sweet, and so effortlessly joyful. It’s a recipe that’s traveled through generations, bringing smiles and memories at every table. I’ve made this countless times with different ice cream flavors, toppings, and presentation styles, and it never fails to bring happiness. Whether you’re celebrating a birthday, a summer evening, or just treating yourself after a long day, this dessert is your friend. It’s adaptable, fun, and delicious—all the reasons I keep coming back to it. So go ahead, slice those bananas, scoop that ice cream, and indulge. And if you do, I’d love to hear how yours turns out! Happy baking, and here’s to sweet moments and happy memories—one spoonful at a time!
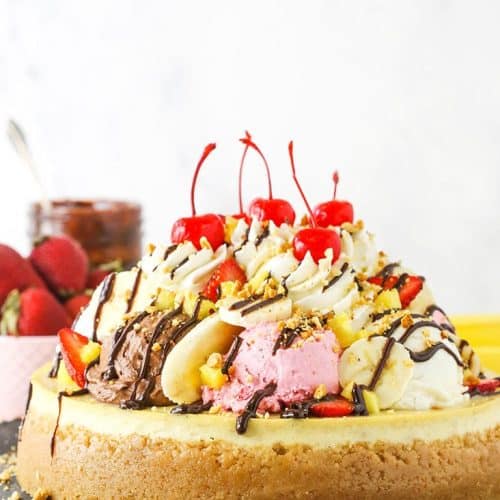
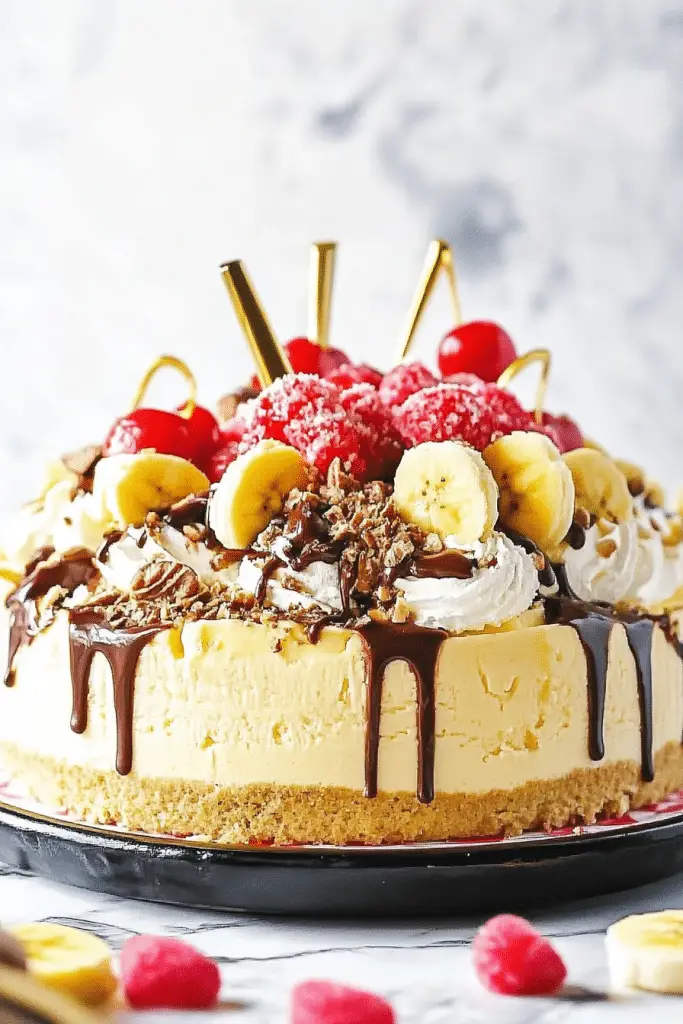
banana split
Ingredients
Main Ingredients
- 2.25 cups vanilla wafer crumbs
- 10 tbsp salted butter, melted
- 3 tbsp sugar
- 24 oz cream cheese, room temperature
- 1 cup sugar
- 3 tbsp all purpose flour
- 0.25 cup sour cream, room temperature
- 2 tsp banana extract
- 1 cup mashed banana (about 2 medium bananas)
- 4 large eggs, room temperature
- 1.5 cups heavy whipping cream, cold
- 6 tbsp powdered sugar
Instructions
Preparation Steps
- Preheat oven to 325°F. Line a 9-inch springform pan with parchment paper in the bottom and grease the sides.
- Combine the crust ingredients in a small bowl. Press into the bottom and up the sides of the pan. Bake for 10 minutes and set aside to cool.
- Reduce oven temperature to 300°F. In a large bowl, beat cream cheese, sugar, and flour on low until smooth. Add sour cream and banana extract, mixing until combined.
- Add pureed bananas and mix. Add eggs one at a time, mixing well after each. Pour batter into crust.
- Place springform pan inside a water bath with warm water halfway up the sides. Bake for 1 hour 10 minutes. Cool gradually with oven door open, then refrigerate until firm, about 5-6 hours.
- Prepare whipped cream and layer scoops of banana flavored ice cream on top of cooled cheesecake, then pipe vanilla whipped cream for decoration.
Notes
Featured Comments
“Impressed! Clear steps and quick weeknight win results. Perfect for busy nights.”
“New favorite here — perfect for busy nights. crowd-pleaser was spot on.”
“Super easy and turned out amazing! My family asked for seconds. Saving this one.”
“This sweet treat was absolutely loved — the light really stands out. Thanks!”
“Made it tonight and wow — quick weeknight win! Will definitely make How to Make a Dreamy Banana Split Dessert again.”
“Packed with flavor and so simple. Exactly what I wanted from How to Make a Dreamy Banana Split Dessert.”


