


There’s something about the crunch and rich sweetness of almond toffee that immediately takes me back to my childhood. I can almost smell the warm vanilla and toasted almonds wafting through my grandma’s kitchen. This recipe is one I’ve been tinkering with for years—trust me, once you get the hang of it, it’s dangerously addictive. It’s not overly complicated, but the key is patience and attention to detail. The best part? It’s a treat that feels fancy but is honestly simple enough to whip up on a weeknight when you need a little comfort. I’ve made this at least a dozen times, and I still get excited every time I break into that shiny, golden slab—kind of like a little piece of happiness. Plus, it’s perfect for sharing, gifting, or just keeping around when you need a quick sugar fix. My kids ask for this all the time, and honestly, I don’t blame them—it’s that good! So, if you love the combination of sweet, crunchy, and nutty, stick around. I promise, once you’ve tried making almond toffee yourself, you’ll never want store-bought again.
What is almond toffee?
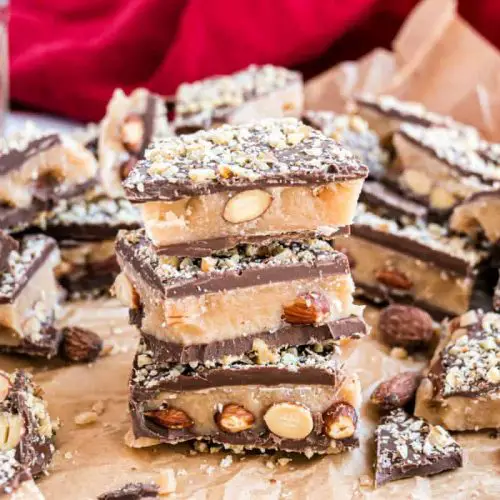
Think of almond toffee as that perfect, buttery, caramelized candy with a lovely crunch. It’s essentially a candy that’s made by cooking sugar, butter, and sometimes a splash of vanilla until it reaches that irresistible golden hue—kind of like that secret way to turn simple ingredients into something magical. Then, it’s poured out onto a baking sheet, sprinkled generously with roasted almonds, and given a quick rest until it’s firm enough to cut. The name “toffee” comes from the process of caramelizing sugar, which gives it that deep, rich flavor and a slightly chewy but mostly crispy texture. It’s a little like praline but in a more grid-like, harder form. I love that it combines the toasted nutty aroma with that sweet, buttery flavor that just kind of melts in your mouth. Think of it as a grown-up version of those chocolate-covered nuts your kids love, but with a crackly, caramel shell that’s just as good for a cozy night in as it is for gifting. It’s a classic treat, but with a personal touch—because nothing beats homemade, right?
How do you make almond toffee?
Quick Overview
This almond toffee is one of those classic recipes that seems fancy but is honestly straightforward. You start by melting sugar and butter over medium heat until it turns that gorgeous amber color—think maple syrup but richer. While that’s happening, you toast your almonds for extra flavor. Once the caramel is ready, you pour it onto a lined baking sheet, sprinkle with almonds, and let it cool until it’s just set. Then, you break it into pieces and enjoy! The trick is watching the sugar carefully so it doesn’t burn, but don’t worry—once you get the hang of it, it’s a breeze. I always do this when I want a quick, impressive-looking gift or just a little treat for myself after the kids are in bed. It’s that perfect balance of simple steps and big flavor, and I promise, once you try it, it’ll be on your regular rotation.
Ingredients
For the Main Toffee:
– 1 cup (200g) granulated sugar – Use good-quality sugar for the best flavor. I buy organic for that extra depth.
– 1/2 cup (115g) unsalted butter – Nothing fancy here, but make sure it’s real butter, not margarine.
– 1 teaspoon vanilla extract – Adds that warm, sweet aroma.
– pinch of salt – Balances the sweetness nicely.
For the Topping:
– 1 to 1 1/2 cups roasted almonds – I prefer raw almonds, toasted until golden. I do this in the oven at 350°F for 8-10 mins, tossing halfway.
– Optional: Sea salt for sprinkling on top for that perfect sweet-salty combo.
For the Glaze (Optional):
– 1/2 cup dark chocolate chips – Melted for drizzling or dipping.
– 1 teaspoon coconut oil – To make the chocolate glossy and easier to spread.
Step-by-Step Instructions
Step 1: Preheat & Prep Pan
Line a baking sheet with parchment paper or a silicone baking mat—you’ll want a smooth surface for pouring your hot toffee. Preheat your oven to toast those almonds—trust me, it adds a whole new depth of flavor. While the oven warm-ups, have all your ingredients measured out and ready. Safety tip: be careful when working with boiling sugar so you don’t scorch yourself—that caramel gets blisteringly hot!
Step 2: Mix Dry Ingredients
This step is pretty simple—set aside your almonds for now. They’ll go on top later, so just get them toasted and cooled. Toasting almonds really unlocks their flavor, and it takes only about 8-10 minutes in the oven at 350°F. Keep an eye on them because they burn quickly once they start turning golden. Trust me, that little step makes all the difference.
Step 3: Mix Wet Ingredients
In a heavy-bottomed pan, melt the butter over medium heat. Add the sugar and stir constantly—this is when the magic happens. Keep stirring until the mixture is bubbling furiously and turns a deep, amber gold. It’ll smell like caramel heaven! Be patient because this can take about 8-10 minutes. If you see any smoke or smell burnt sugar, turn down the heat immediately—that’s a rookie mistake I’ve made more times than I’d like to admit.
Step 4: Combine
Once the sugar and butter are beautifully caramelized, remove the pan from heat and stir in the vanilla and a pinch of salt. Pour the hot caramel onto your prepared baking sheet and spread it out quickly with a spatula. Don’t wait too long—this stuff cools fast. Sprinkle your toasted almonds evenly over the top while it’s still warm so they stick nicely.
Step 5: Prepare Filling
If you’re adding a chocolate drizzle or dip, melt your chocolate chips with coconut oil in short bursts in the microwave or over a double boiler. Trust me, melting chocolate slowly prevents burning and gives you that glossy finish. Once the toffee is cooled and set (about 20-30 minutes), drizzle the melted chocolate over the surface—use a spoon or a piping bag for a pretty finish. Sprinkling a pinch of sea salt on top adds that perfect sweet-salty contrast.
Step 6: Layer & Swirl
If you want a marble effect or a swirl of chocolate, do this while the chocolate is still warm and runny. Use a toothpick or a skewer to create gentle swirls. I love doing this to make it look a little more homemade and artsy. Once it’s fully cooled, you can also break it into uneven chunks for that rustic, homemade vibe.
Step 7: Bake
This isn’t a baked good that needs oven time—once you pour the caramel and almonds it’s ready to cool. Just give it enough time to set up—about 20-30 minutes at room temperature or in the fridge if you’re in a hurry. Just keep it away from humidity because it can make the toffee sticky instead of crisp.
Step 8: Cool & Glaze
Let your toffee cool completely before breaking it into pieces. If you added chocolate, the cooling process also helps the topping set. I like to leave it on the counter—trying not to sneak a piece when nobody’s looking. Once cooled, it’s ready to be enjoyed or stored for later.
Step 9: Slice & Serve
Use a sharp knife to cut clean squares or rectangles—this prevents cracking or crumbling. Serve it on a pretty plate with a mug of coffee or tea, and watch how fast it disappears! I love wrapping it up in wax paper and tying it with a ribbon as a sweet gift. Honestly, I wouldn’t be surprised if your friends ask for the recipe after they taste it.
What to Serve It With
Almond toffee is a total chameleon—it can go from a casual snack to a fancy dessert in seconds. For breakfast, I love pairing it with a hot coffee or a latte—there’s something about the nutty crunch that pairs beautifully with coffee’s bitterness. It’s also fantastic on a brunch table alongside fresh fruit, yogurt, and croissants, making everything feel a little more indulgent. When I make it for dessert, I like to serve it with a scoop of vanilla ice cream or a dollop of whipped cream—a little scoop of salted caramel ice cream on the side only amplifies the caramel goodness. And for a more casual vibe, I toss broken pieces into a bowl with some nuts and dried fruit for a sweet, crunchy snack. Family traditions? Oh yes—this is always a hit during the holidays, gift exchanges, or at birthday parties. I sometimes hide a few pieces just for myself when nobody’s looking—because who can resist that perfect bite of crunch and toffee sweetness?
Top Tips for Perfecting Your Almond Toffee
Over the years, I’ve picked up a few tricks to make sure every batch turns out just right. First, always toast your almonds—this is non-negotiable if you want that deep, roasted flavor that makes the toffee special. When melting the sugar, stay nearby and stir constantly—hot sugar can burn fast, and burnt toffee is the worst! I learned this the hard way. If you want a really shiny, professional-looking top, melt your chocolate along with a teaspoon of coconut oil; it’ll give you a beautiful, glossy finish that’s perfect for gifting. For textures, don’t overmix once you add the butter—just a gentle stir is enough. If you want to switch up the nuts, walnuts or pistachios work beautifully, too. Just remember, the crunch is what makes this recipe stand out. A little sprinkle of flaky sea salt before it cools really brightens the flavor and cuts some of the sweetness. Also, a quick note on storage—keep it in an airtight container at room temp for up to a week, but if you want it to stay crisp longer, stash it in the fridge. Freezing works too; just wrap tightly and thaw at room temp. Honestly, every time I make this, I learn something new—like how adding a pinch of cinnamon makes the flavor even richer. Trust me, once you get comfortable, you’ll experiment endlessly, because that’s part of the fun. And don’t be discouraged if it seems tricky the first time—practice makes perfect, and I promise, the smell alone when it’s baking is worth every effort.
Storing and Reheating Tips
Your homemade almond toffee is worth saving! To keep it crisp and fresh, store it in an airtight container at room temperature—preferably layered with parchment paper to prevent sticking. It’s good for about a week this way, but honestly, it disappears faster than you’d imagine. If you want to keep it longer, wrap individual pieces tightly in plastic wrap or foil and stash them in the fridge for up to two weeks. Want to freeze it? No problem. Wrap the pieces well in plastic wrap, then place them in a zip-top bag or airtight container. It’ll keep well for up to a month. When you’re ready to enjoy, thaw at room temperature for about 15 minutes. If you added chocolate, you can reheat it gently in the microwave for a few seconds—just enough to soften. As for the glaze, if you want that glossy, fresh look, it’s best to add it just before serving or re-warming slightly, as it can melt or become dull in storage. Honestly, I’ve found that the secret to keeping it tasting fresh is to cut only what you plan to eat at a time—less temptation to nibble on the whole batch in one go!
Frequently Asked Questions
Final Thoughts
There’s just something about making your own almond toffee that feels like a small act of love—whether you’re treating yourself or sharing with friends and family. The combination of crispy, caramelized sugar and toasted almonds is endlessly satisfying, and once you get the hang of it, it’s surprisingly forgiving. I’ve learned that patience is key—waiting for that perfect golden hue makes all the difference—and that a sprinkle of sea salt on top can elevate the flavor to new heights. This recipe is a real keeper, and I promise it’s worth every gooey, crunchy bite. I love experimenting with different nuts or adding a drizzle of dark chocolate once it’s cooled—so many ways to make it your own. If you give it a try, let me know how it goes! I’d love to hear about your variations or any tips you discover along the way. Happy baking—and get ready for everyone asking for seconds!
almond toffee
Ingredients
Main Ingredients
- 0.5 cup unsalted butter
- 0.5 cup margarine
- 1 cup granulated sugar
- 0.25 teaspoon kosher salt
- 0.5 teaspoon vanilla extract
- 12 ounce milk chocolate (melted)
- 1 cup unblanched whole almonds
- 1 cup finely ground walnuts
Instructions
Preparation Steps
- Arrange almonds in a single layer on a foil-lined baking dish or in a silicone brownie bite pan. Set aside.
- Combine butter, margarine, sugar, salt, and vanilla extract in a heavy pan. Cook over medium-high heat until butter melts, stirring constantly, until mixture comes to a rolling boil.
- Continue boiling and stirring for about 5-7 minutes until the mixture reaches approximately 300°F (hard crack stage). Quickly pour over almonds. Use a small scoop if using a pan with individual compartments.
- Allow to cool completely for about 2 hours.
- Spread melted milk chocolate over the cooled toffee. Sprinkle ground walnuts on top. Chill until chocolate is set. Cut into pieces if not using a pan.
Notes
Featured Comments
“Impressed! Clear steps and perfect for busy nights results. Perfect for busy nights.”
“New favorite here — turned out amazing. crowd-pleaser was spot on.”
“Super easy and turned out amazing! My family asked for seconds. Saving this one.”
“This sweet treat was absolutely loved — the silky really stands out. Thanks!”
“Made it tonight and wow — comforting! Will definitely make How to Make Delicious Marzipan Toffee Bites again.”
“Packed with flavor and so simple. Exactly what I wanted from How to Make Delicious Marzipan Toffee Bites.”


