

There’s something downright magical about sinking your teeth into a perfect piece of toffee—those rich, buttery bites that melt slowly and leave you craving more. I’ll admit, I’ve always been a sucker for anything caramelized and candy-like, but toffee? That one’s a special kind of love. I still remember my grandma’s kitchen, the warm smell of butter bubbling away, and her gentle hand stirring that golden mixture until it caught the light just right. Honestly, nothing beats that nostalgic scent, and over the years, I’ve tried dozens of recipes, tweaking them here and there, but the one I’m sharing today? It’s my forever favorite. It’s incredibly simple to make, requires just everyday ingredients, and the end result is a sweet, crunchy treat that disappears faster than I can blink—particularly in my house, where my kids ask for seconds before I’ve even plated it. Whether you’re craving a quick homemade gift or just want to satisfy that sweet tooth, this toffee is your new best friend. And trust me, with just a little patience and some gentle attention, you’ll have this irresistible, buttery, perfectly crisp toffee ready in no time. So, let’s get into the kitchen and make some magic happen!
What is toffee?
Think of toffee as the luxurious cousin of caramel—it’s essentially a candy made by cooking sugar (or syrup) with butter until it’s deeply caramelized, giving it that rich, complex flavor. Its name comes from the old French word “tuffeau,” which referenced a type of stone, but in the modern kitchen, we’re talking about that glossy, crunchy, golden-brown delight. It’s a bit like brittle, but with a softer, more buttery twist. What makes toffee so special is the way it balances sweetness with those toasty, sometimes nutty undertones—thanks to the caramelization process. It’s versatile too! You can enjoy it plain, top it with chocolate, sprinkle it with sea salt, or even add nuts for crunch. This treat can be enjoyed on its own, crushed into toppings, or packaged beautifully for gifting during holidays or special occasions. It’s comforting, elegant, and always just a little indulgent—perfect for when you want something sweet that feels like a warm hug from the kitchen.
Why do you like this toffee recipe?
What I love most about this particular toffee recipe is how surprisingly easy it is to pull off, even if you’re new to candy-making. The ingredients are simple, usually just sugar, butter, and a touch of vanilla or salt, and the whole process is mostly about patience—watching that sugar bubble and turn a gorgeous amber, then pouring it out while still hot. I’ve tested this recipe countless times, and it never fails to deliver that perfect crunch with a buttery richness that makes my kids ask for “just one more piece.” Honestly, the smell alone brings everyone to the kitchen—a deep, toasty aroma that’s oddly comforting. Plus, it’s budget-friendly and so versatile—you can dress it up with dark chocolate drizzles, sprinkle it with sea salt, or toss in chopped nuts for extra texture. One of the best parts? It’s a shockingly forgiving recipe. Even if you accidentally stir too much, or the sugar turns a tad darker than expected, it still ends up tasting divine. This toffee’s a lifesaver on busy nights when you need a quick, satisfying treat for friends or family. Once you make it a few times, you’ll realize it’s one of those recipes that becomes a family tradition—filling the house with warm nostalgia and sweet memories. Trust me, once you see how easy and rewarding it is, it’ll be your go-to for every festive occasion or just because you deserve a little indulgence.
How do you make this irresistible toffee?
Quick Overview
This toffee recipe is all about boiling that buttery sugar mixture until it reaches deep, beautiful caramel tones, then pouring it out to cool — simple but seriously impressive. The trick is in getting that perfect caramel color without burning it, which I’ve learned after many tries. Once cooled, you can enjoy it plain or top with chocolate for an extra wow factor. It’s surprisingly fast — from start to finish, you’re looking at about 30-40 minutes, and most of that time is just monitoring the sugar. What makes this method particularly nice is that it doesn’t require fancy equipment—just a sturdy, heavy-bottomed pan and a spatula. I always do this when I want a quick sweet fix or a gift idea that’s guaranteed to wow. The best part? You control the thickness and flavor, making it uniquely yours. This recipe is a wholesome distraction from store-bought candies, and I promise that once you try it, you’ll never settle for pre-made again.
Ingredients
For the Main Toffee:
– 1 cup (200g) granulated sugar — I like to use a good quality, plain old regular sugar for that pure caramel flavor.
– ½ cup (115g) unsalted butter — I always go for unsalted so I can control the salt levels. Stick with high-quality butter for extra richness.
– 1 teaspoon vanilla extract — Feel free to swap this for a splash of almond or espresso extract if you want something different.
– Pinch of salt — This helps enhance the caramel flavor and balance the sweetness.
Optional Toppings:
– ½ cup chopped nuts (almonds, pecans, or walnuts) — For crunch and flavor.
– Melted chocolate or chocolate chips — For a decadent chocolate-topped version.
– Sea salt — Just a pinch on top for that sweet-salty contrast.
Step-by-Step Instructions
Step 1: Preheat & Prepare Pan
First, line your baking sheet with parchment paper or a silicone baking mat—it makes pulling the toffee off so much easier later. Have your spatula ready and keep your ingredients nearby because once the sugar hits that perfect amber, you’ll want to work quickly. Set your oven-safe skillet or heavy-bottomed pan over medium heat. Trust me, a sturdy pan makes all the difference in preventing scorching or uneven cooking.
Step 2: Mix Dry Ingredients
No dry ingredients here, but good prep means having your butter and vanilla measured out beforehand. This way, when the sugar is ready, you can jump right into the next step without fussing around. Quick tip — I always double-check my ingredients; old or damp sugar can mess with the consistency.
Step 3: Mix Wet Ingredients
In your pan, melt the butter gently over medium heat. Once melted, add the sugar gradually, stirring constantly with a heatproof spatula or wooden spoon. It’ll seem like the sugar isn’t dissolving at first, but give it a little patience. Keep stirring until the mixture is smooth and begins bubbling.
Step 4: Combine
Now, turn up the heat slightly; the mixture will start to boil vigorously. Keep stirring gently, watching the color deepen—a golden to amber hue is what you’re aiming for. This process takes about 8-10 minutes. Don’t rush or turn the heat too high; slow and steady wins this candy’s perfection.
Step 5: Prepare Filling
If you’re adding nuts or other fillings, do so now. If you want a simple toffee, skip this step. For extra richness, I sometimes sprinkle coarse sea salt over the boiling mixture right before pouring—it creates that perfect sweet-salty combo everyone loves.
Step 6: Layer & Swirl
Pour the hot toffee onto your prepared baking sheet. Be careful—they’ll be blazing hot! Smooth it out quickly with your spatula, then if you’re adding toppings, sprinkle or swirl them gently on top while it’s still warm. For chocolate drizzle, I like to add melted chocolate once it’s cooled slightly—trust me, it’s worth the wait.
Step 7: Bake
No baking needed here—just let the toffee cool completely at room temperature. If you’re in a hurry, pop it in the fridge after it cools enough to harden the surface. Remember, patience is key for that perfect crunch. Cool for at least an hour before breaking into pieces.
Step 8: Cool & Glaze
Once cooled, break into shards or squares. If you want a glossy, chocolatey topcoat, melt your chocolate and spread or drizzle over the cooled toffee. Let it set for about 15 minutes at room temp or in the fridge for quicker results.
Step 9: Slice & Serve
Use a sharp knife for clean cuts—warm the blade for smoother slicing. Serve on a nice plate, maybe with a cup of tea or coffee; this toffee always feels like a little luxury. It’s perfect as a light dessert or even a gift wrapped in pretty paper. Honestly, I love sharing this with friends—my own little sweet secret.
What to Serve It With
This toffee pairs beautifully with so many things! For breakfast, I love snapping a small piece alongside my morning coffee—it kind of feels like a treat but secretly wakes up my taste buds. For brunch, serve it chopped alongside fresh fruit and yogurt, or crumble bits onto pancakes for a caramel crunch. When I want a decadent finish after dinner, I melt some more chocolate to drizzle over the pieces, adding a flaky sea salt sprinkle for extra punch. It’s fantastic on ice cream, crumbled over cheesecake, or even tucked into gift boxes for friends during the holidays. My family especially loves it wrapped in cellophane with a pretty ribbon—simple, elegant, and delicious. Honestly, it’s one of those recipes that becomes a family favorite—everyone asks for seconds, and I always keep a few pieces aside for myself when I sneak in a quiet moment. This toffee feels like a warm hug in every bite, a little piece of comfort that’s just fancy enough to impress anyone. Plus, making it together is such a fun project—kids love watching it bubble and turn that deep amber, and it’s a sweet way to teach them patience and a little culinary chemistry. I say, dive in, play around with toppings, and enjoy every crisp, buttery bite!
Top Tips for Perfecting Your Toffee
After making this recipe dozens of times, I’ve learned a few tricks that help turn out perfect every single time. First, always use a heavy-bottomed pan—thin pans tend to burn the sugar unevenly, and burnt toffee is a disappointment no one wants. When cooking the sugar mixture, patience is everything—I never turn up the heat too high, because that’s how you burn the sugar or end up with grimy, uneven toffee. Keep a close eye on the color; once it hits that deep amber, remove it from the heat immediately, because it can darken quickly and tip into bitterness. For added flavor, I sometimes toss in a pinch of fleur de sel or a sprinkle of crushed sea salt just as I pour it onto the baking sheet—that salt elevates the caramel notes like nothing else. When swirling toppings or chocolate, act quickly before the toffee sets—using a toothpick or skewer to create pretty marbled effects can turn it into a real showstopper. I’ve also experimented with different nuts—almonds give a lovely crunch, but walnuts add a slightly bitter contrast that’s surprisingly good.
Remember, the key is in the timing—don’t rush cooling, and always store in airtight containers to keep that crisp texture. I’ve found that wrapping pieces in parchment and stacking them carefully keeps the toffee from sticking together. Don’t be discouraged if your first batch isn’t perfect—I’ve burnt sugar several times before I nailed the technique! The most important thing is to enjoy the process and savor that first crunchy, gooey bite. With a little practice, you’ll be whipping up batches of toffee that look just as good as they taste, and your friends will be begging for the secret.
Storing and Reheating Tips
Storing toffee is pretty straightforward, but a couple of little tricks make a big difference in keeping it fresh and crispy. Once cooled completely, I suggest wrapping each piece tightly in parchment or storing in an airtight container. If kept at room temperature, it stays crunchy for about a week—just be sure to keep it away from humidity or direct sunlight, or it might become sticky. For longer storage, pop it in the fridge—this actually helps maintain that perfect crunch—but make sure it’s sealed well, because toffee tends to absorb other fridge odors. When you’re ready to enjoy it again, you can let it come to room temperature or warm it slightly in the oven at low heat (around 200°F). Want to freeze? Wrap tightly with plastic wrap, then in foil—this keeps the flavor fresh. Thaw at room temp for best results. And if you’ve added chocolate or toppings on top, I recommend only doing those right before serving or after reheating, to keep everything looking pristine. Honestly, the only thing to watch out for is moisture—so airtight is the way to go. Keep your toffee dry, cool, and well-wrapped, and it’ll be a guaranteed treat even weeks after you make it.
Frequently Asked Questions
Final Thoughts
There’s a certain magic in making your own toffee—this golden, buttery candy that feels like an instant hug. Every time I craft a batch, it brings back memories of holiday gatherings, weekend baking with my kids, and quiet evenings when I indulge in just one little square. It’s reality-proof, budget-friendly, and incredibly satisfying—trust me, once you master this recipe, it’ll become a staple in your kitchen arsenal. Plus, the joy of sharing handmade treats with loved ones is truly priceless. Whether you’re gifting it, serving it alongside coffee, or just enjoying a quiet moment with a piece on the couch, this toffee never disappoints. My advice? Don’t be afraid of the sugar’s color changing—look for that deep amber hue, and pull it off the heat immediately. Every bite is a little celebration, so go ahead, get your ingredients ready, and create something sweet and special today. Can’t wait to hear how yours turns out—happy baking!
Toffee
Ingredients
Main Ingredients
- 0.5 cup unsalted butter
- 0.5 cup margarine
- 1 cup granulated sugar
- 0.25 teaspoon kosher salt
- 0.5 teaspoon vanilla extract
- 12 ounce milk chocolate (melted)
- 1 cup unblanched whole almonds
- 1 cup finely ground walnuts
Instructions
Preparation Steps
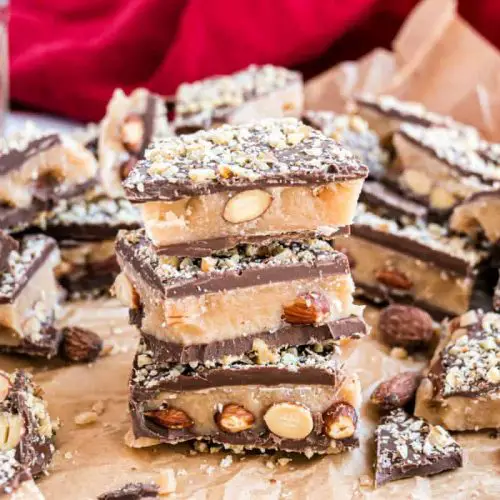
- Line a baking dish with aluminum foil or use a silicone brownie bite pan. Arrange almonds in a single layer and set aside.
- In a heavy saucepan, combine butter, margarine, sugar, salt, and vanilla extract. Cook over medium-high heat, stirring constantly until the butter melts and mixture starts to boil.
- Continue boiling and stirring for an additional 5-7 minutes until the mixture reaches about 300°F (hard crack stage). Pour the hot toffee over the almonds in the prepared dish.
- Allow the toffee to cool completely, about 2 hours. Spread melted milk chocolate evenly over the cooled toffee, then sprinkle with ground walnuts.
- Let the chocolate set at room temperature or in the fridge. Once set, break into pieces or cut into squares. Store in an airtight container.
Notes
Featured Comments
“I’ve always been a huge toffee fan, and these almond treats look absolutely irresistible—thanks for the recipe!”
“Impressed! Clear steps and absolutely loved results. Perfect for busy nights.”
“New favorite here — crowd-pleaser. crowd-pleaser was spot on.”
“Super easy and turned out amazing! My family asked for seconds. Saving this one.”
“This sweet treat was absolutely loved — the fresh really stands out. Thanks!”
“Made it tonight and wow — spot on! Will definitely make How to Make Delicious Toffee Almond Treats again.”


I’ve always been a huge toffee fan, and these almond treats look absolutely irresistible—thanks for the recipe!