

If you’re anything like me, fall just hits differently when there’s a batch of these pumpkin cheesecake bars sitting on the countertop. I still remember the first time I made them — the warm, spicy scent filling my kitchen, perfectly creamy, with that crumble crunch on top. Honestly, they’re like pumpkin pie and cheesecake had a tasty, beautiful lovechild. And what’s so great about these bars is that they’re simple enough to whip up on a busy weeknight but impressive enough to serve to guests. My kids ask for these all the time, especially when we’re craving something sweet and comforting but don’t want to fuss over complicated desserts. Plus, they disappear in minutes at my house, so I always make a double batch now. Trust me, once you try these pumpkin cheesecake bars, they’ll be your go-to for pumpkin season — and maybe year-round, if you’re like me!
What is Pumpkin Cheesecake Bars?
Think of pumpkin cheesecake bars as the lovechild of your favorite fall pumpkin spice latte and a rich, velvety cheesecake — all baked into a portable, sliceable treat. The “bars” here are essentially a cookie crust topped with a luscious pumpkin-spiced filling, finished with a swirl of cream cheese goodness. The name is straightforward, but don’t let that fool you — every bite is packed with warm cinnamon, nutmeg, ginger, and that unmistakable pumpkin flavor we all adore. It’s a dessert that’s as comforting as a cozy sweater and as festive as a pumpkin patch visit. The beauty of these bars is that they’re pretty forgiving — once you get the hang of layering and swirling, you’ll have a show-stopping dessert every time. And I love that they combine the best of both worlds: the creamy richness of cheesecake with the seasonal charm of pumpkin. I promise, once you make these, you’ll be making them each fall — maybe even in summer, if you’re feeling a little pumpkin-spiced rebellion!
How do I make pumpkin cheesecake bars?
Quick Overview
This recipe is surprisingly straightforward. You start by creating a buttery crust, then mix up a luscious pumpkin-spiced filling with cream cheese, sugar, and eggs. After pouring it over the crust, you swirl in some extra cream cheese to make those pretty marbled patterns before baking everything to perfection. Once cooled, a quick glaze or dusting of powdered sugar makes it look as lovely as it tastes. The beauty is in the layering — you get that crispy bottom, creamy middle, and the ribbon of swirled cream cheese that makes each bite interesting. The whole process takes about 45 minutes to prep and an hour in the oven, but it’s so worth every minute. Honestly, once you try it, you’ll be hooked — it’s that good and that easy to make.
Ingredients
For the Main Batter:
- 1 ½ cups graham cracker crumbs or digestive biscuits, crushed finely
- ½ cup unsalted butter, melted (or coconut oil for dairy-free)
- ¼ cup granulated sugar
For the Filling:
- 16 oz (about 450g) cream cheese, softened
- 1 cup canned pumpkin puree (not pumpkin pie filling!)
- ½ cup granulated sugar
- 2 large eggs
- 1 teaspoon vanilla extract
- 1 ½ teaspoons pumpkin pie spice (or mix of cinnamon, nutmeg, ginger, cloves)
- ¼ teaspoon salt
- ½ cup sour cream or Greek yogurt (for extra silkiness)
For the Glaze (optional):
- ½ cup powdered sugar
- 1-2 teaspoons milk or cream (for thinning)
- Cinnamon or pumpkin spice for sprinkling
Step-by-Step Instructions
Step 1: Preheat & Prep Pan
Set your oven to 350°F (175°C). Line a 9-inch square baking pan with parchment paper, leaving a slight overhang on the sides — this makes lifting out the bars so much easier. Lightly grease the parchment if needed. This step helps prevent sticking and makes cleanup a breeze.
Step 2: Mix Dry Ingredients
Combine the graham cracker crumbs and sugar in a bowl. Pour in the melted butter and stir until the mixture is evenly coated and crumbly. This is your base, so don’t skip the butter — it helps everything stick together and lends that perfect crispy edge after baking.
Step 3: Mix Wet Ingredients
In another bowl, beat the softened cream cheese until smooth and fluffy, then add the pumpkin puree, sugar, vanilla, spices, salt, and sour cream. Mix until everything’s nicely combined and silky. The smell alone at this stage is divine — spicy, warm, pumpkin-y heaven.
Step 4: Combine
Press the crumb mixture firmly into the bottom of your prepared pan, spreading it out evenly. Then pour the pumpkin filling over the crust. Use a spatula to gently smooth out the top. This is where patience pays off — making sure the filling is evenly distributed helps with perfect slices later.
Step 5: Prepare Filling
In a small bowl, mix a little extra cream cheese and swirl it over the pumpkin layer. Use a toothpick or skewer to create swirling patterns, which give the bars that beautiful marbled look. Trust me, this step makes all the difference visually and flavor-wise.
Step 6: Layer & Swirl
Gently run a toothpick or skewer through the filling to create marbling. The key is to be gentle — you want patterns that look artistic, not mashed together. Don’t overdo it, or the swirl will blend into a boring uniform color.
Step 7: Bake
Bake in the preheated oven for about 50-60 minutes, or until the center is just set but still slightly jiggly. I always do the toothpick test — insert it in the center, and if it comes out with moist crumbs (not wet batter), you’re good. The edges might be slightly puffed and cracked — that’s totally normal and shows hot air doing its thing. Let it cool completely before slicing.
Step 8: Cool & Glaze
Once cooled, mix your powdered sugar with a little milk or cream until smooth. Drizzle over the top, then sprinkle with a pinch of cinnamon or extra pumpkin spice. The glaze adds just the right touch of sweetness and a glossy finish that makes the bars look almost restaurant-worthy.
Step 9: Slice & Serve
Use a sharp knife to cut clean slices — I like to wipe the knife between cuts to keep it neat. Serve these chilled or at room temperature. They’re amazing with a cup of coffee, a dollop of whipped cream, or even a scoop of vanilla ice cream on the side. Honestly, I’d say these bars are best enjoyed within two days, but they’re so good, they usually don’t last that long!
What to Serve It With
If you’re wondering how to make your pumpkin cheesecake bars even more special, here are some serving ideas I swear by:
For Breakfast: Pair a warm slice with your morning coffee or chai latte. Both completely elevate the experience. I love serving these with a dollop of Greek yogurt and a sprinkle of crushed pecans — it’s like pumpkin pie for breakfast without the guilt.
For Brunch: These make a decadent addition to any brunch buffet. Think about slicing them into smaller squares and placing them on a platter with fresh fruit and sprigs of mint. Serve alongside some hot tea or spiced cider, and you’re all set for a cozy, festive vibe.
As Dessert: Warm or cold, these bars hit the spot after any meal. Top with whipped cream or a drizzle of caramel for extra indulgence. My friends always ask for seconds — they’re that good!
For Cozy Snacks: Sometimes, I cut a small piece and nibble on it with a mug of spiced apple cider. It’s pure comfort. The fallback is always to refrigerate leftover bars, so I can enjoy a mini pumpkin cheesecake bite anytime I need a pick-me-up.
Making and sharing these pumpkin cheesecake bars turns any ordinary day into a celebration. They’re like a warm hug on a plate, and honestly, I can’t think of a better way to welcome pumpkin season than with these in hand.
Top Tips for Perfecting Your Pumpkin Cheesecake Bars
Over the years, I’ve learned a few tricks to make these bars as perfect as possible. Here’s what I always do:
- Crust concerns: Don’t pack the crust too tightly — it’ll bake up crispy and yummy. If it seems too crumbly, add another tablespoon of melted butter to help it bind.
- Balancing moisture: Pumpkin and sour cream are both moist, so be careful not to overmix — this can make the filling airy and cause cracks during baking. Mix just until smooth and combined.
- Swirl finesse: A toothpick is your best friend here. Gently drag it through the filling to create more intricate swirl patterns. Less is more — you want delicate marbling, not streaky chaos.
- Ingredient swaps: Gluten-free graham crackers? Use gluten-free digestive biscuits. Vegan? Swap cream cheese for vegan cream cheese or blended silken tofu. I’ve tested these swaps — they work great, just adjust your baking time slightly.
- Baking tips: Oven temperatures vary, so start checking around the 50-minute mark. Use a light tapping — when the edges are set but the center jiggles slightly, it’s done. If it cracks too much, don’t worry — it still tastes divine!
- Glaze wisdom: Keep it thick but pourable. If you want a shiny finish, add a touch more milk. For a spiced touch, sprinkle cinnamon on top after glazing.
Honestly, I’ve made these so many times that I’ve learned to trust my instincts — and the smile on everyone’s face when they take that first bite makes all the small mistakes worth it. I hope these tips help you nail your own batch!
Storing and Reheating Tips
If you’ve got leftovers (which my family and I rarely do!), here’s how I store and enjoy these pumpkin cheesecake bars later:
Room temperature: They’re good for about 2 days if kept covered tightly with plastic wrap or in a cake dome. Just remember, the filling is quite soft — so don’t leave them out in the sun or in a warm kitchen!
Refrigerator Storage: Wrap the whole pan tightly with plastic wrap or store in an airtight container. They’ll last 4-5 days this way, and the chilled version just gets creamier. Before serving, let them sit out for 10-15 minutes so they’re not too cold, which dulls flavors.
Freezer Instructions: Wrap individual slices well with plastic wrap, then place in a resealable freezer bag. They’ll keep for up to 3 months. Thaw in the fridge overnight, then let sit at room temperature for a few minutes before slicing and serving. They’re surprisingly freezer-friendly — I’ve made this ahead for holiday pies!
Glaze Timing: If you’re freezing, I recommend adding the glaze after thawing so it stays nice and glossy. You can also freeze without glaze and add a fresh drizzle when serving for maximum wow factor.
Basically, these bars hold up pretty well, and with a little care, you can enjoy their creamy pumpkin-spiced goodness anytime you crave it. The key is airtight storage and gentle reheating.
Frequently Asked Questions
Final Thoughts
If you’ve been searching for a cozy, crowd-pleasing dessert that screams fall but is simple enough for any busy weeknight, these pumpkin cheesecake bars are it. They’ve become a staple in my house, especially during pumpkin season — I make a batch, and suddenly, everyone’s gathered around the kitchen, eager for a slice. The blend of creamy pumpkin, warm spices, and that buttery crust is just irresistible. Once you make these, I think you’ll find that they’re more than just a dessert — they’re a little piece of seasonal happiness baked into bars. The best part? They’re so easy, even if you’re new to baking, you’ll have a gorgeous, delicious treat in no time. So go ahead — grab your ingredients, and let’s make some magic happen in the kitchen. Can’t wait to hear how yours turn out! Happy baking!
pumpkin cheesecake bars
Ingredients
Main Ingredients
- 2 cups pumpkin puree
- 0.5 teaspoon salt
- 14 ounces evaporated milk
- 2 large eggs
- 0.75 cup granulated sugar
- 1 teaspoon cinnamon
- 0.5 teaspoon allspice
- 1.25 cups crushed gingerbread cookies
- 5 tablespoons unsalted butter
- 8 ounces cream cheese (at room temperature)
- 0.25 cup superfine sugar
- 0.75 cup milk (I prefer whole)
- 0.5 teaspoon vanilla
Instructions
Preparation Steps
- Add all ingredients to a large bowl and combine by hand until creamy. Set aside while preparing crust.
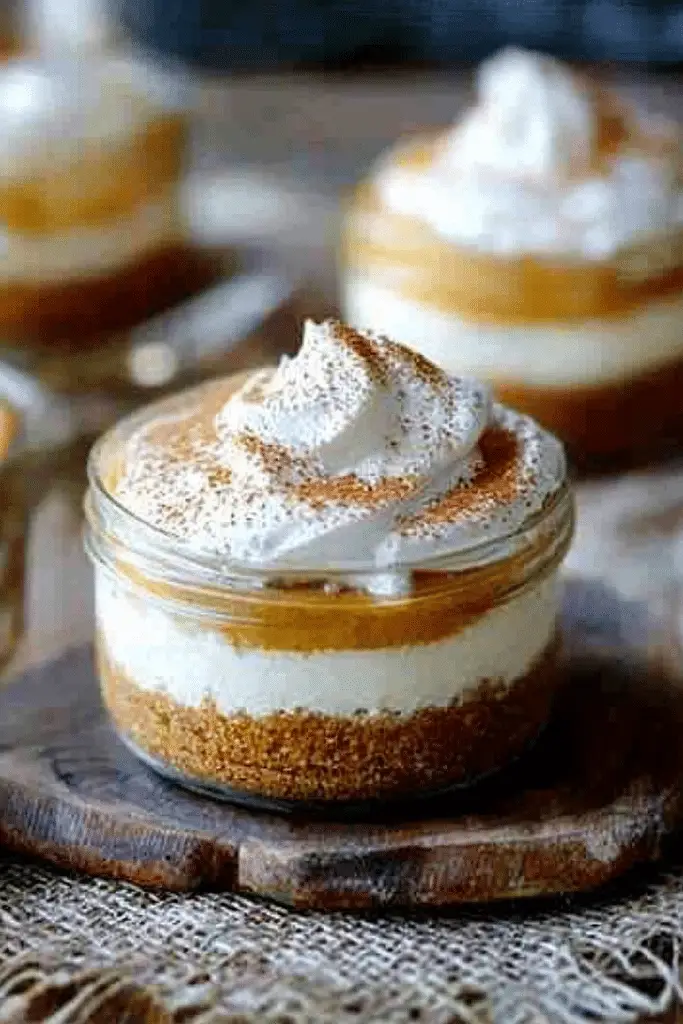
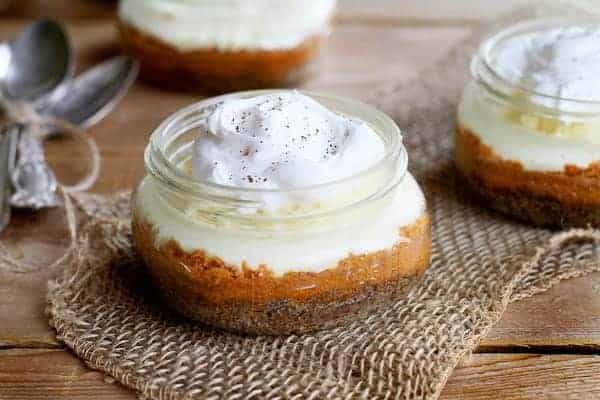
- Preheat oven to 350 degrees F. In a bowl, add melted butter to crushed gingerbread cookies. Spray six wide-mouth half pint jars with non-stick spray. Spread about 1/4 cup of gingerbread crust evenly over the bottom of each jar.
- Place jars on a cookie sheet and bake for 5 minutes to set the crust.
- Remove jars from oven and immediately pour pumpkin filling over the crust, leaving space for the cheesecake layer.
- Bake jars for 20-25 minutes, or until the filling is set. Cool to room temperature.
- Beat room temperature cream cheese with superfine sugar, most of the milk, and vanilla until smooth. Carefully spoon over cooled pumpkin filling and refrigerate until ready to serve.
- Top with whipped cream, crushed gingersnap cookies, caramel sauce, or cinnamon as desired before serving.
Notes
Featured Comments
“I just tried these and they're incredible! Perfect portion control with such rich, creamy flavor. Definitely making these again this weekend.”
“Impressed! Clear steps and so flavorful results. Perfect for busy nights.”
“New favorite here — absolutely loved. crowd-pleaser was spot on.”
“Super easy and turned out amazing! My family asked for seconds. Saving this one.”
“This sweet treat was absolutely loved — the bright really stands out. Thanks!”
“Made it tonight and wow — perfect for busy nights! Will definitely make How to Make Pumpkin Cheesecake Bars in a Jar again.”


I just tried these and they’re incredible! Perfect portion control with such rich, creamy flavor. Definitely making these again this weekend.