

There’s something about curling up with a bite-sized treat that’s soaked in whiskey—that warm, boozy punch hits just right after a long day. I’ll never forget the first time I tasted whiskey balls at a holiday party years ago. The richness of the chocolate combined with that little kick of whiskey? It’s pure magic. Since then, I’ve made these countless times for friends’ gatherings, and honestly, they disappear in minutes at my house. My kids ask for these all the time—though they call them “fancy chocolates”—and honestly, I don’t blame them. They’re such an easy, no-fuss dessert that feels absolutely indulgent. If you’re craving something sweet but want a little zing in every bite, trust me on this one: whiskey balls are your new best friend. They’re also a lifesaver on busy nights when I don’t want to bake or fuss over complicated treats. Just a few ingredients, quick prep, and voila—delicious, boozy chocolates ready to impress. Ready to get your hands messy in the kitchen? Let’s do this!
What are whiskey balls?
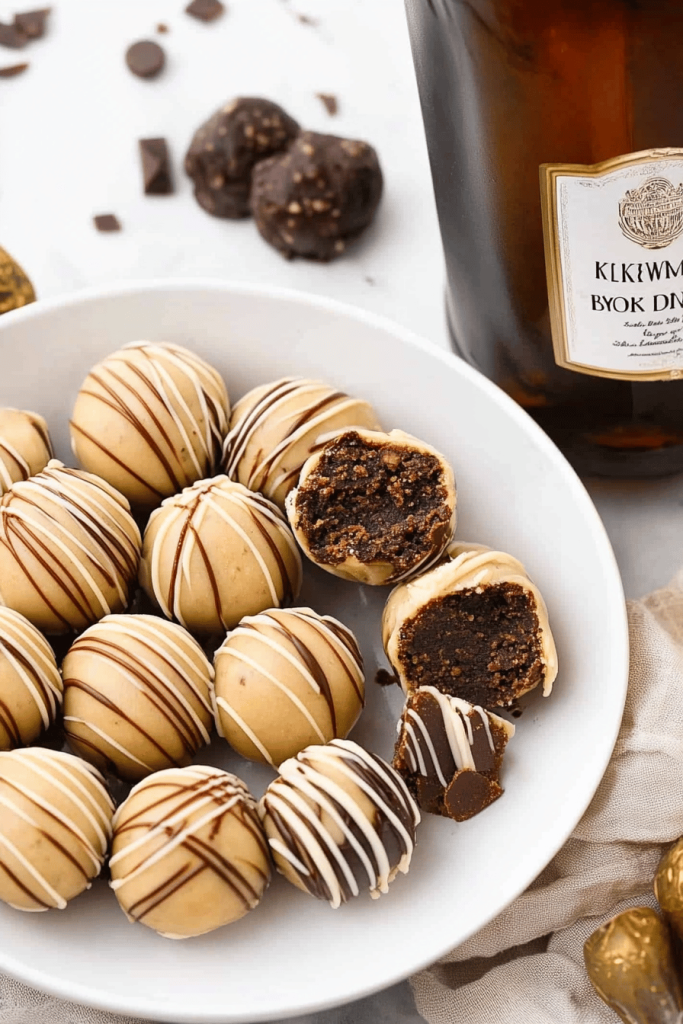
Think of whiskey balls as sophisticated yet fun little chocolates that pack a punch of flavor in every bite. They’re essentially bite-sized balls made from a rich, fudgy chocolate mixture, dusted in cocoa powder or dipped in chocolate, and infused with whiskey. The name “whiskey balls” pretty much sums up the whole vibe: decadent, boozy, and totally addictive. The idea is simple—combine chocolate and whiskey, roll into balls, and then coat or dust them for that perfect finishing touch. Originating from classic party treats, these little delights are popular during the holidays but really, they’re good any time you’re craving something with a bit of a kick. Think of them as the grown-up version of your childhood truffles—only with a spirited twist. My go-to recipe is foolproof, and I love how flexible it is. You can tweak the flavors or coatings to match your mood. Honestly, once you get the hang of it, whiskey balls will be your secret weapon for any celebration—or just because you deserve a treat!
How do you make whiskey balls?
Quick Overview
Making whiskey balls is about as simple as mixing, chilling, and rolling. Start by melting your chosen chocolate, then stir in a splash of whiskey—the more, the merrier. Once the mixture is thick and fudgy, chill it until firm. When ready, scoop out spoonfuls, roll into neat balls, and coat with cocoa powder or dip in melted chocolate for that glossy finish. The key here is patience—let everything chill long enough so the balls hold their shape. In about 30 minutes, you’ll have a tray full of irresistible, boozy bites that are perfect for gifting or enjoying solo. I love how flexible this recipe is—you can make it ahead of time, freeze some for later, and always have a little treat ready to go. Plus, the smell as they’re baking or setting? Pure comfort—reminds me of cozy winter nights. The best part? Once you get the hang of it, it’s so quick, you’ll be making these all the time.
Ingredients
For the Main Batter:
– 1 ¾ cups high-quality semi-sweet or dark chocolate chips or chopped chocolate (trust me, good chocolate makes all the difference)
– ¼ cup unsalted butter (or coconut oil for dairy-free option)
– ½ cup sweetened condensed milk (or evaporated milk for a lighter touch)
– 2 tablespoons whiskey (more if you want a stronger kick)
– 1 teaspoon vanilla extract
– Pinch of salt
For the Filling:
– The chocolate mixture, which you’ll chill and then shape into balls—no fancy filling needed, but you can add chopped nuts or caramel bits for fun.
For the Glaze:
– 1 cup melted chocolate (dark, milk, or white depending on your mood)
– Cocoa powder (for dusting)
– Sprinkles or crushed nuts, if desired
Step-by-Step Instructions
Step 1: Preheat & Prep Pan
Set out a baking sheet lined with parchment paper or a silicone mat. No need to preheat the oven—these are no-bake magic! Just have everything ready. Chilling the mixture later on is key to shaping, so keep some fridge space open.
Step 2: Mix Dry Ingredients
In a microwave-safe bowl, combine your chocolate chips and butter. Microwave in 30-second bursts, stirring in between, until smooth and glossy. This method ensures you don’t overheat the chocolate. Once melted, stir in the sweetened condensed milk, whiskey, vanilla, and salt. Mix until everything’s beautifully combined. It should be thick, fudgy, and shiny. If it’s too runny, pop it in the fridge for 10 minutes—trust me, patience makes perfect balls.
Step 3: Mix Wet Ingredients
Once your mixture is smooth and all ingredients are incorporated, transfer it into a bowl and scoop out about a tablespoon at a time. Your hands will get a little messy here—that’s part of the fun! Roll into small, uniform balls, about 1 inch diameter. If the mixture feels too sticky, sprinkle in a touch more cocoa powder or chill it for a bit; that usually does the trick.
Step 4: Combine
Place the rolled balls on your prepared baking sheet. For a more professional look, you can chill them briefly to set the shape before coating. If you prefer a shiny, dipped look, melt your chocolate for the glaze. I like doing half dipped in chocolate and dusted with cocoa or powdered sugar—depends on the mood!
Step 5: Prepare Filling
This is optional, but if you want to get fancy, stuff these with tiny caramel pieces or chopped nuts before rolling into balls. I tested that last trick after years of making these, and it’s a total game-changer. Just press a small piece into the center of the ball before rolling it smooth again.
Step 6: Layer & Swirl
If you’re going for that marbled effect, drop a dollop of melted chocolate on the ball and use a toothpick or skewer to swirl it around. You can also dip the entire ball into melted chocolate, then place it back on the tray. A quick tip: to avoid drips, use a fork to lift the dipped ball and tap off excess chocolate before placing on your sheet.
Step 7: Bake
No baking involved here—just chilling. Pop your tray into the fridge for at least 30 minutes. If you’re short on time, 15 minutes in the freezer works; just don’t forget to bring them back to room temp before serving for the best flavor.
Step 8: Cool & Glaze
If you’re adding a glaze or chocolate coating, melt your chocolate gently, then dip or drizzle over cooled balls. For a matte, dusted look, sift cocoa powder or powdered sugar over the top once the chocolate has set. Trust me, the aesthetic is almost as good as the taste!
Step 9: Slice & Serve
For perfect presentation, use a sharp, warm knife—dip it in hot water, wipe dry, then slice the whiskey balls. They’re best enjoyed at room temperature, letting that gooey, boozy center shine. I serve these on a pretty plate, maybe with some sprigs of mint or edible glitter for a special touch. They make lovely gifts wrapped in parchment and tied with twine, or just stash a few in your fridge for those moments you crave a grown-up treat.
What to Serve It With
Honestly, whiskey balls are versatile enough to shine in all kinds of settings. For breakfast, I love pairing them with a strong cup of espresso—kind of feels like an elevated coffee break. During brunch, serve them alongside some sweet scones or a cheese platter on a pretty tray; the boozy richness contrasts beautifully with salty cheeses and crisp crackers. If you’re celebrating, pair whiskey balls with a glass of bourbon or a cozy mug of hot toddy—sounds indulgent, right? As a dessert, I often serve them after dinner with a scoop of vanilla ice cream or a drizzle of caramel sauce; it’s basically a fancy, grown-up truffle in every bite. For casual snacking, I tuck a few in a small tin and keep them in the fridge—perfect for unexpected guests or late-night cravings. My family always asks me to make a batch during the holidays because they’re just *that* good. Trust me, these whiskey balls will become a staple in your recipe box, too—so easy and so elevated!
Top Tips for Perfecting Your whiskey balls
Over the years, I’ve learned a few tricks that turn these simple treats into total showstoppers. First, when melting your chocolate, do it gently—microwave in short bursts and stir often to avoid burning. Good chocolate makes all the difference; I swear, the flavor is nothing like those baking chips from a discount brand. When mixing the ingredients, don’t overmix—just combine until it’s smooth. Overmixing can create a waxy texture, and nobody wants that bite. When rolling the balls, wet your hands slightly—moisture prevents the mixture from sticking too much, and your hands won’t get as messy. If your mixture is too loose or sticky, chill it for 15-20 minutes; it firms up beautifully. For the swirl or dip, melting the chocolate slowly on a double boiler or in short bursts in the microwave keeps it silky and shiny. I like to add a touch of sea salt or a dash of cinnamon into the coating for more depth—trust me, those subtle flavor layers make all the difference. Once you get the hang of it, you’ll find new ways to customize each batch. A little experimenting is part of the fun. Oh, and don’t forget: patience is key—chilling is what makes these perfect, so give them time to set before indulging!
Storing and Reheating Tips
These whiskey balls keep surprisingly well, which makes them perfect for making ahead. Store them in an airtight container at room temperature for up to 2 days—just make sure they’re wrapped tightly so they don’t dry out. If it’s warm out—or you want to keep them longer—refrigerate them in an airtight container for up to a week. They’ll stay fresh and tasting just right, especially if you add the glaze or coating after bringing them back to room temp. Want to freeze some? Wrap them carefully in plastic wrap or foil, then store in a freezer-safe container or zip-top bag. They can last up to a month, but I recommend eating them within two weeks for the best flavor. When you’re ready to enjoy, thaw them in the fridge or at room temp for about 15-20 minutes. I’ll often add a fresh dusting of cocoa once they’re defrosted to give that just-made look. A quick tip—if you’ve dipped your balls in chocolate, gently reheat the chocolate for dipping if it hardens up again. The more you practice, the better they get—so don’t fuss too much about perfection. Just enjoy the process and the delicious results!
Frequently Asked Questions
Final Thoughts
If you’ve been searching for that perfect blend of boozy, chocolatey, and downright irresistible, whiskey balls are calling your name. They’re a treat that feels special but is so easy to put together, you’ll wonder why you hadn’t tried earlier. Every time I make a batch, I’m reminded of the cozy nights spent baking and sharing sweets with loved ones. The aroma of melting chocolate, the sight of these little balls rolling around in cocoa—oh, it’s pure comfort. Plus, they’re so adaptable; you can make them your own with different spirits, coatings, or fillings. My advice? Don’t overthink it. Just enjoy the process, have fun experimenting, and savor each bite. I promise, once you try these whiskey balls, they’ll be a regular in your dessert rotation. Happy baking—and cheers to delicious, spirited moments with those you love! I can’t wait to hear how yours turn out, so drop me a comment or share your variations!
whiskey balls
Ingredients
Main Ingredients
- 10 oz shortbread cookies
- 0.75 cup powdered sugar
- 8 oz cream cheese
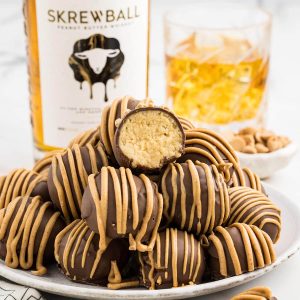
- 0.25 cup Skrewball peanut butter-flavored whiskey
- 16 oz milk chocolate melting discs
- 4 oz Reese’s peanut butter baking chips
- 1 teaspoon coconut oil
Instructions
Preparation Steps
- Line 2 baking sheets with parchment paper or silicone mats and set aside.
- In a food processor, pulse shortbread cookies and powdered sugar until fine crumbs form.
- Add softened cream cheese and whiskey to the processor and blend until smooth.
- Use a cookie scoop to shape mixture into 1.5-inch balls and place on prepared baking sheets.
- Refrigerate for approximately 5 hours until firm.
- Melt milk chocolate discs in microwave at 30-second intervals, stirring in between until smooth.
- Dip whiskey balls into melted chocolate using a fork, tapping off excess, and place back on parchment.
- Melt peanut butter chips and coconut oil in microwave, then pipe over dipped whiskey balls to create a drizzle.
- Refrigerate for an additional 15 minutes until chocolate and drizzle set. Serve chilled.
Notes
Featured Comments
“Impressed! Clear steps and crowd-pleaser results. Perfect for busy nights.”
“New favorite here — crowd-pleaser. crowd-pleaser was spot on.”
“Super easy and turned out amazing! My family asked for seconds. Saving this one.”
“This sweet treat was absolutely loved — the bright really stands out. Thanks!”
“Made it tonight and wow — creamy! Will definitely make How to Make Whiskey Truffles Simply again.”
“Packed with flavor and so simple. Exactly what I wanted from How to Make Whiskey Truffles Simply.”


