

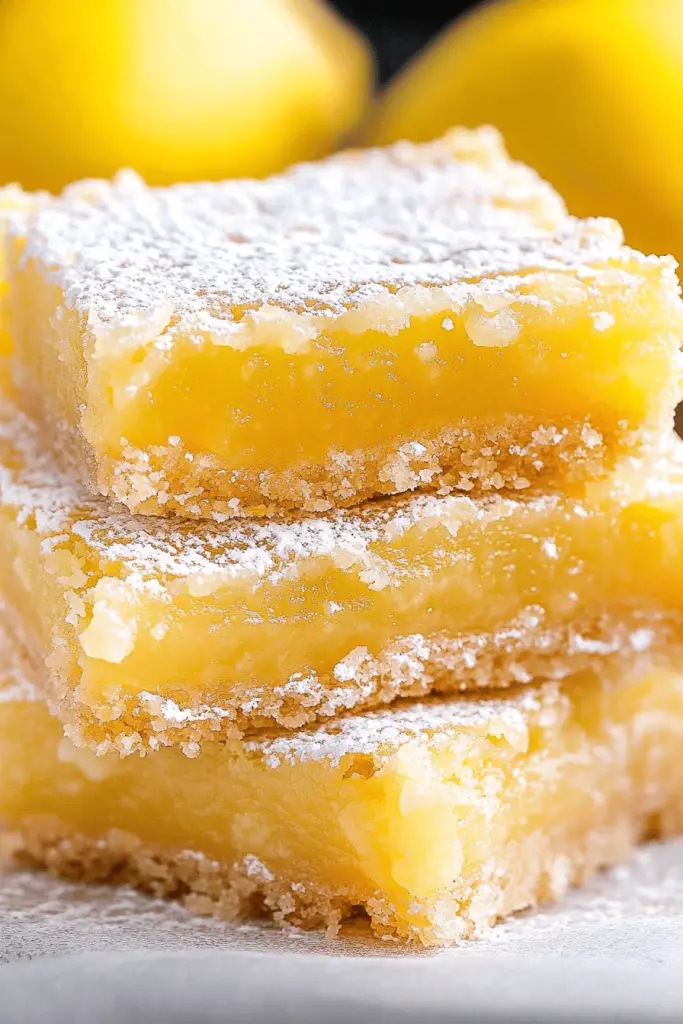
Oh, these lemon raspberry bars! If there’s one dessert that instantly brightens my day and feels like a warm hug, it’s these. I’ve been making them for years, and honestly, they never, ever disappoint. There’s something magical about the way the tangy lemon and sweet, slightly tart raspberries come together in this buttery, shortbread-like base. They remind me of those perfect summer afternoons when everything just feels easy and bright. My absolute favorite thing to compare them to is a classic lemon bar, but with an added burst of fruit that just takes it to a whole new level of deliciousness. It’s the kind of treat that makes people ask, “Where did you get this?” and I get to proudly say, “I made it!” That’s the best feeling, isn’t it? These lemon raspberry bars are truly sunshine on a plate, and I’m so excited to share them with you.
What are lemon raspberry bars?
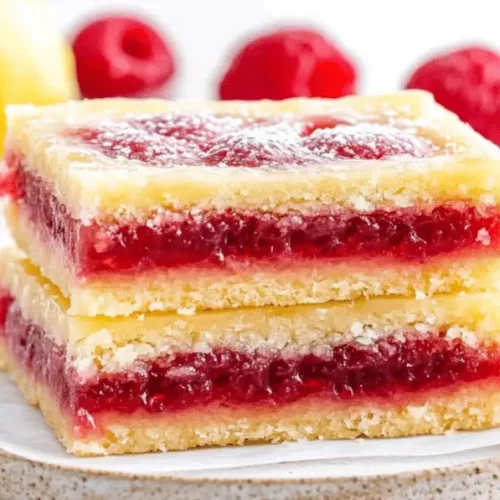
So, what exactly are these delightful Lemon Raspberry Bars? Think of them as the most cheerful cousin of the classic lemon bar. They have a wonderfully tender, buttery shortbread-like crust that’s just firm enough to hold everything together, but still melts in your mouth. Then, there’s the vibrant filling – a silky, bright lemon curd that’s not too sweet and has that perfect zing. And the star of the show? Beautiful bursts of fresh raspberries, either swirled in or scattered throughout, adding little pockets of juicy, fruity goodness. It’s essentially a symphony of textures and flavors: the crumbly base, the smooth filling, and the pop of fresh berries. It’s the kind of dessert that feels elegant enough for guests but is ridiculously easy to whip up on a whim. They’re like a little slice of edible happiness, really!
How do I make lemon raspberry bars?
Quick Overview
Making these Lemon Raspberry Bars is a straightforward process that I’ve streamlined over the years. You’ll start by pressing a simple buttery shortbread mixture into your baking pan, then pouring over a luscious lemon filling speckled with fresh raspberries. Bake until golden and set, then let it cool completely before a final dusting or glaze. It’s honestly that easy! The beauty of this method is that it minimizes mess and maximizes flavor, ensuring you get that perfect balance of crust to filling every single time. Trust me, even if you’re new to baking, you’ve got this!
Ingredients
For the Main Batter (The Crust):
2 cups all-purpose flour
1 cup unsalted butter, softened (I always use good quality butter for the best flavor!)
½ cup granulated sugar (sometimes I use a mix of granulated and brown for a little extra depth)
1 teaspoon vanilla extract
½ teaspoon salt (don’t skip this! It balances the sweetness)
For the Filling:
4 large eggs (room temperature is best for emulsifying)
1 ½ cups granulated sugar
½ cup fresh lemon juice (about 3-4 lemons; use freshly squeezed for the best zing!)
Zest of 2-3 lemons (this is where all that amazing lemon aroma comes from!)
¼ cup all-purpose flour (helps to thicken the filling nicely)
1 cup fresh raspberries (rinsed and patted dry)
For the Glaze (Optional, but recommended!):
1 cup powdered sugar
2-3 tablespoons milk or lemon juice (add just enough to get a drizzly consistency)
Step-by-Step Instructions
Step 1: Preheat & Prep Pan
First things first, get your oven preheating to 350°F (175°C). This ensures it’s nice and hot when your bars are ready to bake. I like to use an 8×8 inch or 9×9 inch baking pan for these. Line it with parchment paper, leaving an overhang on two sides. This makes lifting the bars out so much easier later – it’s a total game-changer and prevents any sticking disasters. Lightly grease the parchment too, just for good measure!
Step 2: Mix Dry Ingredients
In a medium bowl, whisk together your flour and salt. This just makes sure everything is evenly distributed and there are no little pockets of salt. Set this aside for now. It’s a small step, but it helps ensure a consistent crust.
Step 3: Mix Wet Ingredients
In a separate larger bowl, you’re going to cream together the softened butter and sugar. I usually use an electric mixer for this, but you can totally do it by hand if you’re feeling energetic! Beat them until the mixture is light and fluffy, almost like pale yellow clouds. This creaming process incorporates air, which contributes to the tender texture of the crust. Then, beat in the Vanilla Extract until it’s well combined.
Step 4: Combine
Now, gradually add your dry ingredients (the flour and salt mixture) to the wet ingredients. Mix on low speed or stir with a spatula until just combined. You don’t want to overmix here! Overmixing can develop the gluten in the flour, leading to a tough crust, and we definitely don’t want that. It should look like a crumbly dough at this stage. Press this mixture evenly into the bottom of your prepared baking pan. I usually use my hands or the bottom of a glass to get it nice and flat and even. This is your delicious crust!
Step 5: Prepare Filling
In another clean bowl, whisk together your eggs. Then, whisk in the granulated sugar, fresh lemon juice, lemon zest, and the ¼ cup of flour. Whisk it all together until it’s smooth and well combined. You want to make sure there are no lumps of flour. The mixture should look glossy and vibrant yellow. This is the magic part that will bake up into that gorgeous, tangy filling.
Step 6: Layer & Swirl
Pour this lemon filling mixture evenly over the prepared crust. Now, gently scatter your fresh raspberries over the top of the lemon filling. You can just let them sit on top, or if you’re feeling artistic, you can gently swirl them in a bit with a toothpick or knife for a marbled effect. I personally love seeing those pops of red throughout the yellow. Be careful not to swirl too much, or the colors can get a bit muddy.
Step 7: Bake
Pop the pan into your preheated oven. Bake for about 25-35 minutes, or until the edges are golden brown and the center is mostly set but still has a slight jiggle. It shouldn’t look liquidy anymore. The baking time can vary depending on your oven, so keep an eye on them. I usually check around the 25-minute mark. You want the filling to be cooked through but not overbaked, which can make it rubbery.
Step 8: Cool & Glaze
This is perhaps the hardest part: patience! Let the bars cool completely in the pan on a wire rack. I mean *completely* – at least a couple of hours, or even better, pop them in the fridge for an hour after they’ve cooled down a bit. This allows the filling to fully set up. Once they’re cool, you can make the glaze if you’re using it. Whisk the powdered sugar with milk or lemon juice, adding the liquid a tablespoon at a time until you reach a smooth, drizzly consistency. Drizzle this over the cooled bars. You can do a fancy criss-cross or just a freeform drizzle. Let the glaze set for about 15-20 minutes.
Step 9: Slice & Serve
Once the glaze is set (or if you skipped the glaze), use those parchment paper overhangs to carefully lift the entire block of bars out of the pan onto a cutting board. For clean cuts, I like to use a sharp knife that’s been dipped in hot water and wiped dry between each cut. This prevents the glaze from smearing and the bars from sticking. Slice into squares or rectangles, and there you have it! These are best served chilled or at room temperature. Enjoy that burst of sunshine!
What to Serve It With
These Lemon Raspberry Bars are wonderfully versatile and can fit into so many different parts of your day. For a leisurely breakfast, I love them alongside a strong cup of coffee. They’re not too heavy, so they don’t weigh you down, and that little bit of sweetness is just enough to start the day right. I’ll often cut them into smaller squares for a light morning bite.
At brunch, they feel a bit more elegant. I like to arrange them on a nice platter, maybe with a few extra fresh raspberries and a sprig of mint for garnish. They look so appealing against a spread of quiches and fruit salads. And of course, a mimosa or a sparkling lemonade is the perfect beverage pairing.
As a full-on dessert, these bars are a showstopper. They’re fantastic on their own, but you could also serve them with a dollop of whipped cream or a small scoop of vanilla bean ice cream. The cool creaminess is a lovely contrast to the tangy bar. I’ve also found they pair beautifully with a light Moscato or a dessert wine.
And for those cozy snacks or afternoon pick-me-ups, they are just perfect. They’re the kind of treat that makes a simple cup of tea feel like a real indulgence. My kids sometimes ask for these after school, and I always feel good about giving them a treat that has fruit and is homemade. Honestly, my family devours these in minutes whenever I make them, and I’m sure yours will too!
Top Tips for Perfecting Your Lemon Raspberry Bars
Over the years, I’ve picked up a few tricks that I think really elevate these Lemon Raspberry Bars. For the crust, make sure your butter is truly softened, not melted. Softened butter creams with sugar much better, creating that light, tender texture. When you’re pressing it into the pan, make sure it’s even. If one part is thicker than another, it can bake unevenly, and nobody wants a burnt corner or an underdone center.
When it comes to mixing, especially the crust, remember the mantra: “just combined.” Overmixing is the enemy of tender baked goods. You’ll see those little streaks of flour disappear, and that’s your cue to stop. For the filling, whisking until smooth is key to a silky texture. If you have any lumps of flour, they can sometimes create little gummy pockets, which isn’t ideal.
For the swirl, if you choose to do one, don’t go overboard. A gentle swirl is enough to get those beautiful streaks of color. If you over-swirl, the lemon filling can become a bit murky. Sometimes, I even like to just press half the raspberries into the filling right before baking for a more uniform distribution, rather than swirling them.
When it comes to ingredient swaps, I’ve experimented a bit. If you don’t have fresh raspberries, frozen ones can work, but be sure to drain them really well and toss them with a tablespoon of flour before adding to help prevent them from making the filling too watery. For the lemon juice, you can try using a mix of lemon and lime for a slightly different citrus profile. I haven’t tried other berries extensively, but I imagine blueberries might work similarly, though they might bleed color more.
For baking, trust your senses more than the clock. Ovens vary wildly! Look for that golden-brown edge and a center that’s just set. If you’re worried about the crust browning too quickly, you can always loosely tent the pan with foil for the last 5-10 minutes of baking.
And the glaze! If it’s too thick, add a tiny bit more liquid. If it’s too thin, whisk in a little more powdered sugar. For a more intense lemon flavor in the glaze, use lemon juice instead of milk. Some people also like to add a tiny drop of yellow food coloring for an even brighter look, but I prefer to let the natural color shine through!
Storing and Reheating Tips
Properly storing these Lemon Raspberry Bars is key to keeping them tasting their best. At room temperature, they’re good for about 2 days, especially if they have a glaze on them. Make sure they’re covered loosely with plastic wrap or in an airtight container to prevent them from drying out or picking up any odd smells. They stay nice and tender this way.
For refrigerator storage, these bars can last quite a bit longer, usually up to 5 days. I like to store them in an airtight container. You can also place parchment paper between layers if you’re stacking them to prevent sticking. They’re often even better the next day, as the flavors meld together. When you want to serve them from the fridge, I usually let them sit out at room temperature for about 15-20 minutes to take the chill off, which really brings out the flavors and texture.
If you find yourself with an abundance (or if you just want to prep ahead!), they freeze beautifully. For freezer instructions, let the bars cool completely and the glaze (if used) be fully set. Then, cut them into individual portions or leave them as a whole block. Wrap them tightly in plastic wrap, then in aluminum foil, or place them in a freezer-safe airtight container. They’ll keep well for up to 2-3 months. To thaw, unwrap them and let them come to room temperature on a plate. This usually takes a couple of hours.
Regarding glaze timing, if you know you’ll be storing them in the fridge or freezer, I’d actually wait to add the glaze until just before serving. Glaze can sometimes get a bit sticky or soft when refrigerated or thawed. If you’re serving them at room temp within a day or two, glazing after they’ve cooled is totally fine!
Frequently Asked Questions
Final Thoughts
So there you have it – my absolute favorite Lemon Raspberry Bars! I truly believe this recipe is a winner because it hits all the right notes: incredible flavor, surprising ease, and that wonderful homemade charm. It’s the kind of dessert that makes you feel accomplished without spending all day in the kitchen. The bright citrus and sweet berries just sing together, all cradled in that perfect buttery crust. It’s a recipe I come back to again and again, and I’m so happy to be able to share it with you. I hope you’ll give them a try and discover your own love for these little rays of sunshine. If you do make them, please tell me how they turned out in the comments below – I’d love to hear about your baking adventures! And if you enjoy these, you might also like my classic Lemon Bars or my Berry Crumble Bars – they’re in a similar delicious vein!
Lemon Raspberry Bars
Ingredients
Shortbread Crust
- 2.5 cups all-purpose flour
- 1 cup granulated sugar
- 1 cup unsalted butter, softened
Lemon Raspberry Filling
- 4 large eggs eggs
- 1.5 cups granulated sugar
- 0.5 cup fresh lemon juice
- 2 tablespoons lemon zest
- 1 tablespoon all-purpose flour
- 1.5 cups fresh raspberries
Instructions
Preparation Steps
- Preheat oven to 350°F (175°C). Grease and flour a 9x13 inch baking pan.
- For the crust: In a medium bowl, combine flour and sugar. Cut in the softened butter until the mixture resembles coarse crumbs.
- Press the crust mixture evenly into the bottom of the prepared baking pan.
- Bake the crust for 15-20 minutes, or until lightly golden.
- For the filling: In a separate bowl, whisk together eggs and sugar until well combined.
- Stir in lemon juice, lemon zest, and flour until smooth.
- Pour the filling over the baked crust. Gently scatter the raspberries over the filling.
- Bake for another 25-30 minutes, or until the filling is set and the edges are lightly golden.
- Let cool completely in the pan before cutting into bars.
Notes
Featured Comments
“I totally get that feeling—these bars are pure sunshine! The tangy lemon and sweet raspberry combo is just perfect every time.”
“Impressed! Clear steps and spot on results. Perfect for busy nights.”
“New favorite here — absolutely loved. crowd-pleaser was spot on.”
“Super easy and turned out amazing! My family asked for seconds. Saving this one.”
“This sweet treat was absolutely loved — the light really stands out. Thanks!”
“Made it tonight and wow — turned out amazing! Will definitely make Lemon Raspberry Bars again.”


I totally get that feeling—these bars are pure sunshine! The tangy lemon and sweet raspberry combo is just perfect every time.