

There’s something about a cool, sweet grape salad that just makes me smile. It’s like biting into a burst of freshness—juicy grapes mingling with creamy goodness and a hint of crunchy nuts. I remember my grandma making this in the summer, and the smell alone takes me right back to our backyard, sunlight warming my skin, kids laughing, and family gathered around. It’s honestly my go-to when I want something quick, refreshing, and surprisingly indulgent without turning on the oven. My kids ask for this all the time, and if I’m honest, I don’t blame them—it disappears in minutes at my house! It’s one of those recipes that’s simple enough for a busy weeknight but fancy enough to serve at your next picnic or potluck. Trust me, once you try this grape salad, it’ll become a staple in your house too. The best part? It’s like a little celebration of fresh fruit with a creamy twist—you’ll want to make it all year round!
What is a grape salad?
Think of grape salad as the lovechild of fresh fruit and creamy dessert—kind of like a fruit parfait but all in one bowl, ready to scoop. It’s essentially a medley of sweet, juicy grapes mixed with a rich, velvety dressing that makes every bite a little more indulgent. The name itself is pretty straightforward, but what makes it special is how effortlessly it comes together and how versatile it is. You can swap out the grapes for whichever variety you love—seedless red, green, or even black—and toss in your favorite nuts or a sprinkle of coconut if you’re feeling fancy. Some versions even add a little cream cheese or vanilla yogurt for extra richness, but honestly, the simple whipped topping plus grapes is enough to keep everyone coming back for seconds. It’s like a little bite of summer in a bowl—perfect for any occasion from lazy weekends to fancy brunches!
How do I make a grape salad?
Quick Overview
This grape salad is one of those recipes that feels so fancy but is really just a matter of mixing a handful of ingredients. First, you’ll wash and prep your grapes—cutting some in half if they’re big—then mix them with a creamy dressing made from whipped topping, softened cream cheese, and a splash of vanilla. Next, fold in crunchy nuts or seeds for texture, and top it off with a drizzle of honey or a sprinkle of cinnamon if you like. Chill it for about 30 minutes, and you’re set! It’s perfect because it takes no time to put together but always impresses. Plus, I promise, the flavors meld beautifully as it chills, making it even more addictive as time goes on.
Ingredients
For the main salad: What is the best way to prepare it?
– 4 cups of seedless grapes (red and green mixed for color)
– 1 cup whipped topping (cool whip or homemade whipped cream)
– 4 oz cream cheese, softened
– 1 teaspoon vanilla extract
– 1/2 cup chopped walnuts or almonds
– 2 tablespoons honey or maple syrup (optional, for extra sweetness)
– A pinch of cinnamon (optional, for extra warmth and flavor)
For the Garnish:
– Additional chopped nuts
– Fresh mint leaves or a light dusting of powdered sugar (if you want to dress it up)
Step-by-Step Instructions
Step 1: Preheat & Prep Pan
No oven here! Just grab a large mixing bowl and make sure all your ingredients are ready to go—washed grapes and softened cream cheese.
Step 2: Mix Dry Ingredients
If you’re adding nuts or cinnamon, toss them into your prep bowl now. This way, you can toast the nuts beforehand if you want an extra crunch—trust me, it’s worth it—but raw works too.
Step 3: Mix Wet Ingredients
In a separate bowl, beat the softened cream cheese until smooth. Add the vanilla and honey, stirring until combined. Gently fold in the whipped topping. The texture should be fluffy, not runny—think of a creamy cloud.
Step 4: Combine
Now, add your grapes to the dressing. Toss until everyone’s coated in that luscious, creamy mixture. Be gentle so the grapes don’t get squished. If your mixture feels a little too thick, a splash of milk or juice can loosen it up.
Step 5: Prepare Filling
In my version, I don’t make a separate filling—everything is just mixed together. But if you’re feeling fancy, you can add a dollop of cream cheese in layers or swirl caramel for extra decadence.
Step 6: Layer & Swirl
If you want to make it more pretty, layer the grapes and filling in a clear glass dish, then swirl it with a spoon for a marbled effect. Honestly, I love the rustic look—I think it’s charming and invites people to dig right in.
Step 7: Bake
No baking here! Just pop it in the fridge, covered, for at least 30 minutes. This allows the flavors to meld and the chill to set everything nicely.
Step 8: Cool & Glaze
If you’re adding an extra drizzle of honey or a light glaze, do it just before serving. If you like, sprinkle some more nuts on top for that irresistible crunch.
Step 9: Slice & Serve
Serve chilled, straight from the fridge—perfect for hot days or when you want something cool and sweet fast. It’s best enjoyed fresh but can be stored in the fridge for up to 2 days, though I warn you—the grapes tend to lose a little of their firmness over time.
What to Serve It With
This grape salad is so versatile that it fits everywhere. For breakfast, pair it with your favorite coffee or a crispy croissant—simple, satisfying, and sweet enough to start the day with a smile. It makes a stunning brunch side when served alongside quiches or savory muffins, with a bubbly mimosa or fresh orange juice. As a dessert, it’s a no-fuss crowd-pleaser—set it out with some vanilla ice cream or a sprinkle of toasted coconut for extra indulgence. If you’re craving a laid-back snack, just dish up a big bowl for movie night or a picnic. It’s light, fresh, and serves as a natural palate cleanser amid heavier foods. I swear my family can’t get enough of this stuff—it’s become a tradition at our summer get-togethers and holiday feasts!
Top Tips for Perfecting Your Grape Salad
Over the years, I’ve picked up a few tricks to make this recipe even better. First, when washing your grapes, I always do a quick soak in cold water with a splash of vinegar to loosen any dirt and reduce bacteria—then rinse thoroughly. If your grapes are big, cutting some in half is a game-changer—they’re easier to eat and look prettier. To keep the salad from getting watery, consider patting the grapes dry with a paper towel before mixing; moisture can make the creamy dressing more runny. I’ve tested using Greek yogurt instead of whipped topping, and it’s fantastic for a tangier flavor and extra protein—plus, it makes the dish a bit healthier. When layering or swirling, use a spatula gently—overmixing can crush the grapes or deflate the whipped topping. For those who want it sweeter, add a splash more honey or a sprinkle of powdered sugar. And if you’re feeling adventurous, try adding a splash of bourbon or citrus zest for a flavor boost. Every time I tweak a little, I learn something new—like how to toast the nuts beforehand to bring out richer flavor or how chilling it longer enhances the overall taste. These little details really elevate the dish!
Storing and Reheating Tips
This salad is best enjoyed fresh, but if you have leftovers, store it in an airtight container in the fridge for up to 2 days. After that, the grapes tend to get a bit softer, and the creamy dressing may separate slightly. To keep it looking its best, give it a gentle stir before serving again. If you plan to keep it longer, it’s better to store the grapes and dressing separately and toss them together just before serving. When it comes to reheating, honestly, I don’t recommend warming it—this is one dish meant to stay cool and refreshing. However, if you want to serve it as part of a warm dessert presentation, I’ve occasionally spooned it over a scoop of vanilla ice cream, cracking the cold and hot together for a delightful contrast. When storing, I avoid covering the dish with plastic wrap directly on the surface as condensation can make it soggy—the best is to use a airtight container or cover it loosely with aluminum foil. Trust me, this way, your grape salad stays delicious and appetizing for those couple of days.
Frequently Asked Questions
Final Thoughts
This grape salad has become one of those recipes I keep coming back to because it’s just so darn satisfying. It’s fresh, creamy, crunchy, and delicious all at once, without any complicated steps or fancy ingredients. From family barbecues to holiday spreads, it’s always a hit. What I love most is how endlessly customizable it is—swap out the nuts, add some fresh herbs, or try different types of grapes. It’s a reminder that sometimes, the simplest recipes are the most loved. I really hope you give this a try and that it becomes a new favorite in your household too. Drop a comment below if you try it out or have your own twists—I’d love to hear about your version! Happy baking, and enjoy every juicy bite!
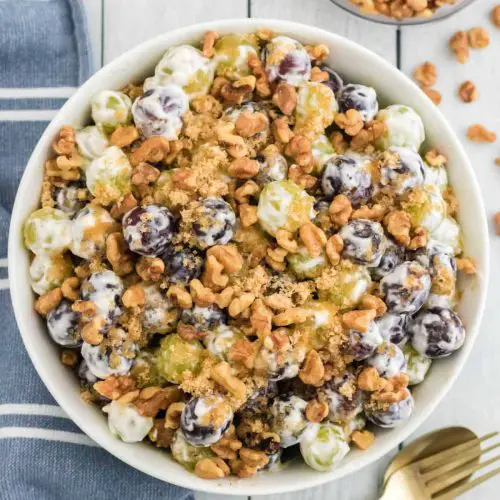
grape salad
Ingredients
Main Ingredients
- 8 oz cream cheese
- 1 cup sour cream
- 0.33 cup sugar
- 1 tsp vanilla extract
- 2 lb green grapes chilled
- 2 lb red grapes chilled
- 0.33 cup walnuts chopped
- 0.25 cup brown sugar
Instructions
Preparation Steps
- In a large bowl, combine the cream cheese, sour cream, sugar, and vanilla. Mix with a mixer until smooth and well incorporated, about 1 to 2 minutes.
- Wash the grapes and remove any stems. Add to a large bowl and pour the cream cheese mixture on top. Gently stir with a rubber spatula to coat the grapes.
- When ready to serve, sprinkle chopped walnuts and brown sugar on top.
Notes
Featured Comments
“Impressed! Clear steps and spot on results. Perfect for busy nights.”
“New favorite here — so flavorful. crowd-pleaser was spot on.”
“Super easy and turned out amazing! My family asked for seconds. Saving this one.”
“This sweet treat was absolutely loved — the bright really stands out. Thanks!”
“Made it tonight and wow — absolutely loved! Will definitely make Luscious Grapes Salad Recipe again.”
“Packed with flavor and so simple. Exactly what I wanted from Luscious Grapes Salad Recipe.”


