

Oh, this Norwegian rhubarb cake. It’s one of those recipes that just feels like a warm hug from a Norwegian grandma, even if you’ve never been to Norway. My mom used to make this every spring when the rhubarb in our garden was just bursting with that perfect tartness. I remember being little, the scent of it baking filling the whole house, and then the first bite… pure bliss. It’s not overly sweet, but it has this wonderful moistness from the rhubarb that just melts in your mouth. It’s sort of like a cross between a Coffee Cake and a fruit tart, but somehow even better. If you’re a fan of my Norwegian apple cake, you’re going to absolutely adore this one. It’s a classic for a reason, and I can’t wait to share my tried-and-true method with you today. This Norwegian rhubarb cake is truly a celebration of spring.
What is Norwegian Rhubarb Cake?
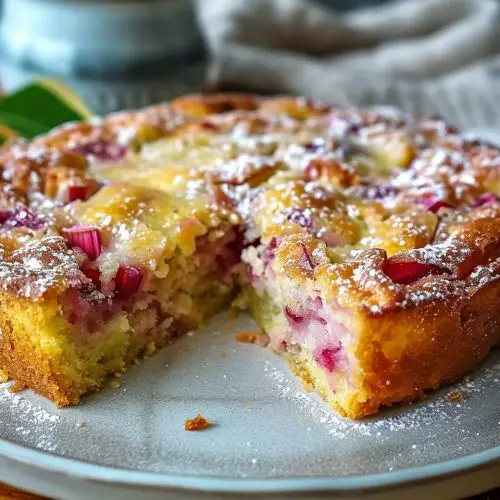
So, what exactly is this magical Norwegian rhubarb cake? Think of it as a delightfully tender, slightly dense cake that’s studded with bright, tangy rhubarb pieces. It’s not usually a layered cake with frosting, but rather a more rustic, home-style creation. Often, it has a simple, sweet glaze or a dusting of powdered sugar on top. The “Norwegian” part often hints at a simpler approach, focusing on the natural flavors of good quality ingredients, especially the star: rhubarb. It’s essentially a celebration of the season’s first harvest, a way to enjoy that unique, mouth-puckering flavor of rhubarb in a comforting, baked form. It’s not fussy, it’s not complicated, and that’s precisely why it’s so perfect for a casual afternoon tea or a simple dessert.
How do I make Norwegian Rhubarb Cake?
Quick Overview
This cake is wonderfully straightforward. You’ll mix up a simple, buttery batter, fold in your prepared rhubarb, and bake until golden and fragrant. The whole process, from gathering ingredients to pulling it out of the oven, is surprisingly quick. The key is not overmixing the batter and using fresh, vibrant rhubarb. It’s a bake that’s forgiving, even for beginners. The result is a moist, tender cake with bursts of tart rhubarb throughout, often finished with a simple, sweet drizzle. It’s the kind of cake that feels special without any fuss.
Ingredients
For the Main Batter:
2 ½ cups (315g) all-purpose flour. I always opt for a good quality unbleached flour; it really does make a difference in texture.
1 ½ teaspoons baking powder. Make sure it’s fresh! Stale baking powder is the culprit behind flat cakes.
½ teaspoon baking soda. This helps with lift and tenderness.
¼ teaspoon salt. Just to balance all those sweet and tart flavors.
1 cup (200g) granulated sugar. You can reduce this slightly if your rhubarb is very sweet, but I find this amount perfect for that balance.
½ cup (115g) unsalted butter, softened. Make sure it’s truly softened, not melted. This is key for a tender crumb.
2 large eggs, at room temperature. Room temperature eggs incorporate better into the batter.
1 teaspoon Vanilla Extract. A good quality vanilla makes all the difference.
½ cup (120ml) milk. Whole milk or even buttermilk adds richness. I’ve even tested this with almond milk and it actually made it even creamier!
For the Filling:
3 cups (about 450g) fresh rhubarb, trimmed and cut into ½-inch pieces. You want nice, firm stalks. If they’re a bit stringy, just give them a quick mince. Don’t use canned or frozen unless you absolutely have to, fresh is best here!
For the Glaze:
1 cup (120g) powdered sugar. Sifted, please! Lumps are not our friend here.
2-3 tablespoons milk or lemon juice. Lemon juice adds a lovely tang that complements the rhubarb beautifully. Start with 2 tablespoons and add more if needed to reach your desired drizzling consistency.
Step-by-Step Instructions
Step 1: Preheat & Prep Pan
First things first, get that oven preheating to 350°F (175°C). You’ll want to grease and flour a 9×13 inch baking pan. I usually use butter for greasing and then a light dusting of flour, but you can also use baking spray. For extra insurance against sticking, I sometimes line the bottom with parchment paper, especially if I’m short on time and don’t want to risk a tear.
Step 2: Mix Dry Ingredients
In a medium bowl, whisk together the flour, baking powder, baking soda, and salt. Give it a good whisking to make sure everything is evenly distributed. This ensures your cake rises evenly and doesn’t have any strange pockets of leavening agents.
Step 3: Mix Wet Ingredients
In a large bowl, cream together the softened butter and granulated sugar until light and fluffy. This usually takes a couple of minutes with an electric mixer, or a bit more elbow grease by hand. Beat in the eggs, one at a time, making sure each is fully incorporated before adding the next. Stir in the vanilla extract.
Step 4: Combine
Now, we’ll alternate adding the dry ingredients and the milk to the wet ingredients. Start by adding about a third of the dry ingredients to the butter mixture, mix on low speed until just combined. Then add half of the milk, mix again. Repeat this process, ending with the dry ingredients. Be careful not to overmix at this stage! Just mix until no dry streaks of flour remain. Overmixing develops gluten, which can lead to a tough cake, and we definitely don’t want that. A few small lumps are totally fine.
Step 5: Prepare Filling
While you’re mixing the batter, make sure your rhubarb is prepped. Trim off any tough ends and cut it into roughly ½-inch pieces. If you notice any stringy bits, you can just give them a quick slice with your knife. You want nice, bite-sized pieces that will soften nicely as the cake bakes. Some people like to toss the rhubarb with a tablespoon of flour and a sprinkle of sugar, but I find that can make the cake a bit too sweet or heavy, so I just add it directly.
Step 6: Layer & Swirl
Now for the fun part! Pour about half of the batter into your prepared pan and spread it evenly. Scatter about half of the rhubarb pieces over the batter. Then, dollop the remaining batter on top of the rhubarb. It might look a little messy, and that’s okay! Spread it as best you can without pressing too hard. Finally, scatter the remaining rhubarb pieces over the top. You can gently press them in a little if you like, or just let them sit on top. The batter will rise and engulf them as it bakes, creating those lovely pockets of rhubarb.
Step 7: Bake
Bake in your preheated oven for 35-45 minutes, or until a toothpick inserted into the center of the cake comes out clean (avoiding a piece of rhubarb, of course!). The top should be golden brown and the edges should be pulling away slightly from the sides of the pan. Oven temperatures can vary, so keep an eye on it. If it’s browning too quickly on top, you can loosely tent it with foil.
Step 8: Cool & Glaze
Let the cake cool in the pan for about 15-20 minutes before you think about glazing it. This allows it to set up properly. While it’s cooling, whisk together the powdered sugar and milk (or lemon juice) for the glaze. Start with 2 tablespoons of liquid and add more gradually until you reach a drizzly consistency – thick enough to coat but thin enough to pour. Once the cake has cooled slightly, drizzle the glaze evenly over the top. It will set as it cools further.
Step 9: Slice & Serve
Once the glaze has set, you can slice into the cake. It’s absolutely divine served warm, perhaps with a scoop of vanilla Ice Cream or a dollop of fresh whipped cream. It’s also wonderful at room temperature. Cut it into squares and enjoy! The smell alone is enough to make you happy.
What to Serve It With
This Norwegian rhubarb cake is so wonderfully versatile; it really does fit into almost any occasion. For breakfast, it’s a lovely treat alongside a steaming mug of coffee. I like to slice it a bit thinner in the morning and serve it with a small dollop of Greek yogurt. For brunch, it feels a little more elegant, especially with the glaze. I’ll often arrange slices on a pretty platter with some fresh berries, and a bright mimosa or a pot of Earl Grey tea is the perfect accompaniment. If I’m serving it as dessert, it’s fantastic with a scoop of high-quality vanilla bean ice cream, or even a light raspberry sorbet to echo the fruitiness. And for those cozy, quiet evenings when you just need a little something sweet without going overboard, a warm slice with a cup of chamomile tea is pure comfort. My family also loves it as an afternoon snack, often dunked into a glass of cold milk – a childhood favorite that never gets old. It’s the perfect treat to share with friends, making any gathering feel a little more special.
Top Tips for Perfecting Your Norwegian Rhubarb Cake
I’ve made this Norwegian rhubarb cake more times than I can count, and over the years, I’ve picked up a few tricks that make it consistently perfect. When it comes to the rhubarb itself, make sure it’s fresh and firm. If you’ve got slightly older rhubarb, it might be a bit stringy, so give it a quick trim and then maybe a light mince if it feels too tough. The moisture content is key too; while you don’t need to wring it out like some zucchini recipes, make sure it’s not sitting in a puddle of liquid. For mixing the batter, the absolute golden rule is: do not overmix! Seriously, once the dry ingredients are just incorporated, stop. A few small lumps in the batter are way better than a tough cake. Overmixing develops the gluten in the flour, and that’s the enemy of tenderness. When it comes to the swirl, don’t overthink it. Just scatter the rhubarb on top of the batter layers; the baking process will do the rest of the magic. If you want to get a bit fancy, you can gently drag a knife through the batter and rhubarb to create a marbled effect, but honestly, it’s delicious no matter what. For ingredient swaps, I’ve experimented a bit. If you’re out of regular milk, oat milk or even a light cream works beautifully. And if you find yourself with less-than-vibrant rhubarb, a squeeze of fresh lemon juice in the batter can brighten its flavor. Baking is always a bit of an adventure, so pay attention to your oven. If it tends to run hot, maybe shave off a few minutes or tent it with foil to prevent the top from burning before the inside is cooked through. The toothpick test is your best friend here! For the glaze, consistency is everything. Too thick and it’s hard to drizzle; too thin and it just runs off. Start with less liquid than you think you need and add it a teaspoon at a time until it’s just right. I’ve also learned that adding a touch of lemon zest to the glaze takes it to a whole new level of bright, zesty goodness!
Storing and Reheating Tips
One of the best things about this Norwegian rhubarb cake is how well it keeps. If you’ve got any leftovers (which, let’s be honest, is rare in my house!), you can store it at room temperature for up to two days. Just make sure it’s covered loosely with plastic wrap or foil to prevent it from drying out. The glaze helps seal in some moisture. If you need it to last a bit longer, the refrigerator is your best bet. Wrap it tightly in plastic wrap or place it in an airtight container, and it should stay fresh for about 4-5 days. The texture might firm up slightly in the fridge, but it’s still delicious. If you plan to freeze it, which is a great idea for future cravings, I recommend doing so before adding the glaze. Wrap the cooled cake tightly in a double layer of plastic wrap, then a layer of aluminum foil. It’ll keep perfectly in the freezer for up to 2-3 months. To thaw, unwrap it and let it come to room temperature on the counter, or gently warm it in a low oven (around 300°F or 150°C) for about 10-15 minutes. If you’ve already glazed it, you can freeze it too, but the glaze might get a little sticky upon thawing. If you’re reheating a slice, a few seconds in the microwave is usually enough to bring back that lovely warm, comforting texture, or a short stint in a toaster oven works wonders too. Just be careful not to overheat it, as it can become dry.
Frequently Asked Questions
Final Thoughts
I truly hope you give this Norwegian rhubarb cake a try. It’s more than just a recipe; it’s a little piece of comfort, a taste of tradition, and a whole lot of deliciousness. What I love most is how it celebrates simple, seasonal ingredients and turns them into something truly special with minimal effort. It’s the perfect example of how the most humble ingredients can create the most memorable flavors. If you enjoy this recipe, you might also love my Norwegian butter cookies for more Scandinavian-inspired baking. I can’t wait to hear how your Norwegian rhubarb cake turns out! Please feel free to leave a comment below with your thoughts, any variations you tried, or even just to say hello. Your feedback means the world to me!
Norwegian Rhubarb Cake
Ingredients
Cake Batter
- 0.75 cup all-purpose flour
- 1 teaspoon baking powder
- 0.25 teaspoon salt
- 0.5 cup unsalted butter softened
- 1 cup granulated sugar
- 2 large eggs
- 0.5 teaspoon vanilla extract
- 0.5 cup milk
Rhubarb Topping
- 3 cups rhubarb chopped
- 0.25 cup granulated sugar
- 0.5 teaspoon almond extract
Instructions
Preparation Steps
- Preheat your oven to 350°F (175°C). Grease and flour a 9-inch round cake pan.
- In a medium bowl, whisk together the flour, baking powder, and salt.
- In a large bowl, cream together the softened butter and granulated sugar until light and fluffy.
- Beat in the eggs one at a time, then stir in the vanilla extract.
- Gradually add the dry ingredients to the wet ingredients, alternating with the milk, beginning and ending with the dry ingredients. Mix until just combined.
- Pour the batter into the prepared cake pan and spread evenly.
- In a separate small bowl, toss the chopped rhubarb with granulated sugar and almond extract.
- Spoon the rhubarb mixture evenly over the cake batter.
- Bake for 35-40 minutes, or until a wooden skewer inserted into the center comes out clean.
- Let the cake cool in the pan for 10 minutes before inverting it onto a wire rack to cool completely.
Notes
Featured Comments
“Impressed! Clear steps and perfect for busy nights results. Perfect for busy nights.”
“New favorite here — turned out amazing. crowd-pleaser was spot on.”
“Super easy and turned out amazing! My family asked for seconds. Saving this one.”
“This sweet treat was absolutely loved — the light really stands out. Thanks!”
“Made it tonight and wow — restaurant-level! Will definitely make Norwegian rhubarb cake again.”
“Packed with flavor and so simple. Exactly what I wanted from Norwegian rhubarb cake.”


