

The scent of lemon and garlic drifting from the oven has always meant home to me. I remember my grandma’s kitchen when the rain tapped the window and she’d slide a tray of something golden into the oven, and the whole house filled with warmth. This oven baked tilapia version is that same comforting feeling, but modern and simple enough for weeknights. It’s incredibly flavorful yet surprisingly gentle on weeknights—crisp edges, flaky fish, and a glaze that shines without being fussy. I’ve made this countless times and it never fails to make the whole dinner feel a little celebratory. If you’ve got a busy evening ahead, this dish is your lifesaver: you can prep while you help kids with homework, and in no time you’ve got a bright, satisfying plate that tastes like you spent all afternoon on it. The focus here is clean, fresh flavors that let the fish shine, with a touch of crunch from the crust and a citrus kiss that keeps things light and bright. And yes, you’ll want to drizzle that glaze a little more than once—trust me on this one.
What is oven baked tilapia?
Oven baked tilapia is essentially a simple, elegant way to prepare a mild, delicate white fish without drying it out. Think of it as an open-face seafood sandwich for your taste buds: the fillet gets coaxed with a light crust, a lemony-Garlic Butter filling, and a quick glaze that makes every bite sparkle. The name itself says it all: fish that’s baked in the oven, finished with a crisp top and a citrus-herb glow. I love that this method keeps the fish juicy and tender, with enough structure from the crust to hold up to a spoonful of sauce. It’s essentially a clean canvas—you can keep it classic with a parmesan-panko crust, or customize with a spinach-lemon filling for a little extra brightness. Either way, you end up with a family-friendly dish that feels special enough for guests but simple enough for a Tuesday night.
How to Make Oven Baked Tilapia
Quick Overview
This method starts with a crisp, Parmesan-panko crust and a bright spinach-lemon filling tucked into the fish. The fillets bake hot and fast to lock in moisture, then a quick glaze brings a glossy finish that makes the dish feel extra special. The beauty is in the balance: crunch from the crust, freshness from the filling, and a kiss of citrus that keeps everything lively. It’s straightforward enough for a busy weeknight but polished enough for a small dinner party. You’ll notice that once the tray goes into the oven, you’ve basically got the rest of the evening free to set the table, pour a glass of white, and breathe a sigh of relief.
Ingredients
For the Main Batter:
- 1 cup panko breadcrumbs (use gluten-free if needed)
- 1/4 cup grated Parmesan cheese
- 1 tsp paprika
- 1/2 tsp garlic powder
- 1/2 tsp onion powder
- 1/2 tsp salt
- 1/4 tsp Black Pepper
- 2 Tbsp olive oil
For the Filling:
- 2 cups fresh spinach, chopped
- 2 cloves garlic, minced
- Zest of 1 lemon
- 1/4 cup feta or Parmesan crumbles
- 2 Tbsp chopped parsley (optional)
For the Glaze:
- 2 Tbsp melted butter or olive oil
- 2 Tbsp lemon juice
- 1 tsp honey or maple syrup
- 1 small garlic clove, minced
Step-by-Step Instructions
Step 1: Preheat & Prep Pan
Heat your oven to 425°F (220°C). Line a baking sheet with parchment paper or a silicone mat, and give it a light vegetable oil spray if you have one. Pat the tilapia fillets dry with a paper towel—excess moisture is the enemy of that crust you’re about to build. If your fillets are super long, you can cut them in half crosswise for easier handling—my kids always love these smaller portions because they’re just the right bite size for dipping and gnawing (in the best way possible).
Step 2: Mix Dry Ingredients
In a shallow dish, whisk together the breadcrumbs, Parmesan, paprika, garlic powder, onion powder, salt, and pepper. This is where the crust starts to becoming a fragrance-forward, toasty blanket for your fish. If you’re gluten-free, the crust still gets gorgeous color and crunch with gluten-free panko; you might add a pinch more cheese to compensate for the absence of gluten’s bite.
Step 3: Mix Wet Ingredients
In another small bowl, stir together the olive oil with a splash of water or milk if you like a slightly moister crust. The wet mix is what will help the breading cling to the fish and create that perfect, not-dry crust. If you’re using a parchment-lined sheet, you won’t need extra oil, but a tiny brush of oil on the top won’t hurt—especially if your breadcrumbs tend to clump.
Step 4: Combine
Dip each tilapia fillet into the wet mixture, then roll it in the seasoned dry crumbs until it’s evenly coated. Press the crumbs gently so they adhere. Don’t worry about getting every nook and cranny—the goal is a nice crusty layer that crackles a little in the oven. If you have a moment, you can lightly press the crust and give the fillet a little turn to coat the other side as well.
Step 5: Prepare Filling
In a skillet over medium heat, sauté the chopped spinach with the minced garlic for 2–3 minutes until wilted. Squeeze a touch of lemon over the greens and sprinkle in the lemon zest. Fold in the feta or Parmesan crumbles and remove from heat. The filling should be bright, a little salty from the cheese, and not wet; if it’s too watery, give it a quick squeeze of excess moisture with a clean cloth or paper towel before filling the fish pockets.
Step 6: Layer & Swirl
Pile a heaping spoonful of the filling onto each fillet, then if you’re feeling fancy, fold the fish to trap a small pocket of filling inside. You can also marinate a tiny bit of lemon-herb butter on top for extra aromatics. Now cover the top with a thick, even layer of the crumb mixture. If you have extra, press it along the sides to create a continuous crust edge that will crisp up nicely in the oven.
Step 7: Bake
Place the crusted fillets on the prepared sheet and bake for 12–15 minutes, depending on the thickness of your fillets. You’re aiming for the fish to be opaque and flaky through the center, with the crust turning a rich, golden brown. If you’re unsure, a quick check with a small knife should reveal tender, not rubbery, flesh. If you want extra color, broil for the last 1–2 minutes, but watch closely so it doesn’t burn.
Step 8: Cool & Glaze
Remove the tray from the oven and allow the fish to rest for a couple of minutes. While it rests, whisk together the glaze ingredients, then brush a light coat over the crust. Return to the oven for 1–2 minutes to set the glaze. The result should be a glossy sheen that catches the light and invites a first bite. If you’d rather skip the glaze, a simple squeeze of fresh lemon over the top is equally fabulous and keeps things extra bright.
Step 9: Slice & Serve
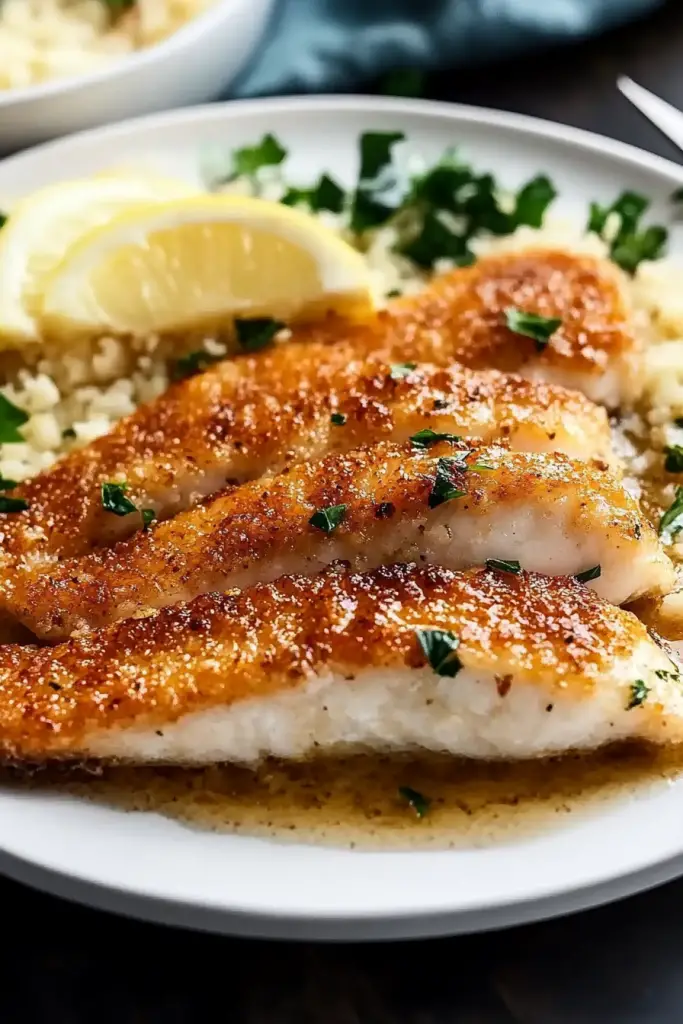
Plate the tilapia with a few lemon wedges on the side and a scatter of chopped parsley for color. A light green salad, quinoa, or a warm potato mash makes a lovely companion. The moment you take a bite is when the aroma hits your nose—the hint of zest, the toasty crust, and the tender fish all come together in a single, satisfying mouthful. This dish is wonderful with a crisp white wine or a sparkling water with a splash of citrus if you’re keeping things non-alcoholic.
What to Serve It With
Creative serving suggestions organized by occasion:
For Breakfast: A breakfast plate can feel indulgent with a soft scramble, a poached egg, and toast topped with a smear of lemon-herb butter. The tilapia adds a savory note to the morning plate without weighing you down.
For Brunch: Serve slices of the baked tilapia over a bright arugula salad with cucumber ribbons and a light yogurt-lemon dressing. Pair it with a flute of sparkling apple juice or a chilled dry sparkling wine for a celebratory brunch vibe.
As Dessert: This is the one that might raise an eyebrow, but I love finishing a meal with something citrusy and sweet. Consider a small lemon yogurt parfait or a citrus-forward sorbet to echo the lemon notes in the glaze—serving them after the plate keeps everything cohesive and refreshing.
For Cozy Snacks: Turn leftovers into a crusty crostini topping. Toast slices of baguette, spread a thin layer of herb Cream Cheese, top with bites of tilapia, and drizzle with a touch more glaze. It’s a comforting, cafe-style snack that kids adore and adults appreciate for its spa-like simplicity.
Top Tips for Perfecting Your Oven Baked Tilapia
Here are practical tricks I’ve learned over the years, organized by technique to keep things simple and delicious:
Zucchini Prep: This tip is for those who want to experiment with moisture balance. If you’re adding finely grated zucchini to the filling, you’ll want to squeeze out as much moisture as possible before mixing. Otherwise, the greens can release water into the crust and soften it. A quick squeeze with a clean kitchen towel goes a long way, and it means your crust stays crisp even after resting.
Mixing Advice: Don’t overmix the dry ingredients; you want a light, airy crumb. A gentle fold when you combine the wet and dry ingredients will yield a crust that’s tender and not dense. If your crumbs clump, add a teaspoon of water at a time until you reach a cohesive, not sticky, texture.
Swirl Customization: If you like a little marbling, reserve a spoonful of glaze or a small portion of the lemon butter before you bake. Drizzle or swirl it onto the crust during the last minute of baking for a glossy, decorative finish that also enhances flavor.
Ingredient Swaps: Swap in gluten-free breadcrumbs, or substitute finely crushed almonds for a nutty crunch. If you’re dairy-free, use olive oil for the glaze and a dairy-free parmesan substitute or nutritional yeast in the crust. The proportions stay fairly forgiving, so you won’t ruin the balance if you’re adjusting a few ingredients to fit dietary needs.
Baking Tips: Oven temperatures can vary—if your oven runs hot, dial back to 400°F and test with a small crusted fillet first to gauge timing. Place the baking sheet in the center of the oven for even heating, and rotate the sheet halfway through to ensure uniform browning.
Glaze Variations: You can switch the glaze to a honey-Dijon version or a simple olive oil-lemon infusion. For a more assertive lemon punch, add extra lemon zest or a pinch of chili flakes for heat. Brush on at the end for a bright, glossy finish that looks as good as it tastes.
Over the years I’ve learned that keeping things flexible makes this recipe a true workhorse. Use what you have, trust your senses, and you’ll land on a version that feels tailored to your table. The fundamentals—fresh fish, a crisp crust, and a bright glaze—remain the same, and that’s the magic here: dependable, comforting, and just a little bit exciting each time you make it.
Storing and Reheating Tips
Leftovers happen, and when they do, you can keep them tasting great with a few Simple Steps. I usually store the fish on a plate with a loose cover or a reusable container, and I keep the glaze separate until I’m ready to reheat. Here’s how I handle it:
Room Temperature: If you’re eating within a couple hours, you can store the fillets loosely covered at room temperature for a short while. If the air is humid, refrigerate sooner rather than later to maintain crispness of the crust.
Refrigerator Storage: Place leftovers in an airtight container. They’ll stay fresh for up to 3 days. Reheat gently in a 350°F (175°C) oven for 8–10 minutes, or until heated through. A quick broil for 1–2 minutes at the end can refresh the crust nicely.
Freezer Instructions: You can freeze fully baked tilapia for up to 2 months. Wrap tightly, then thaw in the fridge overnight before reheating gently. Freezing is best done before glaze application to preserve crust texture, and you can add the glaze fresh when reheating for a bright finish.
Glaze Timing Advice: If you’re reheating, apply glaze just before serving rather than during reheating to keep the glaze from getting gritty or separating. A fresh brush of glaze at the end elevates the look and taste immediately.
These little steps save you from soggy crusts and bland fish and help you enjoy great flavor even on lazy days.
Frequently Asked Questions
Final Thoughts
This oven baked tilapia recipe is one of those plates that earns a spot in the weekly rotation without demanding your entire evening for prep. It feels elevated enough to serve to guests, yet it’s friendly enough for a cozy family dinner. The crust delivers a satisfying bite, the filling adds a cheerful brightness, and the glaze glams everything up without stealing the spotlight from the fish itself. I’m always surprised by how often my kids ask for seconds, even when they’ve just finished a big plate. If you’re chasing a dinner that checks all the boxes—fast, flavorful, and forgiving—this is the one to bookmark. Try it with a crisp white wine or a sparkling water with lemon for the full coastal meal vibe. I’d love to hear how yours turns out, what tweaks you tried, and which part you loved most. Happy baking!

Oven Baked Tilapia
Ingredients
Main Ingredients
- 4 tilapia fillets tilapia fillets
- 0.5 teaspoon paprika
- 0.5 teaspoon dried thyme
- 0.5 teaspoon dried oregano
- 4 tablespoons butter melted
- 4 cloves garlic minced
- 2 tablespoons lemon juice
- 0.25 teaspoon lemon zest
Garnish
- 1 lemon lemon sliced into rounds
- red pepper flakes
- chopped fresh parsley
Instructions
Preparation Steps
- Preheat oven to 400°F (200°C). Season tilapia fillets with salt, pepper, paprika, thyme, and oregano. Arrange the seasoned fish in a 9x13 inch baking dish.
- In a small mixing bowl, whisk together the melted butter, minced garlic, lemon juice, and lemon zest until well combined. Pour this mixture evenly over the tilapia fillets in the baking dish.
- Bake for 10 to 12 minutes, or until the tilapia is opaque and flakes easily with a fork.
- Garnish with red pepper flakes, fresh parsley, and lemon slices before serving.
Notes
Featured Comments
“Impressed! Clear steps and perfect for busy nights results. Perfect for busy nights.”
“New favorite here — turned out amazing. crowd-pleaser was spot on.”
“Super easy and turned out amazing! My family asked for seconds. Saving this one.”
“This sweet treat was absolutely loved — the silky really stands out. Thanks!”
“Made it tonight and wow — absolutely loved! Will definitely make oven baked tilapia again.”
“Packed with flavor and so simple. Exactly what I wanted from oven baked tilapia.”


