

I remember summers at my grandparents’ house, the air thick with the smell of freshly cut grass and my grandma humming in the kitchen. The centerpiece of every picnic, every backyard barbecue, was always a big, beautiful bowl of her pea salad. It wasn’t just a side dish; it was a hug on a plate, a taste of pure nostalgia. Even now, years later, the thought of those bright green peas swimming in a creamy, tangy dressing instantly transports me back. It’s funny how a simple recipe, something so seemingly ordinary, can hold so much power. This pea salad is the classic version, the one that’s stood the test of time, and honestly, it’s the one I crave most when the weather gets warm. Forget those complicated salads with a million ingredients; this one is pure, unadulterated comfort food that always, always hits the spot. It’s my go-to when I need something delicious without a lot of fuss, and my family devours it every single time. It’s the kind of recipe that makes you want to share it, and that’s exactly what I’m doing with you today!
What is Creamy Pea Salad?
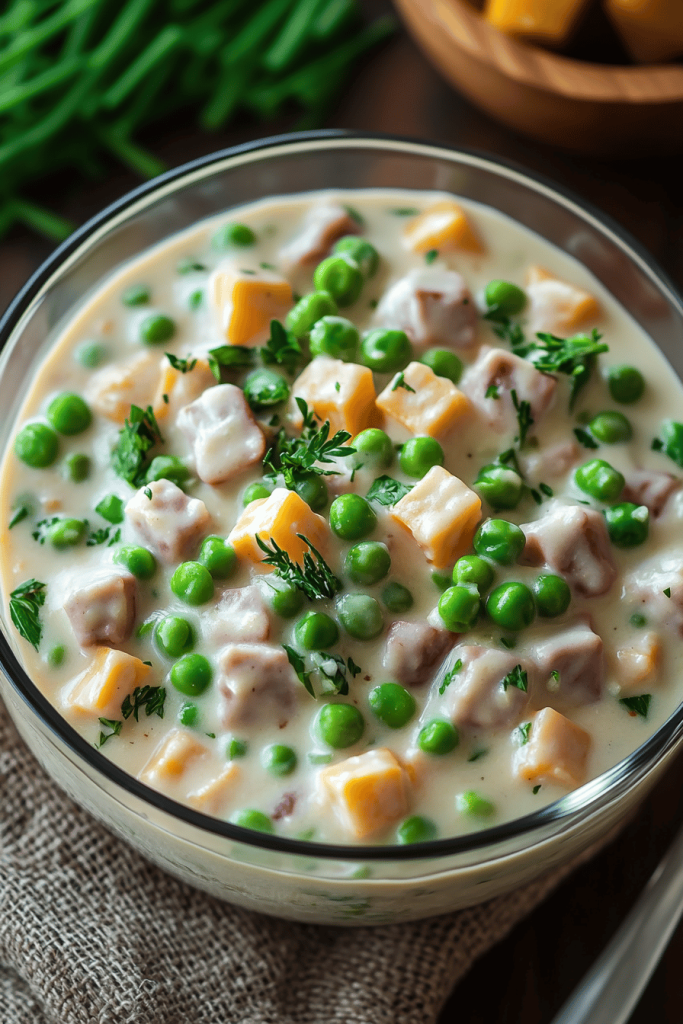
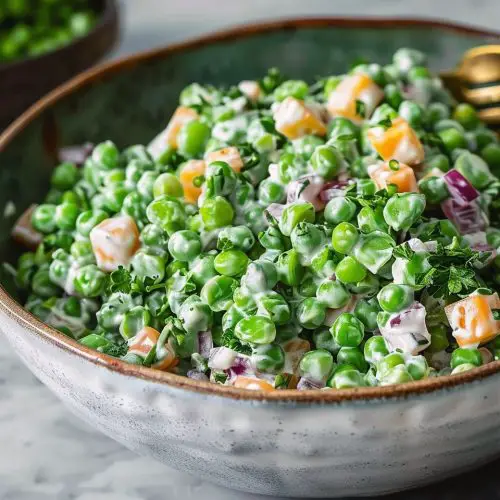
So, what exactly *is* this beloved pea salad? Think of it as a bright, refreshing, and incredibly satisfying cold salad where the star ingredient is, you guessed it, sweet peas! But it’s so much more than just peas. We toss those little green gems with a mix of crunchy, savory elements, all bound together in a luscious, creamy dressing. It’s essentially a celebration of simple, fresh flavors coming together in perfect harmony. The name “Creamy Pea Salad” itself tells you a lot – it’s all about that wonderful, velvety texture from the dressing that coats every single pea and ingredient. It’s not a heavy, mayonnaise-laden affair, though. My grandma always insisted on a dressing that was tangy and just a little bit sweet, with a hint of something special that made it irresistible. It’s the kind of dish that feels wholesome and decadent all at once, a true crowd-pleaser that never fails to get rave reviews. It’s the ultimate potluck dish, the perfect picnic companion, and honestly, a lifesaver on busy weeknights when you need a quick and healthy-ish side.
How do I make a creamy pea salad?
Quick Overview
Making this pea salad is so incredibly easy, it almost feels like cheating! You’ll simply combine your star ingredient, sweet peas, with some crisp veggies and a few other tasty bits. Then, you’ll whip up a quick, creamy dressing that ties it all together beautifully. The whole process takes barely any time at all, and the result is a vibrant, flavorful salad that’s perfect for any occasion. It’s designed for busy home cooks, so don’t worry about a thing – just follow these Simple Steps and you’ll have a crowd-pleasing dish in no time.
Ingredients
For the main salad: What is the best way to prepare it?
3 cups frozen peas, thawed and drained (I always use the good quality ones, they make a difference!)
1 cup finely chopped celery (about 2 stalks) (for that essential crunch)
1/2 cup finely chopped red onion (or sweet onion if you prefer milder)
4 hard-boiled eggs, chopped (optional, but I find they add a lovely richness)
1/2 cup shredded cheddar cheese (sharp or mild, your preference!)
1/4 cup chopped fresh parsley (for a pop of color and freshness)
For the Creamy Dressing:
1/2 cup mayonnaise (use your favorite brand, I’m partial to Duke’s)
1/4 cup sour cream (this gives it that perfect tang!)
1 tablespoon Dijon mustard (don’t skip this, it adds depth!)
1 tablespoon granulated sugar (or a little more, to taste)
1-2 tablespoons white vinegar or apple cider vinegar (for that essential brightness)
Salt and freshly ground Black Pepper, to taste
Step-by-Step Instructions
Step 1: Thaw and Drain the Peas
The first step is to make sure your frozen peas are properly thawed and completely drained. I usually leave them in a colander on the counter for about 30 minutes, or you can give them a quick rinse under cool water. The key here is to get as much moisture out as possible to prevent your salad from becoming watery. Pat them dry with a paper towel if you’re really concerned, especially if you’re making this ahead of time.
Step 2: Chop Your Veggies and Eggs
While the peas are thawing, get your other salad components ready. Finely chop your celery and red onion. I like my veggies to be small and uniform so they distribute evenly throughout the salad. If you’re using eggs, hard-boil them to your liking (I prefer mine with a slightly jammy yolk, but fully cooked is fine too!), let them cool, peel, and chop them up. Shred your cheese if it’s not already shredded, and chop your fresh parsley.
Step 3: Make the Creamy Dressing
In a medium bowl, combine the mayonnaise, sour cream, Dijon mustard, and sugar. Whisk everything together until it’s smooth and well combined. Then, stir in the vinegar. Start with 1 tablespoon of vinegar and taste. You can add more if you prefer a tangier dressing. Season generously with salt and freshly ground black pepper. I always say to season as you go, it makes a world of difference!
Step 4: Combine Everything
In a large bowl, gently combine the thawed and drained peas, chopped celery, chopped red onion, chopped hard-boiled eggs (if using), shredded cheddar cheese, and fresh parsley. Pour about two-thirds of the dressing over the salad mixture. Gently toss everything together until all the ingredients are coated with the dressing. Be careful not to overmix, as you don’t want to mash the peas or eggs.
Step 5: Taste and Adjust
This is where you become the chef! Taste the salad. Does it need more salt? More pepper? A little more tang from the vinegar? Or perhaps a touch more sweetness? Add more dressing if you prefer a creamier salad. Adjust the seasonings and dressing until it tastes absolutely perfect to you. Remember, you can always add more, but you can’t take it away!
Step 6: Chill Before Serving
For the best flavor, cover the bowl and refrigerate the pea salad for at least 30 minutes before serving. This allows all the flavors to meld together beautifully. I often make this a few hours ahead of time, and it’s even better the next day.
Step 7: Serve and Enjoy
Give the salad one last gentle stir before serving. You can serve it chilled straight from the refrigerator. Garnish with a little extra chopped parsley if you like. It’s ready to be the star of your picnic, barbecue, or potluck!
What to Serve It With
This creamy pea salad is surprisingly versatile and pairs wonderfully with so many dishes! For a casual backyard barbecue, it’s the perfect accompaniment to grilled burgers, hot dogs, or ribs. I love serving it alongside my smoky baked beans and some corn on the cob for a classic summer spread. If you’re having a picnic, it’s a fantastic addition to a spread of sandwiches, fried chicken, and deviled eggs. For a lighter meal, I often enjoy a generous scoop of this pea salad as a side to grilled chicken breasts or flaky baked fish. It even works as a delightful potluck contribution, especially when you know you’ll be surrounded by folks who appreciate a good, old-fashioned comfort food dish. Don’t be afraid to get creative with it! It’s hearty enough to be a light lunch on its own, especially on a warm afternoon. My kids love it alongside some chicken nuggets or pizza. It’s just one of those dishes that makes everyone happy at the table, no matter the occasion.
Top Tips for Perfecting Your Creamy Pea Salad
I’ve been making this pea salad for years, and I’ve picked up a few tricks along the way that I think make all the difference. For starters, the quality of your peas really matters. Using good quality frozen peas that are bright green and sweet will give you the best flavor foundation. When you thaw them, make sure they are thoroughly drained. I learned this the hard way once, and ended up with a rather watery salad that just wasn’t the same. A quick rinse under cold water followed by a good pat dry with paper towels is usually sufficient. Regarding the vegetables, the finer you chop your celery and onion, the better they’ll integrate into the salad. You want those little bursts of crunch without huge chunks. If you’re sensitive to raw onion, you can try soaking the chopped onion in ice water for about 10 minutes, then draining it well. This mellows out its sharpness beautifully. For the dressing, don’t be afraid to adjust it to your personal taste. Some people like it tangier, some sweeter. Taste and tweak until it’s just right for you. I’ve found that using a combination of mayonnaise and sour cream gives the dressing the perfect balance of creamy richness and zesty tang. And that touch of Dijon mustard? It’s a secret weapon that adds a subtle depth without making the salad taste “mustardy.” If you’re adding hard-boiled eggs, make sure they’re cooked to your liking. I personally love them just barely set in the middle, but fully cooked works just as well. And for the cheese, while cheddar is classic, I’ve experimented with a little Monterey Jack or even a touch of finely crumbled feta for a different flavor profile. Don’t overmix the salad once the dressing is added; a gentle toss is all you need to combine everything without turning it into mush. Finally, and this is crucial, let it chill! The flavors need time to meld and marry in the refrigerator. I promise it’s worth the wait. If you’re making this for a potluck, just keep it chilled in a cooler and give it a good stir before serving.
Storing and Reheating Tips
This creamy pea salad is best when it’s nice and cold, so proper storage is key to maintaining its fresh, delicious taste. Once it’s made and you’ve let it chill for a bit, store it in an airtight container in the refrigerator. It will stay perfectly fresh and delicious for about 3 to 4 days. Because it’s a cold salad, you won’t really need to reheat it. Just make sure it’s well-chilled before serving. If for some reason it seems to have dried out a little after a day or two, you can always stir in a tablespoon or two of extra mayonnaise or sour cream to freshen it up. If you’re taking it to a potluck or picnic, keep it in a cooler with plenty of ice to ensure it stays cold and safe to eat. I wouldn’t recommend freezing this salad. The texture of the peas and the creamy dressing can change quite a bit once thawed, and it won’t be quite as appealing. It’s definitely best enjoyed fresh within a few days of making it. For the glaze, this recipe doesn’t have a traditional glaze, but if you’re adding extra dressing to freshen it up, do it just before serving. This ensures the creamy texture is at its best.
Frequently Asked Questions
Final Thoughts
Honestly, this creamy pea salad is more than just a recipe to me; it’s a connection to cherished memories and a reminder of how simple ingredients can create something truly wonderful. It’s the kind of dish that always brings smiles to faces, and that’s the best kind of cooking, isn’t it? The blend of sweet peas, crisp veggies, and that perfectly tangy, creamy dressing is just a classic for a reason. It’s proof that you don’t need fancy techniques or exotic ingredients to make a dish that’s bursting with flavor and comfort. It’s a lifesaver for busy cooks and a guaranteed hit at any gathering. If you’re looking for a refreshing, delicious, and easy-to-make side dish that will disappear in minutes, please give this pea salad a try. I’m so excited for you to experience the joy it brings. Let me know in the comments how yours turns out, or if you have any special variations you love to add! I’m always looking for new ideas, and I can’t wait to hear from you. Happy cooking!
Classic Pea Salad
Ingredients
Main Ingredients
- 4 cups frozen peas thawed
- 0.5 cup red onion finely chopped
- 0.5 cup celery chopped
- 0.5 cup cheddar cheese shredded
- 0.25 cup bacon bits
Dressing Ingredients
- 0.75 cup mayonnaise
- 2 tablespoons sour cream
- 1 teaspoon sugar
- 0.5 teaspoon salt
- 0.25 teaspoon black pepper
Instructions
Preparation Steps
- In a large bowl, combine the thawed peas, chopped red onion, chopped celery, shredded cheddar cheese, and bacon bits.
- In a separate small bowl, whisk together the mayonnaise, sour cream, sugar, salt, and black pepper until smooth.
- Pour the dressing over the pea mixture and stir gently until everything is well combined.
- Cover the bowl and refrigerate for at least 30 minutes before serving to allow the flavors to meld.
- Serve chilled.
Notes
Featured Comments
“This pea salad takes me right back to lazy summer afternoons at my grandparents’ house—simple, nostalgic, and packed with love. So good!”
“Impressed! Clear steps and turned out amazing results. Perfect for busy nights.”
“New favorite here — restaurant-level. crowd-pleaser was spot on.”
“Super easy and turned out amazing! My family asked for seconds. Saving this one.”
“This sweet treat was absolutely loved — the rich really stands out. Thanks!”
“Made it tonight and wow — creamy! Will definitely make pea salad again.”


This pea salad takes me right back to lazy summer afternoons at my grandparents’ house—simple, nostalgic, and packed with love. So good!