

There’s something magical about a pecan pie dessert cooling on the rack, the kitchen filled with caramel-y maple aroma and that toasty nut scent that makes everyone wander in like a magnet. I remember Sunday afternoons at grandma’s house, the whole family crowding around the kitchen island while the pie baked, the crust turning a sunny golden and the filling turning glossy and rich. This version is my homestyle, cozy take—easy enough for weeknights but special enough for guests. It’s not fussy, and it tastes like a warm hug. This pecan pie dessert is where old memories meet new memories: a slice for breakfast if you’re feeling indulgent, a slice after dinner if you crave something comforting, or a quiet afternoon treat with a cup of coffee. I’ve made it countless times and it never fails, especially when I’ve got a busy week and want something that feels like a celebration in a pie tin. If you’ve got ripe pecans and a craving for something caramel-sweet, you’re in the right place.
What is a pecan pie dessert?
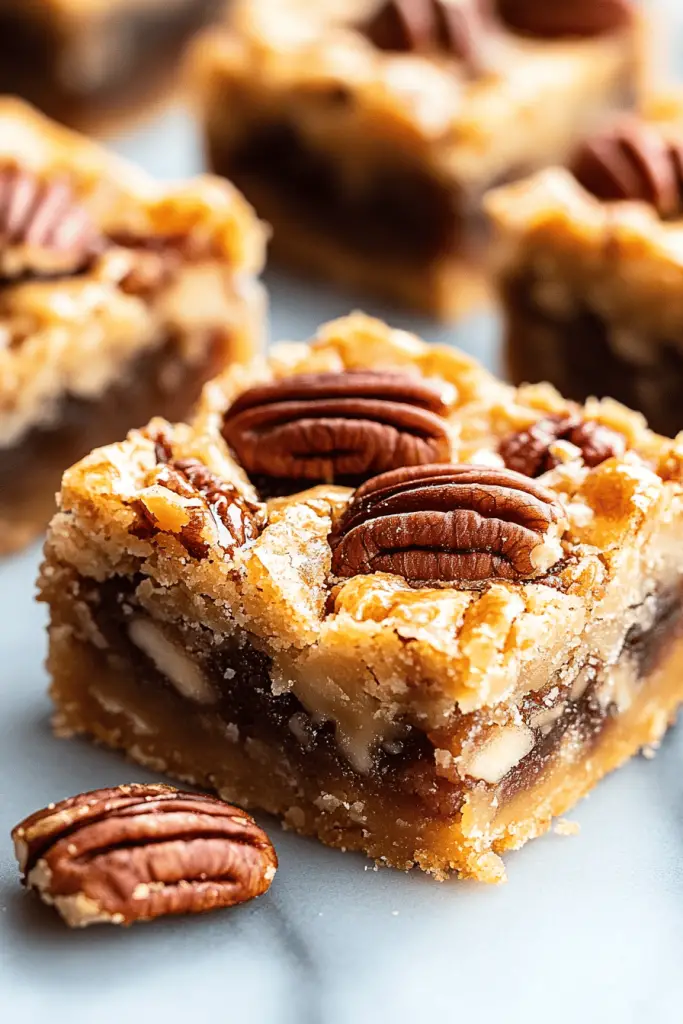
Pecan pie dessert is basically a luscious custard pie crowned with toasted pecans and a caramel-magical filling. Think of it as a cross between a maple tart and a classic Pecan Praline pie, with a flaky crust that bursts with buttery flavor. The name’s simple: it’s dessert-first, with a nutty charisma that steals the show every time. It’s essentially a buttery pie crust cradling a warm, golden-brown filling made from eggs, brown sugar, corn syrup, and vanilla, with pecans scattered or arranged in an eye-catching pattern on top. What I love most about it is how it tastes like a big, comforting hug in a bite—crunchy edges, silky center, and that caramel glaze that glistens just right. This pecan pie dessert isn’t fussy; it’s a reliable, family-friendly recipe that can be dressed up or kept simple, depending on the moment.
How to Make Pecan Pie Dessert
Quick Overview
Here’s the quick version: you’ll blind-bake a crisp, buttery crust, whisk together a silky filling (eggs, corn syrup, brown sugar, butter, vanilla, salt), pour it into the crust, and bake until the center is just set and the edges are deeply caramelized. Then you glaze it with a light maple drizzle and let it rest so the flavors settle. The result is a pie that looks like it took hours to perfect but comes together in under an hour of active time. It’s a straightforward process, and the payoff is pure comfort—think crackly crust, glossy filling, and pecans arranged like little stars across the top. If you’ve got a few minutes and a craving for something sweet, you’ll pull this pecan pie dessert from the oven with a proud smile.
Ingredients
For the Main Crust:
– 1 1/4 cups all-purpose flour
– 1/4 teaspoon salt
– 1/2 cup (1 stick) unsalted butter, cold and cubed
– 2-3 tablespoons ice-cold water (more if needed)
For the Filling:
– 1 cup light corn syrup (or 3/4 cup dark corn syrup for deeper color and flavor)
– 1 cup packed light brown sugar
– 3 large eggs
– 2 tablespoons unsalted butter, melted
– 1 teaspoon Vanilla Extract
– 1/4 teaspoon salt
– 1 1/2 cups pecan halves, toasted lightly if you’ve got the time
For the Glaze:
– 2 tablespoons pure maple syrup (or caramel sauce if you’ve got it on hand)
Tips: I like to toast the pecans lightly to wake up their aroma. If you’re avoiding gluten, you can use a gluten-free all-purpose flour blend for the crust with great results. For a quicker crust, I sometimes mix in a tablespoon of almond flour to add a little nutty depth—it’s delicious and still cracker-crisp.
Step-by-Step Instructions
Step 1: Preheat & Prep Pan
Preheat your oven to 350°F (175°C). If you’re using a metal pie pan, give it a quick spritz of nonstick spray or rub a little butter along the inside. This helps the crust release in perfect wedges. I always line the bottom with a parchment circle too—it keeps the crust from sticking and makes that first slice come out clean.
Step 2: Mix Dry Ingredients
In a bowl, whisk together flour and salt. This step keeps your crust from tasting floury later. It’s a small step, but it matters—especially if you’re using a coarse or whole-grain variation. The goal is a light, sandy texture that folds into butter without being tough.
Step 3: Mix Wet Ingredients
Squarely combine water with a touch more if needed. You want just enough moisture for the dough to come together, not so much you end up with a sticky mess. I like to sprinkle the water in a tablespoon at a time, mixing with a fork until the dough holds together when pressed. If you press and it crumbles, add a touch more water.
Step 4: Combine
Pour the wet into the dry and mix briefly until a cohesive dough forms. Handle it as little as possible—overwork = tough crust. Gather it into a disk, wrap, and chill for at least 30 minutes. While it rests, I often preheat the oven a few minutes early so I’m ready to roll when the dough cooperates.
Step 5: Prepare Filling
In a bowl, whisk the eggs. Then whisk in the corn syrup, brown sugar, melted butter, vanilla, and salt until smooth. The mixture should look glossy and pour like pancake batter. If you’ve got a leftover tablespoon of maple syrup, whisk that in too for a touch of tree-fresh sweetness. Taste a tiny smear—remember you’ll taste this in the final pie, so it should feel balanced, not overly sweet.
Step 6: Layer & Swirl
Roll out the chilled dough on a lightly floured surface to a circle about 12 inches across. Transfer to the pan, trim excess, and crimp the edge. Pour in the filling, then arrange the pecan halves on top. Here’s where I like to layer them in a tight, concentric pattern or in a pretty spiral—the presentation makes the pie feel extra special.
Step 7: Bake
Bake at 350°F for 55–60 minutes, or until the center is just set (a slight jiggle in the middle is okay; you don’t want it to be liquid). If the crust browns too quickly, tent the edges with foil or a pie shield. The whole kitchen will smell like toffee and toasted nuts—a sign you’re on the right track. If your crust seems underdone, give it an extra 5–10 minutes, watching carefully so the filling doesn’t overcook.
Step 8: Cool & Glaze
Let the pie cool completely on a rack; this helps the filling firm up and slices tidy. Once cooled, drizzle the maple glaze or caramel over the top. A light, deliberate drizzle makes the glaze feel luxurious without overpowering the nutty filling. The glaze also helps keep the pecans from sticking to the surface, making slices smoother and more beautiful.
Step 9: Slice & Serve
To slice cleanly, wipe your knife with a warm damp towel between cuts. Serve at room temperature or with a scoop of vanilla ice cream for contrast. A dollop of whipped cream also pairs nicely if you’re in the mood for something lighter. My family loves this pecan pie dessert with a strong coffee or a cold glass of milk—the sweetness is perfectly balanced by the nutty crunch.
What to Serve It With
This pecan pie dessert is incredibly versatile, and I love how it fits different occasions. Here are a few ideas that feel just right in my kitchen:
For Breakfast: A slice with a generous dollop of vanilla yogurt and a robust morning coffee. The contrast between cool creaminess and the caramelized filling wakes you up in the best way.
For Brunch: Pair with a light sparkling beverage and an orange-y citrus salad. The bright acidity will cut through the rich sweetness just enough to keep things bright.
As Dessert: Serve with a whisper of cinnamon whipped cream or a scoop of cinnamon ice cream. The warm spices complement the maple and brown sugar notes beautifully.
For Cozy Snacks: Cut a thin sliver and warm in the microwave for 15 seconds, then top with a pinch of flaky sea salt and whipped cream. This is perfect when you’re craving something sweet at the end of a long day but don’t want to bake a whole cake.
Traditionally, this pecan pie dessert is a Sunday staple in many households, but I love making it for impromptu guests, too. My family often requests extra pecans on top—they say it makes the pie feel extra festive. If you have a favorite twist (bourbon, chocolate swirls, or even a pinch of cayenne), this is your moment to experiment.
Top Tips for Perfecting Your Pecan Pie Dessert
Here are practical tips that have saved me more times than I can count. They come from years of baking and adjusting for family preferences and pantry realities.
Crust prep: Keep your butter cold and your water icy. A cold crust yields a flakier bite. Don’t skip chilling time; it helps the dough relax and roll smoothly. If you’re short on time, you can par-bake the crust for 10 minutes and skip any sogginess.
Filling texture: If your filling looks a little thin after whisking, don’t panic. Gently stir in a teaspoon of cornstarch to help set the custard as it bakes. The goal is a custard that’s just barely wobbly in the center when you remove it from the oven, then fully set as it cools.
Swirl & topping: For a more dramatic top, arrange pecans in a star or sunburst pattern and add a few extra pieces toward the center. It’s not just pretty—it helps with even browning and ensures a striking finish when you slice.
Ingredient swaps: I’ve tested this with light corn syrup and with maple syrup to varying degrees of sweetness. For a deeper caramel note, add a tablespoon of molasses to the filling. If you don’t have pecans, crushed walnuts work beautifully, though the flavor shifts slightly.
Baking tips: If your oven runs hot, lower the temperature by 25 degrees for the last 15 minutes to avoid over-browning. Use an oven thermometer if you’re unsure about your oven’s accuracy; a few degrees can make a big difference in texture.
Glaze variations: The maple glaze is optional but delightful. If you’re watching sugar, brush a thin layer of warmed honey instead for a lighter, floral sweetness. For a chocolatey finish, drizzle with a tad of melted dark chocolate after the glaze sets—it’s a real crowd-pleaser.
These little tweaks have become the backbone of my recipe routine. The result is a pecan pie dessert that feels timeless yet flexible enough to suit any occasion. My mom calls it “the pie that hugs you from the inside,” and honestly, that’s the nicest compliment I could hope for.
Storing and Reheating Tips
Storage and reheating are where this pie shines because you can batch it for weekend gatherings and still have leftovers that taste fantastic the next day. Here’s how I handle it:
Room Temperature: If you’re finishing the pie the same day, you can leave it uncovered for a couple of hours, then refrigerate. It’s best within two days and still glorious cold or gently warmed.
Refrigerator Storage: Wrap the whole pie tightly with plastic wrap or store in an airtight container for up to 4 days. The filling will firm a bit in the fridge, which can be nice for clean, neat slices when you reheat.
Freezer Instructions: Pies freeze well, sliced or whole. Wrap tightly in plastic wrap and then foil. Freeze up to 2 months. Thaw overnight in the fridge or on the counter for a few hours, then rewarm gently in a low oven (325°F) for 10–15 minutes if you’d like a warm, just-baked feel.
Glaze Timing Advice: If you plan to freeze, skip glazing until you’re ready to serve. The glaze can soften during storage, so a final glaze right before serving keeps things crisp and pretty.
Key indicators of quality: the pie should feel custard-like when cooled, the crust should stay crisp for a good slice, and the pecans on top should remain toasted and fragrant, not soggy. If you notice any sogginess, a quick pass in a hot oven helps recapture that crunch.
Frequently Asked Questions
Final Thoughts
In the end, this pecan pie dessert is a recipe you’ll pull out when you want something dependable and comforting, with a touch of elegance. It’s the kind of dessert that makes a weeknight feel like a celebration and a Sunday afternoon feel like a memory-in-the-making. The crust stays beautifully crisp, the filling glows with caramel, and the pecans add that satisfying crunch. If you’re new to baking or you’ve been chasing that exact, homemade pie texture for years, trust me on this one—cover it with a warm towel and let it rest; the flavors settle in, the filling thickens, and every bite becomes a little moment of joy. If you try it, I’d love to hear how you personalized it—did you add a splash of bourbon, or maybe a pinch of sea salt on top? Happy baking! And if you’re reading along with a friend, pin a slice for them, too, so they can taste the memory you’re sharing.

Pecan Pie Balls
Ingredients
Main Ingredients
- 1.5 cups pecans fine chopped
- 0.75 cup graham cracker crumbs
- 0.66 cup brown sugar
- 0.25 cup maple syrup
- 2 tablespoons light karo syrup
- 2 tablespoons salted butter melted
- 0.25 teaspoon almond extract
- 0.75 teaspoon rum extract
- 12 ounces chocolate melting discs I used Ghirardelli brand
- Optional garnish Holiday themed sprinkles
Instructions
Preparation Steps
- In a large mixing bowl, using a wooden spoon, combine the chopped pecans, graham cracker crumbs, brown sugar, maple syrup, karo syrup, melted butter, almond and rum extracts. Mix until evenly combined. Cover with plastic wrap and chill in the refrigerator for 2 hours or up to overnight.
- Once chilled, using a 2 inch cookie scoop, scoop out the pecan filling and form into tight balls. I suggest wetting your hands with warm water, place the scooped filling into the palm of your hand and gently squeeze and compact the pecan filling into a tight ball. Set the pecan balls onto a parchment lined baking sheet and repeat until all the balls are formed.
- In a medium size bowl, that is not too deep, melt the chocolate melting discs according to package directions. Stir until smooth.
- Using a fork gently place one pecan ball at a time into the melted chocolate. Roll it around in the melted chocolate, being very careful not to break apart the pecan ball, and lift out the chocolate coated pecan pie balls with the same fork and place them back onto the parchment lined baking sheet. Repeat this process until all the pecan pie balls are coated in chocolate.
- At this time you can sprinkle on some holiday themed candy sprinkles if desired onto the tops of each pecan pie ball. Place the baking sheet into the refrigerator for 2 hours, uncovered, to allow the chocolate to firm back up.
Notes
Featured Comments
“Impressed! Clear steps and perfect for busy nights results. Perfect for busy nights.”
“New favorite here — turned out amazing. crowd-pleaser was spot on.”
“Super easy and turned out amazing! My family asked for seconds. Saving this one.”
“This sweet treat was absolutely loved — the zingy really stands out. Thanks!”
“Made it tonight and wow — spot on! Will definitely make pecan pie dessert again.”
“Packed with flavor and so simple. Exactly what I wanted from pecan pie dessert.”


