


Oh, you guys, I’ve been *dying* to share this recipe with you. It’s one of those absolute lifesavers on busy weeknights, and honestly, it’s become a staple in our home. If you’ve ever found yourself craving pizza but not wanting the fuss of a full-blown pizza dough situation, this Pull-Apart Pizza Bread is your answer. It reminds me so much of those cheesy, gooey breadsticks you get at certain restaurants, but it’s so much more versatile and, dare I say, even tastier because *you* made it with love! It’s got that comforting, savory goodness that just wraps you up like a warm hug. Think of it as the ultimate pizza upgrade that’s surprisingly simple to pull off. Honestly, the aroma alone when this is baking? Pure magic that draws everyone from every corner of the house straight to the kitchen. It’s truly my go-to when I need something crowd-pleasing and ridiculously delicious without spending hours in the kitchen.
What is pull apart pizza bread?
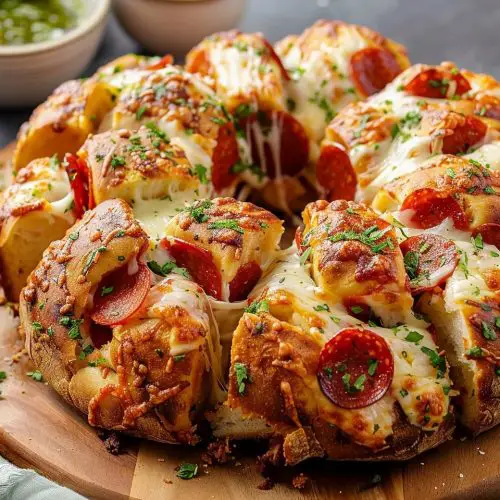
So, what exactly *is* this magical Pull-Apart Pizza Bread? At its heart, it’s a wonderfully simple, yeast-free bread dough that’s layered with pizza sauce, loads of cheese, and your favorite pizza toppings, then baked until golden and bubbly. The “pull-apart” part comes from how it’s baked and then how you serve it – you literally pull off pieces of cheesy, saucy goodness. It’s not a traditional loaf of bread, nor is it quite a pizza. It’s more like the best hybrid imaginable. Think of it as a savory, shareable cake or a giant, cheesy pull-apart Cinnamon Roll, but with all the glorious flavors of pizza! The dough is wonderfully soft and slightly chewy, making it the perfect vessel for all those delicious pizza toppings. It’s essentially pizza comfort food deconstructed into the most irresistible, dippable, shareable format. It’s the kind of food that makes everyone happy, from the pickiest eaters to the most discerning grown-ups.
How do I make pull apart pizza bread?
Quick Overview
This recipe is all about speed and ease. We’re talking about mixing up a simple, no-knead dough, layering it with all your favorite pizza fixings, and baking it until it’s a golden, cheesy masterpiece. The key is the quick dough that comes together in minutes and the simple layering technique that creates those irresistible cheesy pockets. It’s designed to be as straightforward as possible, so even if you’re new to baking, you’ll nail this. You get all the flavor of your favorite pizza without any of the hassle. It’s truly a win-win!
Ingredients
For the Main Batter:
This is what creates that soft, tender, slightly chewy base for our pizza bread. You don’t need anything fancy here!
- All-Purpose Flour: 3 cups. I always opt for a good quality all-purpose flour. Make sure to spoon and level it so you don’t end up with too much flour, which can make the bread tough.
- Granulated Sugar: 1/4 cup. Just a touch to feed the yeast and give a slight sweetness that balances the savory toppings.
- Active Dry Yeast: 2 1/4 teaspoons (one standard packet). Make sure your yeast is fresh! If it hasn’t foamed up in warm water, it’s time for a new packet.
- Salt: 1 teaspoon. Essential for flavor and helps control the yeast activity.
- Warm Water: 1 cup (around 105-115°F or 40-46°C). Not too hot, or it’ll kill the yeast; not too cool, or it won’t activate properly.
- Eggs: 2 large. Room temperature eggs incorporate better.
- Melted Butter: 1/2 cup (1 stick). Unsalted is best so you can control the saltiness. Let it cool slightly before adding to the wet ingredients so it doesn’t cook the eggs.
For the Filling:
This is where the pizza magic happens! Feel free to customize this to your heart’s content.
- Pizza Sauce: 1 cup. Use your favorite jarred sauce or homemade. A thicker sauce works best to prevent sogginess.
- Shredded Mozzarella Cheese: 2 cups, plus more for topping. Freshly shredded cheese melts so much better than pre-shredded, which has anti-caking agents.
- Pepperoni: 1 cup, sliced. Or use mini pepperonis – they’re so cute and fun!
- Optional Add-ins: Sautéed mushrooms, diced bell peppers, olives, cooked crumbled sausage, or spinach. Just make sure any veggies are well-drained to avoid excess moisture.
For the Glaze:
This adds that final touch of deliciousness and shine.
- Melted Butter: 2 tablespoons.
- Garlic Powder: 1/2 teaspoon.
- Dried Oregano (or Italian Seasoning): 1/4 teaspoon.
- Optional: A pinch of Parmesan cheese for extra savory flavor.
Step-by-Step Instructions
Step 1: Preheat & Prep Pan
First things first, get your oven preheating to 375°F (190°C). Then, grab a 9×13 inch baking pan. You want to grease it really well – I like to use butter or cooking spray. This step is crucial to prevent our beautiful pizza bread from sticking. Make sure to get into all the corners! Give it a good coating; you can even dust it lightly with a bit of flour if you’re feeling extra cautious, but usually, a good greasing is enough.
Step 2: Mix Dry Ingredients
In a large mixing bowl, whisk together the all-purpose flour, granulated sugar, active dry yeast, and salt. Give it a good stir to make sure everything is evenly distributed. This ensures the yeast has all the other dry ingredients to work with when we add the wet ingredients. It’s a simple step, but it sets you up for success!
Step 3: Mix Wet Ingredients
In a separate, medium-sized bowl, whisk together the warm water and eggs until they’re well combined. Then, gradually whisk in the slightly cooled melted butter. You don’t want the butter to be piping hot, just warm enough that it’s fully melted. This mixture will be added to our dry ingredients to form the dough.
Step 4: Combine
Pour the wet ingredients into the bowl with the dry ingredients. Using a wooden spoon or a sturdy spatula, mix everything together until a soft dough forms. Don’t overmix! We’re not developing gluten here like with traditional bread. Just mix until you no longer see streaks of dry flour. The dough will be a bit sticky, and that’s exactly what we want. It’s going to be a wonderfully tender bread because of this slightly wetter dough.
Step 5: Prepare Filling
While your dough is just sitting there, let’s get our pizza fillings ready. If you’re adding any veggies like mushrooms or peppers, make sure they’re sautéed until tender and any excess moisture has been squeezed or cooked out. This is really important to avoid a soggy pizza bread. Have your pepperoni, cheese, and any other toppings ready to go. This makes the layering process super quick and efficient.
Step 6: Layer & Swirl
Now for the fun part! Turn the sticky dough out directly into your prepared 9×13 inch baking pan. With lightly floured or buttered hands, gently press and spread the dough evenly to cover the bottom of the pan. It might not spread perfectly, and that’s okay, it will spread more as it bakes. Now, spoon dollops of pizza sauce evenly over the dough. Don’t go too close to the edges, or it might ooze out too much. Sprinkle about half of the mozzarella cheese over the sauce. Then, evenly distribute your pepperoni and any other desired toppings. Finally, sprinkle the remaining mozzarella cheese over everything. If you like a really cheesy top, add a little extra!
Step 7: Bake
Place the pan in your preheated oven. Bake for 25-35 minutes, or until the top is golden brown and the cheese is bubbly and slightly browned in spots. The exact time can vary depending on your oven, so keep an eye on it, especially towards the end. You want that gorgeous golden crust and melted, gooey cheese. If the top starts to brown too quickly, you can always loosely tent it with foil.
Step 8: Cool & Glaze
Once it’s out of the oven, let the Pull-Apart Pizza Bread cool in the pan for about 5-10 minutes. This allows the cheese to set slightly, making it easier to slice and serve. While it’s cooling, whisk together the melted butter, garlic powder, and oregano in a small bowl. Once the bread has cooled a bit, brush this Delicious Garlic-herb butter all over the top. It adds an incredible aroma and flavor boost!
Step 9: Slice & Serve
Now for the best part! Using a sharp knife or a pizza cutter, cut the pizza bread into squares or strips, whatever you prefer. Then, gently pull apart the pieces to serve. It’s warm, cheesy, saucy, and absolutely irresistible. Serve it immediately while it’s hot and gooey. It’s perfect for dipping!
What to Serve It With
This Pull-Apart Pizza Bread is honestly so versatile, it can fit into almost any meal. For a casual **breakfast**, I love serving it warm with a side of scrambled eggs or some crispy bacon. It’s a fun twist on breakfast that feels way more special than a bowl of cereal. The savory, cheesy flavors are just perfect to start the day. When it comes to **brunch**, I like to make it a bit more elegant. I’ll cut it into slightly smaller squares, maybe arrange them nicely on a platter, and serve it alongside a fresh Fruit Salad or a simple green salad with a light vinaigrette. A mimosa or a refreshing iced tea pairs beautifully. For **dessert**, this is where things get really creative! You can absolutely transform this. Instead of pizza sauce, spread a layer of Nutella, add some sliced strawberries or bananas, and a sprinkle of chocolate chips. Bake as usual, and then drizzle with a little extra Nutella or a simple powdered sugar glaze. It becomes this decadent, pull-apart chocolate hazelnut treat! And for those **cozy snacks** or movie nights, it’s simply perfect on its own. I’ll often just cut it into big squares and let everyone dig in. It’s the ultimate comfort food, especially when paired with a big bowl of popcorn or some crunchy veggie sticks for dipping. My family tradition is often just having this as our “pizza night” main event, no other sides needed, just pure cheesy delight!
Top Tips for Perfecting Your Pull-Apart Pizza Bread
I’ve made this Pull-Apart Pizza Bread more times than I can count, and over the years, I’ve picked up a few tricks that really elevate it. First, when it comes to the dough, **don’t overmix**. I know I said it in the instructions, but it’s worth repeating! Overmixing develops the gluten too much, which can lead to a tougher, chewier bread. You just want to combine until no dry flour remains. The dough will be soft and a bit sticky, and that’s perfectly fine – it yields a tender crumb. For the **filling**, the most common mistake people make is using too much sauce or having watery vegetables. This can make the bottom soggy. So, make sure your pizza sauce is on the thicker side, and if you’re adding fresh veggies like mushrooms or peppers, give them a quick sauté and let them cool completely. Patting dry any cooked ingredients really helps. When it comes to **swirling and layering**, don’t be afraid to get creative! You can create fun patterns by strategically placing your toppings or even doing a light swirl of sauce if you like. For the **glaze**, I love the garlic-herb one, but you can totally customize it. A sprinkle of Red Pepper flakes in the butter can add a nice kick, or use Italian seasoning for a broader flavor profile. For **ingredient swaps**, if you don’t have mozzarella, a blend of cheddar and Monterey Jack works beautifully, though it won’t be as classic pizza-like. You can also swap pepperoni for cooked Italian sausage, ham, or even just go vegetarian with loads of veggies. The dough itself is quite forgiving. Regarding **baking**, always keep an eye on your oven. If your oven tends to run hot, you might need to reduce the temperature slightly or shorten the baking time. I often find that placing the pan in the center of the oven gives the most even results. Another tip for **doneness testing** is to gently press the center of the bread; it should spring back slightly. The cheese should be gloriously melted and golden around the edges. If it’s browning too fast on top, a loose tent of aluminum foil can save the day. And for the **glaze timing**, I always apply it right after the bread comes out and cools for a few minutes. This way, the warm bread absorbs all those delicious flavors. If you’re storing leftovers and want to re-glaze, you can gently reheat the bread and then brush on more of the glaze.
Storing and Reheating Tips
This Pull-Apart Pizza Bread is so delicious, you’ll be lucky if there are any leftovers! But if there are, storing it is pretty simple. For **room temperature storage**, if it’s not too hot in your house, you can keep it covered loosely with plastic wrap or foil for up to 2 days. It’s best to let it cool completely before covering. It might lose a bit of its crispness, but it’ll still be wonderfully soft and cheesy. If you need to store it for longer, **refrigerator storage** is your best bet. Place it in an airtight container or wrap it tightly in plastic wrap and then foil. It will stay good in the fridge for up to 4-5 days. Honestly, it’s still pretty tasty even after a few days! For **freezer instructions**, this is a great make-ahead option. Let the bread cool completely, then wrap it very tightly in plastic wrap, followed by a layer of aluminum foil, or place it in a freezer-safe bag. It can be frozen for up to 2-3 months. When you’re ready to enjoy it, you can thaw it overnight in the refrigerator or reheat it directly from frozen (though it might take longer). For **reheating**, the oven is usually the best method. If it’s at room temperature, reheat at 350°F (175°C) for about 10-15 minutes, or until warmed through. If it’s been refrigerated, it might take 15-20 minutes. If it’s straight from the freezer, allow more time, probably 25-30 minutes, and tent with foil if it starts to brown too quickly. A toaster oven also works well for smaller portions. The **glaze timing** is important for storage. I don’t recommend glazing it if you plan to freeze it, as the butter can sometimes separate or make it a bit greasy upon reheating. It’s best to apply the glaze *after* reheating, or just before serving if it’s been refrigerated. If you want to add a fresh glaze to leftovers, just quickly whip up another small batch!
Frequently Asked Questions
Final Thoughts
So there you have it – my absolute favorite Pull-Apart Pizza Bread recipe! It’s more than just a recipe to me; it’s about creating those joyful moments in the kitchen and around the dinner table. This bread consistently delivers on flavor, ease, and pure comfort, making it a win for any occasion. It’s proof that you don’t need complicated techniques or fancy ingredients to make something truly special and delicious. I really hope you give this a try, especially if you’re looking for a fun, interactive meal that your whole family will love. It’s so satisfying to see everyone pulling apart their own cheesy, saucy piece. If you do make it, I’d absolutely love to hear how yours turns out! Please leave a comment below with your thoughts, any variations you tried, or how quickly it disappeared at your house. Sharing your creations and experiences makes my day! And if you enjoyed this, you might also want to check out my [link to another savory bread recipe] or my [link to a quick weeknight meal] for more easy and delicious ideas. Happy baking, and more importantly, happy eating!
Pull-Apart Pizza Bread
Ingredients
Main Ingredients
- 1 loaf French bread hollowed out
- 0.5 cup pizza sauce
- 2 cups shredded mozzarella cheese
- 0.5 cup pepperoni slices cut in half
- 0.25 cup grated Parmesan cheese
- Italian seasoning to taste
- garlic powder to taste
Instructions
Preparation Steps
- Preheat your oven to 375°F (190°C). Line a baking sheet with parchment paper.
- If your French bread is not pre-sliced, cut it crosswise into 1-inch thick slices, but do not cut all the way through the bottom crust. This will create pockets for the filling.1 loaf French bread
- Spread pizza sauce evenly into each slice of the French bread.1 loaf French bread
- Stuff each slice with shredded mozzarella cheese and pepperoni slices.1 loaf French bread
- Sprinkle the top with grated Parmesan cheese, Italian seasoning, and garlic powder.1 loaf French bread
- Wrap the bread loosely in aluminum foil and bake for 15 minutes.
- Remove the foil and bake for another 5-7 minutes, or until the cheese is melted and bubbly and the bread is golden brown.
- Let cool slightly before serving. Pull apart the slices and enjoy!
Notes
Featured Comments
“Impressed! Clear steps and family favorite results. Perfect for busy nights.”
“New favorite here — crowd-pleaser. crowd-pleaser was spot on.”
“Super easy and turned out amazing! My family asked for seconds. Saving this one.”
“This sweet treat was absolutely loved — the rich really stands out. Thanks!”
“Made it tonight and wow — absolutely loved! Will definitely make Pull-Apart Pizza Bread again.”
“Packed with flavor and so simple. Exactly what I wanted from Pull-Apart Pizza Bread.”


