

Remember that old dresser in the attic, the one with the chipped veneer and the scent of forgotten dreams? Or maybe it’s that dining chair set you inherited, sturdy but just… not quite *you*. We’ve all got them, those pieces of furniture whispering for a second chance. For years, I was guilty of letting them gather dust, thinking they were beyond help. Then, one rainy Saturday, I decided to tackle a tired-looking side table with a can of paint, and honestly, it was like magic. Suddenly, this forgotten piece wasn’t just furniture; it was a statement, a splash of personality in my living room. It’s incredible what a little bit of paint can do. It’s not just about covering up flaws; it’s about transformation, about breathing new life into something old and making it shine again. If you’ve ever felt intimidated by the idea of painting furniture, or you’re wondering if it’s even worth the effort, stick around. I’m going to share everything I’ve learned, from my biggest mistakes to my absolute favorite tricks. Think of it as your friendly guide to turning those forgotten relics into the stars of your home. It’s easier than you think, and the results are so rewarding!
What is furniture painting?
So, what exactly is this magical process of painting furniture? At its heart, it’s pretty straightforward: it’s the art of applying paint to wooden, metal, or even some laminate furniture pieces to change their color, finish, or overall aesthetic. It’s not just slapping on a coat of spray paint and hoping for the best (though I’ve definitely done that and learned from it!). Good furniture painting is about preparation, choosing the right materials, and applying them with a bit of care. Think of it as giving your furniture a stylish makeover. It’s the perfect way to update a piece that’s out of style, to match it to your current decor, or simply to add a pop of color to a room. It’s the DIYer’s secret weapon for creating custom looks without the hefty price tag of buying brand new. It’s about taking something functional but perhaps a bit drab, and transforming it into a piece that feels totally unique and personal to your space. It’s accessible, forgiving, and incredibly satisfying!
How do I make my furniture shine?
Quick Overview
The whole process boils down to a few key steps: preparation, priming (usually!), painting, and sealing. Don’t let the word “preparation” scare you; it’s mostly about cleaning and a light sanding to ensure your paint sticks beautifully. Then, you apply your chosen paint, maybe a coat or two, let it dry, and finish with a protective topcoat. It’s a straightforward workflow that yields stunning results, making even the most neglected furniture look brand new. You don’t need a fancy studio; your garage, a spare room, or even a well-ventilated corner of your yard will do. The satisfaction of transforming a piece yourself is immense!
Ingredients
When I first started, I felt so overwhelmed by all the different paint types and supplies. But over time, I’ve figured out what really works and what’s just marketing fluff. Here’s what you’ll generally need:
For the Surface Prep:
* Cleaning Supplies: A good degreaser (like a simple dish soap and water solution or a dedicated TSP substitute) is crucial. You need to get rid of any grime, grease, or wax buildup. I always do a thorough wipe-down with a damp cloth afterward to remove any residue.
* Sandpaper: A medium-grit (around 120-150) for initial scuff sanding and a fine-grit (220+) for smoothing. You’re not trying to remove the old finish entirely unless it’s peeling badly; you just need to create a slightly rough surface for the new paint to grip.
* Tack Cloth: This is a lifesaver for getting rid of every last speck of dust after sanding. Seriously, don’t skip this!
* Screwdriver/Drill (if needed): For removing hardware like knobs and handles. It makes painting so much easier and gives a cleaner finish.
For the Paint & Primer:
* Primer: Depending on the surface and the type of paint you’re using, a good quality primer is often your best friend. It helps with adhesion, blocks stains, and ensures a more even color. I’ve found that a water-based bonding primer works wonders on slick surfaces.
* Paint: This is where the fun really begins! For furniture, I tend to lean towards:
* Chalk Paint: This is incredibly forgiving and requires minimal prep. It dries to a lovely matte finish and is perfect for a distressed, vintage look. It’s my go-to for quick projects.
* Milk Paint: Similar to chalk paint but can sometimes have a more authentic, aged look. It often requires a bonding agent if you want it to stick well.
* Mineral Paints/All-in-One Paints: These are fantastic because they often don’t require a separate primer or topcoat, saving you a step. They offer a durable, smooth finish.
* Latex or Acrylic Enamels: These are more traditional and come in a vast array of colors. They can provide a very durable, smooth finish, especially with a good primer. Look for “cabinet and furniture” formulas.
* Brushes and Rollers: High-quality synthetic brushes are great for most paints, especially latex and acrylics. For chalk and mineral paints, you might prefer a round bristle brush for that distinctive painterly look. Small foam rollers can be excellent for smooth surfaces like tabletops.
For the Topcoat/Sealer:
* Polyurethane or Polycrylic: This is your protective shield! Especially important for high-traffic items like tabletops or dresser drawers. Water-based polycrylic is great because it dries clear and doesn’t yellow like oil-based polyurethane can.
* Wax: Often used over chalk paint for a soft, velvety finish. It offers some protection but isn’t as durable as polycrylic for heavy use. I usually use wax on pieces that won’t get a lot of wear and tear.
Step-by-Step Instructions
Step 1: Preheat & Prep Pan
Alright, let’s get this piece ready for its glow-up! First things first, make sure your furniture piece is in a well-ventilated area. If you’re working indoors, open up some windows or set up a fan. You’ll want to thoroughly clean the entire piece. Use a good degreaser – dish soap and water works in a pinch, but a TSP substitute is even better for really stubborn grime. Wipe it down completely, and then wipe again with a clean damp cloth to remove any residue. Let it dry completely. If your piece has any loose paint or veneer, now’s the time to gently sand or scrape it away. You’re aiming for a clean, smooth surface to start with.
Step 2: Mix Dry Ingredients
This step isn’t about mixing dry ingredients like you would for a cake, but rather ensuring your surface is ready to receive its new coat! After cleaning and drying, it’s time for a light sanding. Grab your medium-grit sandpaper (around 120-150) and give the entire piece a quick scuff. You’re not trying to strip the finish, just create a little “tooth” so the primer and paint have something to grab onto. You’ll see a fine dust forming – that’s good! Once you’ve scuffed everything, use a vacuum or a dry cloth to remove the bulk of the dust. Then, use a tack cloth to pick up every last speck. This is so important; dust bunnies under your paint are no fun!
Step 3: Mix Wet Ingredients
This is where we get the paint ready. If you’re using chalk paint or a mineral paint, give it a good stir. These don’t always require much prep, but it’s always good to mix them thoroughly. If you’re using a latex or acrylic enamel, you’ll want to stir it gently, trying not to whip in too much air. If it seems a bit thick, you can add a tiny amount of water (like a tablespoon per quart) to thin it slightly. Some people swear by adding a leveling agent, but for most projects, just a little water is fine. You’re looking for a smooth, brushable consistency.
Step 4: Combine
Now for the exciting part – painting! If you’re using a primer, apply a thin, even coat using your brush or roller. Let it dry completely according to the manufacturer’s instructions (usually an hour or two). Once dry, give it a light sanding with your fine-grit sandpaper (220+) to smooth out any brush marks or imperfections. Wipe away the dust with a tack cloth. Now, apply your first coat of paint. Work in long, even strokes, going in the same direction. Don’t overwork the paint, and try to avoid drips. Let this coat dry completely. Depending on your paint and the look you want, you might need a second or even a third coat. Lightly sand between coats if you want an ultra-smooth finish. If you’re going for a distressed look with chalk paint, you’ll sand specific areas after the paint is dry to reveal the wood underneath.
Step 5: Prepare Filling
This step is more about refining your paint job than a separate filling. Once your final coat of paint is dry, it’s time to seal it. If you’re using chalk paint or milk paint, you’ll typically apply a furniture wax. Use a wax brush or a lint-free cloth to apply a thin, even layer of wax, working it into the paint. Let it haze over for a few minutes, then buff it with a clean, soft cloth until it’s smooth and has a nice sheen. If you’re using a more durable paint and want extra protection, especially for high-use surfaces like tabletops or drawer fronts, apply a water-based polycrylic. Apply 2-3 thin coats, allowing each to dry thoroughly. A light sanding with 320-grit sandpaper between coats and wiping with a tack cloth will give you an incredibly smooth and durable finish.
Step 6: Layer & Swirl
This is where you add any decorative touches, if you choose. For example, if you’re creating a distressed look, this is when you’d use your fine-grit sandpaper to gently rub away areas of paint to reveal the color or wood underneath, creating a worn, aged appearance. You can also add stencils at this stage. Apply your stencil, secure it well, and carefully paint within the design. I’ve found it’s best to use a stencil brush with very little paint on it to avoid bleeding under the stencil. For a marbled effect, you might apply different colors of paint or glaze and then swirl them together with a tool or brush before they dry.
Step 7: Bake
This isn’t about baking in an oven, but rather letting your beautiful piece cure! The paint needs time to harden fully. While it might feel dry to the touch much sooner, the curing process can take anywhere from 7 to 30 days, depending on the type of paint and topcoat you used. During this time, be gentle with your furniture. Avoid placing heavy items on it, and wipe up spills immediately. The longer you let it cure, the more durable the finish will be. Patience is key here!
Step 8: Cool & Glaze
If you’re using a glaze for an antiqued effect, this is when you’d apply it. You typically apply the glaze over your dried, sealed paint. Wipe it on with a cloth or brush, then wipe away the excess with a clean cloth, leaving the glaze in the crevices and details to add depth and age. If you’re not glazing, and your piece feels a bit dull, this is where you might apply a final buffing with a soft cloth to bring out the shine.
Step 9: Slice & Serve
This is the grand finale – reattaching any hardware, like knobs or drawer pulls. Make sure they are clean and complement your new paint color. If you’re changing them out, now’s the time to install your new ones. Step back and admire your work! You’ve just given a piece of furniture a brand new life, and it looks absolutely fantastic. It’s amazing how much character and style you can add to your home with just a little bit of paint and effort.
What to Serve It With
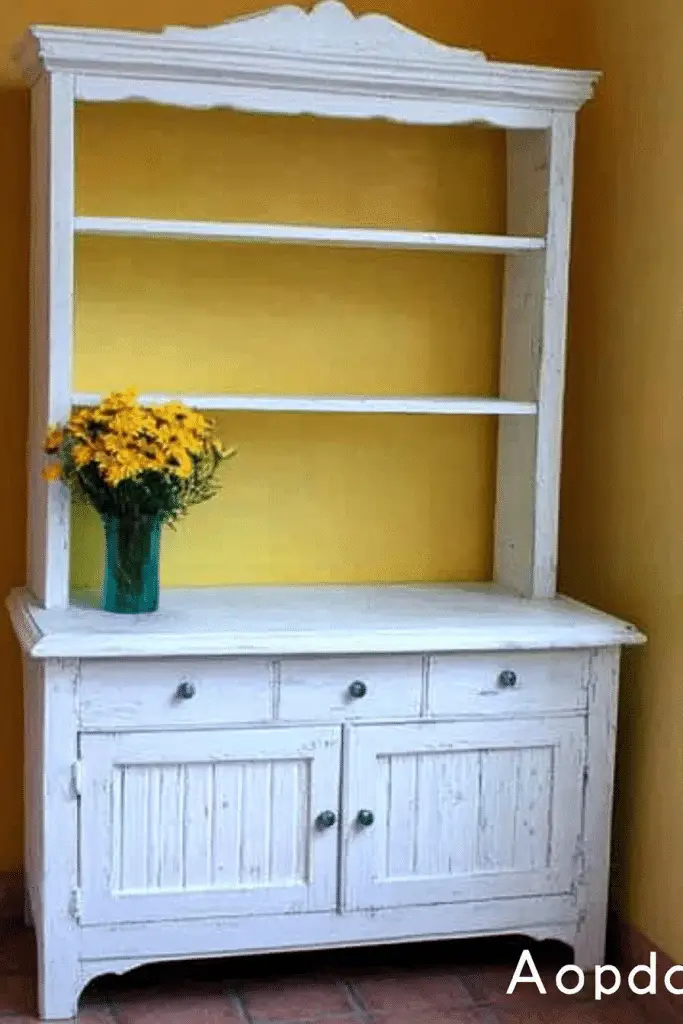
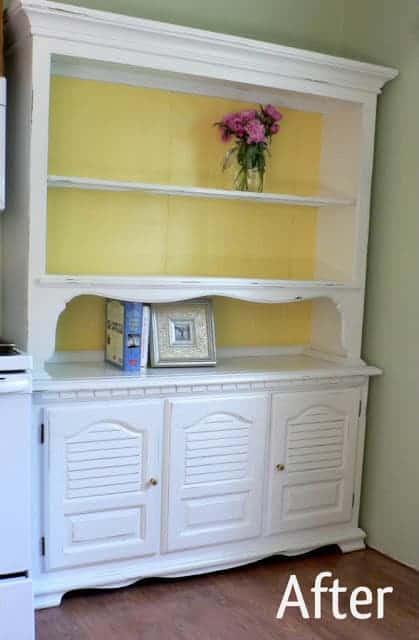
Once you’ve painted your furniture, it’s not just about the piece itself anymore; it’s about how it fits into your life and your home. Painted furniture can be incredibly versatile. For a breakfast nook, a freshly painted farmhouse table or a cheerful pastel-painted hutch can really brighten up your mornings. I love pairing a painted piece with simple, natural elements like a linen tablecloth or a vase of fresh flowers. For brunch gatherings, a sophisticated painted sideboard or console table can serve as a stunning backdrop for your spreads. Think about adding elegant accessories, maybe some vintage silver, and a beautiful centerpiece. It elevates the whole experience! As a standalone dessert piece, a beautifully painted accent chair or a small, striking side table can become a conversation starter. Imagine it next to a cozy reading chair, holding a stack of books and a cup of tea. For those cozy snack moments, a painted coffee table or entryway bench adds warmth and character. I often paint pieces that are used daily, like my kitchen island base or entryway console, and they just make the space feel so much more inviting and lived-in. It’s about creating a space that feels personal and comfortable, and painted furniture is such a fantastic way to achieve that.
Top Tips for Perfecting Your Furniture Painting Journey
Over the years, I’ve definitely learned a thing or two (and made my fair share of mistakes!) when it comes to painting furniture. Here are some of my absolute best tips to help you achieve that professional-looking finish:
Surface Prep is Non-Negotiable: Seriously, don’t skimp on this. I once tried to paint a super glossy table without proper sanding, and the paint just slid right off after a week. Cleaning and scuff sanding create the “tooth” your paint needs to adhere properly. A tack cloth is your best friend for removing every last bit of dust. Trust me on this one – a little extra time here saves a lot of headaches later.
Choose the Right Paint for the Job: This is crucial. For heavily used items like tabletops or chairs, you need something durable. Chalk paint is amazing for its ease of use and matte finish, but it *always* needs a good topcoat (like polycrylic or wax) for protection. If you want a super smooth, high-gloss finish, an enamel paint is your best bet. Mineral paints and all-in-one paints are fantastic for simplifying the process as they often combine primer and paint in one. I tested a new mineral paint last month on a bookshelf, and it was dry to the touch in an hour and felt incredibly tough! It’s about matching the paint’s properties to the furniture’s intended use.
Embrace the Primer: While some paints claim to be “no-primer needed,” I’ve found that a good primer makes a world of difference, especially on dark woods, laminate, or if you’re painting a light color over a dark one. It blocks tannins from bleeding through, ensures even color, and provides a superior bond. I always use a water-based bonding primer on tricky surfaces.
Invest in Quality Brushes and Rollers: You don’t need a professional kit, but cheap brushes will leave streaks and shed bristles all over your beautiful paint job. Synthetic brushes work well for water-based paints, and a good quality foam roller can give you a super smooth finish on flat surfaces. For chalk paint, a good quality round bristle brush gives that signature texture.
Thin Coats are Key: It’s tempting to slap on thick coats to get it done faster, but resist the urge! Thin, even coats dry faster, look smoother, and are less likely to drip. You can always add more coats, but it’s a pain to fix drips and unevenness from thick coats. I usually aim for 2-3 thin coats of paint, and 2-3 thin coats of topcoat.
Sanding Between Coats (Lightly!): After your primer is dry and before your first paint coat, and then lightly between paint coats (if you’re going for a super smooth finish), use a fine-grit sandpaper (220-320). This knocks down any tiny imperfections or dust nibs. Always wipe away the dust with a tack cloth afterwards. It makes a huge difference in the final smoothness.
Don’t Rush the Drying and Curing: This is where many DIYers (myself included, early on!) get impatient. Paint needs to be dry to the touch, but the curing process – where the paint fully hardens – can take weeks. Be gentle with your freshly painted piece during this time. Avoid placing heavy objects on it or scrubbing it. The longer it cures, the more durable it becomes.
Experiment with Finishes: Don’t be afraid to try different topcoats. Wax over chalk paint gives a soft, matte, velvety look that’s beautiful. Polycrylic provides a harder, more durable sheen, perfect for high-traffic areas. You can even mix them – use wax for aesthetics and polycrylic in areas prone to wear. For a more advanced look, try a glaze over your painted finish to create an antique or aged effect.
Hardware Matters: New hardware can completely change the look of a piece. Don’t underestimate the power of a fresh set of knobs or pulls. It’s a small change that makes a big impact and is super easy to swap out.
Storing and Reheating Tips
Once your beautiful piece is painted, you’ll want to keep it looking its best! If you’ve sealed your furniture with a durable topcoat like polycrylic, it should hold up really well to everyday use. For storage, if you need to put a piece away for a while, make sure it’s clean and completely dry. You can cover it with a breathable drop cloth or an old sheet to protect it from dust and scratches. Avoid plastic sheeting, as it can trap moisture and potentially damage the paint finish over time. If you’re storing it long-term in a damp area, consider using a dehumidifier or placing moisture absorbers nearby.
When it comes to “reheating” – which in furniture terms means dealing with minor nicks or scratches – the approach depends on your finish. For pieces finished with chalk paint and wax, you can often simply reapply a thin layer of wax to the affected area and buff it out. It’s usually quite forgiving. For more significant scratches on polycrylic finishes, you might need to do a light sanding with very fine-grit sandpaper (320+) and then reapply a thin coat of polycrylic. For painted furniture that’s been stored, give it a good dusting and a gentle wipe-down with a damp cloth before bringing it back into use. If it was glazed, you might need to re-glaze certain areas if the glaze wore off.
The key to longevity is treating your painted furniture with a little care. Avoid harsh chemical cleaners, and always use coasters or placemats on surfaces prone to spills or heat. With a little attention, your beautifully painted furniture will be a cherished part of your home for years to come!
Frequently Asked Questions
Final Thoughts
So there you have it! Painting furniture is such a rewarding way to transform your home and express your personal style. It’s not just about a new coat of paint; it’s about giving a piece a second life, adding character to your space, and saving money while you’re at it. Remember those dusty old pieces you might have overlooked? They’re probably just waiting for a little love and a splash of color to become your new favorite items. Don’t be afraid to experiment, learn from your mistakes (we all make them!), and most importantly, have fun with it! If you’ve tried painting furniture before, I’d love to hear about your favorite projects or any tips you’ve picked up along the way. And if you’re just starting out, I hope this guide gives you the confidence to dive in. I can’t wait to see what beautiful transformations you create!
Paint Furniture Without Sanding
Ingredients
Materials
- 1 piece Furniture to renovate
- 1 quart Zinsser Cover Stain oil-based primer
- 1 quart Floetrol paint conditioner
- 0.5 cup Paint thinner
- 1 tube Elmer's wood filler
- 1 Good quality two-inch angled brush Purdy brush recommended
- 3 Sanding blocks medium-grit, fine-grit
- 1 quart Paint of your choice
- 1 quart Minwax water-based Polycrylic or Varathane water-based polyurethane
- 1 Screwdriver
- 1 Tack cloth or lint-free rag
Instructions
Preparation Steps
- Prep the furniture by removing all doors and hardware using a screwdriver. Follow the directions on the wood-filler to patch any holes and then sand them smooth.
- Use the medium-grit sanding block to lightly rough up all surfaces you plan to paint. The goal is to create a surface for the primer to adhere to, not to remove old finishes. Remove all dust completely before proceeding.
- Apply the first coat of primer. Allow it to dry completely according to the manufacturer's instructions.
- Apply a second coat of primer. Ensure it dries completely.
- Apply 1-2 coats of your chosen paint. Allow each coat to dry thoroughly before applying the next. Let the final coat of paint dry for at least 24 hours before distressing or applying a topcoat.
- If desired, distress the furniture using the fine-grit sanding block to achieve your desired look. Remove all dust with a tack cloth.
- Apply the first coat of polyurethane. Let it dry, then lightly sand with the fine-grit block to smooth out any drips or brush strokes. Remove dust with a tack cloth. Repeat this process for as many coats of polyurethane as needed to achieve the desired sheen and protection.
Notes
Featured Comments
“I finally gave my old dresser a makeover and it looks brand new! The paint job made such a huge difference—so satisfying.”
“I love this DIY guide—finally giving my dusty attic dresser a new life! Any tips for fixing chipped veneer without it looking too obvious?”
“Impressed! Clear steps and creamy results. Perfect for busy nights.”
“New favorite here — so flavorful. crowd-pleaser was spot on.”
“Super easy and turned out amazing! My family asked for seconds. Saving this one.”
“This sweet treat was absolutely loved — the rich really stands out. Thanks!”


I love this DIY guide—finally giving my dusty attic dresser a new life! Any tips for fixing chipped veneer without it looking too obvious?
I finally gave my old dresser a makeover and it looks brand new! The paint job made such a huge difference—so satisfying.