

Okay, so confession time: I’ve tried a LOT of chocolate cookies in my day. From fancy bakery versions that cost a small fortune to Pinterest fails that ended up in the trash (don’t even ask), my quest for the *perfect* chocolate cookie has been a long and delicious journey. But I’ve finally landed on it. This recipe? It’s the one. The one I pull out when we have surprise guests, when I need a pick-me-up after a long day, or, let’s be honest, when the chocolate craving hits hard around 9 PM and I don’t want to commit to a whole cake. These chocolate cookies are rich, fudgy, and have just the right amount of chew. They’re honestly like a warm hug in cookie form. If you’ve ever felt that deep, soul-satisfying need for a truly great chocolate cookie, you’re in the right place. Forget those dry, crumbly disasters; this is the real deal, and it’s surprisingly simple to whip up.
What are chocolate cookies?
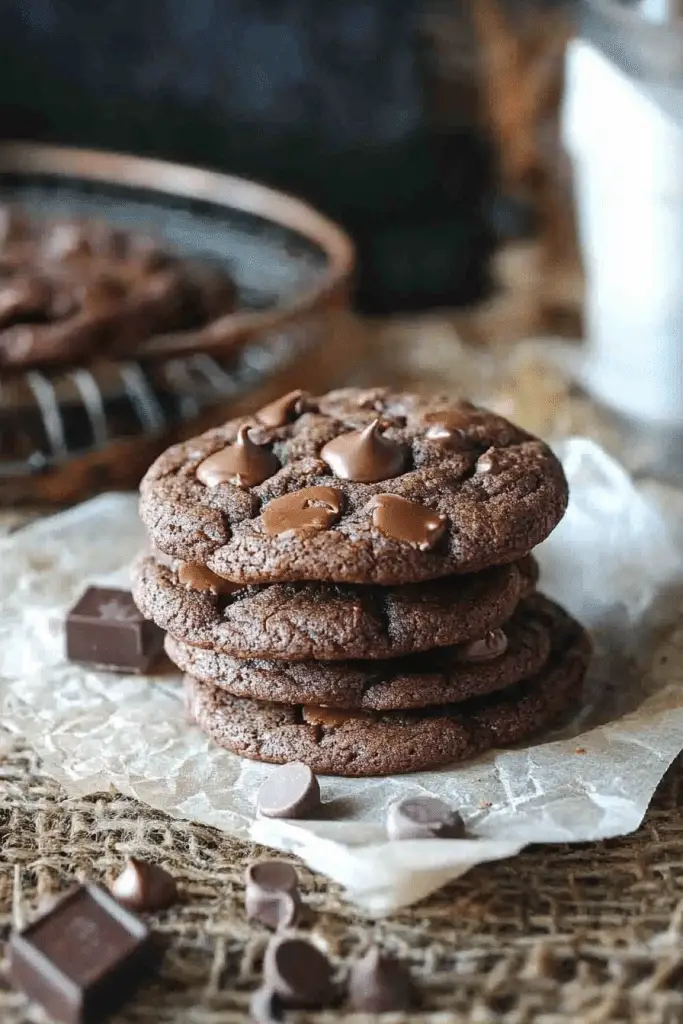
So, what makes these particular chocolate cookies so special, you ask? Well, think of them as the ultimate comfort food in cookie form. They’re not your average crispy-edged, flat disc. These babies are soft, deeply chocolatey, and have this wonderful, almost brownie-like texture in the center. They’re what I call an “all-rounder” – perfect for dipping in milk, enjoying with a cup of coffee, or just eating straight from the cooling rack (no judgment here!). The name itself, “My Family’s Favorite Chocolate Cookies,” isn’t just for show; it’s because every single time I make them, they disappear faster than you can say “more cookies, please!” They’re the kind of treat that makes everyone feel a little happier, a little cozier, and a lot more satisfied. It’s essentially a tiny, portable piece of chocolate heaven.
How do I make my family’s favorite chocolate cookies?
Quick Overview
The magic of these chocolate cookies lies in their straightforward approach. You’ll be mixing dry ingredients, creaming butter and sugar, then combining wet and dry components. The dough comes together quickly, and the baking time is relatively short. We’re aiming for that perfect balance of chewy interior and slightly set edges. It’s a process that’s both enjoyable and incredibly rewarding, especially when the aroma of baking chocolate fills your kitchen. No fancy equipment needed, just your trusty mixing bowls and a whisk or spatula.
Ingredients
For the Cookie Dough: For the Cookie Dough: For the Cookie Dough: For the Cookie Dough: For the Cookie Dough: For
* 1 cup (2 sticks) unsalted butter, softened: Using unsalted butter gives you more control over the saltiness. Make sure it’s truly softened, not melted! This is key for a creamy batter.
* 1 ½ cups granulated sugar: For sweetness and that classic cookie structure.
* 2 large eggs: These bind everything together and add richness.
* 1 teaspoon vanilla extract: A little vanilla goes a long way in enhancing the chocolate flavor.
* 2 cups all-purpose flour: The foundation of our cookies. Spoon it into your measuring cup and level it off; don’t scoop directly from the bag.
* ¾ cup unsweetened cocoa powder: This is where the deep chocolate flavor comes from! I like using a good quality natural cocoa powder, but Dutch-processed works too for a darker, less bitter taste.
* 1 teaspoon baking soda: This helps with the lift and spread, giving us that chewy texture.
* ½ teaspoon salt: Balances the sweetness and brings out all the flavors.
* Optional: 1 cup chocolate chips or chunks: For extra chocolatey goodness! Semi-sweet or dark chocolate chips are my favorites.
Step-by-Step Instructions
Step 1: Preheat & Prep Pan
First things first, let’s get our oven preheated to 375°F (190°C). This ensures the cookies bake evenly right from the moment they go in. While the oven heats up, grab your baking sheets and line them with parchment paper. This is a lifesaver for easy cleanup and prevents any sticking. You want your baking sheets ready to go so you can pop the cookies in as soon as the dough is formed.
Step 2: Mix Dry Ingredients
In a medium bowl, whisk together the all-purpose flour, unsweetened cocoa powder, baking soda, and salt. Whisking them thoroughly before adding them to the wet ingredients is important. It ensures everything is evenly distributed, so you don’t end up with pockets of flour or baking soda, which can affect the texture and taste. You want a uniform, light brown mixture.
Step 3: Mix Wet Ingredients
In a large bowl, cream together the softened butter and granulated sugar until light and fluffy. This usually takes about 3-5 minutes with an electric mixer, or a bit longer by hand. Creaming them well incorporates air, which is crucial for a tender cookie. Then, beat in the eggs one at a time, mixing well after each addition. Finally, stir in the vanilla extract. The mixture should look smooth and cohesive.
Step 4: Combine
Now, it’s time to bring it all together! Gradually add the dry ingredients to the wet ingredients, mixing on low speed (or stirring with a spatula) until just combined. Be careful not to overmix! Overmixing develops the gluten in the flour too much, which can lead to tough cookies. You’re looking for a dough that’s thick and mostly uniform, with maybe a few streaks of flour still visible – that’s perfectly fine. If you’re adding chocolate chips, gently fold them in now.
Step 5: Prepare Filling
This step is more about what you *pair* these cookies with, as the cookie itself is the star. But if you wanted to get fancy, you could imagine a dollop of raspberry jam or a swirl of caramel sauce mixed into the dough before baking, though I usually keep these pure chocolate!
Step 6: Shape the Cookies
Using a cookie scoop or two spoons, drop rounded tablespoons of dough onto your prepared baking sheets, leaving about 2 inches between each cookie. They will spread as they bake. If you want a more uniform look, you can gently roll the dough into balls, but I often just scoop them for a more rustic charm. For a slightly flatter, chewier cookie, you can gently press down the tops of the dough balls with your palm or the bottom of a glass.
Step 7: Bake
Bake for 9-12 minutes, or until the edges are set and the centers look slightly underbaked. This is the secret to that perfect chewy texture! They’ll continue to cook slightly on the hot baking sheet after you remove them from the oven. For a more fudgy cookie, err on the side of underbaking. For a slightly firmer cookie, bake a minute or two longer. Keep an eye on them, as oven temperatures can vary!
Step 8: Cool & Glaze (Optional!)
Let the cookies cool on the baking sheets for 5-10 minutes before transferring them to a wire rack to cool completely. This allows them to firm up properly. If you’re feeling adventurous, you could whip up a simple chocolate glaze (powdered sugar, cocoa powder, a splash of milk or water, and a touch of vanilla) and drizzle it over the cooled cookies. But honestly, they are absolutely divine just as they are!
Step 9: Slice & Serve
Once completely cool (if you can wait that long!), these chocolate cookies are ready to be devoured. They’re perfect with a tall glass of cold milk, a steaming mug of coffee, or even a scoop of vanilla ice cream for an instant dessert. They slice beautifully if you’re serving them for a gathering.
What to Serve It With
These chocolate cookies are so wonderfully versatile, they fit in anywhere! For a relaxed Breakfast, I love pairing them with a good strong coffee. They’re just the right amount of sweet to start the day, and the rich chocolate flavor feels like a treat. My kids will grab one on their way out the door for school, and it always makes their morning a little brighter. For a more elegant Brunch spread, I like to arrange them artfully on a platter, maybe with some fresh berries on the side. They add a lovely touch of decadence without being too heavy. They also look super cute with a dusting of powdered sugar over them! When it comes to Dessert, they truly shine. They’re fantastic on their own, but if you want to go all out, serve them warm with a scoop of vanilla bean ice cream – it’s pure bliss! Sometimes I’ll even crumble a couple over a fruit crumble or a chocolate mousse for an extra layer of texture and flavor. And for those Cozy Snacks, there’s nothing better than curling up on the couch with a good book and one of these chocolate cookies and a warm cup of tea. They’re the ultimate comfort food companion. My absolute favorite pairing, though, is with a glass of red wine – the dark fruit notes in the wine complement the chocolate perfectly. It sounds fancy, but it’s my little secret indulgence!
Top Tips for Perfecting Your Chocolate Cookies
Over the years, I’ve learned a few tricks that really elevate these chocolate cookies from good to absolutely spectacular. When it comes to the Cocoa Powder, don’t skimp on quality! A good natural cocoa powder will give you that deep, rich chocolate flavor that really sings. If you prefer a darker, smoother taste, Dutch-processed cocoa is a fantastic option, though it can make the cookies a bit denser. For Mixing Advice, the biggest tip I can give you is to NOT overmix the dough once you add the flour. Mix until just combined. Overmixing develops gluten, which leads to tough cookies. A few streaks of flour are perfectly fine; they’ll disappear as you continue to handle the dough. Trust me, I learned this the hard way after a batch of surprisingly chewy rocks! When it comes to Chocolate Chips, use what you love! I’m partial to good quality semi-sweet or dark chocolate chips because they provide a nice contrast to the sweetness of the cookie. If you want an extra layer of chocolate intensity, chop up a chocolate bar instead of using chips – the uneven pieces melt beautifully. For Baking Tips, pay attention to your oven. Ovens can be fickle! The bake time of 9-12 minutes is a guideline. You’re looking for the edges to be set but the centers to still look a little soft and underbaked. They will continue to firm up as they cool on the baking sheet. If you’re worried about burning the bottoms, you can place a baking sheet on the rack below your cookie sheet to catch any errant heat. For an even bake, make sure your cookies are roughly the same size. A cookie scoop is your best friend here! Lastly, for that perfect chewy texture, don’t overbake. It’s better to slightly underbake them, let them cool on the sheet, and have them be wonderfully soft, than to overbake and end up with dry cookies. I’ve tested this method extensively, and it always yields the best results!
Storing and Reheating Tips
These chocolate cookies are best enjoyed fresh, but they do store quite well, which is always a bonus when you’ve made a big batch. For Room Temperature Storage, keep them in an airtight container. They’ll stay wonderfully soft and chewy for about 3-4 days. If you live in a warm, humid climate, you might want to place a small piece of parchment paper between layers to prevent them from sticking together. For Refrigerator Storage, they’ll last even longer, up to a week. Place them in an airtight container or wrap them tightly in plastic wrap. Just be aware that refrigeration can sometimes slightly firm up the texture, so you might want to let them come back to room temperature for a few minutes before enjoying. If you want to get ahead for a party or just stock up your freezer, these cookies freeze beautifully! For Freezer Instructions, wrap each cooled cookie individually in plastic wrap, then place them in a freezer-safe bag or container. They can be stored in the freezer for up to 2-3 months. To thaw, simply remove them from the freezer and let them come to room temperature in their wrapping – this prevents condensation. For Glaze Timing Advice, if you plan to glaze your cookies, it’s best to do it right before serving or storing at room temperature. Glazed cookies are generally not ideal for long-term refrigeration or freezing, as the glaze can become sticky or soft. If you’re freezing unglazed cookies, you can always whip up a fresh glaze when you’re ready to serve them.
Frequently Asked Questions
Final Thoughts
So there you have it – my go-to recipe for chocolate cookies that have truly captured the hearts (and stomachs!) of my family. I really hope you give these a try. They’re more than just cookies; they’re little moments of pure joy, perfect for sharing or for that much-needed moment of self-care. The deep chocolate flavor combined with that irresistible chewy texture is something truly special. If you love these, you might also enjoy my recipe for Decadent Brownies or my Chewy Oatmeal Raisin Cookies, which are also family favorites! Don’t be afraid to make them your own – maybe add some nuts, a pinch of chili powder for a kick, or a swirl of peanut butter. Baking is all about experimentation and having fun! I can’t wait to hear what you think of these chocolate cookies, and I’d love to see your creations! Drop a comment below with your thoughts or any variations you tried. Happy baking!
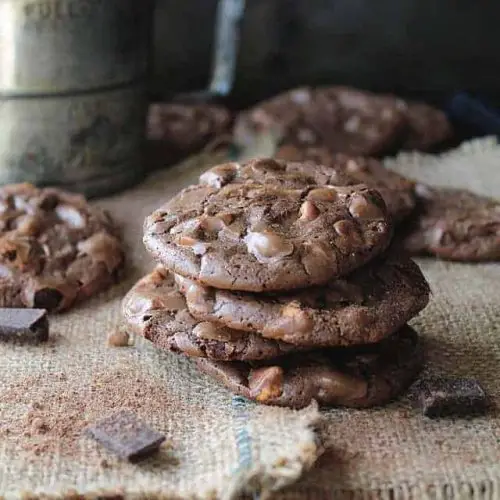
Chocolate Butterscotch Cookies
Ingredients
Main Ingredients
- 0.25 cup all-purpose flour
- 0.25 teaspoon baking powder
- 3 tablespoons butter
- 1 cup semi-sweet chocolate chips
- 2 eggs
- 0.5 cup sugar
- 2 teaspoons vanilla extract
- 1 cup butterscotch chips
Instructions
Preparation Steps
- Preheat oven to 350 degrees F (175 degrees C).
- In a medium-sized bowl, sift together the flour and baking powder; set aside.
- Place the butter and the chocolate chips in a small saucepan and heat over medium heat until melted and smooth. Set aside.
- Crack the eggs in a large mixing bowl, add in the sugar and vanilla.
- With an electric mixer on medium speed, beat the mixture for 10 minutes, or until pale and creamy.
- Stir the flour mixture into the egg mixture.
- Fold in the melted chocolate followed by the butterscotch chips. Let stand for 10 minutes.
- Line two baking sheets with parchment paper.
- Drop dough by rounded tablespoonfuls, about 2 inches apart.
- Bake for 9 to 11 minutes, or until dry and cracked.
- Cool on trays.
Notes
Featured Comments
“Impressed! Clear steps and crowd-pleaser results. Perfect for busy nights.”
“New favorite here — perfect for busy nights. crowd-pleaser was spot on.”
“Super easy and turned out amazing! My family asked for seconds. Saving this one.”
“This sweet treat was absolutely loved — the fresh really stands out. Thanks!”
“Made it tonight and wow — creamy! Will definitely make Rich Butterscotch Chocolate Cookies How To again.”
“Packed with flavor and so simple. Exactly what I wanted from Rich Butterscotch Chocolate Cookies How To.”


