

I remember the first time I tried making baked salmon. It was one of those nights where I wanted something special but didn’t want to spend hours fussing in the kitchen. You know that feeling when your house smells like a cozy little seafood bizzeria, and everyone suddenly appears, drawn by the aroma? That’s exactly what happens when I make this—I swear, my whole family comes sprinting to the table! The truth is, baked salmon is my go-to when I want a dish that feels fancy but is actually a total breeze to whip up. Trust me, I’ve tested it with different herbs, sauces, even a splash of coconut oil when I was feeling adventurous. The result? Always tender, flaky, and packed with flavor. It’s perfect when you’re craving something healthy but still crave that indulgent, melt-in-your-mouth goodness. My kids ask for this all the time, and honestly, I love how simple and satisfying it is. Plus, it’s one of those recipes I can throw together when I’m running late but still want to serve something beautiful.
What is baked salmon?
Think of baked salmon as the laid-back, fuss-free cousin of grilled or pan-fried salmon. It’s essentially salmon fillets or steaks baked in the oven, usually topped with a little seasoning or marinade—sometimes just lemon and herbs, sometimes a drizzle of honey or soy sauce for a sweet-salty combo. The idea is to cook the fish slowly in gentle heat, which results in perfectly flaky flesh that practically melts at the touch. The name says it all: it’s baked, simple as that. No pans to scrub, no splatters—I love that about it. This dish has roots all over the world, from Scandinavian smoked salmon to Mediterranean baked fillets, but I like to keep mine straightforward and flavorful. It’s a healthy, protein-packed dinner that feels luxurious but is actually super easy to pull off, even on busy weeknights. Think of it as the easiest way to impress someone or treat yourself without complicating your life.
How do you bake salmon?
Quick Overview
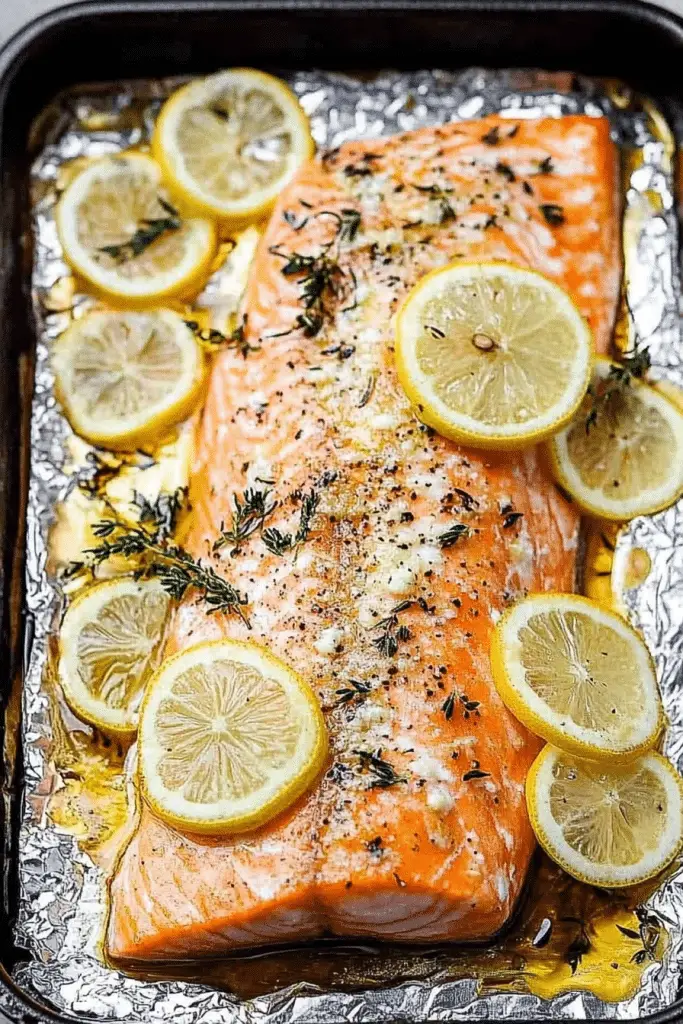
In a nutshell, baking salmon is as simple as seasoning and popping it into the oven. I like to keep it straightforward—just salt, pepper, lemon, and herbs. I place the fillets on a baking sheet lined with parchment paper or foil for easy cleanup, then bake at about 400°F (200°C) for 12-15 minutes. The key is to watch it closely, so it stays flaky and moist. What makes this method special is how forgiving it is—once you get the timing right, the salmon comes out perfectly tender every single time. I’ve tested this with different oven setups and thicknesses, and trust me—once you do it a few times, it feels like second nature. It’s the kind of recipe that, once you master it, becomes a go-to for everything from weeknight dinners to holiday entertaining. Plus, it smells amazing—garlic and herbs filling your kitchen like a warm hug.
Ingredients
For the Main Salmon: For the main salmon: For the main salmon: For the main salmon: For the main salmon: For the main salmon: For
– 4 salmon fillets, skin-on or off (fresh or thawed)
– 2 tablespoons olive oil or melted butter
– 2 cloves garlic, minced
– 1 teaspoon salt
– ½ teaspoon freshly ground black pepper
– 1 lemon, sliced thin
– Fresh herbs like dill, parsley, or thyme (a handful, chopped)
For Optional Glaze or Topping:
– Honey or maple syrup (a drizzle for a touch of sweetness)
– Dijon mustard (for a tangy kick)
– Capers or sliced olives (if you’re feeling salty)
Step-by-Step Instructions
Step 1: Preheat & Prep Pan
Heat your oven to 400°F (200°C). Line a baking sheet with parchment paper or foil—trust me, cleanup is a breeze that way. Pat the salmon dry with paper towels; this helps the seasoning stick and gives a nicer crust. If you’re skin-on, leave the skin on—it helps keep the fish moist and adds flavor, but you can remove it after baking if you prefer.
Step 2: Mix Dry Ingredients
In a small bowl, combine salt, pepper, and any dried herbs or seasonings you like. I usually add a pinch of paprika or a sprinkle of Italian seasoning for extra punch. This mix is your simple flavor base that will enhance the fish without overwhelming it.
Step 3: Mix Wet Ingredients
In another bowl, whisk together olive oil or melted butter with minced garlic and lemon juice. I sometimes add a splash of soy sauce or a tiny squeeze of honey here—depends on my mood. The mixture should be smooth and fragrant, ready to bring out the best in your salmon.
Step 4: Combine
Brush the salmon fillets generously with the wet mixture, then sprinkle evenly with your dry seasoning. Don’t overthink it—just make sure each piece’s surface is coated well. Place the fillets skin-side down on your prepared baking sheet. If you want, add lemon slices on top for an extra zesty aroma.
Step 5: Prepare Filling
This step is optional, but I love adding a little herbal topping or thin lemon wedges on top before baking. If you’re into fancy patterns, a quick swirl of mustard or a few capers can elevate the flavor and appearance. These small touches make a big difference.
Step 6: Layer & Swirl
Sliding the fillets into the oven, I try to keep the pieces spaced out for even cooking. If you’re adding toppings or glazes, do so about 5 minutes before the timer goes off—this gives them time to caramelize slightly or stay fresh and bright.
Step 7: Bake
Pop it in the oven and bake for 12-15 minutes. The general rule? Fish is done when it’s opaque and flakes easily with a fork. Thicker fillets might need a minute or two more. Keep an eye on it—overbaking can make it dry, and nobody wants that. When it looks juicy and flaky, it’s perfect.
Step 8: Cool & Glaze
Once out, let the salmon rest for a few minutes. If you’re glazing, brush on a little honey-dijon mixture or a drizzle of olive oil. This lets everything settle and adds a lovely shine and extra flavor.
Step 9: Slice & Serve
Use a sharp knife to gently slide under the fish and lift out the portions. Serve with your favorite sides—roasted veggies, fluffy rice, or a fresh salad—and enjoy the aroma that’s guaranteed to draw compliments. I always serve this with a wedge of lemon on the side—because, trust me, a squeeze brightens everything up.
What to Serve It With
This baked salmon is incredibly adaptable. For a casual weeknight, I whip up some garlic roasted potatoes and a simple green salad. It’s also a showstopper for a weekend dinner when I want to impress friends without breaking a sweat. My family loves it over a bed of fragrant jasmine rice, topped with chopped herbs and a squeeze of fresh lemon. Want something a little fancier? Serve it with roasted asparagus or balsamic-glazed Brussels sprouts. And if you’re feeling indulgent, a dollop of herbed greek yogurt on the side is fabulous. I’ve even been known to fold some chopped spinach or cherry tomatoes into the topping for extra freshness. Honestly, I think the versatility is what makes this dish my forever favorite. It’s a canvas that adapts to whatever mood or season I’m in—and always delivers a little piece of happiness.
Top Tips for Perfecting Your Baked Salmon
If you want to get this just right, a few insider tricks have saved me more than once. First, always pat your fish dry before seasoning—moisture is the enemy of that crispy top you might want. When mixing your flavors, taste your marinade or butter first; a little extra lemon or garlic can really make a difference. For the swirl patterns or toppings, I like to keep it simple—don’t overcrowd because it affects even cooking. If you’re experimenting, try adding a splash of balsamic or a dash of smoked paprika to add complexity. When baking, position your rack in the middle of the oven for even heat. Always check for doneness a few minutes early—overbaked salmon dries out faster than you think. For glaze variations, with honey or maple, I suggest warming them slightly first—it helps them spread more easily and cling better. Oh, and don’t forget: let the fish rest a few minutes after baking! It redistributes the juices and keeps everything moist. My biggest lesson? Practice makes perfect, and don’t be afraid to tweak flavors until it feels just right. Over the years, I learned that patience, good ingredients, and a loving pinch of creativity bring out the best in baked salmon.
Storing and Reheating Tips
Leftover baked salmon? No problem. Store it in an airtight container in the fridge for up to 2 days. I like to let it cool to room temperature first, then pop it in—this way, it doesn’t sweat and stays fresh longer. To reheat, I prefer the oven at about 300°F (150°C)—cover it loosely with foil so it doesn’t dry out. It usually takes about 10 minutes, depending on thickness. If you’re in a rush, a gentle microwave burst (about 30 seconds to a minute) works too, but be careful not to overcook. When storing, I usually remove the skin once it’s cooled—makes it easier to reheat and serve. For freezing, wrap it tightly in foil or vacuum-seal, and it’ll stay good for up to 3 months. Thaw overnight in the fridge before reheating. Honestly, leftover salmon still tastes amazing—just a little drier, but a squeeze of lemon or a dab of fresh herbs can instantly revive it. I think the key is not to overheat it—that’s when it gets tough. A little patience and gentle reheating keep it tasting just as good as when it first came out of the oven.
Frequently Asked Questions
Final Thoughts
If there’s one recipe I’d recommend trying again and again, it’s this baked salmon. It’s one of those dishes that feels like a warm embrace, whether you’re cooking for yourself or a crowd. The flavor combinations are endlessly customizable, making it a perfect blank canvas for your culinary creativity. Every time I make it, I think about how simple ingredients and a little patience turn into something truly special. Plus, it’s a dish I’ve seen my kids devour with innocent gusto, which is such a joy. I encourage you to experiment—try different herbs, glazes, or even stuff with a splash of cream cheese and herbs. The key is to keep it from overbaking; once you master that, you’re set for perfect flaky, juicy baked salmon every single time. Happy baking! And I’d love to hear how yours turns out—drop a comment below or share your favorite twists. Cooking is all about love, after all.
baked salmon
Ingredients
Main Ingredients
- 2.5 pounds salmon fillet
- 0.125 teaspoon salt
- 0.125 teaspoon pepper
- 1 medium lemon sliced
- 4 sprigs fresh dill
- 2 tablespoons cold butter
- 0.25 cup olive oil
- 2 tablespoons lemon juice
- 1 teaspoon dijon mustard
- 2 teaspoons honey
- 0.125 teaspoon garlic powder
- 0.125 teaspoon onion powder
- 0.5 cup Greek yogurt
Instructions
Preparation Steps
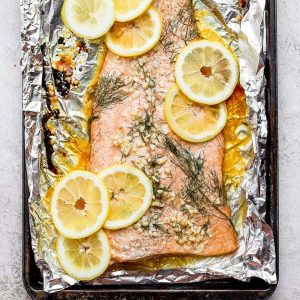
- Preheat your oven to 375°F and prepare a large piece of foil on a baking sheet.
- Rub the salmon fillet with salt and pepper. Set aside.
- In a bowl, whisk together olive oil, lemon juice, dijon mustard, honey, dill, garlic powder, and onion powder to make the marinade.
- Place the salmon in the center of the foil and pour the marinade over it, spread sliced lemon and dill sprigs on top.
- Fold the foil edges securely to create a sealed packet.
- Bake in the oven for 25 minutes or until the salmon flakes easily with a fork.
- While baking, prepare tartar sauce by mixing Greek yogurt, chopped dill pickles, lemon juice, and a pinch of garlic powder.
- Once cooked, carefully open the foil, place a tablespoon of cold butter on top of the salmon, and broil for 2-3 minutes until melted and slightly caramelized.
- Remove from oven, let rest for 5 minutes, then serve with tartar sauce.
Notes
Featured Comments
“Impressed! Clear steps and restaurant-level results. Perfect for busy nights.”
“New favorite here — so flavorful. crowd-pleaser was spot on.”
“Super easy and turned out amazing! My family asked for seconds. Saving this one.”
“This sweet treat was absolutely loved — the hearty really stands out. Thanks!”
“Made it tonight and wow — spot on! Will definitely make Simple Baked Salmon in Foil Packets again.”
“Packed with flavor and so simple. Exactly what I wanted from Simple Baked Salmon in Foil Packets.”


