


There’s something about the smell of baking chocolate wafting through the house that instantly lifts everyone’s mood. I remember growing up, my mom’s chocolate cake was the highlight of Sunday family dinners. It’s the kind of dessert that’s rich, moist, and just right — not overly sweet, with that perfect cocoa kick. Honestly, I used to think making a cake from scratch was complicated until I discovered this recipe. Now, it’s become my go-to for birthdays, lazy weekend treats, or whenever I need a serious chocolate fix. This chocolate cake has that nostalgic comfort factor, but what I love most is how straightforward it is to make. No fancy ingredients, no fuss, just honest, good old-fashioned baking that reminds me of home. My kids ask for this all the time—trust me, it disappears in minutes at my house—and I bet it will become a favorite in yours, too. So grab your mixing bowls, and let’s bake up some happy memories!
What is chocolate cake?
Think of a chocolate cake as the ultimate chocolate lover’s dream—a soft, tender crumb layered with rich cocoa flavor. It’s essentially a chocolate sponge or Devil’s food cake that’s been around for ages, but like all good recipes, it’s evolved into countless variations. The name ‘chocolate cake’ is straightforward, but what makes each version special is how you balance the cocoa, sweetness, and moisture. My version is a cozy, no-fuss kind—think of it as a warm hug in cake form. It’s not overly complicated; just the right amount of decadence that makes it irresistible. Whether you call it a birthday cake, an afternoon snack, or a midnight treat, a good chocolate cake has this magic power to bring people together. It’s perfect with a dollop of whipped cream or a simple glaze, depending on what mood you’re in. In essence, it’s that timeless dessert everyone secretly cherishes—whether you’re a baker pro or just starting out.
How do I make a chocolate cake?
Quick Overview
This chocolate cake recipe is a no-fail, one-bowl wonder. It starts with mixing dry ingredients and wet ingredients separately, then combines them gently to keep the crumb light and airy. The batter is poured into a prepared pan, swirled with a simple chocolate filling, and baked to perfection. The whole process is straightforward, making it perfect for weeknights or whenever you crave something chocolate-y but don’t want to fuss. The magic happens in the oven, and when it’s done, you’re greeted with an irresistibly moist cake topped with a glossy glaze. My tip? Don’t rush cooling — let it sit until barely warm before glazing for that beautiful, shiny finish. This is one of those recipes that makes the house smell amazing and gets everyone hovering around the kitchen. You really don’t need any fancy special equipment — just a whisk, a spoon, and your oven. And trust me, once you taste it, you’ll be adding this to your regular rotation.
Ingredients
For the Main Batter:
– 1 and 3/4 cups all-purpose flour (I like unbleached for a richer flavor)
– 2 cups granulated sugar (because good, honest sweetness is key)
– 3/4 cup unsweetened cocoa powder (the darker, the better)
– 1 and 1/2 teaspoons baking powder
– 1 and 1/2 teaspoons baking soda
– 1 teaspoon salt
– 2 large eggs (fresh, large eggs to keep it moist)
– 1 cup whole milk (or almond milk for a dairy-free twist)
– 1/2 cup vegetable oil (or melted butter if you want an even richer flavor)
– 2 teaspoons vanilla extract
– 1 cup boiling water (this makes the batter extra moist and fudgy)
For the Filling (optional but SO good):
– 1/2 cup cocoa powder
– 1/4 cup powdered sugar
– 2-3 tablespoons softened butter
– A splash of milk to loosen (start with a teaspoon, add more if needed)
For the Glaze:
– 1/2 cup semi-sweet chocolate chips or chopped good-quality chocolate
– 2 tablespoons butter or cream
– A pinch of sea salt (for depth)
– Optional: a teaspoon of vanilla or coffee extract for extra flavor
Step-by-Step Instructions
Step 1: Preheat & Prep Pan
Set your oven to 350°F (175°C). Grease your favorite 9-inch round cake pan with butter or non-stick spray and line the bottom with parchment paper. This little step helps the cake come out perfectly — trust me, sticking is a buzzkill. Dust the pan with a bit of flour or cocoa powder to keep it smooth for easy removal. While the oven preheats, gather all your ingredients — having everything measured out makes baking feel more like a cozy activity without stress.
Step 2: Mix Dry Ingredients
In a big mixing bowl, whisk together the flour, sugar, cocoa powder, baking powder, baking soda, and salt. I always do this first to distribute everything evenly. When you see everything combined into a uniform, slightly earthy-looking dry mix, you know you’re on the right track. That cocoa smell is just the beginning of the chocolate goodness to come.
Step 3: Mix Wet Ingredients
In a separate bowl, beat the eggs, then add the milk, oil, and vanilla. Whisk until smooth — it’s okay if it looks a little frothy or streaky. I’ve tested this with almond milk, and honestly, it made the cake even creamier, so feel free to experiment! Loosen up the mixture with a splash of water if you want a lighter batter.
Step 4: Combine
Pour the wet mixture into your dry ingredients and mix gently with a spatula or whisk. Don’t overmix — just enough to incorporate everything without creating tunnels or dense patches. When you see a uniform batter, you’re good to go. At this phase, the batter should be thick but pourable. If it feels too stiff, a little more milk can help.
Step 5: Prepare Filling
Mix together your cocoa, powdered sugar, softened butter, and a splash of milk. It should be fudgy but spreadable. I like to taste it before using — trust me, this little bit makes a big difference in the final flavor and texture. Feel free to add a pinch of cinnamon or chili powder if you’re feeling adventurous.
Step 6: Layer & Swirl
Pour half the batter into the prepared pan. Spread the filling evenly over it, then pour the rest of the batter on top. Use a toothpick or skewer to swirl the filling into the batter gently — don’t overdo it, but a few swirling motions will create beautiful marbling. This step is what gives your cake a little something extra, a surprise chocolatey ribbon in every slice.
Step 7: Bake
Pop the cake in the oven and bake for about 30-35 minutes. Check doneness with a toothpick inserted in the center—if it comes out clean, you’re golden. Every oven is slightly different, so start checking around the 30-minute mark. Your cake should be springy, with a slight crack on top, smelling like heaven.
Step 8: Cool & Glaze
Let the cake cool in the pan for about 15 minutes, then transfer it to a wire rack. Patience here really pays off — don’t rush slicing into it while warm, or it might be a crumbly mess. When it’s just barely warm, pour your shiny glaze over the top and let it set for a few minutes. That glossy coating makes it look as good as it tastes!
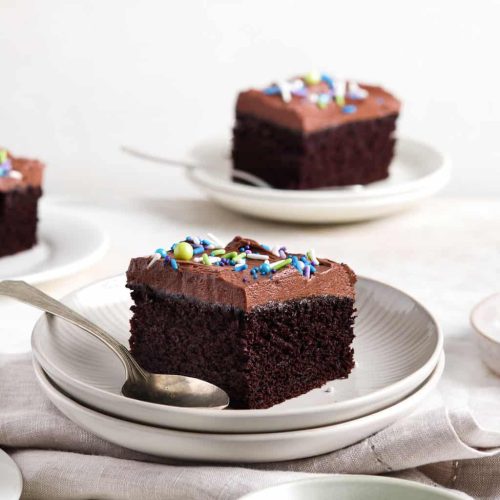
Step 9: Slice & Serve
Use a sharp knife to cut clean slices, wiping it between cuts for neat pieces. Serve with whipped cream, fresh berries, or just as it is — simple and divine. My favorite way is with a cold glass of milk or a cup of coffee. Wrap leftovers in foil or store in an airtight container — it’s even better the next day, if it lasts that long!
What to Serve It With
This chocolate cake is versatile enough to be a breakfast treat, a festive centerpiece, or a cozy snack. For breakfast, a cup of strong French press coffee pairs beautifully, and a slice with a smear of butter makes mornings feel special. At brunch, consider serving it with a dollop of whipped cream and fresh berries — brightens the richness. As a dessert, it’s perfect with a swirl of vanilla ice cream or a drizzle of caramel—think of it as a rich palate cleanser. I often keep leftovers for a midnight snack, cut into small squares because honestly, it’s so addictive that I can’t resist. Sometimes, I add a sprinkle of sea salt or chopped nuts on top of the glaze for extra texture. This cake has become our family favorite because it’s cozy, satisfying, and just the right amount of sweet. And trust me, once you see how easy it is, you’ll be baking this on repeat, too!
Top Tips for Perfecting Your Chocolate Cake
After countless batches, I’ve picked up some tricks that make a big difference:
- Zucchini Prep: If you want to sneak in some veggies, grate zucchini and squeeze out the excess moisture before folding it into the batter. It keeps the cake moist without watering it down.
- Mixing Advice: Overmixing at any stage can make the cake dense and tough. Mix just until combined, especially after adding the wet ingredients.
- Swirl Customization: Use a toothpick or skewer to create swirl patterns—try different shapes or random twirls for a rustic look. It’s all about having fun with it.
- Ingredient Swaps: Want dairy-free? Use coconut oil and plant-based milk. For a healthier twist, swap half the sugar with honey or maple syrup—just reduce the liquid slightly.
- Baking Tips: Place your pan in the center of the oven for even baking. Rotate if your oven heats unevenly. Keep an eye on the clock—don’t overbake or it loses moisture.
- Glaze Variations: Mix in a pinch of chili powder or a splash of bourbon in your glaze for a flavor twist. For a glossy finish, add a teaspoon of corn syrup or honey when melting your chocolate.
Honestly, the more I make this, the more I learn. Sometimes I forget the baking soda or put too much filling in the middle, but it’s all part of the charm. The key is to keep experimenting and trust your taste buds. Every oven has its quirks, so don’t be discouraged if it takes a couple of tries to get it just right. When I finally got the glaze smooth and shiny, I knew I nailed it. And my family couldn’t get enough — that’s always the best confirmation.
Storing and Reheating Tips
This cake stays delicious for a couple of days if stored properly. Wrap it tightly in plastic wrap or keep it in an airtight container. If kept at room temperature, it’s best to eat within two days — after that, it starts to dry out. Refrigeration slows down spoilage, but it can make the cake a bit denser; I recommend bringing it to room temp or warming slices gently before serving. To freeze, wrap it well in plastic wrap followed by foil. It can last up to three months. When ready to eat, thaw in the fridge overnight or warm slices in the microwave for about 15 seconds until soft and warm, just like fresh out of the oven. If you added the glaze last, reheat slices just enough to get a bit of warmth but not melt the coating. This cake gets even better the next day — the flavors meld beautifully.
Frequently Asked Questions
Final Thoughts
I truly believe that a good chocolate cake can brighten even the gloomiest days. This recipe, molded by years of trial and error, has become my family’s favorite for a reason—because it’s honest, comforting, and endlessly versatile. Whether you’re celebrating a birthday or just craving a chocolatey hug after a long day, this cake never lets me down. It’s simple enough for a beginner, yet deep and flavorful enough to impress seasoned bakers. And the best part? It’s baked with love, and that love makes all the difference in every slice. I can’t wait to hear how yours turns out — don’t forget to leave a comment or share your tweaks! Happy baking, friends — and beware, this one’s addictive!
Easy & Moist Chocolate Sheet Cake
Ingredients
Cake Ingredients
- 1.75 cups all purpose flour
- 2 cups granulated sugar
- 0.75 cup natural unsweetened cocoa powder sifted
- 2.25 tsp baking soda
- 0.5 tsp baking powder
- 1 tsp salt
- 1 cup milk
- 0.5 cup vegetable oil
- 1.5 tsp vanilla extract
- 2 large eggs
- 1 cup hot water
Chocolate Buttercream Frosting
- 1 cup unsalted butter softened
- 4 cups powdered sugar
- 4 to 6 milk or cream Tbsp
- 0.5 cup natural unsweetened cocoa powder sifted
- 1 tsp vanilla extract
- sprinkles optional
Instructions
Cake Preparation
- Preheat oven to 350F and grease a 9x13" baking pan with non-stick baking spray or butter.
- In a large bowl, whisk together the flour, sugar, cocoa powder, baking soda, baking powder and salt. Set aside.
- In a medium bowl, whisk together the milk, vegetable oil, vanilla and eggs.
- Add the wet ingredients to the dry ingredients and mix until combined with a rubber spatula.
- Add in the hot water and whisk until smooth.
- Pour into the prepared baking pan and bake for 30-32 minutes or until a toothpick inserted into the center comes out with a few moist crumbs.
- Let cool completely before frosting.
Buttercream Frosting Preparation
- Using a handheld or stand mixer, beat the butter for 1 minute until creamy. Mix in 1 cup of powder sugar and with 1 Tbsp of milk/cream at a time, mixing well in between.
- Mix in the cocoa powder and vanilla until smooth. Add more milk/cream if necessary for a spreadable consistency.
Notes
Featured Comments
“Impressed! Clear steps and comforting results. Perfect for busy nights.”
“New favorite here — absolutely loved. crowd-pleaser was spot on.”
“Super easy and turned out amazing! My family asked for seconds. Saving this one.”
“This sweet treat was absolutely loved — the balanced really stands out. Thanks!”
“Made it tonight and wow — spot on! Will definitely make Simple Chocolate Sheet Cake Recipe again.”
“Packed with flavor and so simple. Exactly what I wanted from Simple Chocolate Sheet Cake Recipe.”


