

Sunday afternoons call for something cozy and crave-worthy, and I always reach for skinny cheese fries when the kitchen feels a little chaotic. The smell of crisp fries, a glossy cheese sauce, and a sprinkle of bright green chives is like a hug that’s easy to pull together. I grew up loving Classic Cheese fries, but this lighter version fits my current rhythm: baked instead of fried, and a cheese sauce that’s creamy without becoming heavy. This isn’t just comfort food—it’s a friendly reminder that tasty traditions can be kinder to our bodies without losing the joy. My kids call it “restaurant vibes at home,” and honestly, it never fails to disappear in minutes around our table. If you’ve got a busy week ahead, this is the perfect fallback: simple ingredients, big flavor, and a textures-and-flavors contrast that keeps everyone coming back for more.
What is skinny cheese fries?
Think of skinny cheese fries as the lighter cousin of the beloved cheese fries. It’s essentially crispy, oven-baked fries topped with a silky, lighter cheese sauce rather than a heavy, dairy-heavy pool. The idea is simple: crisp edges, a cheese layer that glides over the fries without oozing into everything, and a little brightness from yogurt or milk to keep the whole thing singing. I like to keep the fries thin and evenly seasoned, so every bite has that salty crackle followed by creamy cheese drama. It’s a quick, crowd-pleasing snack or side that feels indulgent but won’t derail a weeknight plan. Think of it as comfort with restraint—savory, satisfying, and surprisingly forgiving for beginners and seasoned home cooks alike.
Flavor
- Savory depth:What are some of the best flavors for potatoes?
- Bright finish: A splash of milk and a touch of Dijon lift the sauce so it’s silky without being thick and gluey.
- Cheese harmony: Reduced-fat cheddar or a mild Monterey Jack melt into the sauce for that glossy, cling-to-every-bite look.
Simplicity
- One-pan artistry: The fries bake on a single sheet, with minimal fuss and clean-up.
- Short ingredient list: You probably have most items in your pantry right now.
Cost-efficiency
- Budget-smart ingredients: Potatoes, a modest amount of cheese, a dairy starter (yogurt) that stretches far.
- Versatile leftovers: Leftover sauce can be repurposed for dipping vegetables or drizzling over roasted broccoli.
Versatility
- Meal-ready: Serve as a snack, a game-day bite, or a side with protein for a light dinner.
- Flavor playground: Try chipotle in adobo for a smoky kick, or a squeeze of lime for a tangy zing.
If you’ve ever wished for “fries with finesse” that still feels cozy, this dish nails that balance. It’s a personal favorite because I can tweak it a little each time and still land on something crowd-pleasing. And yes, the aroma alone is enough to coax everyone to the kitchen— trust me on that one.
How to Make skinny cheese fries
Quick Overview
This recipe is all about speed and texture. Start with thin, evenly cut fries, toss them with a touch of cornstarch and oil to guarantee crisp edges, and bake until they’re golden and shook with a little salt. While the fries crisp, whisk together a light cheese sauce using shredded cheese and Greek yogurt for creaminess without heaviness. When the fries are out of the oven, spoon the glossy sauce over them, scatter any preferred herbs or spices, and finish with a quick drizzle or dollop of a yogurt-based glaze. It’s a simple sequence, but the result reads as indulgent and satisfying without feeling extravagant.
Ingredients
For the Fries (the Main Layer):
- 2 large russet potatoes (or 3 medium), cut into thin, uniform batons
- 1 tablespoon cornstarch (for extra crunch)
- 1 tablespoon olive oil, plus extra for spraying the pan
- 1 teaspoon kosher salt, plus a pinch for finishing
- 1/2 teaspoon smoked paprika
- 1/4 teaspoon garlic powder
- Optional: pinch of cayenne for a gentle heat
For the Cheese Sauce:
- 1 cup shredded reduced-fat cheddar or a mild blend
- 1/2 cup plain Greek yogurt (full-fat works too for extra creaminess)
- 1/4 cup milk (adjust for desired pourability)
- 1 teaspoon Dijon mustard (adds a little zing)
- Salt and pepper to taste
For the Glaze (optional finishing drizzle):
- 1/4 cup plain yogurt or sour cream
- 1 tablespoon chopped chives or green onions
- Salt to taste
Step-by-Step Instructions
Step 1: Preheat & Prep Pan
Set your oven to 425°F (220°C). Line a rimmed baking sheet with a light coating of oil or spray it so the fries won’t stick. Pat the potato batons dry with a clean towel—you want them as dry as possible so they crisp rather than steam. A little patience here pays off with crisper edges and less sog.
Step 2: Mix Dry Ingredients
In a large bowl, whisk together the cornstarch, salt, smoked paprika, garlic powder, and the optional cayenne. The cornstarch is my secret weapon for that bakery-crisp texture; the spices give every bite a warm, toasty edge. This is the moment I tell myself, yes, I’m making fries—and yes, they’ll be elevated.
Step 3: Mix Wet Ingredients
Lightly drizzle the fries with the olive oil. Sprinkle the spice mixture over the fries and toss until every stick is coated with a thin, seasoned glaze. The oil helps the starch adhere and the spices bloom in the heat, so you’ll get that beautiful caramelized surface.
Step 4: Combine
Spread the fries in a single layer on the prepared pan, giving them a little room to breathe. Overcrowding makes them steam rather than crisp, and we’re aiming for crisp here, not soft potato pillows. If you need to bake in two batches, that’s fine—they’ll still be worth the extra minute in the oven.
Step 5: Prepare Filling
While the fries roast, whisk together the cheese sauce ingredients: cheddar, Greek yogurt, milk, and Dijon. You’re aiming for a silky, pourable texture that clings to the fries without pooling. If it feels too thick, splash in a little more milk; if it’s too thin, whisk in a pinch more cheese. Taste and adjust with a pinch of salt and pepper. The sauce should feel indulgent but bright.
Step 6: Layer & Swirl
When the fries are evenly browned and crisp (about 18–22 minutes), remove the pan and drizzle half of the cheese sauce over them. Use a spoon to swirl lightly, letting some fries catch more sauce than others. Return the pan to the oven for 2–3 minutes to help the sauce set just enough to cling without sliding off. You’re aiming for glossy patches, not a pool of liquid.
Step 7: Bake
Finish baking until the fries reach your preferred crispness. I like them at about 20–25 minutes total, flipping once halfway through to ensure even browning. If your oven runs hot, start checking earlier; you want that golden edge with a whisper of crunch rather than a dry, fried-like texture.
Step 8: Cool & Glaze
Pull the sheet from the oven and let the fries rest on the pan for a minute or two. Pour the remaining cheese sauce over the top and give a quick, gentle swirl to distribute. If you’re using the glaze, whisk together the yogurt and chives, then drizzle sparingly over the hot fries. The heat will loosen the sauce ever so slightly, releasing a gentle tang that brightens the whole dish.
Step 9: Slice & Serve
If you’re serving as a main snack, cut a few into bite-sized pieces for easy dipping. The contrast between the crisp fries and the creamy cheese is what makes this dish sing, so don’t overdo the layering—some fries should stay relatively cheese-free to maintain the texture balance. Serve hot, with extra chopped chives or a quick green salad on the side for color and contrast. This is absolutely best enjoyed straight away, with a little extra pepper and a pinch of flaky salt on top if you like.
What to Serve It With
skinny cheese fries are aای fantastic side or stand-alone snack, and I love pairing them with a few easy accompaniments to elevate the meal. Here are some ideas that feel effortless and comforting.
For Breakfast: A crisp, fresh salad on the side and a sunny-side-up egg perched on top of a small portion of fries for a cheeky weekend brunch. A robust coffee and a splash of orange juice round out the morning vibe nicely.
For Brunch: Serve with a platter of Roasted vegetables, a few dollops of avocado crema, and a sparkling beverage. The light tang from the cheese sauce plays beautifully with citrus and herbs in the side dishes.
As Dinner or Main Occasion: Pair with a bright green salad, a simple grilled Chicken Breast, or a tender piece of fish. The fries act like a luxurious little scoop of comfort under a lean protein, and the sauce ties everything together in a way that feels festive without being heavy.
Casual Snacks & Game Night: A bowl of skinny cheese fries becomes a sharing moment—place them on a big tray with a few toppings: chopped jalapeños, extra salsa, or dollops of sour cream. My family often adds a side of pickled red onions for a sweet-sour counterpoint. It’s pure, cozy, late-evening magic.
Personally, I’ve used this recipe as a quick dinner on busy nights, then as a late-night snack when I’m craving something indulgent but don’t want to overdo it. The little cheese drizzle gives the fries a glossy coat that looks like a treat from a bistro, but it’s made with ingredients you probably already have in your fridge. It’s one of those recipes that grows a personality in your kitchen—you’ll tweak and twist until it’s exactly your vibe. And if you’re cooking for kids, watch their faces light up when they see that golden, cheesy top—the reward is in the wonder of a truly simple indulgence.
Top Tips for Perfecting Your skinny cheese fries
Here are a few practical tricks that keep this dish tasty and consistent, especially when you’re juggling a busy week.
Fries Prep: Keep fries uniformly thin for even cooking. Dry them well; moisture is the enemy of crispness. A quick shake in a clean towel after cutting can make all the difference.
Crunch & Coat: Dust with cornstarch or arrowroot to boost crispness. Don’t skip this step if you want that bakery-like crunch on the edges.
Cheese Sauce Texture: Aim for pourable, not too thick. If it’s too thick, loosen with a splash of milk. If it’s too thin, whisk in a pinch more cheese and a touch more yogurt for body.
Swirl Style: When you drizzle sauce back onto the fries, use a light, slow swirl rather than a heavy pour—this creates a marbled, appetizing look and helps every bite catch some sauce.
Flavor Variations: Swap in pepper Jack for a kick, or a white cheddar for a milder tone. A teaspoon of smoked paprika in the cheese sauce can add a subtle barbecue note that goes surprisingly well with fries.
Glaze Customization: If you prefer a sweeter glaze, a touch of honey in the yogurt glaze can create an intriguing contrast with the salty fries. For a herb-forward finish, add chopped dill or parsley to the glaze.
Make Ahead: The fries are best fresh, but you can rewarm them in a hot oven to restore crispness. Reheating sauce separately helps prevent the fries from turning soggy on day two.
My best tip: taste as you go. It’s amazing how a pinch more salt or a splash more Dijon can elevate the entire plate. And if you’re craving a little more indulgence, a light sprinkle of grated parmesan on top just before serving makes it feel extra special without wrecking the lighter goal of this dish.
Storing and Reheating Tips
Storing skinny cheese fries isn’t ideal, but it happens. Here’s how to keep them as tasty as possible if you’ve got leftovers or you’re meal-prepping.
Room Temperature: Best eaten the same day. If you have to keep them, spread in a thin layer on a plate and cover loosely. They’ll lose some crispness but can still be enjoyable with a quick reheat.
Refrigerator Storage: Store fries and sauce separately in airtight containers for up to 2 days. Reheat fries in a 400°F (200°C) oven for 6–8 minutes, then rewarm the sauce gently on the stove or in short intervals in the microwave, stirring until smooth. Reheat until everything is hot and fragrant, but avoid overcooking the sauce or it can separate.
Freezer Instructions: I don’t recommend freezing the assembled dish, but you can freeze plain, cooked fries for up to 1 month. Reheat on a baking sheet in a hot oven to revive some crispness. Sauce doesn’t freeze well, so it’s best made fresh.
Glaze Timing Advice: If you’re storing, don’t glaze in advance. Add the glaze right before serving to maintain texture and brightness. A quick yogurt drizzle can also be added after reheating for a fresh finish.
In my kitchen, the best memory of this dish is the way the family gathers around the table—everyone’s got their toppings ready, the cheese glistening under kitchen lights, and the satisfied sighs that say, “Let’s do this again next weekend.” It’s a simple dish with a lot of heart, and it travels well from counter to couch for a cozy movie night or a casual supper with friends.
Frequently Asked Questions
Final Thoughts
Skinny cheese fries are a recipe I come back to because they feel like a small celebration in the middle of a week. They’re reliable, forgiving, and deeply satisfying without leaving you groggy or overstuffed. The balance between crispy, lightly salted fries and a glossy, yogurt-kissed cheese layer is exactly what I crave when I want comfort with a lighter footprint. I encourage you to try this with your own spin—swap in different cheeses, adjust the spice, or skip the glaze if you’re short on time. The joy is in the process and the way the kitchen fills with inviting aromas that say, “Dinner’s almost ready.” If you try it, I’d love to hear how you personalized your skinny cheese fries. Leave a comment, rate the recipe, and share your favorite topping combinations. Happy baking!
skinny cheese fries
Ingredients
Main Ingredients
- 2 medium potatoes 5.5 oz each, yukon gold or russet, washed and dried
- 2 tsp olive oil
- 1 tsp smoked paprika
- 0.25 tsp chili powder
- 0.25 tsp onion powder
- 0.25 tsp garlic powder
- 0.125 tsp cumin
- 1 slice center cut bacon cooked & finely chopped
- 0.333 cup sharp shredded cheddar cheese
- 2 tbsp diced scallions
- 1 tbsp sliced pickled jalapeno jarred or canned
Instructions
Preparation Steps
- Preheat the oven to 450°. Line baking sheet with foil for easy clean-up if desired. Lightly coat with cooking spray.
- Cut each potato lengthwise into 0.25 inch thin slices; then cut each slice into 0.25 inch fries.
- In a large bowl, combine cut potatoes and oil; toss well. Add seasoning (paprika to salt and pepper). Toss to coat.
- Place potatoes in a single layer, bake in the bottom third of the oven 10 minutes, turn and bake an additional 8 to 10 minutes, or until crisp and browned.
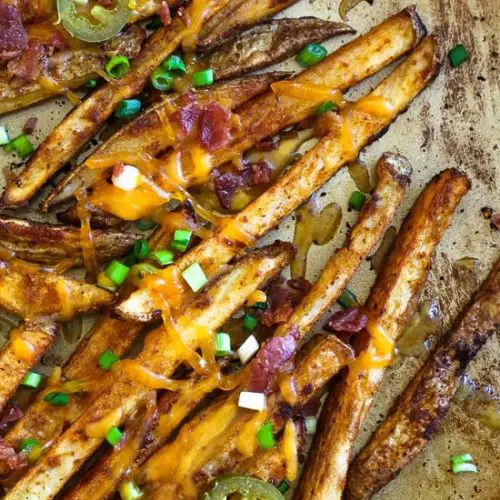
- Remove from oven, top with cheddar cheese, sliced jalapenos, scallions and bacon bits and return to oven for about 1 to 2 minutes, or until the cheese melts.
Notes
Featured Comments
“Love this idea—simple, comforting, and perfect for lazy Sundays. I’ve got to try these skinny cheese fries soon!”
“Impressed! Clear steps and quick weeknight win results. Perfect for busy nights.”
“New favorite here — turned out amazing. crowd-pleaser was spot on.”
“Super easy and turned out amazing! My family asked for seconds. Saving this one.”
“This sweet treat was absolutely loved — the balanced really stands out. Thanks!”
“Made it tonight and wow — spot on! Will definitely make skinny cheese fries again.”


Love this idea—simple, comforting, and perfect for lazy Sundays. I’ve got to try these skinny cheese fries soon!