


You know those moments? The ones where you’re mid-recipe, whisk in one hand, and you realize… you’re out of garlic. Or worse, the garlic you *do* have is shriveled, sprouted, and about as flavorful as a damp sock. Ugh. It’s the absolute worst, right? I’ve been there more times than I care to admit, frantically trying to salvage a meal or making a last-minute dash to the store. But then, I remembered my grandmother’s kitchen. It was always filled with this incredible, aromatic warmth, and no matter the season, she always seemed to have the perfect amount of pungent, ready-to-go garlic. Her secret? Preserving garlic. And let me tell you, once you unlock this simple method, your cooking life will change. It’s not complicated, it doesn’t require fancy gadgets, and it means you’ll never be caught garlic-less again. Think of it as a little bit of culinary magic, ready at your fingertips. This whole process is really about taking that fresh, vibrant garlic and keeping it that way, so you can add that essential zing to anything, anytime. It’s really a game-changer for anyone who loves to cook, just like it was for me.
What is the best way to preserve garlic?
So, what exactly *is* preserving garlic? At its heart, it’s simply the practice of preparing fresh garlic cloves in a way that extends their shelf life significantly, while also making them even more accessible for cooking. Think of it as giving your garlic a spa treatment that makes it last way longer than just sitting in a bowl on the counter. Instead of having to buy garlic every week or two, or wrestling with those sad, woody cloves, you’ll have prepped garlic ready to go. We’re talking about garlic that’s been lovingly peeled, sometimes chopped, and then stored in a way that keeps it potent and delicious. It’s essentially taking the bulk of your garlic haul, when it’s at its peak, and making sure you can enjoy that amazing flavor for months, not days. It’s a humble yet incredibly powerful technique that makes busy weeknight dinners so much smoother, and it feels like such a smart way to handle a staple ingredient that I use in almost *everything*.
How do I make Garlic Pastry?
Quick Overview
The core idea is to prepare your fresh garlic – usually peeling and sometimes chopping it – and then store it submerged in a good quality oil, often with a touch of salt or other aromatics. This protects it from air, which is what causes it to go bad. It’s a straightforward process that takes maybe 30-45 minutes for a good-sized batch. You’re essentially creating a barrier that keeps the garlic fresh and flavorful for months. It’s perfect for busy home cooks because you’re doing the prep work in one go, making your future cooking sessions incredibly efficient. This is a method that has stood the test of time for a reason – it works!
Ingredients
For the Garlic Prep:
Fresh Garlic: I usually buy it in bulk when it’s on sale, aiming for firm heads with no soft spots. You’ll need a good amount, depending on how much you want to preserve. Think in terms of whole heads. The fresher, the better your preserved garlic will be. I often aim for at least a pound or two to make it worthwhile.
For the Storage Medium:
Olive Oil: A good quality extra virgin olive oil is my go-to. It has a wonderful flavor that complements the garlic beautifully. You can also use a neutral oil like avocado or canola oil if you prefer, but I find olive oil adds an extra layer of deliciousness, especially if you plan to use the infused oil itself. Make sure you have enough to completely cover the garlic.
Optional Add-ins:
Sea Salt: A little bit of salt helps with preservation and adds a subtle flavor boost. Don’t go overboard, just a teaspoon or two for a medium batch is usually enough.
Dried Herbs (like rosemary or thyme): These can add a lovely aromatic depth to your preserved garlic, but I usually keep it simple to let the garlic shine. A pinch of Red Pepper flakes can also add a nice warmth if you like a little heat.
Step-by-Step Instructions
Step 1: Prepare Your Workspace and Jars
First things first, grab your clean glass jars. Mason jars are perfect for this. Make sure they are thoroughly washed and dried, or even better, run them through the dishwasher or sterilize them. This is super important for safe preservation. You’ll also want a good cutting board and a sharp knife. Have your oil ready and measured out if you’re particular about that, though I usually just pour it in.
Step 2: Peel the Garlic
This is the most time-consuming part, but totally worth it. You can peel the garlic cloves one by one, or if you have a lot, there are a few tricks. Smashing the head with the flat side of your knife can loosen the skins. Another method is to shake a bunch of cloves in a bowl or between two metal bowls. Whatever method you choose, get them all peeled. Don’t worry about perfection here; just get the papery skins off. I sometimes leave the root end attached for a bit, it’s easier to pull the skin off.
Step 3: Chop or Leave Whole (Your Choice!)
This is where you decide how you want to use it later. You can leave the cloves whole, which is great if you want larger pieces for roasting or adding to sauces where they’ll soften. Or, you can chop them. I usually chop them into a coarse mince, about the size of a small dice. This makes it super easy to just spoon out what you need for sautéing. If you’re chopping, do it on your cutting board until you reach your desired size.
Step 4: Pack the Jars
Now, carefully place the peeled (and chopped, if you’re doing that) garlic cloves into your clean jars. Don’t pack them in so tightly that you can’t get the oil in easily. Leave a little bit of headspace at the top, about an inch. If you’re adding salt or dried herbs, you can sprinkle them in amongst the garlic cloves as you fill the jar.
Step 5: Cover with Oil
Pour your olive oil (or chosen oil) over the garlic cloves. Make sure the garlic is completely submerged. This is the key to preservation. You don’t want any part of the garlic exposed to the air. Gently shake the jar or use a clean chopstick to push down any air bubbles that might be trapped. You might need to top it off with a little more oil if you see any garlic peeking out after a minute.
Step 6: Seal and Store
Put the lids on your jars tightly. Now, here’s the crucial part: Store them in the refrigerator. Seriously, this is not something you want to leave on the counter at room temperature for extended periods, as this can create an environment for botulism. Refrigeration is key to keeping this preserved garlic safe and delicious.
Step 7: Let it Mellow (Patience is a Virtue!)
While you *can* technically use it right away, I highly recommend letting it sit in the fridge for at least 24-48 hours before diving in. This allows the flavors to meld and deepen. The garlic will absorb some of the oil, and the oil will become infused with that wonderful garlic essence. The longer it sits, the better it gets, usually!
What to Serve It With
Oh, the possibilities are endless once you have this magic jar of preserved garlic in your fridge! For breakfast, imagine a quick drizzle of the garlic-infused oil over some crusty toast, or even whisked into scrambled eggs for a little savory kick. It’s amazing how a tiny bit of garlic can elevate simple morning fare. For a more elegant brunch, you could use the preserved garlic to flavor some Roasted Potatoes or to sauté some mushrooms as a side dish. The infused oil itself is fantastic brushed over bruschetta or used to toss a simple green salad. And as a dessert? Well, maybe not a dessert in the traditional sense, but think of it as enhancing appetizers. That garlic-infused oil is perfect for dipping crusty bread alongside a cheese board, or it can be used to roast some chickpeas for a savory snack. For cozy snacks, I often just spoon a little out to toss with pasta for a super quick, flavorful meal. It’s also amazing stirred into hummus or using it as a base for a quick pan sauce for chicken or fish. My family loves when I use it to make garlic bread; the flavor is just so much richer than using fresh garlic sometimes. It’s a true culinary multitasker!
Top Tips for Perfecting Your Preserved Garlic
Okay, let’s talk about getting this *just right*. When you’re selecting your garlic heads, always go for firm ones. If they feel soft or have any green sprouts already emerging, they won’t preserve as well. I’ve learned that lesson the hard way. For peeling, if you’re doing a huge batch, the microwave trick (a quick 10-15 second burst) can sometimes loosen skins, but watch it carefully so you don’t cook the garlic. When it comes to chopping, I find a coarse chop is the most versatile. If you chop it too fine, it can sometimes get a bit mushy in the oil over time, whereas larger pieces hold their texture better. Don’t be afraid to experiment with different oils! While olive oil is my favorite, a blend with a more neutral oil can work well too if you want a lighter flavor profile. And about those optional add-ins: a sprig of rosemary or a few dried chili flakes can add a wonderful dimension, but start small. You can always add more next time. My personal favorite addition is a tiny pinch of smoked paprika for a hint of smokiness. When you’re packing your jars, make sure you really push down to get rid of any air pockets. Air is the enemy of preservation! Also, remember that the garlic will continue to absorb oil, so check your jars after a day or two and top them up if necessary to ensure everything stays submerged. I’ve found that the smaller the jar, the less oil you’ll need to top up. When it comes to using your preserved garlic, don’t just think of it as minced garlic. If you have whole cloves, they’re fantastic for roasting whole in the oven with a chicken or potatoes; they become wonderfully sweet and creamy. And please, for the love of all that is delicious, use the infused oil! It’s liquid gold. Drizzle it on salads, use it for sautéing, or even mix it into salad dressings. It’s such a waste to discard it. If you find the oil has solidified in the fridge (especially if it’s a good quality olive oil), just let the jar sit on the counter for 15-20 minutes to warm up and liquefy before using. It’s perfectly normal and a sign of good ingredients!
Storing and Reheating Tips
Storing your preserved garlic is really straightforward, but there are a few key things to keep in mind for maximum safety and flavor. Always, always, always store it in the refrigerator. The oil creates a barrier, but refrigeration is the crucial factor in preventing spoilage and maintaining quality. When it comes to how long it lasts, I’ve found that a well-prepared jar of preserved garlic can stay good in the fridge for up to 3-4 months. After that, while it might still be safe, the flavor can start to diminish, and the garlic might get a bit too soft for my liking. I usually make a note on the jar with the date I prepared it, just to keep track. If you see any mold or the oil looks cloudy or smells off, it’s time to toss it. Always use clean utensils when retrieving garlic from the jar to avoid introducing bacteria. If you happen to have an abundance and want to preserve it for even longer, you can freeze it. You can freeze the garlic cloves themselves, packed tightly in an airtight container or freezer bag, or you can freeze portions of the garlic and oil in ice cube trays. Once frozen into cubes, pop them out and store them in a freezer bag. This is a fantastic way to have pre-portioned garlic ready to go for quick meals. When you need to use frozen preserved garlic, either thaw it in the refrigerator overnight or pop a cube directly into a hot pan. For the oil, it will freeze solid but will thaw relatively quickly. I generally don’t bother with reheating preserved garlic itself unless it’s going into a cooked dish; its purpose is to be added to cooking. The beauty of this method is that it’s already ready to go, so “reheating” is simply adding it to your pan or dish as you normally would.
Frequently Asked Questions
Final Thoughts
So there you have it – my tried-and-true method for preserving garlic. It’s such a simple thing, really, but it makes such a massive difference in the kitchen. Having that jar of perfectly preserved garlic, ready to go at a moment’s notice, feels like a culinary superpower. It means less stress, more flavor, and a constant reminder of how easy it is to be prepared. I hope this inspires you to give it a try! It’s one of those foundational kitchen skills that just pays off again and again. If you’re a fan of this kind of practical kitchen wisdom, you might also enjoy my post on how to make homemade vegetable broth from scraps – another fantastic way to reduce waste and boost flavor. I can’t wait to hear how your preserved garlic turns out! Let me know in the comments below if you try it, or if you have any other brilliant garlic preservation tips you swear by. Happy cooking, and happy preserving!
Preserving Garlic for Winter
Ingredients
Main Ingredients
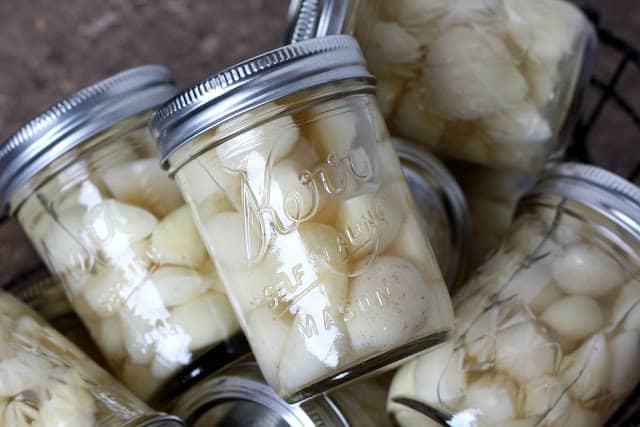
- 1 heads Garlic broken apart and cloves peeled
- 8 cups Distilled vinegar
Instructions
Preparation Steps
- Break apart your heads of garlic and peel the cloves. Place the peeled cloves of garlic in a large mixing bowl and fill with water. Use your fingertips to scrub any dirt off of the cloves. Once the cloves are cleaned, transfer them to a large strainer and rinse well.
- Depending on when your garlic was harvested, you might have very few brown spots on the cloves. My garlic was harvested late this year, so the ends were quite brown with some spots on the cloves as well. Use a small paring knife to trim the spots and then transfer the cleaned and trimmed cloves back to the strainer. Rinse again.
- Bring the vinegar to a boil in a large pot. Place the clean garlic cloves into small jars (half pint jars are recommended to avoid contaminating a large amount if the jar is open for too long in the refrigerator). Once the vinegar has boiled, pour it over the garlic and screw the lids on tight.
- Let the jars come to room temperature on the counter overnight and then store in the refrigerator. This will keep in the refrigerator for up to a year. Enjoy!
Notes
Featured Comments
“Ugh, I totally get that! Nothing kills a recipe faster than missing garlic. Thanks for the tips—I’ll definitely try storing it in the fridge now.”
“Impressed! Clear steps and spot on results. Perfect for busy nights.”
“New favorite here — quick weeknight win. crowd-pleaser was spot on.”
“Super easy and turned out amazing! My family asked for seconds. Saving this one.”
“This sweet treat was absolutely loved — the balanced really stands out. Thanks!”
“Made it tonight and wow — super easy! Will definitely make Storing Garlic for Later How To Preserve It again.”


Ugh, I totally get that! Nothing kills a recipe faster than missing garlic. Thanks for the tips—I’ll definitely try storing it in the fridge now.