

There are some recipes that just stick with you, you know? The ones you find yourself making over and over again because they’re just THAT good. For me, this stuffed bread is one of those magical recipes. It’s been a hit at every potluck, family gathering, and even just on a random Tuesday night when the sweet craving hits hard. I remember the first time I made it; I was experimenting, trying to come up with something that was a little bit cakey, a little bit muffin-y, but with a delightful surprise inside. It didn’t quite turn out how I planned initially (more on that later!), but the end result was so surprisingly delicious, I knew I was onto something special. It’s like a cozy hug in bread form, and if you’ve ever loved a good cinnamon swirl cake or a gooey coffee cake, then you are going to absolutely adore this. It’s a wonderful example of how simple ingredients can transform into something truly extraordinary, a testament to the humble, yet glorious, stuffed bread.
What is Stuffed Bread?
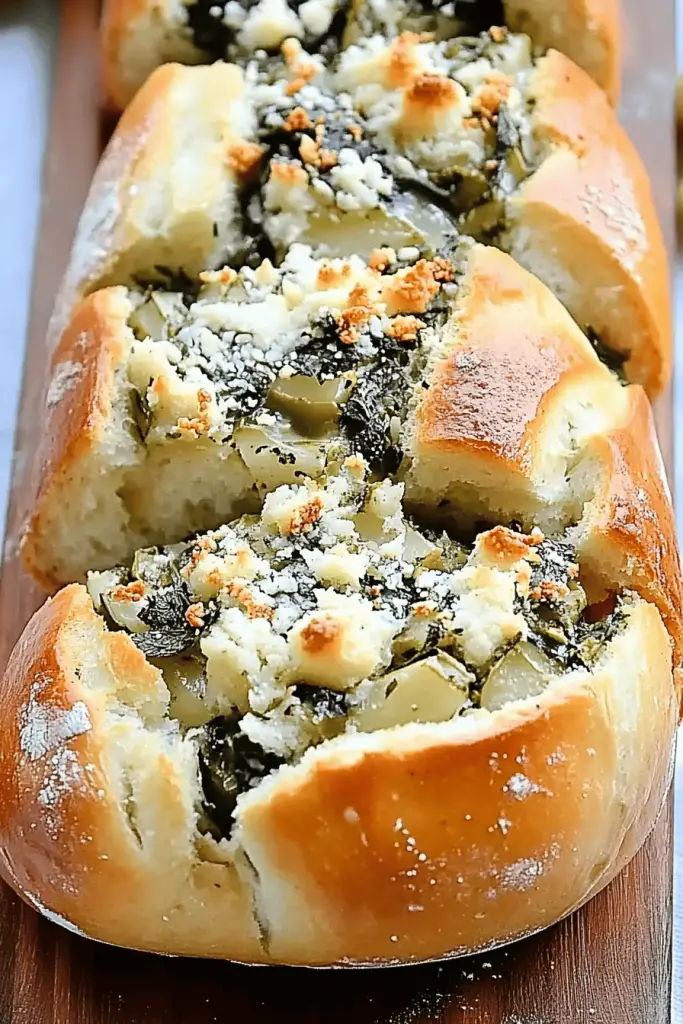
So, what exactly *is* this stuffed bread I’m raving about? Think of it as a soft, tender, slightly sweet bread loaf that’s been lovingly swirled with a rich, flavorful filling, and then topped with a delicate glaze. It’s not quite a cake, and it’s not quite a bread in the traditional sense – it’s something wonderfully in between! The name itself, “stuffed bread,” hints at the magic that happens inside. We’re essentially taking a beautifully moist batter, creating a gorgeous filling, and then artfully layering and swirling them together before baking. It’s designed to be decadent enough for dessert but comforting enough for breakfast or a snack. It’s the kind of thing that makes your kitchen smell absolutely incredible while it’s baking, drawing everyone in with its warm, inviting aroma. It’s familiar yet exciting, a classic comfort food with a delightful twist that always seems to impress.
How do I make this delicious stuffed bread?
Quick Overview
This recipe is all about creating two simple components – the batter and the filling – and then artfully combining them. You’ll mix up a quick batter, prepare a flavorful swirl filling, layer them in a loaf pan, swirl for that beautiful marbled effect, and bake until golden and fragrant. It’s genuinely quite straightforward, and the visual appeal of the swirl makes it look like you spent hours on it, even though it comes together pretty quickly. The key is not to overmix the batter and to get a nice, even swirl for the best texture and appearance.
Ingredients
For the Main Batter:
Here’s what you’ll need to get that tender, moist crumb:
- 2 ½ cups all-purpose flour: This is your sturdy base. Make sure it’s fresh!
- 1 teaspoon baking soda: For a good lift and tender texture.
- ½ teaspoon salt: Balances the sweetness beautifully.
- 1 teaspoon ground cinnamon: Adds a subtle warmth and depth.
- ¼ teaspoon ground nutmeg: Just a pinch to enhance the spices.
- 1 cup granulated sugar: For sweetness. You can adjust this slightly if you prefer it less sweet.
- ½ cup unsalted butter, softened: Make sure it’s truly softened, not melted, for the best incorporation.
- 2 large eggs: Room temperature eggs incorporate better into the batter.
- 1 teaspoon vanilla extract: Always use the good stuff – it makes a difference!
- 1 cup buttermilk: This is my secret weapon for an incredibly moist crumb. If you don’t have buttermilk, you can make a quick substitute by adding 1 tablespoon of lemon juice or white vinegar to 1 cup of milk and letting it sit for 5-10 minutes.
For the Filling:
This is where the real magic happens! It’s rich, spiced, and utterly irresistible:
- 1 cup packed light brown sugar: The brown sugar gives it that lovely caramel note and soft texture.
- 2 tablespoons all-purpose flour: Helps thicken the filling so it doesn’t all run out.
- 1 ½ teaspoons ground cinnamon: More cinnamon is always a good idea in my book!
- ½ teaspoon ground allspice: Adds a wonderfully complex spice note.
- ¼ cup unsalted butter, melted: This binds everything together and makes it wonderfully gooey.
For the Glaze:
Just a touch of sweetness to finish it off:
- 1 cup powdered sugar: For that classic smooth glaze.
- 2-3 tablespoons milk (or buttermilk for extra tang): Start with 2 tablespoons and add more until you reach your desired drizzling consistency.
- ½ teaspoon vanilla extract: Enhances the flavor.
Step-by-Step Instructions
Step 1: Preheat & Prep Pan
First things first, let’s get that oven ready. Preheat your oven to 350°F (175°C). Now, grab a 9×5 inch loaf pan and grease it really well. I like to use butter or a non-stick cooking spray. For extra insurance against sticking, you can also line it with parchment paper, leaving some overhang on the sides so you can easily lift the baked bread out. This step is crucial; nobody wants their beautiful creation stuck to the pan!
Step 2: Mix Dry Ingredients
In a large bowl, whisk together the 2 ½ cups of flour, 1 teaspoon baking soda, ½ teaspoon salt, 1 teaspoon cinnamon, and ¼ teaspoon nutmeg. Whisking them together now ensures that the leavening agents and spices are evenly distributed throughout the batter, preventing any pockets of flavor or texture. You want everything to be perfectly blended.
Step 3: Mix Wet Ingredients
In a separate, medium-sized bowl, cream together 1 cup of granulated sugar and ½ cup of softened butter until light and fluffy. This usually takes a couple of minutes with an electric mixer. Then, beat in the 2 large eggs, one at a time, making sure each is fully incorporated before adding the next. Stir in the 1 teaspoon of Vanilla Extract.
Step 4: Combine
Now, it’s time to bring the wet and dry ingredients together. Gradually add the dry ingredients to the wet ingredients, alternating with the 1 cup of buttermilk. Start and end with the dry ingredients. So, add about a third of the dry ingredients, mix until just combined, then half of the buttermilk, mix, another third of the dry, mix, the remaining buttermilk, mix, and finish with the rest of the dry ingredients. Mix until just combined. Be careful not to overmix! A few little lumps are perfectly fine. Overmixing can develop the gluten too much, leading to a tough bread. We’re going for tender and moist here!
Step 5: Prepare Filling
In a small bowl, combine the 1 cup of packed light brown sugar, 2 tablespoons of flour, 1 ½ teaspoons of cinnamon, and ½ teaspoon of allspice. Pour in the ¼ cup of melted butter and stir until it forms a thick, paste-like consistency. This filling is pure comfort and deliciousness!
Step 6: Layer & Swirl
Pour about half of the batter into your prepared loaf pan and spread it out evenly. Now, dollop spoonfuls of the filling mixture over the batter. Don’t worry about being too precise! Then, carefully pour the remaining batter over the filling. I like to gently spread it to cover most of the filling. Now for the fun part: take a knife or a skewer and gently swirl the filling through the batter. Don’t overdo it; we want distinct swirls, not a completely mixed batter. Aim for a few passes up and down and side to side to create those beautiful marbled patterns.
Step 7: Bake
Place the loaf pan in the preheated oven. Bake for 50-60 minutes, or until a wooden skewer or toothpick inserted into the center comes out clean. The top should be golden brown and fragrant. If it starts to brown too quickly, you can loosely tent it with aluminum foil for the last 15-20 minutes of baking.
Step 8: Cool & Glaze
Once baked, let the stuffed bread cool in the pan for about 10-15 minutes. Then, use the parchment paper overhang (if you used it) or carefully invert the pan to remove the bread onto a wire rack to cool completely. It’s important to let it cool fully before glazing, otherwise, the glaze will just melt off. While it’s cooling, whisk together the 1 cup of powdered sugar, 2 tablespoons of milk, and ½ teaspoon of vanilla extract for the glaze. Add more milk, a teaspoon at a time, until it reaches a nice drizzling consistency. Drizzle it generously over the cooled bread.
Step 9: Slice & Serve
Once the glaze has set slightly, slice your beautiful stuffed bread into thick slices. Serve it at room temperature for the best texture and flavor. Enjoy that first bite – the soft crumb, the warm, spiced filling, and that hint of sweet glaze. It’s pure bliss!
What to Serve It With
This stuffed bread is so versatile, it fits into almost any meal or occasion. For breakfast, I love it simply with a hot cup of coffee. The comforting flavors are just the perfect way to start the day. We often have it on weekend mornings when we have a little more time to relax. For a more elegant brunch, I’ll slice it a bit thinner and serve it alongside fresh berries and maybe a dollop of whipped cream or Greek yogurt. It looks so lovely on a platter, especially with the swirls peeking out. As a dessert, it’s phenomenal! It’s fantastic on its own, but if you want to go all out, a scoop of vanilla bean Ice Cream or a drizzle of warm caramel sauce is pure indulgence. It’s perfect after a hearty dinner when you want something sweet but not too heavy. And for those cozy, no-reason-at-all snacks? This is it. It’s perfect with a glass of milk or tea on a chilly afternoon. My family loves it as an after-school treat; it always disappears in minutes!
Top Tips for Perfecting Your Stuffed Bread
I’ve made this stuffed bread more times than I can count, and over the years, I’ve picked up a few tricks that really make a difference. For the batter, I always stress the importance of not overmixing. Seriously, once the flour is just incorporated, stop. A few lumps are your friend here, leading to a tender crumb. Overmixing develops gluten, which we don’t want. When it comes to the filling, make sure your brown sugar is well-packed. This gives it that lovely moist texture and rich caramel flavor. If your filling seems a little dry, don’t be afraid to add just a tiny bit more melted butter, maybe an extra teaspoon. For the swirling, my biggest tip is to be gentle! You want defined swirls, not a muddy mess. Think of it like painting – a few deliberate strokes are better than overworking it. Also, if you find your swirls are sinking, it might mean your batter is too thin or your filling is too wet. That’s why the flour in the filling is important; it acts as a bit of a binder. I’ve experimented with different spices in the filling too – a pinch of cardamom or even a tiny bit of finely grated orange zest can add a lovely new dimension. If you’re worried about the top browning too quickly, just loosely tent it with foil. It’s a lifesaver! And for the glaze, patience is key. Let the bread cool completely! Trying to glaze a warm loaf is a recipe for a sticky, runny mess. Aim for a consistency that drips slowly; too thin and it runs off, too thick and it’s hard to spread. Trust me on this one; a little patience goes a long way for that perfect finishing touch.
Storing and Reheating Tips
One of the best things about this stuffed bread is how well it keeps, making it perfect for making ahead. For room temperature storage, once it’s completely cooled and the glaze has set, wrap it tightly in plastic wrap or place it in an airtight container. It should stay fresh for about 2-3 days. It’s perfect for those moments when you need a quick breakfast or snack. If you think you’ll need it for longer, the refrigerator is your best bet. Again, wrap it well in plastic wrap, then in foil, or place it in an airtight container. It will keep well in the fridge for up to a week. When you want to enjoy a slice from the fridge, you can either eat it cold, or warm it up slightly. For reheating, I usually pop a slice in the toaster oven for a few minutes, or even microwave it for about 10-15 seconds – just until warmed through and that lovely spiced aroma returns. If you’re freezing it, I recommend slicing it first. Wrap each slice individually in plastic wrap, then place them all in a freezer-safe bag or container. This way, you can just take out a slice or two as needed. It will keep in the freezer for up to 2-3 months. Thaw frozen slices at room temperature or gently reheat them. I generally recommend glazing the bread *after* it has been baked and cooled completely, regardless of whether you’re storing it or planning to eat it soon. If you are planning to freeze it, I would suggest glazing it just before serving after thawing for the freshest appearance and taste. However, if you do glaze before freezing, just be aware the glaze might become a bit softer upon thawing.
Frequently Asked Questions
Final Thoughts
So there you have it – my cherished recipe for stuffed bread! I truly hope you give this a try. It’s more than just a recipe to me; it’s a little slice of happiness that I’ve loved sharing with my family and friends. It’s that perfect balance of comforting and slightly indulgent, incredibly forgiving for new bakers, and always a guaranteed crowd-pleaser. If you enjoy this recipe, you might also love my Spiced Apple Crumble Coffee Cake or my Lemon Blueberry Streusel Muffins, which have similar cozy, flavor-packed vibes. I can’t wait to hear what you think! If you make this stuffed bread, please leave a comment below and let me know how it turned out. I’d also love to see your creations, so feel free to share photos and your own favorite variations. Happy baking, everyone!
stuffed bread
Ingredients
Dough
- 3.5 cups all-purpose flour
- 0.33 cup warm water
- 0.1 cup olive oil
- 0.03 cup granulated sugar
- 0.01 packet active dry yeast
- 0.01 teaspoon salt
Filling
- 0.5 pound ground beef or your preferred ground meat
- 1 cup chopped onion
- 0.5 cup diced bell pepper any color
- 1 clove garlic minced
- 0.25 cup tomato sauce
- 0.5 teaspoon dried oregano
- 0.25 teaspoon salt
- 0.1 teaspoon black pepper
Egg Wash
- 1 large egg beaten
- 1 tablespoon water
Instructions
Dough Preparation
- In a large bowl, whisk together warm water, sugar, and yeast. Let stand for 5-10 minutes until foamy.
- Stir in olive oil and salt into the yeast mixture.
- Gradually add flour, mixing until a shaggy dough forms. Turn out onto a floured surface and knead for 8-10 minutes until smooth and elastic.
- Place dough in a lightly oiled bowl, cover with plastic wrap, and let rise in a warm place for 1-1.5 hours, or until doubled in size.
Filling Preparation
- In a skillet over medium heat, cook ground beef until browned. Drain off excess fat.
- Add chopped onion and bell pepper to the skillet and cook until softened, about 5 minutes.
- Stir in minced garlic and cook for 1 minute more until fragrant.
- Add tomato sauce, oregano, salt, and pepper. Stir to combine and simmer for 5 minutes.
- Remove from heat and let the filling cool slightly.
Assembly and Baking
- Preheat oven to 375°F (190°C). Line a baking sheet with parchment paper.
- Punch down the risen dough and turn it out onto a lightly floured surface. Roll the dough into a large rectangle, about 12x18 inches.
- Spread the cooled filling evenly over the dough, leaving a 1-inch border on all sides.
- Carefully roll up the dough from one of the long sides, pinching the seam to seal.
- Place the rolled dough seam-side down on the prepared baking sheet.
- In a small bowl, whisk together the beaten egg and water for the egg wash. Brush evenly over the top of the dough.
- Bake for 25-30 minutes, or until golden brown and cooked through.
- Let cool for a few minutes before slicing and serving.
Notes
Featured Comments
“Impressed! Clear steps and comforting results. Perfect for busy nights.”
“New favorite here — super easy. crowd-pleaser was spot on.”
“Super easy and turned out amazing! My family asked for seconds. Saving this one.”
“This sweet treat was absolutely loved — the cozy really stands out. Thanks!”
“Made it tonight and wow — so flavorful! Will definitely make stuffed bread again.”
“Packed with flavor and so simple. Exactly what I wanted from stuffed bread.”


