

If you’ve ever had a moment of pure bliss biting into a fudgy brownie topped with gooey salted caramel, then you know what I’m talking about. That perfect combination of rich chocolate, sweet caramel, and just a touch of sea salt is honestly my weakness. I remember baking these with my grandma when I was a kid — she always said, “A little salt makes everything better,” and she was right. Now, whenever I need a quick comfort treat or a show-stopping dessert for friends, salted caramel brownies are my go-to. This recipe is dangerously easy and always disappears in minutes at my house. Honestly, once you try making your own salted caramel, you’ll never grab the store-bought stuff again. Trust me — this one’s a lifesaver on busy nights, and it’s so good, my kids ask for seconds every time. The smell alone when they’re baking is enough to pull everyone into the kitchen. Best part? You probably have all the ingredients lurking in your pantry already. Let’s dive into this delicious, kid- and grown-up-approved dessert!
What is salted caramel brownies?
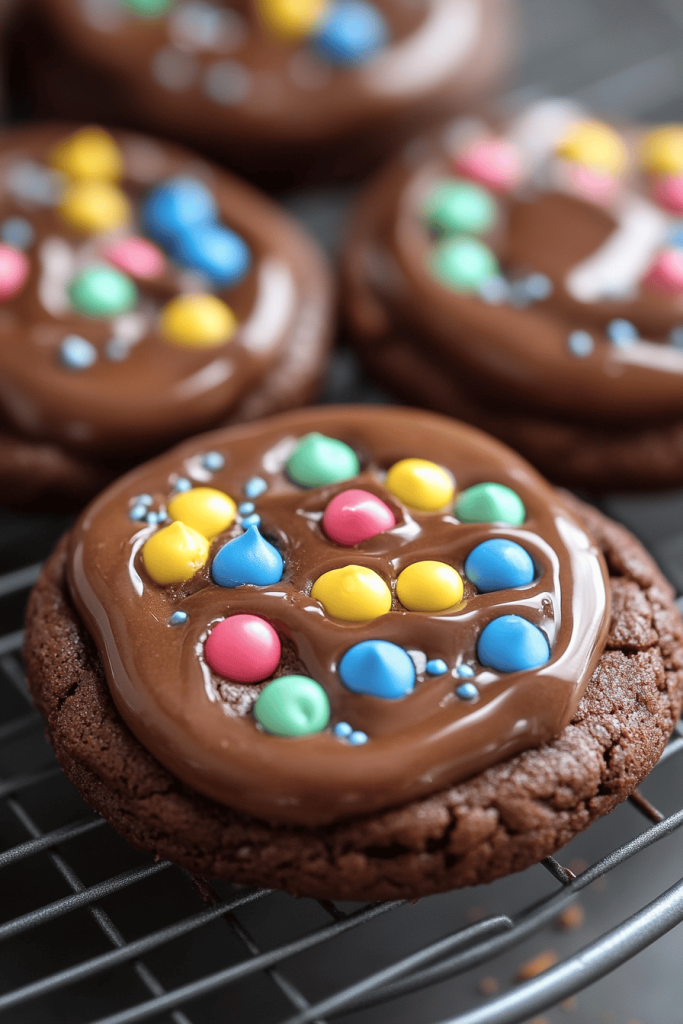
Salted caramel brownies are essentially a decadent mashup of two beloved treats — fudgy chocolate brownies topped or swirled with homemade salted caramel. Think of it as the perfect harmony between sweet and salty, with layers of velvety caramel hugging rich chocolate. The name’s pretty much self-explanatory: “salted caramel” refers to the luscious caramel flavor with a sprinkle of sea salt, and “brownies” are that familiar, comforting chocolate cake-like squares. The magic happens when you swirl that caramel into baking batter or layer it on top for extra gooey goodness. It’s an irresistible combo that hits all the right notes — and it’s seriously easier to make than you might think. I love how this treat can be both sophisticated enough for dinner parties and simple enough for a lazy Sunday afternoon snack. Think of these as the adult version of your favorite chocolate bar, elevated with just a dash of sea salt and homemade caramel drizzle.
How to Make Salted Caramel Brownies
Quick Overview
This recipe is all about combining rich, melted chocolate with eggs and sugar, then folding in the dry ingredients — like a typical brownie batter. The twist? You swirl in homemade salted caramel or spoon it between layers. Once baked until just set, you drizzle on a glossy caramel glaze and sprinkle with sea salt. The result? Thick, fudgy brownies with irresistible caramel pockets. The best part? Most of the work is mixing — no complicated steps, and you can have these ready in under an hour. These brownies stay gooey and moist for days, so I always bake a double batch. Trust me, you’ll want leftovers for sure!
Ingredients
For the Main Brownie Batter:
- 1 cup (2 sticks) unsalted butter, melted — because buttery brownies are the best!
- 2 cups granulated sugar — for that rich sweetness
- 4 large eggs — eggs give the structure and help bind everything together
- 1 teaspoon pure vanilla extract — my secret to extra depth
- 1 cup all-purpose flour — for the perfect fudginess
- ½ cup unsweetened cocoa powder — adds that dark chocolate flavor
- ½ teaspoon salt — to balance the sweetness and enhance the chocolate
- 1 cup good-quality semi-sweet chocolate chips or chopped chocolate — optional but highly recommended
For the Filling:
- ½ cup homemade salted caramel (or store-bought but homemade’s better!)
- A sprinkle of flaky sea salt for added punch
For the Glaze:
- ½ cup caramel sauce or leftover salted caramel
- 1 teaspoon heavy cream (optional, for glossiness)
- Extra flaky sea salt, for sprinkling on top
Step-by-Step Instructions
Step 1: Preheat & Prep Pan
Set your oven to 350°F (180°C). Line a 9-inch square baking pan with parchment paper or butter it generously. Trust me, no one wants their brownies stuck in the pan — a little prep makes for easy cutting and presentation!
Step 2: Mix Dry Ingredients
In a small bowl, whisk together the flour, cocoa powder, and salt. This step helps evenly distribute everything and keeps the batter smooth in the end. It’s a small step but makes a big difference in the final texture.
Step 3: Mix Wet Ingredients
In a large mixing bowl, combine melted butter and sugar. I always do this while the butter’s still warm — it helps everything blend smoothly. Add eggs one at a time, whisking well after each, until the mixture looks shiny and slightly thickened. Stir in vanilla. The smell of vanilla and warm butter is just pure comfort.
Step 4: Combine
Gently fold the dry ingredients into the wet mixture — don’t overmix, or you’ll end up with cakey brownies. Just until it’s combined and looks fudgy. If you’re using chocolate chips, fold those in now for extra richness.
Step 5: Prepare Filling
If you’re making salted caramel from scratch (which I recommend for best flavor), simmer sugar, butter, and cream until thick and glossy, then stir in sea salt. Let it cool slightly. If you’re using store-bought caramel, you can warm it a bit to make swirling easier.
Step 6: Layer & Swirl
Pour half the brownie batter into the pan. Dollop teaspoon-sized spoonfuls of salted caramel and swirl with a toothpick or skewer. Pour the rest of the batter on top and repeat swirls. Want a more marbled look? Just swirl gently but thoroughly for a nice pattern.
Step 7: Bake
Pop into the oven for about 25-30 minutes. You’ll know they’re done when a toothpick inserted in the middle comes out with a few moist crumbs but no wet batter. They might look a little underdone — that’s precisely what you want for a fudgy texture. Trust me, overbaking makes them dry.
Step 8: Cool & Glaze
Let the brownies cool completely in the pan on a wire rack. Once cooled, warm your caramel glaze slightly and pour over the top. Sprinkle with flaky salt and let sit for at least 10 minutes to set. The smell of caramel mingling with chocolate — it’s pure magic.
Step 9: Slice & Serve
Use a sharp knife to cut into squares. Wipe the knife between cuts for clean edges. Serve these warm with a scoop of vanilla ice cream if you’re feeling fancy. Or, just grab one with a tall glass of milk — perfection.
What to Serve It With
Honestly, there’s no wrong way here. These brownies are rich enough to stand alone, but I like pairing them with a hot cup of coffee or a glass of cold milk. For brunch, I’ll serve a few smaller squares alongside fresh berries and whipped cream. They’re also a showstopper at dinners — sliced with a dollop of whipped mascarpone or a drizzle of extra salted caramel for that *wow* factor. My kids ask for these almost weekly, especially when I sprinkle a little extra sea salt on top right before baking. If I want a more casual night, I’ll just warm a piece in the microwave—trust me, it tastes like molten chocolate and caramel. You can also crumble leftovers over ice cream, or sandwich them with a scoop of ice cream for an epic homemade ice cream sandwich. No matter how you serve it, these brownies add a little sweetness and a lot of love to any occasion.
Top Tips for Perfecting Your Salted Caramel Brownies
I’ve baked countless batches of these, and a few tricks help make the process even smoother. First, when making salted caramel from scratch, be patient — it can take around 10 minutes of simmering, but don’t rush this step or it might burn. I learned to use a heavy-bottomed saucepan for even heat distribution. For the brownie batter, avoid overmixing once you add the dry ingredients — this keeps them fudgy and dense instead of cakey. When swirling caramel into the batter, take your time with a toothpick or skewer to create beautiful marbled effects. Want a deeper caramel flavor? Add a splash of bourbon or a pinch of sea salt to the caramel as it cooks — it’s a game-changer. If you prefer a less sweet version, reduce the sugar slightly or use dark chocolate. Baking time can vary slightly depending on your oven — I always set a timer for 25 minutes and check; they might need just a few more minutes for that perfect fudgy center. For the glaze, I love adding a tiny pinch of sea salt or vanilla extract to heighten the caramel flavor. Trust me, these little tweaks just improve the overall experience and make the process fun and stress-free.
Storing and Reheating Tips
Once cooled, store these brownies in an airtight container at room temperature for up to three days. I recommend placing a sheet of parchment paper between layers if you’re stacking them — they tend to stick if you don’t. For longer storage, you can refrigerate for up to a week or freeze individual slices wrapped tightly in plastic wrap and foil for up to a month. To reheat, pop a brownie in the microwave for about 10-15 seconds — it makes the caramel gooey and melts the chocolate just enough. If you prefer them chilled, they’re still heavenly straight from the fridge, especially paired with a cold glass of milk. If you’re planning to save leftovers longer-term, I recommend adding a fresh drizzle of caramel before serving for that just-made look. The texture might firm up a bit after refrigeration, but trust me — a quick zap returns that fudgy, warm deliciousness.
Frequently Asked Questions
Final Thoughts
If you’re searching for the perfect balance of sweet, salty, and fudgy, then these salted caramel brownies are your new best friend. They’ve got that irresistible gooey center, a hint of salt that makes all the flavors pop, and a caramel swirl that’s addictive. I’ve tested this recipe countless times — every batch gets better with a little tweak here and there — and I promise, once you try it, it’ll become a staple in your dessert rotation. It’s one of those recipes that feels fancy but is actually super simple to pull off, making it a favorite for last-minute gatherings or cozy nights in. Plus, the whole family loves it, which is really the real test of a good recipe, right? So go ahead, gather your ingredients, and get ready to indulge in your new favorite treat. I’d love to hear how yours turn out — drop a comment, share your tweaks, and happy baking!

salted caramel brownies
Ingredients
Main Ingredients
- 7 oz semi-sweet chocolate
- 1 cup unsalted butter
- 3 large eggs
- 1 cup granulated sugar
- 1 tsp vanilla extract
- 1 cup all-purpose flour
- 0.5 cup cocoa powder
- 1 cup Dulce de Leche
- 1 tsp flaky sea salt plus extra for sprinkling
Instructions
Preparation Steps
- Preheat the oven to 350°F. Line an 8-inch square baking pan with parchment paper and lightly grease with cooking spray.
- Add the chocolate and butter to a saucepan over low heat. Melt, stirring often. Set aside.
- In a large mixing bowl, whisk the eggs, sugar, and vanilla extract until doubled in volume.
- Pour the melted chocolate and butter into the egg mixture and mix until fully combined.
- Sift in the flour and cocoa powder. Mix on low speed until just combined.
- Pour the batter into the prepared baking pan. Smooth the top with a spatula.
- Bake for 30 minutes. Test with a toothpick; it should not be wet.
- Heat the Dulce de Leche in a microwave-safe dish for 20-30 seconds to loosen. Stir in sea salt.
- Pour the caramel over the brownies and let set at room temperature for 2-3 hours.
- Cut into 9 squares and sprinkle with flaky sea salt.
Notes
Featured Comments
“Impressed! Clear steps and restaurant-level results. Perfect for busy nights.”
“New favorite here — restaurant-level. crowd-pleaser was spot on.”
“Super easy and turned out amazing! My family asked for seconds. Saving this one.”
“This sweet treat was absolutely loved — the silky really stands out. Thanks!”
“Made it tonight and wow — spot on! Will definitely make Sweet Caramel Brownies How to Bake Them again.”
“Packed with flavor and so simple. Exactly what I wanted from Sweet Caramel Brownies How to Bake Them.”


