

There’s just something so nostalgic about biting into a Candy Christmas Tree—those little edible conifers that sprinkle a dash of holiday magic on the dessert table. I remember as a kid, my mom would make these every December, and I’d sneak into the kitchen early in the morning just to get that first crispy, sweet bite. The smell of chocolate, the crunch of candy, and the cute, twinkling Christmas sprinkles—these trees bring back all the warm-fuzzies of the holidays. Honestly, they’re so simple to make that I’ve whipped up a batch at the last minute more times than I can count—especially when friends drop by and I want to serve a showstopper that takes no effort. What I love most about these Candy Christmas Trees is how customizable they are. If you’re looking for something festive yet easy, trust me on this one—these little trees are a total lifesaver on busy nights or when you just want to indulge in a sweet, pretty treat without the fuss.
What is candy Christmas tree?
Think of Candy Christmas Trees as adorable, edible holiday decorations that double as dessert. They’re essentially mini chocolate cakes shaped like tiny evergreen trees, topped with a swirl of frosting, and then decorated with colorful candies, sprinkles, and edible glitter. The name’s pretty literal—these trees look like tiny pine trees decorated for Christmas, but instead of real branches, they’re made from a chocolate cake or brownie base. It’s a fun, crafty treat that’s perfect for kids and adults alike. The best part? They don’t require fancy baking skills. I’ve seen folks use everything from homemade cake batter to store-bought brownies, then shape or cut them into little trees. It’s basically a sweet, edible homage to holiday decorating—perfect for your cookie tray, a cute gift, or just a fun activity to get into the spirit.
How do I make candy Christmas trees?
Quick Overview
This recipe is all about simple, fun assembly. You start with a base—either cake or brownie—that gets shaped into tiny Christmas tree forms. Then, you frost the “trees” with fluffy white or green frosting to mimic snow or pine needles. The decorating part is the best—think colorful candies, sprinkles, and edible glitter—like dressing up the most adorable little holiday trees you’ve ever seen. The whole process takes about 30 minutes, plus baking time if you’re starting from scratch. The key is to keep it easy and playful; these aren’t meant to look perfect—they’re meant to look festive and loving. Whenever I make these, I always feel a little kid again, decorating my mini trees with reckless abandon. Trust me, once you get into the spirit, it’s pure joy—and the best part? No stress, just sweet fun!
Ingredients
For the Main Batter:
– 1 box chocolate cake mix (or homemade chocolate cake if you’re ambitious! This one’s a lifesaver on busy nights)
– 3 eggs
– 1/2 cup vegetable oil
– 1/2 cup water or milk for extra richness
– A pinch of salt and vanilla extract for depth
For the Filling (optional):
– Cream cheese mixed with powdered sugar for a creamy center, if you want a surprise filling
– Or crushed cookies or toffee bits for added crunch
For the Glaze and Decorations:
– White or green frosting (store-bought or homemade)
– Assorted colorful candies—M&Ms, gumdrops, or Christmas-themed chocolates
– Sprinkles, edible glitter, or sugar crystals for a snowy effect
– Candy canes or peppermint sticks for a rustic touch
Step-by-Step Instructions
Step 1: Preheat & Prep Pan
First things first, preheat your oven to 350°F (175°C). Line a baking sheet with parchment paper or lightly grease a cake pan or muffin tin—whatever you’re using to shape the trees. You want the surface to be smooth so the cakes release easily. If you’re shaping the cakes later, I recommend using a standard loaf pan or even a muffin tray for small trees. My trick? I lightly spray with cooking spray and dust with a little flour or cocoa powder to prevent sticking.
Step 2: Mix Dry Ingredients
In a big mixing bowl, combine your cake mix with eggs, oil, and water. Stir until the batter is smooth—no lumps. I always do this step with a whisk or hand mixer to ensure everything’s thoroughly mixed, but a good spoon works too. The batter should be thick but pourable. Don’t overmix—it can make the cake dense. I’ve learned that gentle stirring prevents the cakes from getting tough and keeps the texture light and tender.
Step 3: Mix Wet Ingredients
If you’re using homemade batter, now’s the time to add in any extra flavorings—vanilla, coffee, or even a splash of liqueur for grown-up treats. Keep everything at room temp so it mixes evenly. For store-bought mixes, just follow the box instructions. I like to double-check that my eggs are well incorporated—nothing worse than biting into a surprise chunk of raw flour!
Step 4: Combine
Pour your batter into your prepared pans—just filling about two-thirds full. Bake in the oven, and here’s a trick: if making mini trees, reduce the baking time to around 15-20 minutes. You want a toothpick inserted into the center to come out clean. I always check around the minimum time; ovens vary and I’d rather underbake than overbake these little guys. Once baked, let them cool on a wire rack—it’s tempting to frost them hot, but patience pays off with neat decorating.
Step 5: Prepare Filling (Optional)
If you’re feeling fancy or want a surprise middle, mix soft cream cheese with powdered sugar and vanilla—think of it as a sweet, creamy cream. Slice your cooled cakes into small rectangles or triangles, then add a dollop of filling in the middle before frosting. This trick works beautifully to add richness and surprise bites. Or, for a crunch, sprinkle crushed peppermints or cookies on top after frosting.
Step 6: Layer & Swirl
Once your cakes are cooled, spread a generous layer of frosting—green if you want a more traditional tree or white for a snow-covered look. Use a piping bag or a butter knife to swirl the frosting, starting from the bottom and working your way up, mimicking the shape of a pine cone. For added charm, I like to dab some frosting at the top and sprinkle glitter or candies—think of it as “decorating your tiny Christmas forest.” Don’t worry if the layers aren’t perfect, it’s all about the fun!
Step 7: Bake
If you’re adding any toppings that need to set, like candies or sprinkles, do so immediately after applying the frosting, before it hardens. Keep your decorated trees in a cool place or refrigerator until ready to serve. I’ve found that chilling them for 15-30 minutes helps everything set up nicely—not to mention, it makes for a cleaner bite.
Step 8: Cool & Glaze
Allow the trees to cool completely before glazing or final decorations. You can melt more chocolate to drizzle as a rustic “snow” or use icing to give them a glossy finish. Just a quick coat over the top makes everything look extra festive. If you like a snowy effect or shimmer, dust a little edible glitter or shimmer spray. Trust me, it makes even the simplest tree look like a mini holiday masterpiece.
Step 9: Slice & Serve
When it’s party time or family dinner, slice your tiny trees into neat little pieces—watch how quickly they disappear! In my house, these are always the first to go, and I swear the kids ask for seconds every single time. Serve on cute holiday trays, sprinkle with extra glitter, and watch everyone’s faces light up. They’re adorable, delicious, and a perfect way to end a festive meal or cheerful get-together.
What to Serve It With
These Candy Christmas Trees are so versatile that they fit practically any occasion. For a cozy breakfast, pair them with a hot cup of cinnamon-spiced coffee or a creamy latte—these little trees make a fun holiday morning treat. During brunch, slice them up alongside some fluffy scrambled eggs and fresh fruit for a sweet contrast. As a dessert, they’re a showstopper—set them on a pretty platter with peppermint sticks and a dusting of powdered sugar for that magic winter wonderland look. Or, just toss a few on a plate with a side of warm cocoa or hot mulled wine for an adult-friendly twist. I often make a variety—some decorated with red and green candies, others with glitter and sprinkles—to keep things festive. These little treats have become a family tradition, and I love how they bring everyone together—kids, grandparents, and friends—all eager to taste and admire the tiny, colorful trees. Plus, they’re so fun to decorate, I sometimes let my kids take charge—trust me, their creative chaos only adds to the charm.
Top Tips for Perfecting Your Candy Christmas Trees
From my years of making these, I’ve picked up a few tricks to make your Candy Christmas Trees truly stand out. First, when shaping your cakes, be sure to let them cool completely—it makes them easier to cut or mold without crumbling. If you’re using cake or brownies, I always recommend trimming uneven edges before decorating; it creates a neater tree shape. Want a more realistic look? Lightly brush your cakes with a little nut milk or butter before frosting—it helps the frosting stick better and adds a touch of richness. For the frosting, I tested both homemade buttercream and store-bought options. Honestly, store-bought works fine in a pinch, but I’ve found that adding a little cream cheese makes it extra creamy and resilience to melting on the cake surface. When decorating, I love to get creative with candies—try mini pretzels for “branches” or crushed peppermint for a snowy effect. The swirl pattern is key—to make it look lush, pipe the frosting in a tight spiral from the bottom up, then gently drag to create a textured, pine-like look. If you want a little extra sparkle, dust your completed trees with edible glitter or shimmer spray. And finally, don’t be shy—this is all about the fun and festive spirit. I learned that it’s perfectly okay if every tree isn’t ‘perfect’; the imperfect ones often have the most charm. Just keep experimenting, taste-testing, and most of all, enjoying the process!
Storing and Reheating Tips
These little trees are pretty resilient, but the way you store them can make a difference in their freshness. If you’re planning to serve them within a day, keep them at room temperature in an airtight container—just make sure they’re not in direct sunlight or near heat, or the frosting might soften. For longer storage, refrigerate them in a sealed container for up to three days. Just take note: refrigerating can sometimes cause candies and frosting to lose a bit of their vibrant shine, so I usually take them out about 20 minutes before serving to soften slightly. For freezing, wrap individual trees tightly in plastic wrap and store in a resealable bag for up to a month. When you’re ready to enjoy, let them thaw at room temperature—frostings tend to get a little soft but still taste delicious. If you want to keep the glossy glaze or glitter intact, I recommend adding the finishing touches just before serving rather than before storage. That way, they look fresh and festive every time. A quick tip: if your glaze or decorated candies start to look dull, giving them a light spritz of edible shimmer or dusting with a little extra glitter can magically revive that holiday sparkle.
Frequently Asked Questions
Final Thoughts
Honestly, Candy Christmas Trees are one of those recipes that really capture the spirit of the season—simple, cheerful, and a little bit magical. I’ve made these countless times, tweaking the decorations and flavors each year, and they never fail to bring joy to my family and friends. They’re perfect for last-minute gatherings or when you want a festive dessert without spending hours in the kitchen. The best part? Watching everyone’s eyes light up when they see these tiny, colorful trees—and then taste how delicious they are! So give it a try, have fun with the decorations, and don’t worry about perfection. Sometimes the most charming treats are the messiest, and that’s what makes them special. And hey—if you end up with a “tree” that looks more like a candy sculpture than a pine, just call it abstract art and enjoy. I can’t wait to hear how yours turn out—happy baking, and happy holidays!

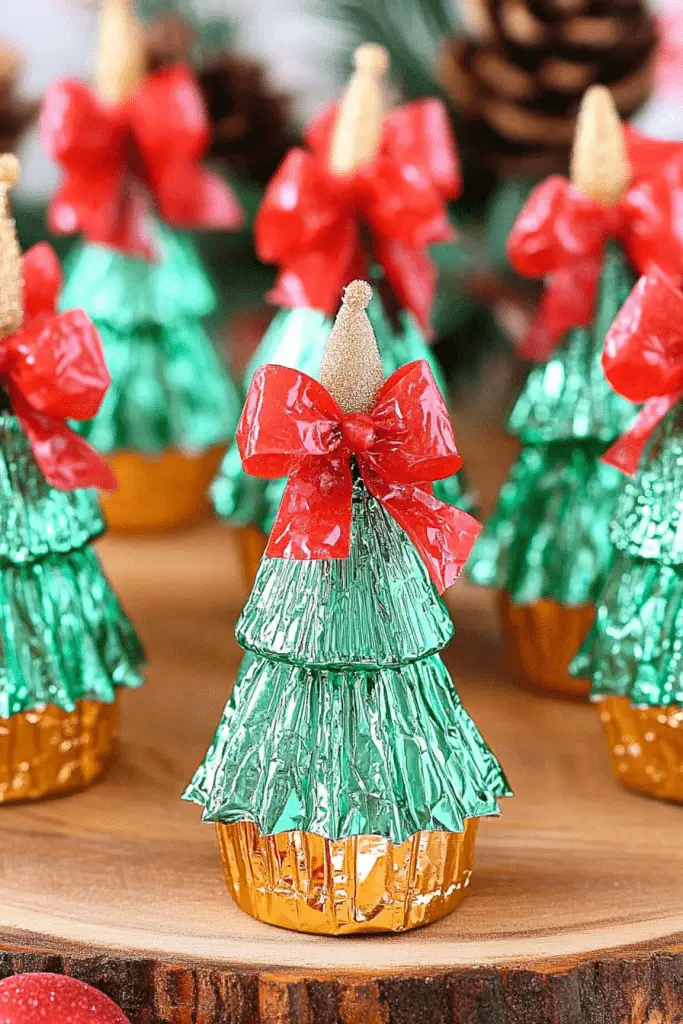
Candy Christmas Trees
Ingredients
Main Ingredients
- 20 pieces green mini Reese’s Cups
- 10 pieces gold foil Rolos
- 10 pieces green Hershey’s Kisses
- 10 pieces small red bows
Instructions
Preparation Steps
- Preheat your hot glue gun.
- Apply glue on top of a Rolos, pressing a mini Reese’s Cup with flat side facing up and hold until set.
- Place another mini Reese’s Cup on top, facing the same way, and hold until the glue sets.
- Put glue on top of the stacked Reese’s Cups and attach a Hershey’s Kiss on top, holding until secured.
- Adhere a small red bow at the intersection of Reese’s Cups and Hershey’s Kiss with a tiny dab of glue.
Notes
Featured Comments
“This takes me back to my childhood—so cute and festive! Love how simple yet magical these little treats are.”
“Impressed! Clear steps and so flavorful results. Perfect for busy nights.”
“New favorite here — spot on. crowd-pleaser was spot on.”
“Super easy and turned out amazing! My family asked for seconds. Saving this one.”
“This sweet treat was absolutely loved — the bright really stands out. Thanks!”
“Made it tonight and wow — spot on! Will definitely make Sweet Holiday Trees A Simple Treat again.”


This takes me back to my childhood—so cute and festive! Love how simple yet magical these little treats are.