

Oh, where do I even begin with these tie dye cookies? Honestly, they’re more than just a treat; they’re pure joy on a plate! I remember the first time I saw them, and I thought, “No way, those can’t be real!” They looked like little works of art, all swirly and vibrant, and I was convinced they required some kind of professional baker wizardry. But then, my dear friend Sarah, who is an absolute magician in the kitchen (and happens to be the one who shared this recipe with me!), assured me they were totally doable. And she was right! Making these tie dye cookies is seriously so much fun, and the outcome is always breathtaking. They’re like a edible kaleidoscope, and honestly, the process itself is almost as satisfying as eating them. If you’ve ever wanted to impress your friends or just add a splash of color to your day, you absolutely *have* to try this recipe. They’re a fantastic alternative to a simple Sugar cookie, offering a bit more wow factor without a ton of extra fuss. Plus, who doesn’t love a recipe that brings out their inner artist?
What are Tie Dye Cookies?
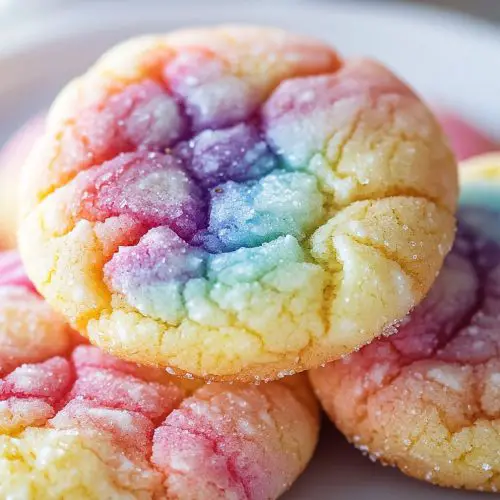
So, what exactly are these mesmerizing tie dye cookies? Think of them as a playful, visually stunning twist on a classic sugar cookie. The magic happens with the batter. We’re essentially making a simple, delicious vanilla Cookie Dough, but then we’re dividing it, coloring each portion with vibrant food gels, and swirling them together before baking. It’s this swirling technique that creates those beautiful, unpredictable patterns that look just like a tie-dye t-shirt. It’s not complicated at all, really! You don’t need any fancy tools, just a little bit of patience and a willingness to get a little colorful in the kitchen. The flavor is that comforting, familiar taste of a good sugar cookie, but the visual appeal takes it to a whole new level. They’re perfect for parties, holidays, or just when you need a little extra sparkle in your life. It’s essentially a blank canvas for your creativity, and the results are always unique and totally delightful.
How to Make Tie Dye Cookies
Quick Overview
Making these tie dye cookies is a straightforward process that breaks down into a few key steps: preparing a simple cookie dough, dividing and coloring it, swirling the colors together artfully, baking them to golden perfection, and then finishing with a simple glaze. The beauty of this method is that even if your swirls aren’t perfectly uniform, they’ll still look amazing! It’s designed to be forgiving and fun, ensuring you get delicious cookies with that stunning tie-dye effect every single time. Trust me, the process is more enjoyable than complicated.
Ingredients
For the Main Batter:
2 and 3/4 cups all-purpose flour: I always use a good quality, unbleached all-purpose flour. Make sure to spoon and level it into your measuring cup to avoid packing too much in, which can lead to dry cookies.
1 teaspoon baking soda: This helps with the lift and spread.
1/2 teaspoon salt: Balances out the sweetness and enhances flavor.
1 cup (2 sticks) unsalted butter, softened: It’s crucial that your butter is truly softened, not melted. This ensures it creams well with the sugar for a tender cookie.
1 and 1/2 cups granulated sugar: For that classic sweetness and structure.
2 large eggs: Room temperature eggs incorporate better into the batter.
1 teaspoon Vanilla Extract: The backbone of our vanilla flavor.
1/4 teaspoon almond extract (optional, but highly recommended!): This gives it a little something extra, a depth of flavor that’s just divine.
For the Coloring:
Gel food coloring in your desired colors: I love using gel colors because they provide intense hues without adding extra liquid to the dough. You’ll need about 1-2 teaspoons of each color, depending on how vibrant you want them.
For the Glaze:
1 cup powdered sugar: Sifted, if you want it super smooth, but not essential for this rustic swirl.
2-3 tablespoons milk (or water): Start with 2 tablespoons and add more until you reach your desired drizzling consistency.
1/4 teaspoon vanilla extract: For a little extra flavor in the glaze.
Step-by-Step Instructions
Step 1: Preheat & Prep Pan
First things first, get your oven preheated to 375 degrees Fahrenheit (190 degrees Celsius). Line your baking sheets with parchment paper. This is a game-changer, trust me. It prevents sticking, makes cleanup a breeze, and ensures your cookies bake evenly without any crispy burnt bottoms. I always have a couple of sheet pans ready to go so I can bake batches back-to-back.
Step 2: Mix Dry Ingredients
In a medium bowl, whisk together the flour, baking soda, and salt. Giving these dry ingredients a good whisk ensures everything is evenly distributed, which prevents pockets of salt or baking soda in your cookies. This is a small step, but it makes a difference in the final texture.
Step 3: Mix Wet Ingredients
In a large bowl, cream together the softened butter and granulated sugar until light and fluffy. This usually takes about 2-3 minutes with an electric mixer. Then, beat in the eggs, one at a time, making sure each is fully incorporated before adding the next. Stir in the vanilla extract and almond extract (if using). The mixture should look smooth and creamy.
Step 4: Combine
Gradually add the dry ingredients to the wet ingredients, mixing on low speed until just combined. Be careful not to overmix! Overmixing develops the gluten in the flour, which can lead to tough cookies. You want to stop as soon as you no longer see streaks of dry flour. The dough will be soft and slightly sticky.
Step 5: Prepare Filling
Now for the fun part! Divide your cookie dough into 3-4 equal portions, depending on how many colors you want. Place each portion into a separate small bowl. Add a few drops of gel food coloring to each bowl – start with less and add more until you achieve your desired vibrant shades. Gently mix the color into each portion of dough until it’s uniform. Again, don’t overmix; just blend until the color is evenly distributed.
Step 6: Layer & Swirl
This is where the magic really happens. Take small spoonfuls of each colored dough and drop them randomly into a larger bowl. Don’t worry about making it look perfect; the more random, the better! Once you have a collection of colorful dough blobs, gently stir them together with a spatula a few times – just enough to swirl them together. You want to see distinct ribbons of color, not one muddy mess. Then, take about a tablespoon of this swirled dough and roll it gently into a ball. Place the ball on your prepared baking sheet, leaving about 2 inches between cookies as they will spread a bit.
Step 7: Bake
Bake for 9-12 minutes, or until the edges are lightly golden brown. The centers should look set but not hard. Ovens can vary, so keep an eye on them! It’s always better to underbake slightly for a chewier cookie than to overbake and have them turn dry.
Step 8: Cool & Glaze
Let the cookies cool on the baking sheet for 5 minutes before transferring them to a wire rack to cool completely. While they’re cooling, whisk together the powdered sugar, 2 tablespoons of milk, and vanilla extract for the glaze. Add more milk, a tiny bit at a time, until you have a pourable but not too thin consistency. Once the cookies are completely cool, drizzle the glaze over them in a zig-zag pattern. This is where you can add a little extra visual pop!
Step 9: Slice & Serve
Once the glaze has set, your beautiful tie dye cookies are ready to be devoured! I love slicing them for that perfect presentation, but honestly, they’re just as delicious when broken into pieces. They’re best enjoyed fresh!
What to Serve It With
These tie dye cookies are so versatile, they can really fit into almost any occasion. For Breakfast, I love pairing them with a simple cup of coffee or a glass of cold milk. They’re not overly sweet, so they make a nice little morning pick-me-up, especially if you have a few minutes to savor them before the day gets crazy. For a more elaborate Brunch spread, these cookies are a showstopper! Imagine them as part of a dessert table alongside fresh fruit and maybe some mini quiches. They add such a fun, colorful element. You can arrange them on a tiered stand for an extra touch of elegance. For an actual Dessert, they are fantastic! Serve them after dinner with a scoop of vanilla Ice Cream or alongside a fresh berry salad. The contrast between the cool ice cream and the buttery cookie is just divine. And for those quiet, Cozy Snacks moments, when you just need a little something sweet to curl up with on the couch? These are perfect. Pair them with a warm mug of tea or hot chocolate, and just let yourself relax. My family has a tradition of making these for movie nights, and they always disappear in minutes. I’ve also found they’re a huge hit at bake sales and potlucks because they’re always a conversation starter!
Top Tips for Perfecting Your Tie Dye Cookies
I’ve made these tie dye cookies more times than I can count, and over the years, I’ve picked up a few little tricks that I think make a big difference. For the dough itself, I can’t stress enough the importance of not overmixing once you add the flour. You want to stop as soon as the last streak of flour disappears. A little mixer fatigue here is a good thing! It ensures tender cookies, not hockey pucks. When you’re doing the swirl customization, don’t be afraid to go a little wild! The more random the dollops of color, the more unique and interesting your tie-dye pattern will be. I often try to avoid putting the same color next to itself when dropping them into the bowl. For the coloring, using gel food coloring is key. Liquid coloring can add too much moisture and change the dough consistency. Gel colors give you that intense hue without altering the bake. If you’re looking for ingredient swaps, I’ve experimented a bit. For a dairy-free option, I’ve had success using a good quality plant-based butter stick and a non-dairy milk for the glaze. The texture is very similar, so you won’t miss out! For the baking tips, always pay attention to your oven. If you find your cookies tend to spread too much, you can try chilling the colored dough balls for about 15-20 minutes before baking. This helps them hold their shape a bit better. Also, rotating your baking sheets halfway through baking can help ensure even browning. When it comes to the glaze variations, don’t feel tied to just vanilla. A touch of lemon extract can add a nice brightness, or even a tiny bit of peppermint extract for a festive twist, especially around the holidays. Just remember to use just a tiny bit so it doesn’t overpower the cookie.
Storing and Reheating Tips
One of the best things about these tie dye cookies is that they store remarkably well, meaning you can enjoy that beautiful swirl and delicious flavor for days. For Room Temperature storage, once the cookies are completely cool and the glaze has set, you can store them in an airtight container. They’ll stay fresh and delicious for about 3-4 days. Just make sure there’s no moisture in the container, as that can make them soggy. If you need them to last a bit longer, Refrigerator Storage is your best bet. Again, an airtight container is key. They should keep well in the fridge for up to a week. Just a heads-up, the glaze might become a little softer in the fridge, but the cookie itself will remain wonderfully chewy. When it comes to Freezer Instructions, these cookies freeze beautifully! You can freeze the baked and cooled cookies (without glaze) for up to 3 months. Wrap them individually in plastic wrap, then place them in a freezer-safe bag or container. To thaw, simply remove them from the freezer and let them come to room temperature on a wire rack. For the glaze, I always recommend glazing them after they’ve thawed. Adding the glaze to frozen cookies can lead to condensation and a messy outcome. So, the Glaze Timing Advice is pretty simple: bake, cool, freeze (if desired), thaw, then glaze just before serving for the best visual appeal and texture!
Frequently Asked Questions
Final Thoughts
So there you have it, my friends! These tie dye cookies are truly a labor of love, but in the best possible way. They’re a delightful adventure for your taste buds and your eyes, and the process is just so much fun. What I adore most is how each batch turns out completely unique, making every cookie a little masterpiece. They’re proof that you don’t need to be a pastry chef to create something truly special and beautiful in your own kitchen. They bring such a smile to my face, and I just know they’ll do the same for you and your loved ones. If you enjoy making simple, crowd-pleasing desserts like my Easy No-Bake Cheesecake Bites, you’re going to absolutely adore these cookies. They offer that same heartwarming satisfaction with an extra visual punch! Give them a try, embrace the swirls, and have a blast making them. I can’t wait to hear how yours turn out and what color combinations you come up with! Don’t forget to share your creations with me in the comments below, or tag me on social media – I’d love to see your artistic flair! Happy baking!
Tie-Dye Sugar Cookies
Ingredients
Cookie Dough
- 1 cup unsalted butter, softened
- 1.5 cup granulated sugar
- 2 large eggs
- 1 teaspoon vanilla extract
- 3 cup all-purpose flour
- 1 teaspoon baking powder
- 0.5 teaspoon salt
Royal Icing
- 4 cup powdered sugar
- 0.5 cup meringue powder
- 0.25 cup water
- food coloring (various colors)
Instructions
Cookie Preparation
- In a large bowl, cream together the softened butter and granulated sugar until light and fluffy.
- Beat in the eggs one at a time, then stir in the vanilla extract.
- In a separate bowl, whisk together the flour, baking powder, and salt.
- Gradually add the dry ingredients to the wet ingredients, mixing until just combined.
- Divide the dough into portions, color each portion with a different food coloring, and wrap in plastic wrap. Chill for at least 30 minutes.
- Preheat oven to 350°F (175°C). Line baking sheets with parchment paper.
- Roll out each colored dough portion thinly on a floured surface. Layer and swirl the colors together to create a tie-dye effect. Cut out desired shapes using cookie cutters.
- Place cookies on the prepared baking sheets and bake for 8-10 minutes, or until edges are lightly golden.
- Let cookies cool on the baking sheets for a few minutes before transferring them to a wire rack to cool completely.
Icing and Decorating
- In a large bowl, whisk together the powdered sugar and meringue powder.
- Gradually add the water, mixing until you have a smooth, thick icing consistency. If too thick, add a few drops of water; if too thin, add more powdered sugar.
- Divide the icing into smaller bowls and tint each with a different food coloring.
- Once cookies are completely cool, drizzle or spread the colored icing over them in a tie-dye pattern. You can use toothpicks to swirl the colors further.
- Let the icing dry completely before storing.
Notes
Featured Comments
“Impressed! Clear steps and spot on results. Perfect for busy nights.”
“New favorite here — creamy. crowd-pleaser was spot on.”
“Super easy and turned out amazing! My family asked for seconds. Saving this one.”
“This sweet treat was absolutely loved — the rich really stands out. Thanks!”
“Made it tonight and wow — super easy! Will definitely make tie dye cookies again.”
“Packed with flavor and so simple. Exactly what I wanted from tie dye cookies.”


