

There’s something about the smell of fresh-baked apple muffins that instantly warms my kitchen and my heart. I remember growing up waking up to the sweet aroma drifting from the oven on chilly Sunday mornings — it was like a hug in muffin form. Over the years, I’ve perfected my recipe, and let me tell you, it’s a game-changer. These apple muffins are incredibly moist, bursting with tender apple chunks, and topped just right with a hint of cinnamon-sugar crunch. They’re the kind of treat that turns a regular breakfast into a little celebration, or a cozy afternoon snack when you need a bit of comfort. Honestly, I’ve made these countless times, and my family still asks for seconds every single time. If you’re craving something sweet but don’t want to fuss too much in the kitchen, trust me on this one — these apple muffins will become your new go-to! Now, let’s dive into how to make them from scratch. Spoiler: It’s easier than you think and so worth the aroma filling your home.
What is an apple muffin?
Think of apple muffins as the lovechild of a fruit crisp and a fluffy muffin — a perfect snack that’s not too sweet, with cozy apple bits baked into a tender batter. They’re essentially muffins infused with fresh apples and warm spices like cinnamon and nutmeg, giving every bite that comforting fall flavor year-round. The name is simple but charming, because they’re muffins made with apples — but the real magic is in how they taste. Think of it as a portable slice of apple pie, but in muffin form. These are the kind of treats that my kids ask for when they want a special breakfast, and I love them because I can whip up a batch in under 30 minutes. They’re great for breakfast, brunch, or even a sneaky late-night sweet craving. And let’s be honest — there’s something about a warm apple muffin that makes everything feel just a little bit cozier, don’t you think?
How do I make Apple Muffins?
Quick Overview
This recipe is all about keeping things simple and fuss-free. Start by preheating your oven and lining a muffin tin. Whisk together your dry ingredients — flour, sugar, baking powder, cinnamon — then in another bowl, mix up your wet ingredients like eggs, milk, melted butter, and vanilla. Fold the wet into the dry, being careful not to overmix — that’s the secret to fluffy muffins! Prepare your apples by peeling and chopping into small cubes, then swirl some cinnamon sugar into the batter, add apple chunks, and gently fold everything together. Spoon the batter into your muffin tins, add a sprinkle of cinnamon sugar on top for that perfect crunch, and bake until golden and fragrant. While they’re baking, I always sneak a quick taste of the batter — it’s almost good enough to eat raw! Once out of the oven, let them cool just a bit before drizzling with a simple glaze if you wish. Trust me, these muffins come together faster than you think and make your house smell like heaven.
Ingredients
For the Main Batter:
– 2 cups all-purpose flour (I like unbleached for a richer flavor)
– 1 cup granulated sugar (or coconut sugar if you prefer)
– 1 tablespoon baking powder
– 1 teaspoon ground cinnamon
– 1/2 teaspoon nutmeg (optional but fabulous)
– A pinch of salt
– 1/2 cup melted unsalted butter or neutral oil
– 2 large eggs
– 1/2 cup milk (dairy or plant-based — I’ve tested almond milk and it’s great!)
– 1 teaspoon vanilla extract
For the Filling:
– 2-3 crisp apples (Granny Smith or Honeycrisp work beautifully)
– 2 tablespoons sugar
– 1 teaspoon ground cinnamon
– A splash of lemon juice (to keep apples fresh and flavorful)
For the Glaze:
– 1 cup powdered sugar
– 2-3 tablespoons milk or lemon juice for a tangy twist
– Optional: a dash of vanilla or cinnamon for extra flavor
Step-by-Step Instructions
Step 1: Preheat & Prep Pan
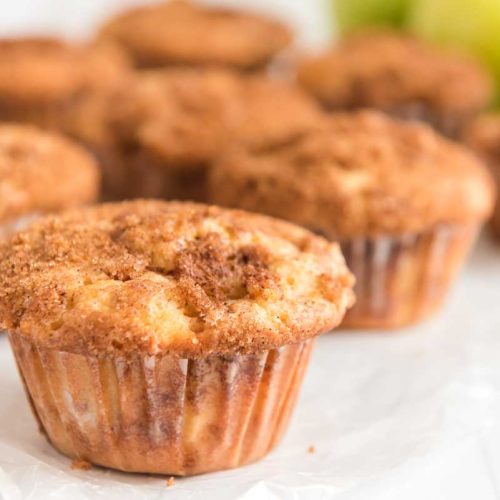
Heat your oven to 375°F (190°C). Line a muffin tin with paper liners or lightly grease the cups to prevent sticking. I always do this first so I can focus on mixing without rushing — and it keeps the muffins from sticking! If you want a little extra crunch, sprinkle a tiny bit of cinnamon sugar on the liners or tops before baking. While the oven heats, peel and chop your apples into tiny cubes — you want them small enough so they bake evenly and melt into the muffin nicely.
Step 2: Mix Dry Ingredients
In a big bowl, whisk together the flour, sugar, baking powder, cinnamon, nutmeg, and salt. This ensures all the flavors and leavening are evenly distributed. If you’re feeling adventurous, a pinch of salt really balances the sweetness and brings out the spices. I’ve found that sifting or whisking thoroughly makes the muffins lighter and fluffier — no dense bites here!
Step 3: Mix Wet Ingredients
In a separate bowl, beat the eggs, then add melted butter (or oil), milk, and vanilla. I like to use a whisk here because it helps everything combine smoothly. When the butter has cooled just a bit so it doesn’t cook the eggs, it’s perfect. The mixture should look shiny and slightly frothy — that’s a good sign you’re on the right track.
Step 4: Combine
Pour the wet ingredients into the dry and gently fold together with a spatula or spoon. Be careful not to overmix — a few lumps are totally fine! I’ve learned that overmixing makes muffins dense and rubbery. Stop mixing as soon as you don’t see streaks of flour, but don’t beat it into submission — trust me on this one.
Step 5: Prepare Filling
In a small bowl, toss your chopped apples with sugar, cinnamon, and a splash of lemon juice. This helps them stay crisp and adds extra flavor. You can also add nuts or dried fruit if you’re feeling fancy — my kids love a few chopped walnuts folded in here.
Step 6: Layer & Swirl
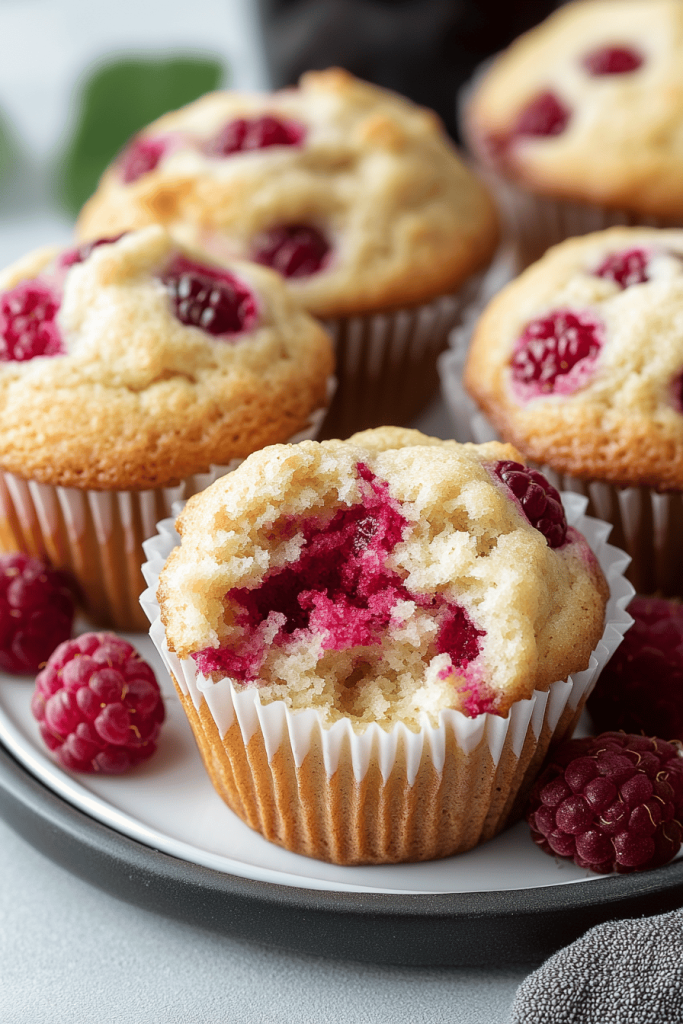
Drop a spoonful of muffin batter into each cup, then add a sprinkle of apple filling. Cover with more batter, then gently swirl with a toothpick or skewer to marble the apples into the batter. This step is so much fun — I love seeing the pretty swirls emerge when baking. Don’t overdo it — just enough to create a marbled effect without mixing everything into a uniform mess.
Step 7: Bake
Bake for about 20-25 minutes, or until a toothpick inserted in the center comes out clean. Keep an eye on them after 20 minutes because oven times can vary. The tops should turn a beautiful golden honey shade and smell irresistible. Every once in a while, I give the pan a little wiggle to check if they’re set — no jiggle means they’re ready!
Step 8: Cool & Glaze
Let the muffins cool in the tin for about 5 minutes — if you try to move them too soon, they might fall apart (been there, done that). Then transfer to a wire rack and drizzle with your glaze while still warm. The glaze adds a lovely shiny finish and just enough sweetness. I usually just whisk powdered sugar with a splash of milk or lemon juice, but you can get creative with flavor additions like vanilla or cinnamon here.
Step 9: Slice & Serve
Once cooled slightly, these muffins are best enjoyed warm or at room temperature. They’re fabulous on their own, but I love serving mine with a dollop of whipped cream or a swipe of butter. My kids actually ask for these for breakfast, snack time, and even as a quick dessert. They disappear in minutes at my house—trust me, you’ll find yourself reaching for one again and again.
What to Serve It With
This apple muffin recipe is pretty versatile. For breakfast, pair it with a steaming cup of coffee or a glass of freshly squeezed orange juice — the warmth and fruitiness make mornings feel special. I also love serving these muffins at brunch alongside scrambled eggs and some crispy bacon — it’s a balance of sweet and savory. If you’re leaning more toward dessert, pile on a scoop of vanilla ice cream or a drizzle of caramel sauce for a decadent treat. My family’s favorite way to enjoy them is with a splash of hot tea in the afternoon, especially when it’s chilly outside. Sometimes I sprinkle extra cinnamon sugar on top right before baking for an even crunch, or top with a smear of cream cheese for a decadent twist. These muffins are the ultimate all-in-one comfort snack, and they’re just as good solo or dressed up with toppings.
Top Tips for Perfecting Your Apple Muffins
After making these a dozen times, I’ve picked up a few tricks that make all the difference. First, prep your apples properly — I always peel and chop them small, then toss with lemon juice to prevent browning and keep them crisp. When mixing the batter, use a gentle touch and stop as soon as everything is combined; the secret to fluffy muffins is not overworking the batter. For the swirl, I like to sprinkle a bit of cinnamon sugar on the top before baking — it creates that irresistible crunchy top everyone loves. If you want a moister muffin, try substituting part of the milk with Greek yogurt or sour cream, which adds richness and tang. Always check your oven temperature with an oven thermometer — they can be off by a few degrees, and that slight variation can alter baking time. For glazes, I’ve tested both thick drizzles and thin washes — find what feels right for your aesthetic and taste. Lastly, don’t rush the cooling process; cooling on a rack avoids soggy bottoms, and it gives the flavors a moment to settle and deepen. Trust me, a little patience here makes all the difference — these muffins should be tender, moist, and packed with flavor. Every batch gets better with each tweak, so don’t be afraid to experiment a bit and find your perfect combo!
Storing and Reheating Tips
These apple muffins are best enjoyed fresh, but I know life gets busy. To keep them tasting great, store any leftovers in an airtight container at room temperature for up to 2 days — just be sure they’re covered well to prevent them from drying out. If you want them to stay moist longer, pop them into the refrigerator, where they’ll keep for about 4 days; reheat gently in the microwave for about 20 seconds, or in a warm oven wrapped in foil for 10 minutes. For longer storage, wrapping individual muffins tightly in plastic wrap and freezing is a lifesaver — they’ll last up to 3 months. When you’re ready to enjoy, thaw at room temperature or warm slightly in the microwave. If you’ve glazed your muffins, hold off on glazing until just before serving to keep the shine and texture fresh. I’ve found that reheating slowly preserves moisture best, and it’s almost as delicious as when they first came out of the oven. I love having a batch stashed in the freezer for those times I need a quick pick-me-up — just pop one in, and within minutes, your home smells like circles of apple goodness.
Frequently Asked Questions
Final Thoughts
There’s truly nothing quite like biting into a warm, homemade apple muffin — it’s comfort, nostalgia, and a little burst of autumn all in one. This recipe has become a staple in my house because it’s simple, reliable, and insanely delicious. Plus, seeing the joy on my kids’ faces when I serve these fresh from the oven is priceless. Whether it’s for a quick breakfast, a cozy afternoon snack, or a sweet finish to your meal, I promise these muffins won’t disappoint. Feel free to get creative — add nuts, swap out spices, or even fold in some chocolate chips for a fun twist. I’d love to hear what variations you try! Happy baking, my friend. And remember, sometimes the simplest recipes are the ones that become the most loved. Enjoy every bite!
apple muffins
Ingredients
Main Ingredients
- 0.5 cup packed light brown sugar
- 1.5 teaspoons ground cinnamon
- 0.333 cup white sugar
- 0.5 cup butter, softened
- 2 pieces eggs
- 2 teaspoons vanilla extract
- 1.5 cups all-purpose flour
- 1.5 teaspoons baking powder
- 0.5 cup milk
- 1 large apple, peeled and finely chopped
Instructions
Preparation Steps
- Preheat oven to 350 degrees F (175 degrees C).
- Line a muffin tin with paper liners.
- In a small bowl, mix brown sugar and cinnamon, set aside.
- In a large bowl, beat together butter and white sugar until creamy.
- Add eggs one at a time, then stir in vanilla.
- In another bowl, whisk together flour and baking powder.
- Gradually add dry ingredients to wet mixture, alternating with milk.
- Fold in chopped apples.
- Fill each muffin liner about 2/3 full with batter.
- Sprinkle the cinnamon sugar mixture on top of each muffin.
- Bake for 30 minutes or until a toothpick inserted into the center comes out clean.
- Allow muffins to cool in the pan for 10 minutes, then transfer to a wire rack.
Notes
Featured Comments
“This recipe sounds amazing! I can already imagine the cozy kitchen and warm muffins—perfect for fall mornings.”
“Impressed! Clear steps and perfect for busy nights results. Perfect for busy nights.”
“New favorite here — restaurant-level. crowd-pleaser was spot on.”
“Super easy and turned out amazing! My family asked for seconds. Saving this one.”
“This sweet treat was absolutely loved — the fresh really stands out. Thanks!”
“Made it tonight and wow — creamy! Will definitely make Warm Apple Spice Muffins How to Bake Them again.”


