

There are certain flavors that just *sing* of spring, and for me, rhubarb is high on that list. That slightly tart, bright pink goodness always makes me feel like the gloomy days are finally behind us and sunshine is on its way. And when you pair it with the comforting chewiness of oats and a sweet, creamy glaze? Oh, it’s pure magic. My mom used to make something similar when I was a kid, and these Amish oatmeal rhubarb bars are my grown-up, slightly tweaked version. They remind me of those sunny afternoons, the smell of baking wafting through the house, and the pure joy of a treat that’s both wholesome and utterly decadent. If you’ve ever had a really good oatmeal cookie or a classic rhubarb crisp, imagine those two delicious worlds colliding in the most delightful way. These bars are seriously that good. They’re the kind of thing you’ll want to make over and over again, especially when that first rhubarb appears at the farmer’s market. Trust me, these are going to become a new favorite in your kitchen, too.
What are Amish Oatmeal Rhubarb Bars?
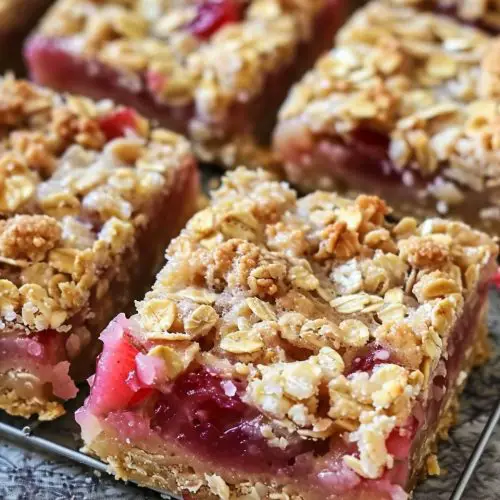
So, what exactly are these delightful little squares we’re talking about? Think of them as a hug in bar form, a perfect marriage of textures and flavors. At their heart, these are an incredibly tender, slightly chewy oatmeal base, almost like a soft-baked oatmeal cookie, but in a convenient bar shape. Then, layered on top is a vibrant, slightly tangy rhubarb filling that cuts through the sweetness beautifully. And to really bring it all together, there’s usually a simple, sweet glaze drizzled over the top, adding just that extra touch of indulgence. The “Amish” part of the name often refers to a traditional, no-fuss approach to baking, focusing on simple, wholesome ingredients that yield incredible results. It’s the kind of baking that feels both rustic and sophisticated, like something passed down through generations. These aren’t complicated, fussy desserts; they’re honest, delicious treats made with love and good ingredients.
How to Make Amish Oatmeal Rhubarb Bars
Quick Overview
Making these bars is a straightforward process that breaks down into a few easy stages: preparing a simple oatmeal crust and topping, cooking down a bright rhubarb filling, and then layering and baking until golden. The beauty of this recipe is its forgiving nature; it’s designed for home bakers who want delicious results without stress. You’ll mix up a quick oat mixture for the base, press most of it into your pan, spread the cooked rhubarb filling over that, and then crumble the rest of the oat mixture on top before baking. A simple glaze finishes it off, but even without the glaze, these are wonderful. It’s the kind of recipe you can confidently make even if you’re not a seasoned baker.
Ingredients
For the Main Batter:
You’ll need 1 ½ cups of all-purpose flour, which provides the structure. Make sure it’s not packed too tightly when you measure it! Then, 1 ½ cups of old-fashioned rolled oats – I prefer the old-fashioned kind over instant or quick oats because they give a better texture; they hold their shape and provide a lovely chew. For sweetness and binding, we use 1 cup of packed brown sugar, and I always opt for dark brown sugar for that extra molasses depth. ½ teaspoon of baking soda is crucial for a little lift and tenderness. And don’t forget ¼ teaspoon of salt to balance all those sweet flavors. For richness, ½ cup (1 stick) of unsalted butter, melted, brings it all together. I always use unsalted so I can control the saltiness precisely.
For the Filling:
The star here is 4 cups of fresh or frozen rhubarb, chopped into ½-inch pieces. If you’re using frozen, don’t thaw it first; just add it straight from the freezer. You’ll also need ¾ cup of granulated sugar to sweeten the tart rhubarb, 2 tablespoons of all-purpose flour to help thicken the juices, and 1 teaspoon of lemon zest for an extra zing that really brightens up the rhubarb flavor. You can absolutely use store-bought rhubarb, but if you can get your hands on fresh, especially from a local farmer’s market, it truly makes a difference.
For the Glaze:
This is optional, but highly recommended! You’ll need 1 cup of powdered sugar (also called confectioners’ sugar) for that smooth, sweet finish. Then, 2 to 3 tablespoons of milk or heavy cream. Milk works just fine, but if you want a richer glaze, cream is lovely. You can also use water if you’re out of dairy, but it won’t be quite as creamy. Lastly, ½ teaspoon of Vanilla Extract adds a wonderful aroma and flavor.
Step-by-Step Instructions
Step 1: Preheat & Prep Pan
The very first thing I do is get my oven preheating to 375°F (190°C). This ensures it’s nice and hot and ready to bake those bars perfectly. Then, I grab a 9×13 inch baking pan. I like to line mine with parchment paper, leaving an overhang on the sides. This makes lifting the bars out so much easier later – it’s a total game-changer for cleanup! Just grease the pan lightly first, then lay the parchment paper in, pressing it into the corners. That little bit of overhang acts like handles, so you can lift the entire baked slab out in one piece before cutting.
Step 2: Mix Dry Ingredients
In a large bowl, I whisk together the 1 ½ cups of all-purpose flour, 1 ½ cups of rolled oats, 1 cup of packed brown sugar, ½ teaspoon of baking soda, and ¼ teaspoon of salt. Whisking them thoroughly ensures that the baking soda and salt are evenly distributed, which means your bars will bake up evenly and taste balanced. You want to make sure there are no clumps of brown sugar or baking soda. It’s a quick step, but super important for the overall texture and flavor.
Step 3: Mix Wet Ingredients
Now, pour the ½ cup of melted unsalted butter into the bowl with your dry ingredients. You don’t need to whisk the wet ingredients separately here; they all get combined right in the bowl with the dry. The melted butter will coat the dry ingredients and start to bring them together into a crumbly mixture.
Step 4: Combine
Using a fork or a spatula, mix everything together until it’s well combined and looks like coarse crumbs. Don’t overmix at this stage; we’re not making a dough, just a cohesive crumble. You want it to hold together when you squeeze it, but still be loose enough to crumble over the filling. About ¾ of this mixture will become your bottom crust, and the remaining ¼ will be your crumble topping. So, scoop out about ¾ of the oat mixture and press it firmly and evenly into the bottom of your prepared 9×13 inch pan. You can use the bottom of a glass or a measuring cup to get it nice and compact. This forms the sturdy base for our delicious bars.
Step 5: Prepare Filling
In a separate medium bowl, gently toss together the 4 cups of chopped rhubarb, ¾ cup of granulated sugar, 2 tablespoons of flour, and 1 teaspoon of lemon zest. If you’re using frozen rhubarb, you might notice it releases a lot of liquid – that’s perfectly fine! Make sure the flour and sugar are evenly distributed to coat the rhubarb pieces. This helps to create that lovely, slightly jammy consistency as it bakes.
Step 6: Layer & Swirl
Now, spoon the prepared rhubarb filling evenly over the pressed oat base in the baking pan. Spread it out so you have a nice, even layer. Then, take that reserved ¼ of the oat mixture and crumble it evenly over the top of the rhubarb filling. You can just drop spoonfuls and let them fall where they may, or gently press it down a little if you like. I usually just let it be a bit rustic; it bakes up beautifully that way. You don’t need to swirl it into the rhubarb unless you want a more integrated look, but I love the distinct layers.
Step 7: Bake
Pop that pan into your preheated 375°F (190°C) oven. Bake for about 35-45 minutes. You’re looking for the edges to be golden brown and the filling to be bubbly. The crumble on top should also be nicely browned. If the edges start to get too dark before the center is done, you can always loosely tent the pan with aluminum foil for the last 10-15 minutes of baking.
Step 8: Cool & Glaze
Once they’re baked to perfection, carefully remove the pan from the oven. This is crucial: let them cool completely in the pan on a wire rack. I know, I know, the smell is intoxicating and you’ll want to dive in immediately, but patience is key here! Letting them cool allows the filling to set up properly and the bars to firm up, making them much easier to cut. Once they are completely cool, you can whip up the glaze. In a small bowl, whisk together the 1 cup of powdered sugar, 2 tablespoons of milk or cream, and ½ teaspoon of vanilla extract. Add more liquid, a tiny bit at a time, if you want a thinner glaze. If it’s too thin, add a bit more powdered sugar. Drizzle this over the cooled bars. Let the glaze set for about 15-20 minutes before slicing.
Step 9: Slice & Serve
Once the glaze is set, use the parchment paper overhang to lift the entire slab out of the pan onto a cutting board. Then, use a sharp knife to cut them into bars. I usually cut mine into about 12-16 bars, depending on how big I want them. Serve them at room temperature for the best flavor and texture. They are absolutely wonderful on their own, but a little dollop of whipped cream or a scoop of vanilla Ice Cream takes them to a whole new level, especially if you’re serving them as a dessert!
What to Serve It With
These Amish oatmeal rhubarb bars are wonderfully versatile, fitting in perfectly no matter the meal or occasion. For a delightful breakfast, they’re fantastic alongside a hot cup of coffee or a glass of cold milk. They offer a touch of sweetness to start the day without being overly rich. I love them cut into smaller squares for a more casual morning treat. When it comes to brunch, they really shine. Imagine them arranged on a platter alongside fresh fruit salad, mini quiches, and perhaps some scrambled eggs. A light dusting of powdered sugar can make them look extra special. For a truly decadent dessert, serving them warm, perhaps with a scoop of vanilla bean Ice Cream or a drizzle of extra cream, is absolute heaven. They’re also lovely after dinner with a cup of tea. And for those simply craving a comforting, cozy snack, these bars are ideal. I often cut them into squares and have one with my afternoon tea or coffee, or even a late-night treat when I need something sweet. My family loves them, and they’ve become a staple for potlucks and gatherings because they travel so well and always disappear fast!
Top Tips for Perfecting Your Amish Oatmeal Rhubarb Bars
Over the years, I’ve learned a few little tricks that really help make these bars absolutely perfect every single time. First, when it comes to the rhubarb, if you notice your fresh rhubarb is particularly thick or woody, you might want to peel the very outer layer. It’s not always necessary, but it can ensure a more tender filling. For the oats, sticking with old-fashioned rolled oats is key. Instant oats tend to get mushy, and while they’d still be edible, you won’t get that lovely chewy texture. When you’re mixing the oat base, don’t be tempted to overmix once the butter is added. You want it to stay crumbly. If you mix it too much, it can become tough. Pressing the bottom layer firmly is also important; it creates a solid base that won’t fall apart when you cut the bars. For the rhubarb filling, if you’re using frozen rhubarb, you might need to bake the bars a few minutes longer, as frozen fruit releases more moisture. Regarding the crumble topping, I like to just sprinkle it on top. However, if you prefer a more cohesive topping, you can lightly press it down after crumbling. If your oven tends to run hot, keep an eye on the bars and consider loosely tenting them with foil if the top starts to brown too quickly. Baking them until the edges are set and bubbly in the center is your best indicator of doneness. For the glaze, consistency is everything! If it’s too thick, add milk or cream a teaspoon at a time until you reach your desired drizzling consistency. If it’s too thin, add more powdered sugar. And remember, letting the bars cool completely before glazing and cutting is non-negotiable if you want clean slices!
Storing and Reheating Tips
One of the best things about these Amish oatmeal rhubarb bars is how well they keep. For room temperature storage, if they aren’t devoured in the first day (which is unlikely in my house!), you can keep them in an airtight container for up to 2 days. Just make sure they’ve cooled completely before sealing them up. If you’re making them ahead or have leftovers that need to last longer, refrigerator storage is your best bet. Pop them into an airtight container, and they’ll stay delicious for about 4-5 days. The texture might firm up a little in the fridge, but they’re still wonderful. If you plan on freezer storage, these bars freeze beautifully! Let them cool completely, then wrap individual bars or the whole slab tightly in plastic wrap, followed by a layer of aluminum foil or a freezer-safe bag. They can stay frozen for up to 2-3 months. To thaw, simply bring them to room temperature. For the glaze, I usually add it *after* the bars have cooled and are ready to be stored at room temperature or in the fridge. If you’re freezing them with the glaze on, ensure the glaze has set completely before wrapping and freezing. If you’re reheating them, a few seconds in the microwave can warm them up nicely, especially if serving with ice cream. Just be careful not to overheat them, as the oats can get a bit chewy if overdone.
Frequently Asked Questions
Final Thoughts
I truly hope you give these Amish oatmeal rhubarb bars a try. They’re more than just a dessert; they’re a little slice of comfort, a reminder of simpler times, and a burst of springtime sunshine in every bite. The way the crumbly, chewy oat base meets that vibrant, tangy rhubarb filling is just pure bliss. They are so wonderfully adaptable – perfect for a special occasion, a casual gathering, or just a quiet moment of indulgence with a cup of coffee. They’re proof that the most delicious treats often come from the simplest ingredients and a little bit of love. If you enjoy this recipe, you might also love my Apple Crumble Pie or my Classic Lemon Bars for more fruity delights. I can’t wait to hear what you think! Let me know in the comments below how yours turn out, or if you’ve discovered any other fantastic ways to enjoy them. Happy baking, and may your kitchen always be filled with wonderful aromas!
Amish Oatmeal Rhubarb Bars
Ingredients
Oatmeal Crust and Topping
- 1.5 cups all-purpose flour
- 1 cup rolled oats
- 1 cup granulated sugar
- 0.5 teaspoon salt
- 0.75 cup unsalted butter melted
Rhubarb Filling
- 4 cups fresh rhubarb chopped
- 1 cup granulated sugar
- 3 tablespoons all-purpose flour
- 0.5 teaspoon ground cinnamon
Instructions
Preparation Steps
- Preheat oven to 375°F (190°C). Grease and flour a 9x13 inch baking pan.
- In a large bowl, combine the flour, rolled oats, 1 cup granulated sugar, and salt for the crust. Pour in the melted butter and stir until well combined and crumbly.1.5 cups all-purpose flour
- Press about two-thirds of the oatmeal mixture evenly into the bottom of the prepared baking pan to form the crust.
- In a separate bowl, gently toss the chopped rhubarb with 1 cup granulated sugar, 3 tablespoons flour, and cinnamon until evenly coated.1.5 cups all-purpose flour
- Spread the rhubarb filling evenly over the oatmeal crust.
- Sprinkle the remaining oatmeal mixture evenly over the rhubarb filling.
- Bake for 30-40 minutes, or until the topping is golden brown and the rhubarb filling is bubbly.
- Let cool completely before cutting into bars.
Notes
Featured Comments
“So delicious! Rhubarb always reminds me of spring baking—this sounds like a perfect treat.”
“Impressed! Clear steps and quick weeknight win results. Perfect for busy nights.”
“New favorite here — comforting. crowd-pleaser was spot on.”
“Super easy and turned out amazing! My family asked for seconds. Saving this one.”
“This sweet treat was absolutely loved — the buttery really stands out. Thanks!”
“Made it tonight and wow — perfect for busy nights! Will definitely make Amish oatmeal rhubarb bars again.”


So delicious! Rhubarb always reminds me of spring baking—this sounds like a perfect treat.