

I can still smell the glaze in the air as I write this. There’s something magical about Asian chicken drumsticks—the way the outside crisps to a lacquered amber, while the inside stays juicy and just a touch savory-sweet. I learned this trick years ago from a friend who fed a crowd with a single sheet pan and a handful of pantry staples. It’s honest-to-goodness comfort food, and it doesn’t require fancy equipment or hours in the kitchen. This is the kind of recipe you pull out for busy weeknights, for weekend gatherings, or when you’re craving something that feels celebratory but won’t steal your entire evening. If you love a glossy glaze, a gentle kick of heat, and skin that crackles when you bite in, you’ll want to keep this on repeat. And yes, I’ll admit it: this dish has become my kids’ favorite for casual Friday dinners—the way their eyes light up when the tray comes out is the real win. Asian chicken drumsticks, I’ve found, bring everyone to the table with a smile.
What is Asian chicken drumsticks?
Think of Asian chicken drumsticks as a friendly, approachable version of a glossy, restaurant-inspired crowd-pleaser. It’s essentially chicken drumsticks bathed in a two-part rhythm: a crispy, lightly seasoned coating that cling-wraps to the meat, and a sweet-tish, tangy glaze that caramelizes in the heat. The name hints at a variety of regional influences—the glaze may lean toward honey-sesame notes one week, toward soy-ginger warmth the next—but the core idea stays the same: big flavor, simple technique, and a finish that begs for seconds. I love that this dish is forgiving and flexible. If you don’t have baking powder, you can still achieve a nice crust with extra cornstarch; if you’re avoiding honey, maple works beautifully too. It’s essentially a weeknight-friendly brag, minus the stress.
How do I make Asian chicken drumsticks?
Quick Overview
In a nutshell, you’re getting a crisp, lightly seasoned coating on the drumsticks, a fragrant under-skin filling for extra flavor, and a lacquered glaze that caramelizes beautifully. The trick is to start with a hot oven so the crust sets quickly, then finish with a glossy glaze that sticks to every crevice. I love the contrast between the crackle of the crust and the juicy bite beneath—that balance is what makes this dish feel like a celebration, even on a Tuesday. The method is forgiving: you can adjust the glaze’s sweetness, tweak the heat, or keep it ultra-simplified with a soy-honey combination. You’ll see how easy it is to make a big impression with just a handful of pantry staples and a little patience for the glaze to cling.
Ingredients
For the Main Batter:
– 1 cup cornstarch (for extra-crisp coating; you can mix with 1/4 cup all-purpose flour for a touch more structure)
– 1/2 teaspoon baking powder
– 1 teaspoon kosher salt
– 1/2 teaspoon white pepper or Black Pepper
– 1/2 teaspoon garlic powder
– 2 tablespoons neutral oil (optional, helps the coating cling)
– 1/4 cup cold water (adjust as needed to make a light batter)
For the Filling:
– 4-6 garlic cloves, minced
– 1 tablespoon grated fresh ginger
– 2 green onions, finely chopped (white and light green parts)
– 1 teaspoon soy sauce
– 1 teaspoon sesame oil
– A pinch of salt, to taste
– Optional: 1 teaspoon miso paste for extra depth (dissolve in the soy)
For the Glaze:
– 1/4 cup honey or maple syrup (adjust for sweetness)
– 2 tablespoons soy sauce
– 1 tablespoon rice vinegar or Apple Cider vinegar
– 1 teaspoon sriracha or chili paste (adjust to heat preference)
– 1 teaspoon toasted sesame oil
– 1 teaspoon cornstarch whisked with 2 teaspoons water (slurry for thickening, optional)
Step-by-Step Instructions
Step 1: Preheat & Prep Pan
Heat your oven to 425°F (220°C). Line a sheet pan with parchment for easy cleanup and place a wire rack on top if you have one. The rack helps air circulate around the drumsticks so they crisp evenly. If you don’t have a rack, don’t sweat it—just give the pan a good spray and prop the drumsticks on a couple of crumpled pieces of foil so they aren’t sitting in their own juices.
Step 2: Mix Dry Ingredients
In a shallow dish, whisk together the cornstarch, flour (if using), baking powder, salt, and pepper. This dry mix is your crust, so a few little lumps won’t hurt, but try to keep it mostly smooth so you don’t get clumps on the chicken. I like to double-check for any stray flour pockets by sifting quickly over the bowl.
Step 3: Mix Wet Ingredients
In another bowl, whisk the water, a splash of soy sauce, a drizzle of sesame oil, and a pinch of sugar if you like a touch of sweetness. The batter should be light and a little runny—not thick like pancake batter. You want just enough moisture to help the dry mix cling to the skin.
Step 4: Combine
Pat the drumsticks dry with paper towels. Dip each piece into the wet mixture, letting the excess drip off, then dredge in the dry mixture until the surface is evenly coated. For extra crunch, you can repeat the dip-dry cycle once more and lay the drumsticks on the rack to rest while you finish the rest.
Step 5: Prepare Filling
Now for the flavor under the skin—this is the little secret that makes a difference. Gently loosen the skin at the drumstick bone end with a fingertip, being careful not to tear it. In a small bowl, combine the minced garlic, grated ginger, chopped green onions, soy sauce, sesame oil, and a pinch of salt. Gently smear the filling under the loosened skin, distributing a little into each drumstick. Don’t worry if some of it sticks to your fingers—this is where the aroma does most of the work.
Step 6: Layer & Swirl
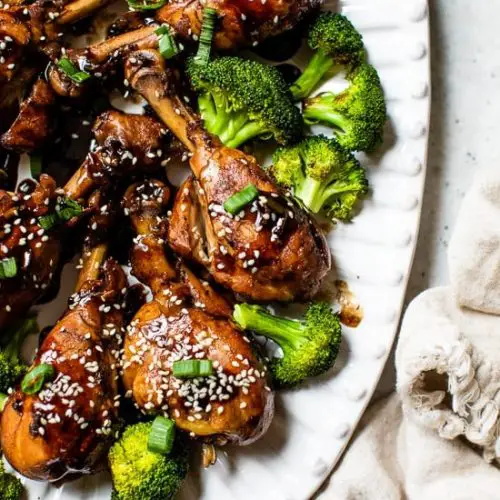
Arrange the coated drumsticks on the rack. Brush a light coat of the glaze over them to encourage the crust to set and to add a hint of sweetness from the start. As they bake, rotate the pan halfway through so every side gets a little caramelized kiss. If you like extra gloss, you can brush on a second layer of glaze about 15 minutes before they finish, then give them a final 5 minutes to set and bubble.
Step 7: Bake
Slide the pan into the hot oven and bake for 25–30 minutes, flipping once at the halfway point. You’re aiming for the crust to be deeply golden and crisp at the edges, with the juices running clear when you cut into the thickest part. If your oven runs a bit hot or cooler, keep an eye on the color; you want a bronzy, not burnt, glaze. If you have a convection setting, use it for an extra-crispy finish, but reduce the time by a few minutes and watch closely.
Step 8: Cool & Glaze
Remove from the oven and let the drumsticks rest on the rack for 5 minutes. Then brush with a final glaze—this is the moment you want that lacquered shine. If you want a thicker glaze, simmer the glaze ingredients with the slurry for a minute or two until it coats the back of a spoon and clings to the chicken.
Step 9: Slice & Serve
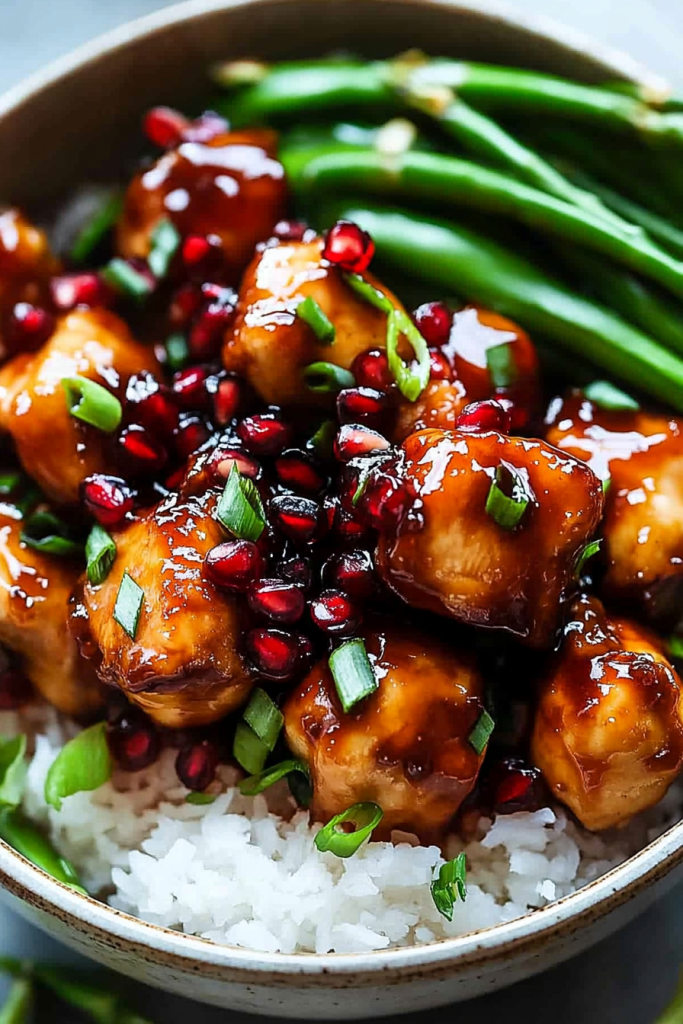
Give the drumsticks a light rest before serving. You’ll hear that satisfying crack as you bite through the crust. Plate them with a little extra drizzle of glaze on top, a scatter of sesame seeds, and sliced scallions for color. Serve hot, with a warm side like fluffy jasmine rice or a quick cucumber-sesame salad. The first bite should deliver a little snap, then a juicy center, and a finish that lingers with a gentle sweetness and a whisper of garlic.
What to Serve It With
These drumsticks are flexible enough to steal the show on many occasions. Here are my favorite pairing ideas, organized by mood:
For Breakfast: A light, savory start with a small rice bowl, a soft-boiled egg, and a pickled cucumber medley. A cup of robust coffee or warm jasmine tea keeps the morning vibe cozy.
For Brunch: Serve with a bright carrot-ginger slaw, a handful of fresh herbs, and a citrusy yuzu spritz. The glaze can be adjusted to be a touch sweeter for a brunch crowd.
As Dinner: Pair with steamed bok choy or sautéed baby bok choy, fluffy jasmine rice or garlic fried rice, and a simple miso soup on the side. A sprinkle of sesame seeds and chopped scallions on top makes it feel complete.
For Cozy Snacks: Cut the drumsticks into shorter pieces, arrange on a platter with dipping sauces (sweet chili, soy-dried onion, or a zippy garlic mayo), and let everyone grab and go. It’s a little celebration to brighten a quiet evening.
In our family, these are the moments that become memories—the kitchen smells, the clinking of plates, the way the kids race to the table with napkins in their pockets. This dish travels well to potlucks, too, since the glaze stays glossy and the crust holds up even after a little time on the serving tray. If you’re cooking for a crowd, you can multiply ingredients and bake on two racks, rotating halfway for even crisping. The scents alone will have people asking for your “secret.” Spoiler: the secret is simply giving this dish the attention it deserves, and letting the glaze do the talking.
Top Tips for Perfecting Your Asian chicken drumsticks
Here are a few tricks I’ve learned along the way.
Coating & Crispness: The key to a crackly crust is a dry finish on the skin before it hits the hot oven. If you can, pat the drumsticks dry, then give them a light dusting of cornstarch in addition to the batter. The cornstarch dries out the surface just enough to crisp without making the coating feel gritty.
Marinade & Filling Timing: Let the filling sit under the skin for at least 15 minutes if you can, longer if you’ve got time. The aromatics will permeate the meat beautifully, and you’ll get a more pronounced garlic-ginger scent in every bite.
Glaze Consistency: If your glaze is too thin, it won’t cling; if it’s too thick, it won’t spread. A quick slurry (cornstarch + water) helps you reach a glossy, lacquer-like finish. Heat it gently as you brush on the final layer so it sets quickly on the hot surface.
Swirl & Pattern: For a more playful look, you can reserve a portion of the glaze and drizzle it in a quick zigzag or circular pattern after the first coating sets. The marbling adds visual appeal and a moment of delight when slicing into the meat.
Ingredient Swaps: Soy sauce can be swapped with tamari for a gluten-free version, and honey can be replaced with maple for a different sweetness profile. If you’re avoiding gluten, ensure your soy sauce is certified gluten-free. You’ll keep the balance with a splash of rice vinegar and a touch of sugar or honey.
Baking Tips: If you’re using a convection oven, reduce the temperature by 25°F and start checking earlier. Oven racks matter, too—position the pan in the middle for even heat distribution. If you’re air-frying, cook at 400–415°F for about 18–22 minutes, turning halfway through, until crisp and the internal temperature hits 165°F (74°C).
Glaze Variations: Experiment with a smoky note by adding a drop of liquid smoke or a pinch of chili-garlic paste. A citrus twist (orange or lime zest stirred into the glaze) adds brightness that balances the savory-sweet glaze beautifully.
This is the kind of recipe that rewards a little improvisation. I’ve made it with miso for deeper savoriness, with chili crisp for extra texture, and with a handful of sesame seeds for crunch. Each tweak tells a story, and the result is always a little different, but always comforting. Lesson learned: trust the glaze, listen to the oven, and let the kitchen do the cooking for you while you relax at the counter with a mug of something warm.
Storing and Reheating Tips
Leftovers are rare here, but when they happen, I’ve found a few tricks that keep the flavor intact.
Room Temperature: If you’re taking a picnic or leaving a dish out for a party, it’s best to keep the drumsticks from sitting out more than 2 hours. They’re safe to reheat, but the glaze may weep a little if left out too long.
Refrigerator Storage: Store in an airtight container for up to 3 days. Reheat gently in the oven or a skillet to keep the crust crisp. I sometimes add a quick splash of water to the glaze to loosen it a touch, then re-brush before serving.
Freezer Instructions: You can freeze fully cooked drumsticks for up to 2 months. Thaw overnight in the fridge, reheat in a 350°F (175°C) oven for 10–15 minutes to warm through, then give them a quick glaze kiss under the broiler for 1–2 minutes to re-crisp the surface.
Glaze Timing Advice: If you’re reheating from chilled, brush on glaze during the last 5–7 minutes of reheating so the surface stays glossy and doesn’t become sticky with too much moisture.
With these tips, you’ll keep the texture and flavor vibrant, even after storage. The goal is to preserve the initial crispness and the balance of sweet, salty, and a touch of acid that makes this dish sing on day two and day three.
Frequently Asked Questions
Final Thoughts
If you’re hunting for a dish that feels both cozy and a little special, this is it. The crisp crust, the aromatic under-skin filling, and the glossy glaze all come together in a way that’s irresistible without being fussy. It’s a dish I’ve made countless times, and every plate still brings a smile. It pairs beautifully with simple sides and holds up for leftovers that taste just as good the next day. So try it this weekend, share it with friends, and tell me how you adjusted the glaze to fit your family’s tastes. I’d love to hear your twists and tips in the comments below. Happy baking, friends!
Asian chicken drumsticks
Ingredients
Main Ingredients
- 8 medium chicken drumsticks skin removed
- 0.75 cup water
- 1 tbsp sriracha
- 0.33 cup balsamic vinegar
- 0.33 cup low sodium soy sauce
- 1 tbsp honey or sugar
- 3 cloves garlic crushed
- 1 tsp ginger grated
- 2 tbsp chives chopped, or scallions
- 1 tsp sesame seeds
Instructions
Preparation Steps
- In a heavy large saucepan, brown chicken on high for 3-4 minutes with a little spray oil.
- Add water, balsamic, soy sauce, honey, garlic, ginger, hot sauce and cook on high until liquid comes to a boil.
- Reduce heat to low and simmer, covered for about 20 minutes.
- Remove cover and bring heat to high, allowing sauce to reduce down, about 8-10 minutes, until it becomes thick, turning chicken occasionally. (Keep an eye on glaze, you don't want it to burn when it starts becoming thick).
- Transfer chicken to a platter and pour sauce on top.
- Top with chives and sesame seeds and serve.
Notes
Featured Comments
“Impressed! Clear steps and super easy results. Perfect for busy nights.”
“New favorite here — creamy. crowd-pleaser was spot on.”
“Super easy and turned out amazing! My family asked for seconds. Saving this one.”
“This sweet treat was absolutely loved — the fresh really stands out. Thanks!”
“Made it tonight and wow — family favorite! Will definitely make Asian chicken drumsticks again.”
“Packed with flavor and so simple. Exactly what I wanted from Asian chicken drumsticks.”


