

You know those mornings? The ones where the sun is barely peeking over the horizon, you’ve hit snooze more times than you care to admit, and the thought of making anything more complicated than pouring cereal feels like an Olympic sport? Yeah, I’ve been there. More times than I’d like to count, if I’m being honest! But then there are those other mornings, the crisp autumn ones, where you crave something warm, comforting, and just a little bit special. That’s where this baked pumpkin oatmeal enters the chat, and let me tell you, it’s a game-changer. It’s like a hug in a pan, folks, and it’s ridiculously easy to whip up. Forget those soggy, sad bowls of instant oats; this is a whole different league. It’s got that cozy, spiced flavor we all crave this time of year, but it’s so much more substantial and satisfying. If you’ve ever loved a pumpkin bread or a pumpkin pie, this baked pumpkin oatmeal is going to be your new best friend for breakfast, brunch, and honestly, even a sneaky dessert.
What is baked pumpkin oatmeal?
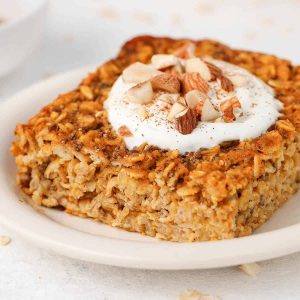
So, what exactly *is* this magical thing called baked pumpkin oatmeal? Think of it as your favorite morning oatmeal, but elevated. Instead of stirring it on the stovetop until it’s just right, we’re baking it all together in one dish. This gives it this incredible, tender texture that’s richer and more decadent than regular oatmeal. It’s essentially a warm, custardy, pumpkin-spiced oat bake. The name itself is pretty descriptive, right? We’re taking classic oatmeal, infusing it with the warm, earthy flavors of pumpkin puree and all those cozy spices we love (cinnamon, nutmeg, ginger, cloves – the whole gang!), and then baking it until it’s perfectly set. It’s a bit like a Breakfast Casserole, a bit like a baked pudding, and all delicious. It’s the kind of dish that makes your whole house smell like autumn, and who doesn’t love that?
How do I make baked pumpkin oatmeal?
Quick Overview
This baked pumpkin oatmeal is all about bringing together simple, wholesome ingredients into one glorious dish. We’ll whisk together the dry ingredients, then the wet ingredients, combine them gently, swirl in some extra pumpkin goodness, and bake until golden and fragrant. It’s honestly that straightforward. The baking process allows the flavors to meld beautifully and creates a delightful, hearty texture that’s far superior to stovetop oatmeal. It’s practically foolproof, even if you’re new to baking.
Ingredients
For the Main Batter:
2 cups rolled oats (old-fashioned oats work best here for texture; quick oats can make it a bit mushy, so I’d stick with rolled if you can!)
1 teaspoon baking powder (this helps give it a nice lift)
1 teaspoon ground cinnamon
1/2 teaspoon ground nutmeg
1/4 teaspoon ground ginger
Pinch of ground cloves (optional, but it adds such warmth!)
1/2 teaspoon salt
2 cups milk (I’ve tested this with whole milk for richness, but almond milk or oat milk work wonderfully too and make it even creamier!)
1/2 cup pumpkin puree (make sure it’s pure pumpkin, not pumpkin pie filling – that has added sugar and spices you don’t need here)
2 large eggs
1/4 cup maple syrup (or honey, adjust to your sweetness preference!)
2 tablespoons melted butter or coconut oil
For the Filling:
1/2 cup pumpkin puree
1 tablespoon maple syrup
1/2 teaspoon cinnamon
For the Glaze:
1 cup powdered sugar
2-3 tablespoons milk (or water, for a thinner glaze)
1/4 teaspoon Vanilla Extract
Step-by-Step Instructions
Step 1: Preheat & Prep Pan
First things first, let’s get our oven fired up to 375 degrees Fahrenheit (190 degrees Celsius). While it’s heating, grab an 8×8 inch baking dish. I like to give it a good spray with non-stick cooking spray, or you can grease it well with butter. This just ensures everything releases beautifully once it’s done. You could also line it with parchment paper for extra insurance, especially if you want to lift it out in one piece like a cake!
Step 2: Mix Dry Ingredients
In a large bowl, combine your rolled oats, baking powder, cinnamon, nutmeg, ginger, cloves (if using), and salt. Give it all a good whisk to make sure everything is evenly distributed. This step might seem small, but it ensures you don’t get little pockets of baking powder or spice in your finished bake.
Step 3: Mix Wet Ingredients
In a separate medium bowl, whisk together the milk, 1/2 cup of pumpkin puree, eggs, maple syrup, and melted butter (or coconut oil). Whisk until everything is smooth and well combined. You want a nice, homogenous mixture here.
Step 4: Combine
Now, pour the wet ingredients into the bowl with the dry ingredients. Stir gently until just combined. Don’t overmix here! We just want to make sure there are no dry spots of oats remaining. Overmixing can develop the gluten in the oats too much, leading to a tougher texture, and nobody wants that.
Step 5: Prepare Filling
In a small bowl, stir together the remaining 1/2 cup of pumpkin puree with the tablespoon of maple syrup and the 1/2 teaspoon of cinnamon. This is going to give us those lovely swirls of extra pumpkin flavor and color. It should be a thick, spoonable consistency.
Step 6: Layer & Swirl
Pour about half of the oat mixture into your prepared baking dish and spread it out evenly. Then, dollop spoonfuls of the filling mixture over the top. Don’t worry about making it perfect. Now, pour the remaining oat mixture over the filling. You can gently swirl it with a knife or a skewer to create those beautiful marbled patterns. I like to just poke it around a bit – it makes for a more rustic, homemade look.
Step 7: Bake
Pop that dish into your preheated oven and bake for 30-40 minutes. You’ll know it’s done when the edges are set and slightly golden brown, and the center is mostly firm with maybe a slight wobble. A toothpick inserted into the center should come out mostly clean, though it might be a little moist from the pumpkin. Ovens can vary, so keep an eye on it towards the end of the baking time.
Step 8: Cool & Glaze
Once it’s baked, take it out of the oven and let it cool on a wire rack for at least 10-15 minutes. This is important for it to set up properly. While it’s cooling, whisk together your powdered sugar, 2 tablespoons of milk, and vanilla extract in a small bowl. Add more milk, a teaspoon at a time, until you reach your desired drizzling consistency. You want it thick enough to coat, but thin enough to pour. Once the oatmeal is slightly cooled, drizzle that glorious glaze over the top. It’s optional, but it really takes it to the next level!
Step 9: Slice & Serve
Once the glaze has set a bit, it’s time to slice and serve! I love cutting it into squares, just like a breakfast cake. It’s wonderful served warm, but it’s also delicious at room temperature. You can serve it as is, or with a dollop of yogurt, some fresh fruit, or a little extra drizzle of maple syrup. Enjoy that cozy, comforting goodness!
What to Serve It With
This baked pumpkin oatmeal is so versatile, you can dress it up or down depending on the occasion. It’s a real crowd-pleaser, and I love finding new ways to enjoy it.
For Breakfast: On a typical morning, I’ll just grab a square (or two!) and eat it as is, maybe with a steaming mug of coffee or a glass of cold milk. It’s hearty enough to keep you full until lunch, and the flavors are just so comforting to start the day. Sometimes I’ll add a handful of fresh berries on the side for a pop of freshness.
For Brunch: If I’m hosting brunch, I’ll make sure this is on the menu! I love serving it warm, perhaps with a dollop of Whipped Cream or a Greek yogurt alongside. For drinks, it pairs beautifully with a mimosa or a festive spiced cider. You can also serve it with a side of crispy bacon or sausage for a more complete meal.
As Dessert: Don’t be afraid to have this as a dessert! Especially with that sweet glaze, it feels incredibly decadent. I’ll often serve a warm slice with a scoop of vanilla bean ice cream. The contrast of the warm oatmeal and cold ice cream is just heavenly. A sprinkle of toasted pecans or walnuts on top adds a lovely crunch.
For Cozy Snacks: This is also my go-to when I’m craving something sweet in the afternoon or evening but don’t want to bake a whole cake. A small square, maybe warmed up slightly, with a cup of tea is pure bliss. It feels indulgent without being overly heavy. My kids often ask for this as a special after-school treat too!
Top Tips for Perfecting Your Baked Pumpkin Oatmeal
I’ve made this baked pumpkin oatmeal more times than I can count, and through those countless batches, I’ve picked up a few tricks that I think make all the difference. You know, the kind of things you only learn through experience!
Zucchini Prep: While this recipe doesn’t technically use zucchini, if you’re ever thinking about adding it to a similar bake, my biggest tip is always to squeeze out as much moisture as possible! For this oatmeal, it’s all about the pumpkin. Make sure you’re using *pure* pumpkin puree. Canned pumpkin is great, but if you have fresh pumpkin on hand, roast it until tender, then puree it until smooth. Ensure it’s not watery! The less excess moisture, the better your baked oatmeal will set up.
Mixing Advice: This is a big one. Remember what I said about not overmixing? It’s crucial for that tender, slightly chewy texture. Gently stir the wet and dry ingredients until just combined. If you see a few streaks of flour or oats, that’s perfectly fine! Overmixing can make it tough and gummy, which is the opposite of what we want for this comforting dish.
Swirl Customization: Don’t stress about getting the swirl perfect. The beauty of this recipe is its rustic charm. I usually just dollop the filling mixture on top of the first layer of oats and then pour the second half of the oat mixture over that. Then, I take a knife or a skewer and gently swirl it through. You don’t need to be an artist! Even a few gentle turns will give you lovely pockets of flavor and a pretty, marbled appearance.
Ingredient Swaps: I’ve played around with the milk quite a bit. Whole milk gives a richer, creamier result, but I’ve also made it with almond milk and oat milk, and it’s still fantastic. The texture is slightly different, maybe a touch lighter, but the flavor is just as lovely. For sweetness, maple syrup is my favorite, but honey works well too. You can also reduce the maple syrup slightly if you prefer it less sweet, especially if you plan on using the glaze.
Baking Tips: My oven tends to run a little hot, so I always keep an eye on it. If yours tends to bake quickly, you might want to check it around the 30-minute mark. If it seems to be browning too fast on top but is still jiggly in the middle, you can loosely tent it with foil. The toothpick test is your best friend here – a few moist crumbs are fine, but you don’t want a completely wet batter coming out.
Glaze Variations: The glaze is lovely, but totally optional! If you want something lighter, you can simply dust the cooled baked oatmeal with a little powdered sugar. Or, for a more caramel-like flavor, a drizzle of maple syrup or a thinned caramel sauce would be divine. For a tangier twist, you could even mix a little cream cheese into the powdered sugar and milk mixture.
Storing and Reheating Tips
One of the things I love most about this baked pumpkin oatmeal is how well it stores. It makes fantastic leftovers, which is always a win in my book!
Room Temperature: If you’ve got leftovers and plan on eating them within a day or two, you can definitely store it on the counter, covered loosely with foil or plastic wrap. It stays delicious for about a day, but for optimal freshness and safety, I usually move it to the fridge after that.
Refrigerator Storage: Once cooled, I like to store any leftovers in an airtight container in the refrigerator. It will keep well for up to 3-4 days. The texture might change slightly as it cools, becoming a bit firmer, but it reheats beautifully. I usually cut it into portions before storing, so it’s easy to grab what I need.
Freezer Instructions: Yes, you can absolutely freeze this! Once it’s completely cooled, you can wrap the entire pan tightly in plastic wrap and then aluminum foil, or cut individual portions and wrap them well. It should last in the freezer for up to 2-3 months. To thaw, I usually transfer a portion to the refrigerator overnight and then reheat. For a quick thaw, you can reheat directly from frozen, but it will take a little longer.
Glaze Timing Advice: If you’re storing leftovers, I highly recommend adding the glaze *just before* serving. If you glaze it and then store it, the glaze can become a bit sticky or even dissolve, especially if you plan on reheating. So, it’s best to store the baked oatmeal plain and add the glaze fresh when you’re ready to enjoy it again.
Frequently Asked Questions
Final Thoughts
Honestly, if you’re looking for a way to bring a little more warmth and coziness into your mornings, or just want a truly delightful breakfast treat that’s surprisingly simple to make, you’ve got to give this baked pumpkin oatmeal a try. It’s the perfect combination of comforting flavors, a wonderfully tender texture, and the kind of aroma that just makes your kitchen feel like home. It’s proof that simple ingredients, when treated with a little love, can create something truly special. It’s become a staple in my kitchen, especially during the fall and winter months, and my family asks for it all the time. If you love pumpkin and cinnamon as much as I do, I promise you won’t be disappointed. Give it a whirl, and let me know what you think! I’d love to hear how yours turns out, or if you have any fun variations you try. Happy baking!
Baked Pumpkin Oatmeal
Ingredients
Main Ingredients
- 2 cups rolled oats
- 1 teaspoon baking powder
- 0.5 teaspoon salt
- 1 teaspoon cinnamon
- 0.25 teaspoon nutmeg
- 0.25 teaspoon ginger
- 1 cup pumpkin puree
- 1.5 cups milk or non-dairy alternative
- 0.5 cup maple syrup
- 2 large eggs beaten
- 0.25 cup melted butter or coconut oil
- 1 teaspoon vanilla extract
Instructions
Preparation Steps
- Preheat your oven to 375°F (190°C). Lightly grease an 8x8 inch baking dish.
- In a large bowl, whisk together the rolled oats, baking powder, salt, cinnamon, nutmeg, and ginger.2 cups rolled oats
- In a separate medium bowl, whisk together the pumpkin puree, milk, maple syrup, beaten eggs, melted butter, and vanilla extract until well combined.2 cups rolled oats
- Pour the wet ingredients into the dry ingredients and stir until just combined. Do not overmix.
- Pour the batter into the prepared baking dish and spread evenly.
- Bake for 30-35 minutes, or until the center is set and the top is lightly golden brown.
- Let cool for a few minutes before serving. Serve warm with your favorite toppings like extra maple syrup, whipped cream, or chopped nuts.
Notes
Featured Comments
“Impressed! Clear steps and restaurant-level results. Perfect for busy nights.”
“New favorite here — creamy. crowd-pleaser was spot on.”
“Super easy and turned out amazing! My family asked for seconds. Saving this one.”
“This sweet treat was absolutely loved — the buttery really stands out. Thanks!”
“Made it tonight and wow — creamy! Will definitely make baked pumpkin oatmeal again.”
“Packed with flavor and so simple. Exactly what I wanted from baked pumpkin oatmeal.”


