

I’ve always believed that a great dessert is like a warm hug you can hold in your hands. This Biscoff cheesecake is that hug—creamy, a little caramel-spiced, and somehow comforting enough to make any weeknight feel special. I remember the first time I tasted a slice with coffee on a rainy Sunday; the cookies crumbled in the crust like soft, cinnamon-scented snow, and the creamy filling whispered of vanilla and maple notes. If you’ve ever traded a heavy chocolate cake for something a touch lighter in texture, you’ll know the feeling. This Biscoff Cheesecake is a little nostalgic and a lot delicious, and it’s surprisingly simple to pull together. It’s sort of the grown-up version of a cookie-dough dream, but with cheesecake silkened into every bite. This is my go-to when I want something inviting to share with friends after dinner, and yes—my kids actually ask for seconds. I always keep a few extra Biscoff cookies on hand for moments like these.

What is Biscoff cheesecake?
Think of Biscoff Cheesecake as the best of both worlds: the crisp, caramel-spiced snap of Biscoff cookies making up the crust, and a luxuriously creamy cheesecake filling that tastes like a vanilla cloud with a sultry cinnamon-kissed finish. It’s essentially a classic cheesecake where the crust and a generous swirl of Lotus Biscoff spread give you that unmistakable cookie-butter magic. The name comes from the beloved caramelized-spice cookies that bring all the warm, cozy notes you crave in autumn and winter, but this cake shines all year round. It’s friendly enough for a weeknight, yet elegant enough to serve when guests pop by. And yes, the name is a mouthful, but the flavor is simple and memorable: something familiar, something dreamy, all in one smooth slice.

How do you make Biscoff cheesecake?
Quick Overview
This is bakery-grade comfort with a home-kitchen vibe. I start by pressing a cookie crust from crushed Biscoff cookies and butter, then whip up a smooth cream-cheese filling with a whisper of vanilla and a touch of sour cream for tang. A swirl of extra Biscoff spread runs through the center so you get that pretty marbling plus an intensified cookie-spice note. Bake at a gentle temperature in a water bath for even cooking, then cool completely before glazing or serving. The result is a glossy, pale slice with a delicate crack on top that you can cover with Whipped Cream or a simple drizzle—your call. It’s forgiving enough for a busy week but refined enough to feel like a special treat. And yes, it refrigerates beautifully, which makes it perfect for entertaining or making ahead.
Ingredients
For the Crust (Main Batter):
- 1 1/2 cups (150 g) finely crushed Lotus Biscoff cookies
- 4 tablespoons (56 g) unsalted butter, melted
- Pinch of salt
For the Filling:
- 24 oz (680 g) cream cheese, softened
- 1 cup (200 g) granulated sugar
- 3 large eggs, room temperature
- 1/2 cup (120 ml) sour cream
- 1/4 cup (60 ml) heavy cream
- 2 tablespoons Lotus Biscoff spread, plus extra for swirling
- 2 teaspoons Vanilla Extract
- Pinch of salt
For the Glaze (optional):
- 1/2 cup (120 ml) Biscoff spread, warmed
- 1–2 tablespoons milk or cream to thin, if needed
- Chopped toasted Biscoff cookies for topping (optional)
Step-by-Step Instructions
Step 1: Preheat & Prep Pan
Heat your oven to 325°F (165°C). Have a 9-inch springform pan ready. Line the bottom with parchment and butter the sides. I like to wrap the outside of the pan tightly in two layers of heavy-duty foil so a gentle water bath doesn’t leak in. Trust me on this—it keeps the crust from getting soggy and helps the cheesecake bake evenly. I always do this step ahead of time so I’m not scrambling later.
Step 2: Mix Dry Ingredients
Crush the Biscoff cookies until they’re sandy, not powdery. If you crush them too fine, the crust will feel dry; aim for a fine crumbs texture with a few颗 small bits for crunch. Stir in a pinch of salt so the butter can carry the cookie sweetness and soften the bite just a touch. This is the base that makes the magic happen.
Step 3: Mix Wet Ingredients
In a large bowl, beat the Cream Cheese until smooth and fluffy—really, you want it creamy enough to push off lumps. Add the sugar and beat until fully incorporated and light. Then beat in the vanilla, sour cream, and heavy cream. You should have a satin-smooth filling with no lumps. If you see streaks, keep mixing a little longer; smooth is the goal here.
Step 4: Combine
With the mixer on low, add the eggs one at a time, mixing just until each is incorporated. Overmixing at this stage can trap air and cause cracks. Scrape down the sides so everything stays uniform. Fold in the 2 tablespoons of Biscoff spread by hand to keep a bit of texture and to balance the flavor; you don’t want it fully blended in—just a few ribbons here and there.
Step 5: Prepare Filling
Now you’re ready to make the filling truly sing. If your cream cheese was very soft, you’ll be rewarded with a silkier batter. If not, give it a few extra seconds. The goal is a glossy, pourable—but not runny—consistency. This is where a lot of people go wrong: they overbeat and end up with a cheesecake that cracks or sinks. I keep my mixer on the lower side and mix by hand for the last few folds if I’m paying close attention to texture.
Step 6: Layer & Swirl
Pour the batter into the crust, smoothing the top with a spatula. For a pretty marble effect, drop spoonfuls of extra Biscoff spread onto the surface and swirl gently with a skewer or knife. Don’t overdo the swirls—they’ll disappear in the bake, but a few delicate ribbons will look stunning when it’s set.
Step 7: Bake
Set the pan in a larger baking dish and pour hot water halfway up the sides of the springform to create a gentle water bath. This helps the cheesecake bake evenly and prevents cracking. Bake for about 60–70 minutes, or until the center only jiggles slightly when you wiggle the pan. The edges should be set, with a subtle wobble in the middle. If the top starts to brown too quickly, tent the cake with a little foil for the last 10 minutes.
Step 8: Cool & Glaze
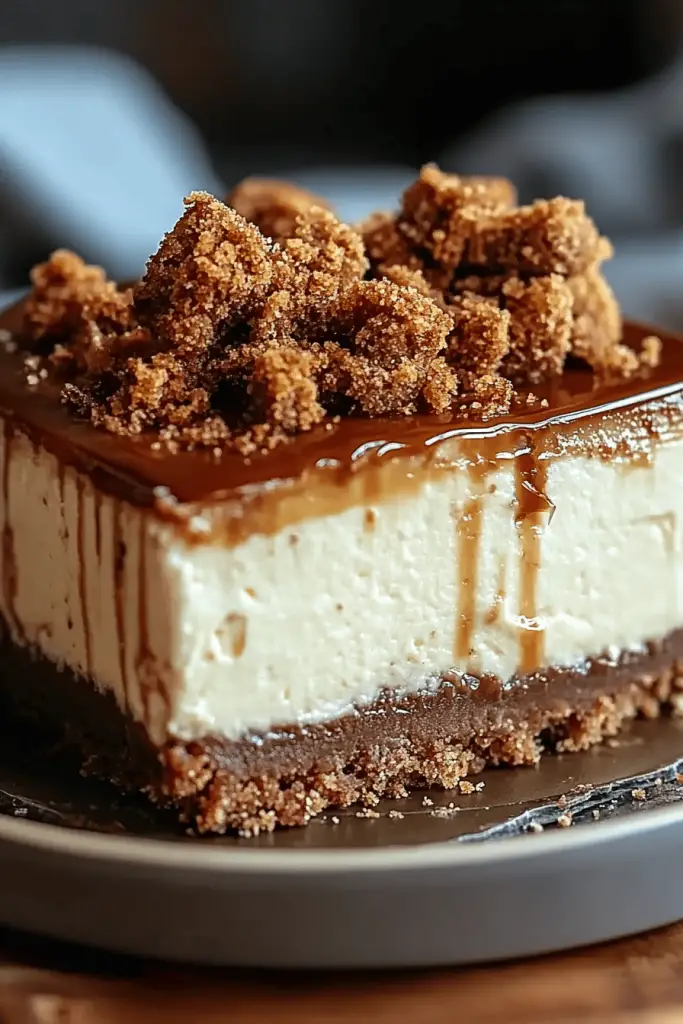
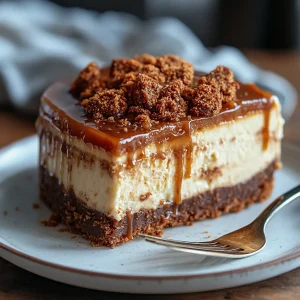
Turn the oven off and let the cheesecake sit in the oven with the door ajar for about 1 hour. Then remove to cool on the counter, and finally refrigerate for at least 6 hours, ideally overnight. This chilling is essential for the filling to set and the flavors to mellow. If you’re serving with glaze, warm the Biscoff spread for a quick glossy drizzle and thin with a teaspoon of milk if needed. Drizzle when the cake is fully chilled, or skip the glaze for a clean, glossy look.
Step 9: Slice & Serve
Run a knife around the edge before releasing the pan. Wipe the blade between cuts for cleaner slices. For presentation, you can dust with a touch of cocoa powder or sprinkle with chopped Biscoff cookies. Serve chilled with a dollop of whipped cream or a fresh berry compote to balance the richness. This Biscoff Cheesecake shines on a dessert table and holds up beautifully in the fridge for days, which is perfect for gatherings that stretch over a weekend.
What to Serve It With
This cheesecake sings with a few well-chosen partners. It’s comforting on its own, but the right accompaniments can elevate it to a show-stopper.
For Breakfast: A dollop of vanilla yogurt, a few berries, and a splash of strong coffee. The tang of yogurt lightens the richness just enough to make a morning bite feel fancy without being fussy.
For Brunch: Fresh fruit salad, a little lemon zest twist, and a tiny glass of sparkling cider. The brightness from the fruit branches out nicely with the cookie-spice flavor.
As Dessert: Espresso or dark chocolate sauce alongside a whipped cream cloud. If you’re feeling a little extra, serve it with candied orange zest for a citrusy lift that brightens the caramel notes.
For Cozy Snacks: A hot drink on the side—cardamom chai or a milky cappuccino—and maybe a few crunchy hazelnuts for texture. This is the kind of dessert you want on a sofa, late at night, when the house is quiet and the kettle is singing softly in the background.
My family tradition is to slice thin wedges and freeze a portion for emergencies—because life happens, and you’ll thank yourself when a craving for something creamy hits at 10 p.m. The aroma alone is enough to pull everyone into the kitchen. It’s like a memory you can bite into, and as the spoon sinks into the first bite, you’ll hear the familiar chorus of “mmmms” that tell you you did it right.
Top Tips for Perfecting Your Biscoff Cheesecake
These little refinements have saved me more times than I can count. They’re enough to turn a good cheesecake into something that feels like a favorite bakery treat.
Crust Prep: Don’t skip chilling the crust before filling. A cold crust holds together better and prevents cracking around the edges. If your crust seems too dry, add a teaspoon of water at a time until it just holds together when pressed.
Mixing Advice: Room-temperature ingredients are your best friend here. Cold cream cheese can beat into lumps and your texture won’t be as silky. Beat the cream cheese until fluffy, then fold in the other liquids gently to avoid overworking the batter.
Swirl Customization: If you want bolder Biscoff flavor, add a few extra dollops of spread and swirl more aggressively. For a subtler look, keep the ribbons light and airy. A little swirl goes a long way in both taste and appearance.
Ingredient Swaps: You can swap sour cream for a lighter option like Greek yogurt (full-fat) for a tangier bite. If you’re avoiding dairy, use full-fat coconut cream and a splash of lemon juice to mimic tanginess, though note the flavor will shift. If you love a more intense cookie-spice profile, you can fold in a tablespoon of ground cinnamon or a pinch of cardamom into the crust batter.
Baking Tips: A water bath is your friend for an even bake. If you don’t have a roasting pan large enough, you can wrap the springform in multiple layers of foil to keep water out, but the water bath is worth it for even texture. If your oven runs hot, start checking at 50–55 minutes for doneness and adjust accordingly. The center should wobble only slightly when you gently shake the pan.
Glaze Variations: For a glossy finish, whisk in a teaspoon of light corn syrup with the warm Biscoff glaze. You can also mix in a pinch of sea salt to balance sweetness. If you’re serving later, keep the glaze on the side until serving time and drizzle just before slicing to preserve shine.
As you can see, this Biscoff Cheesecake isn’t about chasing perfection; it’s about embracing a few simple steps that yield a dessert that feels special without being fussy. I’ve learned to experiment with texture, temperature, and timing, and I still get that same “home sweet home” aroma every time I bake this cake. It’s a recipe that rewards attention without demanding it, and that balance is what makes it a favorite in my kitchen.
Storing and Reheating Tips
Storage is where this cheesecake truly shines. It holds up well when you want to make it ahead for a party or for a week of sweet treats in the fridge. Here’s how I keep it at its best.
Room Temperature: Not recommended for more than 2 hours. Cheesecake tends to soften and lose its structure if left out too long, especially in warm rooms.
Refrigerator Storage: Cover tightly or keep in an airtight container for up to 5 days. The flavors develop with time, and the texture stays creamy if kept chilled. If you plan to slice later, you can portion it and store wrapped in plastic wrap and foil for a neater presentation.
Freezer Instructions: Cheesecake freezes beautifully for up to 2–3 months. Freeze the whole cake or individual slices. Wrap tightly in plastic and then foil to prevent freezer burn. Thaw overnight in the fridge for best texture, then bring to room temperature for 15–20 minutes before serving and drizzle with glaze if desired.
Glaze Timing Advice: If you’re freezing, skip the glaze and add it after thawing for the freshest look. If you’re refrigerating for a party, you can glaze a few hours before serving so it doesn’t dry out.
Fresh flavors and a texture that feels indulgent even when you’re trying to keep things simple—that’s what this Biscoff Cheesecake delivers. It travels well to gatherings and holds up beautifully in a cooler for day trips, making it one of my most-used crowd-pleasers.
Final Thoughts
In the end, what makes this Biscoff Cheesecake special isn’t just the flavor—though yes, that cookie-spice, caramel-sweet personality is a major draw. It’s the way the recipe sits in your hands: confident but forgiving, simple yet celebratory. It’s a dessert you can assemble with one eye on the timer and one eye on your family, knowing that a few precise steps will yield something memorable. The crust offers a satisfying bite, the filling glides on the palate, and a touch of Biscoff drizzle ties everything together with a glossy finish. I’ve made this countless times and it never fails to bring a smile, a chorus of compliments, and a little moment of shared joy. If you’ve got a craving for something warm, cozy, and a little bit fancy, this Biscoff Cheesecake is your answer. Happy baking, friends—and I’d love to hear how yours turns out. Share your variations, what you served it with, and any tweaks you discovered along the way in the comments below!
Frequently Asked Questions
Biscoff Cheesecake
Ingredients
Main Ingredients
- 24 g Biscoff cookies
- 0.5 cup unsalted butter, melted
- 16 oz cream cheese, softened
- 0.75 cup granulated sugar
- 1 tsp vanilla extract
- 2 large eggs
- 1 cup Biscoff spread divided (0.5 cup for filling, 0.5 cup for ganache)
- 0.5 cup heavy cream for ganache
Garnish
- 8 Biscoff cookies whole, for decorating
- 0.25 cup chopped Biscoff cookies for sprinkling
Instructions
Preparation Steps
- Preheat oven to 325°F (165°C). Wrap the outside of a 9-inch springform pan with aluminum foil to prevent leaks.
- In a food processor, pulse 24g Biscoff cookies into fine crumbs. Mix with melted butter and press firmly into the bottom and slightly up the sides of the springform pan.
- Bake the crust for 10 minutes, then let cool while preparing the filling.
- In a large bowl, beat cream cheese and sugar on medium speed until smooth and creamy, about 3 minutes.
- Mix in vanilla and 0.5 cup Biscoff spread until fully incorporated. Scrape down the bowl as needed.
- Add eggs one at a time, mixing on low just until blended. Do not overmix.
- Pour the batter over the cooled crust. Place the pan inside a larger roasting dish and add hot water to the outer dish to halfway up the side of the springform (water bath).
- Bake for 60 minutes. Turn off the oven and crack the door open slightly. Let the cheesecake cool inside for 1 hour to prevent cracking.
- Remove from oven and water bath. Chill in the refrigerator for at least 4 hours or preferably overnight.
- For the ganache, heat heavy cream in a small saucepan until steaming but not boiling. Pour over remaining 0.5 cup Biscoff spread and stir until smooth. Let cool slightly.
- Pour ganache over chilled cheesecake and smooth with a spatula. Decorate with whole and chopped Biscoff cookies.
- Refrigerate for at least 30 minutes before slicing. Serve chilled.
Notes
Featured Comments
“Impressed! Clear steps and super easy results. Perfect for busy nights.”
“New favorite here — turned out amazing. crowd-pleaser was spot on.”
“Super easy and turned out amazing! My family asked for seconds. Saving this one.”
“This sweet treat was absolutely loved — the buttery really stands out. Thanks!”
“Made it tonight and wow — so flavorful! Will definitely make Biscoff Cheesecake again.”
“Packed with flavor and so simple. Exactly what I wanted from Biscoff Cheesecake.”


