

On busy weeknights I crave something that tastes like a celebration but comes together in minutes. I’m transported back to Sundays at grandma’s house—the air always smelled faintly of vanilla and warm chocolate, and the kitchen counter shimmered with powdered sugar. My mom would pull out a tray of Cannoli Cups and the room lit up with smiles. Think of Cannoli Cups as a fancy-scrumptious cousin of your favorite cookie, only easier and way more portable. It’s the kind of dessert you can set on the table and disappear in minutes, even when there’s a full cake staring you down. This—this little cups-filled-with-ricotta magic—has become a family favorite around here, a quick-dixie-dessert that feels special but doesn’t demand a whole afternoon in the kitchen. I’ve made these countless times, and they never fail to bring a flutter of nostalgia with every bite.
What is cannoli cup?
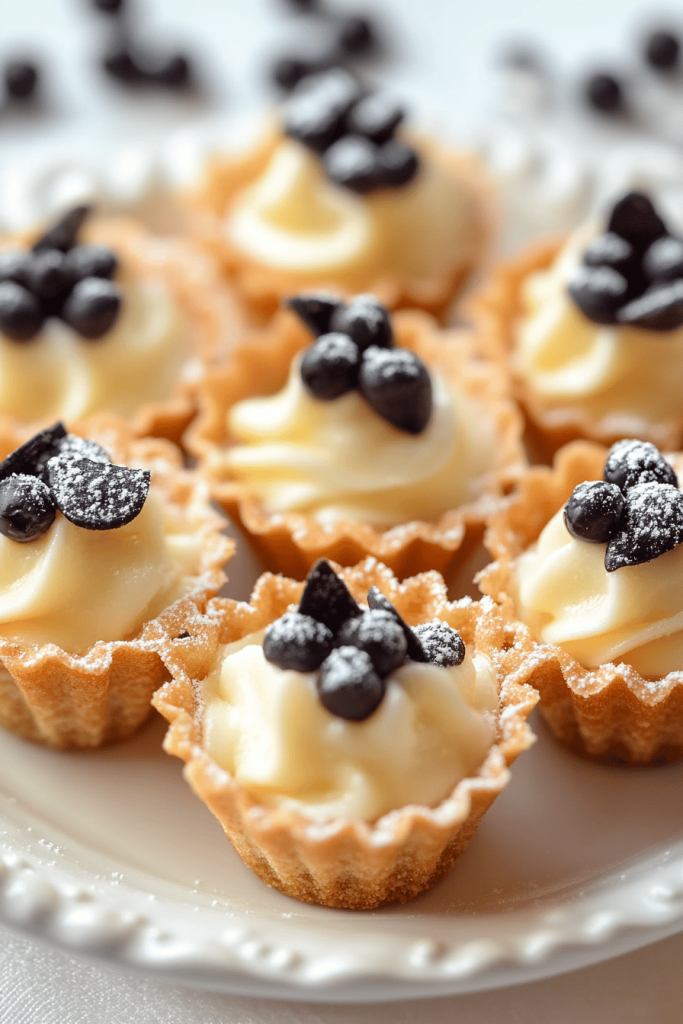
Cannoli Cups are essentially a playful, no-fuss take on the classic Sicilian cannoli. The “shell” is a crisp crust pressed into mini muffin tins, then baked until golden and sturdy enough to hold a cloud-like ricotta filling. The name nods to the traditional cannoli—a crisp tube filled with sweet cheese—while the cups give you all that flavor in a grab-and-go format. Think of it as bite-size comfort that travels well to potlucks, picnics, or a weeknight family dessert. The idea is simple: a crunchy, lightly sweet shell that hugs a creamy, lemon-zesty ricotta filling, finished with a glossy chocolate glaze or a dusting of pistachio. It feels indulgent without being heavy, and the aroma alone is enough to pull everyone to the kitchen.
How do
Quick Overview
This is basically three little miracles in one: a crisp crust, a velvet ricotta filling, and a glossy glaze or dusting that makes them look like little edible works of art. The crust is pressed into a muffin tin and baked until it holds its shape. The filling comes together in minutes with ricotta, a touch of mascarpone, vanilla, and lemon zest for brightness. Chilled briefly, they set into bite-sized cups that taste like they came straight from an Italian bakery—only with much less fuss. The method rewards you with a dessert that’s both elegant and approachable, so you can wow guests without spending hours in the kitchen.
Ingredients
For the Main Crust (the Cup Shell
- 2 cups graham cracker crumbs (or digestive biscuits, finely crushed)
- 1/4 cup finely chopped toasted almonds (optional, for crunch)
- 1/3 cup unsalted butter, melted
- 2 tablespoons granulated sugar
- Pinch of fine salt
For the Filling:
- 1 cup ricotta cheese, well drained
- 1/2 cup mascarpone (optional for extra creaminess)
- 1/2 cup powdered sugar (adjust to taste)
- 1 teaspoon vanilla extract
- 1 teaspoon lemon zest (or orange zest if you prefer)
- 1/4 cup mini chocolate chips or finely chopped dark chocolate
- 2 tablespoons finely chopped pistachios (for garnish, optional)
For the Glaze (optional):
- 2 ounces dark chocolate, melted with 1 teaspoon coconut oil or light cream
- Or a simple dusting of cocoa powder and powdered sugar
Step-by-Step Instructions
Step 1: Preheat & Prep Pan
Heat your oven to 350°F (175°C). Lightly grease a standard 12-c muffin tin or line with paper cups. If you’re worried about sticking, give it a quick spray of nonstick and a tiny wipe of butter for luck. The scent of warm butter in the air is basically a kitchen hug, and you want those shells to come out clean and neat.
Step 2: Mix Dry Ingredients
In a bowl, combine the graham cracker crumbs, almonds (if using), sugar, and salt. I like to whisk them together until the crumb mixture looks uniform and a little sandy—that sheen means the butter will bind evenly and create a sturdy, tender shell.
Step 3: Mix Wet Ingredients
Pour in the melted butter and stir until the crumbs resemble damp sand that just holds together when pressed. If it feels too dry, add a teaspoon or two of water—just enough to bring it together without making the mixture greasy.
Step 4: Combine
Scoop about 2 heaped tablespoons of the crust into each muffin cup. Press firmly with the back of a spoon or a small shot glass to form a compact shell. The goal is a crust that’s sturdy enough to handle the filling but delicate enough to melt in your mouth. Bake for 10 minutes, or until the edges are lightly golden. Remove from the oven and let the shells cool completely in the pan; they’ll crisp up as they rest.
Step 5: Prepare Filling
While the crust cools, whisk together the ricotta, mascarpone (if using), powdered sugar, vanilla, and lemon zest until smooth. Fold in the chocolate chips. If you want a silkier texture, you can press the ricotta mixture through a fine sieve once or twice. The filling should be creamy but hold its shape when piped or scooped into the cups. A quick chill in the fridge helps it set and makes piping easier.
Step 6: Layer & Swirl
When the crusts are room temperature, spoon or pipe the filling into each cup. If you’re feeling fancy, use a piping bag with a star tip to create a ribbed shell look, then swirl the filling slightly with the back of a spoon so the top has a gentle peak. A few sprinkles of chopped pistachios on top add color and a nice bite.
Step 7: Bake
We already baked the shells; the filling doesn’t need baking, just chilling. If you want a warm, gooey effect, you could spoon the filling into the shells and give them a very brief 5-minute bake, but that’s optional. For a more classic, clean finish, skip this step and move straight to cooling and glazing.
Step 8: Cool & Glaze
Let the filled Cannoli Cups rest in the fridge for 20–30 minutes so the filling holds its shape. If you’re glazing, melt the chocolate with the oil or cream until glossy, then drizzle a thin line over each cup or dip the tip of each filled cup into the chocolate for a chocolate-cheerful cap. If you prefer a simple, elegant look, dust with a touch of cocoa or powdered sugar instead. You’ll notice the glaze sets quickly, leaving a polished finish that makes them look bakery-fresh.
Step 9: Slice & Serve
These are best served chilled—the filling stays cooler, and the crust remains crisp. Place Cannoli Cups on a pretty platter and give them a light dusting of powdered sugar just before serving. If you’re sharing with kids, a tiny chocolate drizzle can be a big hit, and if you’re serving guests who adore pistachios, scattering a few more on top adds a pop of color and texture. The first bite should reveal a crackling shell, a creamy center, and a citrusy brightness that lingers in your mouth, like a memory of a sunny Italian afternoon.
What to Serve It With
Cannoli Cups are versatile enough to carry through different occasions with a little styling. Here are a few ideas that feel like a warm hug from the kitchen.
For Breakfast: Set out Cannoli Cups with a strong, dark roast or a cappuccino. The citrus notes in the filling echo the brightness of a morning coffee, and the crust provides just enough sweetness to wake you up nicely without overpowering the day. I sometimes pair them with a plate of fresh berries and a dollop of Whipped Cream for a special brunch display.
For Brunch: Arrange them on a tiered tray with citrus slices, mini cannoli-shell cookies, and a light ricotta-topped yogurt bowl. These little cups shine in a relaxed, celebratory brunch spread—easy to grab, easy to admire, and easy to share.
As Dessert: They’re ideal for a finish after a hearty Italian-inspired dinner, or after a Sunday potluck. Pair Cannoli Cups with espresso, a glass of dessert wine, or a small plate of fresh fruit. The lemon zest keeps things bright, so you’ll never feel weighed down after dessert.
For Cozy Snacks: Heat up a few and serve with a hot mug of milk or tea. The crunch of the crust and the cool, creamy filling are excellent late-night cravings—trust me, this is a go-to when you want something comforting but not cloying.
My family has a ritual around Cannoli Cups: we bake the shells on a Sunday, fill them after lunch, and then hide a few away for a “surprise treat” after dinner. It’s the little traditions that make the best memories, and these cups are the ones we pull out whenever we want a little sunshine in a bite.
Top Tips for Perfecting Your Cannoli Cups
Here are the tricks I’ve learned over the years, organized by technique so you can jump straight to what you need.
Zucchini Prep: Not relevant here; swap with Crust Prep instead. For the crust, I always press the crumbs firmly. A tight crust holds the shell shape better when you spoon in the filling, and it gives you that satisfying snap when you bite. If you’re using moist cookies, you can dry them a bit in the oven for 3–4 minutes before crushing to reduce moisture that could make the crust soggy.
Mixing Advice: Don’t overwork the crust mixture. You’re aiming for a sandy texture that holds together when pressed. If it’s crumbly, add a touch more melted butter—just enough to bind. For the filling, a gentle fold is enough; overbeating can make the ricotta airy but dry, and that’s not what we want. The goal is a luscious, spoonable texture that holds its shape in the cups.
Swirl Customization: If you want pretty marbling, light swirl the filling with a toothpick after piping. A few minutes of artistry adds a wow factor without extra effort. You can also tint portions of the filling with a drop of food coloring for a variegated look—just a pinch, so it stays tasteful and not cartoonish.
Ingredient Swaps: You can swap biscuits or cookies for an even crisper crust—think shortbread or amaretti for a rich, almond-forward note. For a dairy-free version, use almond ricotta or coconut Cream Cheese blended with a touch of coconut yogurt, and skip the mascarpone. The texture will be slightly lighter but still deliciously creamy, and the lemon zest will keep it bright.
Baking Tips: If your oven runs hot, reduce the crust bake time by a few minutes and check early. Oven hot spots can cause uneven browning, so rotating the pan halfway through helps. If you’re using a dark muffin tin, start checking a bit earlier since those pans can darken the crust edges faster.
Glaze Variations: The glaze is optional but fun. A glossy chocolate glaze pairs beautifully with the lemony filling, but you can also do a white chocolate drizzle for contrast or dust with cocoa powder for a more rustic look. If you’re making them ahead, hold off on the glaze until just before serving to keep the shells crisp.
Lessons Learned: I’ve learned to drain the ricotta really well—wet cheese sinks and can make the filling runny. A quick chill in the fridge helps everything set up and makes the cups more stable for plating.
Flavor Boosts: A teaspoon of orange blossom water or a pinch of cinnamon in the crust adds a delightful warmth. If you’re a pistachio lover, crush a few extra kernels to sprinkle on top for color and crunch. These little additions create a signature bite that keeps guests guessing in a good way.
Scaling: If you need more cups, just multiply the ingredients by the number of cups you want, keeping the same 2:1 crust-to-filling ratio. The beauty is that you can make the shells ahead and fill closer to serving, so you’re never racing the clock.
Storing and Reheating Tips
Storage is simple, and the good news is you can make this ahead without compromising texture or flavor. The shells stay crisp for a day or two if kept in a dry, airtight container, and the filling firms up nicely in the fridge.
Room Temperature: If you’re serving soon, the shells can be kept at room temperature for a few hours in a dry container. They’ll stay crisp and inviting, with a nice scent of butter in the air.
Refrigerator Storage: Store filled Cannoli Cups in an airtight container in the refrigerator for up to 2 days. If you’re afraid of the shells softening, fill just before serving or add a small splash of extra lemon zest to the filling to refresh the flavor.
Freezer Instructions: The shells are best fresh, but you can freeze filled cups for up to 1 month if needed. Wrap them tightly and place in a freezer bag. Thaw in the fridge and add a quick chocolate glaze to reinvigorate the surface. The texture changes slightly, but the taste remains wonderfully comforting.
Glaze Timing Advice: If you freeze, add glaze after thawing to keep the shells crisp. If you’re refrigerating, you can glaze after chilling for a neat, glossy finish. The glaze is the finishing touch that makes them feel extra special, so don’t skip it if you want a restaurant-worthy look.
[A quick note from my kitchen: I once tried a lemon-ricotta version with a dairy-free glaze. It was bright and creamy—still Cannoli Cups, just with a new personality. My cousin swore they tasted like sunshine in a bite. Give it a go if you’re dairy-free or dairy-curious.]
Frequently Asked Questions
Final Thoughts
In the end, Cannoli Cups are about warmth, simplicity, and a touch of joy. They’re the kind of dessert that says, “Let’s take a moment for ourselves,” with the first bite delivering a playful crunch and a surprisingly creamy center. If you’re cooking for a crowd, you’ll appreciate how easy they are to prepare ahead and how visually charming they look on a platter. And if you’re cooking just for you and someone you love, they’ll feel like a thoughtful afternoon in a bite-sized package. I’ve learned that the best versions come from keeping things a bit flexible—crusts can be a touch more crumbly or a touch more crisp, fillings can lean dairy-free or stay rich and indulgent, and the glaze can be bold or simply fragrant with citrus oils. The core remains the same: a shell that cracks perfectly, a filling that coats your palate with vanilla and lemon, and a finish that makes everyone reach for one more. If you try this, I’d love to hear how you customize yours—your pistachio crunch, your favorite chocolate drizzle, your personal little twist. Happy baking! And please, tell me what you’re calling your Cannoli Cups when you share a photo or a story in the comments. Cannoli Cups are waiting for your family’s memories to begin.

Cannoli Cups
Ingredients
For the Filling:
- 15 oz ricotta cheese, drained very well
- 0.5 cup powdered sugar
- 0.5 teaspoon vanilla extract
- 0.25 cup mini chocolate chips
For the Cups:
- 1 package refrigerated crescent roll dough
- 1 tablespoon melted butter
- 2 tablespoons granulated sugar
- 0.5 teaspoon cinnamon
Instructions
Preparation Steps
- Preheat oven to 375°F (190°C). Grease and flour a 12-cup muffin tin.
- In a medium bowl, stir together the ricotta cheese, powdered sugar, and vanilla extract until well combined. Fold in the mini chocolate chips.
- Unroll the crescent roll dough and separate into 8 triangles. Press the triangles together to form a rectangle, then press out any perforations.
- Cut the dough rectangle into 12 equal squares.
- Press each square of dough into the cups of the prepared muffin tin, pressing it up the sides.
- In a small bowl, combine the melted butter, granulated sugar, and cinnamon. Brush this mixture over the inside of each dough cup.
- Bake for 12-15 minutes, or until golden brown and puffed.
- Let the cups cool in the muffin tin for a few minutes before carefully removing them to a wire rack to cool completely.
- Once cooled, fill each cup with the prepared cannoli filling. You can use a spoon or a piping bag for this.
- Chill the cannoli cups for at least 30 minutes before serving.
Notes
Featured Comments
“Impressed! Clear steps and spot on results. Perfect for busy nights.”
“New favorite here — absolutely loved. crowd-pleaser was spot on.”
“Super easy and turned out amazing! My family asked for seconds. Saving this one.”
“This sweet treat was absolutely loved — the hearty really stands out. Thanks!”
“Made it tonight and wow — creamy! Will definitely make Cannoli Cups again.”
“Packed with flavor and so simple. Exactly what I wanted from Cannoli Cups.”


