

Oh, this cherry pineapple Dump Cake! It’s one of those recipes that feels like a warm hug on a chilly evening, or a little burst of sunshine on a cloudy day. I remember the first time I made it, I was absolutely blown away by how simple it was and how incredibly delicious the result was. It kind of reminds me of a pineapple upside-down cake, but in this case, it’s even more forgiving and, dare I say, easier to achieve that perfect sweet and tangy caramelization. My kids go bananas for this treat, and honestly, I can’t blame them. It’s become my go-to when I’m craving something sweet but my energy levels are running on fumes, or when unexpected guests pop over and I need a dessert that looks impressive but took minimal effort. This cherry pineapple dump cake is truly a lifesaver!
What is a Pineapple Dump Cake?
So, what exactly is a cherry pineapple Dump Cake? Well, the name kind of says it all, doesn’t it? It’s called a “dump” cake because, well, you quite literally dump the ingredients into the pan. There’s no fancy mixing, no creaming butter and sugar, no complicated layering. You just toss everything in, bake it, and magic happens. It’s essentially a glorious, sweet mess that bakes into a moist, tender cake with pockets of gooey fruit and a perfectly crisp topping. The combination of bright, tart cherries and sweet, tropical pineapple is just heavenly, especially when they meld together with that buttery cakey goodness. Think of it as the ultimate shortcut to a fantastic, crowd-pleasing dessert that tastes like you spent hours in the kitchen, when in reality, you spent maybe ten minutes prepping it.
How do I make a cherry pineapple dump cake?
Quick Overview
Making this cherry pineapple dump cake is as simple as this: spread your fruit in the bottom of a baking dish, sprinkle a cake mix over the top, then drizzle with melted butter. Pop it in the oven, and let it work its magic. It’s truly that straightforward. The beauty of this method is that the butter seeps down through the cake mix, creating pockets of delicious, golden cake that surround the tender fruit. No bowls, no mess, just pure, unadulterated dessert joy. It’s the perfect recipe for beginner bakers or anyone who needs a last-minute dessert that tastes phenomenal.
Ingredients
For the Main Batter:
1 box (about 15.25 ounces) yellow cake mix. Make sure it’s the dry mix from the box, no need to add eggs or oil or anything the box usually calls for! I find a good quality yellow cake mix gives the best neutral base, but I’ve also had success with a vanilla or even a Spice cake mix when I’m feeling adventurous. Just don’t use one with pudding already mixed in. A classic yellow is your safest bet for that perfect balance with the fruit.
For the Filling:
1 can (20 ounces) crushed pineapple, undrained. You want the juice! It adds moisture and sweetness to the bottom layer. I usually just grab the regular canned stuff, but if you can find pineapple chunks and prefer them, you can chop them up a bit more yourself. The key is to keep that liquid in there. I’ve also tried it with fresh pineapple, but it tends to be a bit drier, so I always stick to canned for this recipe to ensure that lovely syrupy consistency. And don’t drain it – that juice is pure gold!
1 can (21 ounces) cherry pie filling. This is what gives it that beautiful color and delicious cherry flavor. Again, grab the pre-made pie filling. It’s already sweetened and thickened, which is exactly what we want. You can find it in the canned fruit aisle. I’ve tried using fresh cherries, but they don’t create the same luscious, syrupy texture. So, trust me on this one and go for the pie filling!
For the Glaze:
1 cup (2 sticks) unsalted butter, melted. You need a good amount of butter to help the cake mix bake up and get that golden, slightly crisp topping. Make sure it’s fully melted so it can distribute evenly. I always use unsalted so I can control the saltiness, though I’ve never found this cake to be overly salty even with salted butter.
Step-by-Step Instructions
Step 1: Preheat & Prep Pan
First things first, get your oven preheated to 350 degrees Fahrenheit (175 degrees Celsius). Grab a 9×13 inch baking dish. You don’t need to grease it or anything fancy – the butter in the topping usually takes care of that. Just make sure it’s clean and ready to go. Sometimes, I like to give it a quick wipe with a paper towel just to be sure, but honestly, it’s rarely needed. This step is super quick, so you can do it while you’re gathering your ingredients.
Step 2: Mix Dry Ingredients
This is the “dump” part! Open your box of yellow cake mix and sprinkle it evenly over the crushed pineapple and cherry pie filling in the baking dish. Try to get it as spread out as you can, covering as much of the fruit as possible. Don’t worry if there are a few small gaps; the butter will help it spread during baking. The goal here is to create a nice, even layer of dry cake mix that will soak up all that fruity goodness.
Step 3: Mix Wet Ingredients
Melt your butter. You can do this in a small saucepan on the stovetop or pop it in the microwave for about 30-60 seconds. You want it completely liquid. Make sure to let it cool just slightly so it’s not boiling hot when you pour it over the cake mix, but still nice and warm. This is the only “wet” ingredient you really need to prepare, and it’s super simple.
Step 4: Combine
Now for the grand finale of prep! Drizzle the melted butter evenly over the entire top of the cake mix. Make sure you get it all over, especially into those spots where the cake mix might be a little thicker. This butter is going to create that delicious, golden, slightly crisp topping as it bakes, and it also helps to moisten the cake mix as it seeps down. Try to cover as much surface area as possible!
Step 5: Prepare Filling
This step is actually already done when you open the cans! The crushed pineapple (undrained) and the cherry pie filling are your filling. Just spread them out evenly in the bottom of your 9×13 baking dish before you sprinkle the cake mix on top. The juices from both are crucial for keeping the cake moist and creating that lovely, gooey layer underneath. So, no extra prep needed here – just pour and spread!
Step 6: Layer & Swirl
Okay, so this isn’t a traditional layering or swirling process like you might see in other cakes. Here’s how it works: First, spread the undrained crushed pineapple evenly across the bottom of your greased 9×13 inch baking dish. Then, spoon the cherry pie filling over the pineapple, distributing it as evenly as you can. Finally, take your dry yellow cake mix and sprinkle it evenly over the fruit layers. Make sure you get as much coverage as possible. Don’t try to mix it; just let it sit on top!
Step 7: Bake
Pop the dish into your preheated oven. Bake for about 45-55 minutes. You’re looking for that topping to be golden brown and bubbly around the edges. If the top starts to get too brown before the center is cooked through, you can always loosely tent it with aluminum foil. I usually check mine around the 45-minute mark and let it go a bit longer if needed. The smell that fills your kitchen is absolutely divine!
Step 8: Cool & Glaze
Once it’s golden and bubbly, carefully take the dump cake out of the oven. Let it cool for at least 15-20 minutes before you even think about slicing into it. This is important! It allows the cake to set up properly. If you cut it too soon, it can get a bit mushy. The fruit filling will be volcanically hot, so patience is key here! Some people like to add a glaze, but honestly, the way the fruit and cake mix bake together is usually enough. If you *do* want a glaze, you can whisk together some powdered sugar with a little milk or lemon juice until it’s a drizzly consistency and add it after the cake has cooled slightly.
Step 9: Slice & Serve
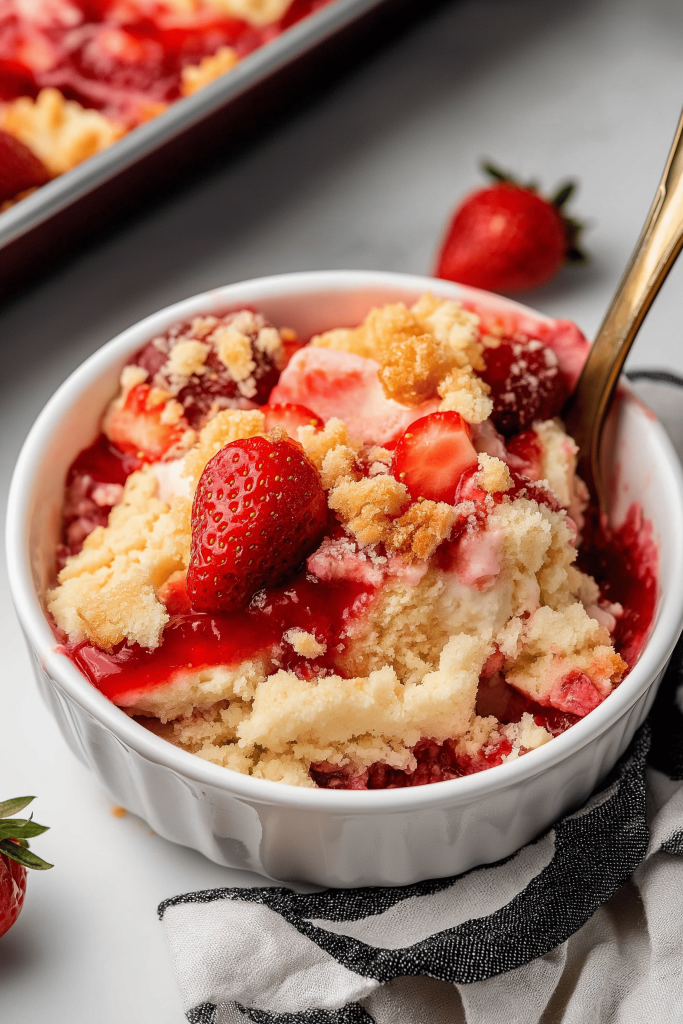
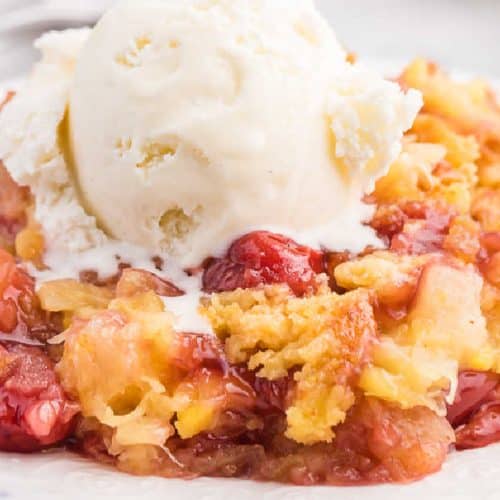
Once it’s had a chance to cool down a bit, slice it into generous squares. It’s delicious served warm, but honestly, it’s also fantastic at room temperature. I love to serve it with a big dollop of whipped cream or a scoop of vanilla ice cream. The cold creaminess is the perfect contrast to the warm, fruity cake. It’s a simple but decadent pairing that really elevates the whole experience. Enjoy every single bite!
What to Serve It With
This cherry pineapple dump cake is pretty much a standalone star, but if you want to take it to the next level, here are a few ideas! For breakfast or brunch, I sometimes serve a smaller portion with a dollop of Greek yogurt and a sprinkle of granola for a sweet start to the day. It feels almost like a treat but with a little added protein to keep you going. As a dessert, it’s absolutely divine with a scoop of vanilla bean ice cream – the classic pairing for a reason! A drizzle of caramel sauce can also be a lovely addition if you’re feeling extra indulgent. For a cozy snack, I often enjoy a slice with a warm cup of coffee or tea. The sweetness of the cake pairs beautifully with the slight bitterness of coffee or the warmth of tea. It’s also wonderful with a glass of milk for the kids (and me!). My family loves it when I serve it alongside fresh berries during the summer – it adds a bit of freshness and color to the plate.
Top Tips for Perfecting Your Cherry Pineapple Dump Cake
Over the years, I’ve picked up a few little tricks that have helped me make this cherry pineapple dump cake absolutely perfect every single time. For the fruit filling, I always make sure I’m using the undrained pineapple. That juice is crucial for creating a moist cake and that wonderfully syrupy bottom layer. Don’t be tempted to drain it! When it comes to the cake mix, just sprinkle it directly from the box. Resist the urge to mix it with anything else. The melted butter is what bakes it into that delicious, cakey topping. And speaking of butter, make sure it’s fully melted and evenly drizzled over the entire surface of the cake mix. This ensures a uniform golden-brown crust. If your topping starts to brown too quickly before the cake is cooked through, don’t panic! Just loosely tent the dish with aluminum foil for the remaining baking time. This prevents burning while allowing the cake to finish cooking. I’ve learned this after one too many slightly-too-dark-on-top cakes! For ingredient swaps, while the classic cherry and pineapple combo is divine, feel free to experiment! I’ve had great results using canned peaches or even a mix of berries in place of one of the fruits. Just ensure they’re canned with syrup or juice, or adjust moisture if using fresh. The key is to keep that fruit layer moist. If you’re looking for a bit of extra flavor, you can sprinkle some chopped nuts like pecans or walnuts over the cake mix before drizzling with butter. It adds a lovely crunch and nutty depth. And when it comes to baking, always trust your oven, but keep an eye on it. Start checking for doneness around the 45-minute mark. A toothpick inserted into the center of the cake (avoiding the fruit layer) should come out mostly clean. Finally, patience is a virtue when it comes to cooling. Letting it rest for at least 15-20 minutes allows the cake to set and prevents it from falling apart when you slice it. Trust me on this one – it’s worth the wait!
Storing and Reheating Tips
Storing this delicious cherry pineapple dump cake is pretty straightforward. If you happen to have any leftovers (which is rare in my house!), you can store it covered at room temperature for up to two days. Just make sure it’s well-covered with plastic wrap or foil to keep it fresh. If you plan to keep it longer, or if your kitchen is particularly warm, I’d recommend refrigerating it. In the fridge, it should stay good for about 4-5 days. Just pop it into an airtight container or cover the baking dish tightly. When you’re ready to reheat, you have a couple of options. You can gently warm individual slices in the microwave for about 30-60 seconds, or warm the whole dish in a 300-degree Fahrenheit oven for about 10-15 minutes until warmed through. If you’re reheating refrigerated leftovers, the oven method works best to restore that lovely texture. I’ve never tried freezing this cake myself, as it’s usually devoured too quickly! But if you wanted to freeze it, I’d recommend baking it, letting it cool completely, and then wrapping it tightly in plastic wrap followed by a layer of aluminum foil. It should freeze well for about 2-3 months. Thaw it overnight in the refrigerator before reheating. Regarding the glaze, I always recommend adding it *after* baking and cooling if you’re using one, especially if you’re going to store it. A warm glaze can get a bit sticky during storage.
Frequently Asked Questions
Final Thoughts
So there you have it – a recipe for cherry pineapple dump cake that’s almost ridiculously easy and unbelievably delicious. It’s one of those gems that proves you don’t need complicated steps or fancy techniques to create something truly special. The way the sweet cherries and tangy pineapple meld with that buttery, golden cake topping is just pure magic. It’s the perfect treat for potlucks, family dinners, or just a cozy night in. If you’re a fan of simple, comforting desserts that pack a flavor punch, you absolutely have to give this one a try. It’s a recipe that I know will become a staple in your kitchen too. I can’t wait to hear how yours turns out! If you give it a go, please leave a comment below and let me know what you think, or share any fun variations you tried. Happy baking!
Cherry Pineapple Dump Cake
Ingredients
Main Ingredients
- 540 ml crushed pineapple with juice
- 591 ml cherry pie filling
- 1 box yellow cake mix
- 227 g cold salted butter cut into squares
Instructions
Preparation Steps
- Preheat oven to 350°F. Grease a 9x13 inch baking pan with cooking spray.
- Spread crushed pineapple with juice on the bottom of the pan.
- Spread cherry pie filling on top of the pineapple.
- Spread cake mix on top of the cherry pie filling.
- Evenly spread out butter slices on top of the cake mix.
- Bake for 1 hour, until golden brown. Let cool slightly before serving.
Notes
Featured Comments
“Impressed! Clear steps and comforting results. Perfect for busy nights.”
“New favorite here — comforting. crowd-pleaser was spot on.”
“Super easy and turned out amazing! My family asked for seconds. Saving this one.”
“This sweet treat was absolutely loved — the silky really stands out. Thanks!”
“Made it tonight and wow — comforting! Will definitely make Cherry Pineapple Delight Easy Dump Cake again.”
“Packed with flavor and so simple. Exactly what I wanted from Cherry Pineapple Delight Easy Dump Cake.”


