


You know those nights? The ones where you’re staring into the fridge with absolutely no inspiration, and the thought of a complicated meal just makes you want to order pizza? Yeah, I know them well. That’s exactly when this chicken sandwich recipe comes to the rescue. It’s not just any chicken sandwich; this is the one that makes my whole family light up. It’s got that perfect crunch, a flavor explosion that’s not too fancy but totally satisfying, and it’s surprisingly straightforward. I’ve tried a million variations over the years, searching for that ultimate balance of crispy, juicy, and flavorful, and let me tell you, this is IT. It’s my go-to when I need a win, and honestly, it’s better than most of the restaurant versions I’ve had. The secret is in the simple technique, and once you try it, you’ll see why it’s a staple in my kitchen.

What is my crispy chicken sandwich recipe?
So, what exactly *is* this magical chicken sandwich recipe? Think of it as your ultimate comfort food, elevated. It’s a carefully crafted balance of juicy, tender chicken, encased in a super-crispy, flavorful coating, nestled between soft, toasted buns with all the best fixings. The “magic” part isn’t some obscure ingredient; it’s really about how we prepare the chicken and the coating to achieve that incredible, satisfying crunch that doesn’t fall off with the first bite. It’s essentially the perfect handheld meal. The name itself, “My Absolute Favorite Crispy Chicken Sandwich Recipe,” really sums it up because, well, it truly is my absolute favorite! It’s the kind of dish that feels special enough for a weekend treat but is practical enough for a weeknight dinner. It’s simple, honest, and delivers on pure deliciousness, every single time.
How to Make My Crispy Chicken Sandwich
Quick Overview
Making this incredible chicken sandwich recipe is simpler than you might think! The whole process is about getting that perfect crispy coating on juicy chicken and assembling it with your favorite fixings. We’ll start by preparing the chicken, then dip it into a seasoned coating, fry it to golden perfection, and finally, serve it on a toasted bun. It’s a straightforward sequence that guarantees a delicious outcome, making it totally manageable even on a busy weeknight. Trust me, the payoff is HUGE for the effort involved.
Ingredients
For the Chicken:
1.5 lbs boneless, skinless chicken thighs or breasts, cut into sandwich-sized pieces
A good pinch of salt and freshly ground Black Pepper
For the Main Batter:
2 cups all-purpose flour
1 tablespoon paprika (smoked if you have it, it adds such a lovely depth!)
2 teaspoons garlic powder
1 teaspoon onion powder
1 teaspoon dried thyme
1 teaspoon dried oregano
1 teaspoon cayenne pepper (or more if you like it spicier!)
1 teaspoon salt
1/2 teaspoon freshly ground black pepper
For the Wet Mixture:
1 cup buttermilk (or regular milk with 1 tablespoon lemon juice or vinegar, let it sit for 5 minutes)
2 large eggs
For Frying:
About 2-3 cups of neutral oil like canola, vegetable, or peanut oil
Step-by-Step Instructions
Step 1: Preheat & Prep Pan
First things first, let’s get our oil ready. Pour your chosen frying oil into a heavy-bottomed pot or Dutch oven, ensuring it’s at least 2-3 inches deep. We want to heat this up over medium-high heat until it reaches about 350°F (175°C). If you don’t have a thermometer, don’t worry! A good test is to drop a tiny bit of the flour mixture into the oil; it should sizzle and float to the top immediately. While the oil heats, pat your chicken pieces dry with paper towels and season them generously with salt and pepper. This step is crucial for flavor!
Step 2: Mix Dry Ingredients
In a large shallow bowl or a wide dish, whisk together the flour, paprika, garlic powder, onion powder, thyme, oregano, cayenne pepper, salt, and black pepper. Make sure it’s all really well combined. We want that flavor to be evenly distributed throughout the coating. You’re looking for a nice, uniform color and aroma – it should smell amazing already!
Step 3: Mix Wet Ingredients
In a separate medium bowl, whisk together the buttermilk (or your milk mixture) and the eggs until they’re thoroughly combined and slightly frothy. This wet mixture is what helps the flour coating stick beautifully to the chicken, creating that irresistible crust.
Step 4: Combine
Now for the fun part! Take each seasoned chicken piece and dip it into the wet mixture, letting any excess drip off for a second. Then, transfer it to the bowl with the seasoned flour. Dredge the chicken thoroughly, pressing the flour onto it to ensure it’s completely coated. You can even give it a little shake to get off any loose bits, then dip it back into the wet mixture for a double coating – this is my little secret for extra crispiness! Finally, dredge it in the flour *again*, pressing it on firmly. Place the coated chicken pieces on a wire rack set over a baking sheet while you coat the rest. This prevents them from sticking and helps keep the coating dry.
Step 5: Prepare Filling
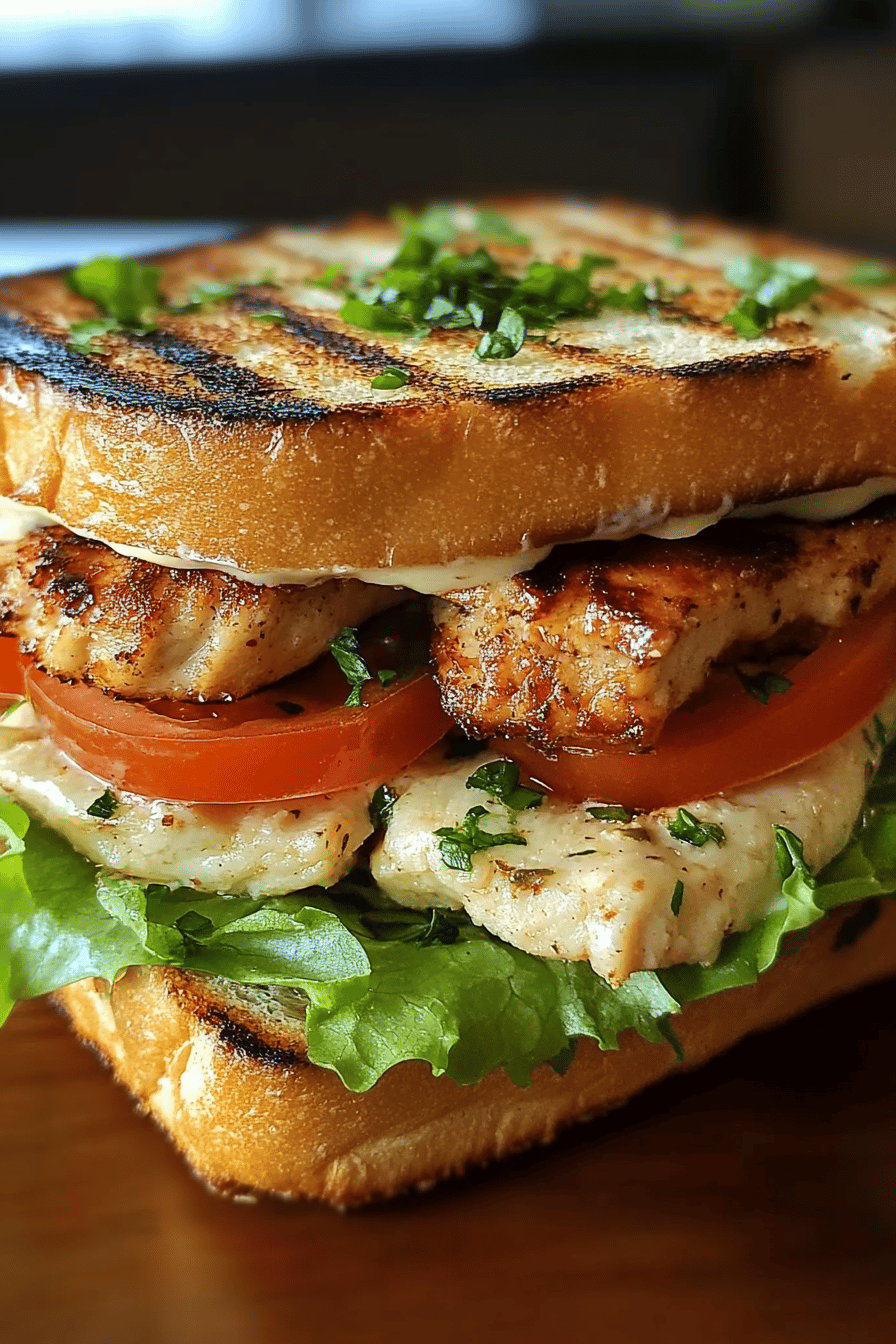
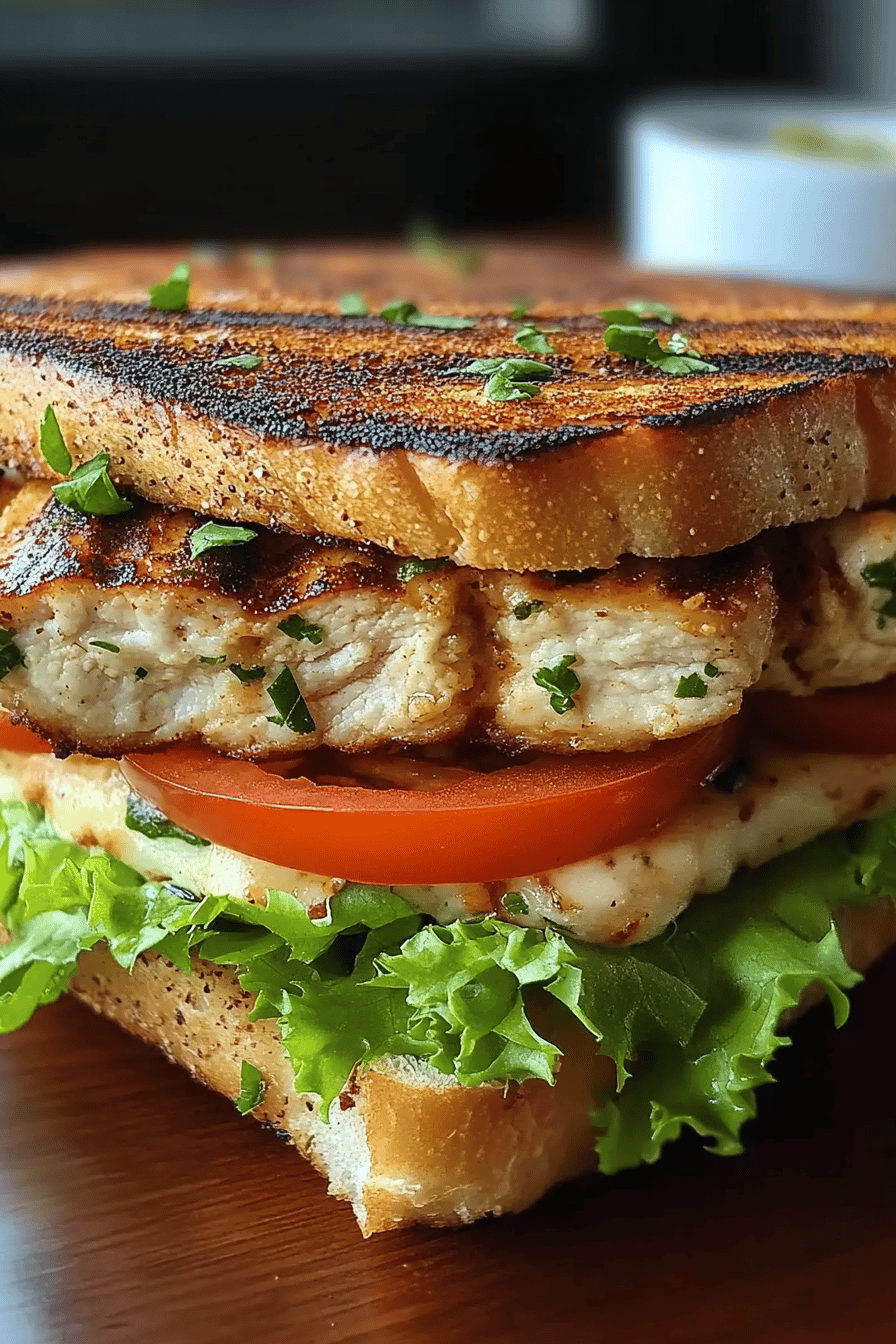
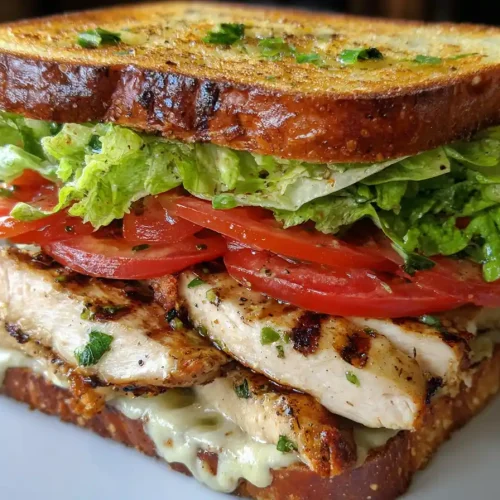
While the chicken is getting its coating ready, it’s time to prep any toppings you want! I usually toast my buns lightly in a pan with a little butter or mayo. Slice up some crisp lettuce, ripe tomatoes, and maybe some tangy pickles. If you’re feeling fancy, a quick homemade aioli or a simple mix of mayo, a dash of hot sauce, and a squeeze of lime is divine. Having everything ready means you can assemble your masterpiece as soon as the chicken is done.
Step 6: Layer & Swirl
This step is about timing and assembly! Once your chicken is perfectly golden brown and crispy, let it drain for just a moment on a wire rack. Then, it’s time to build your sandwich. Spread your favorite sauce on the bottom bun, place the hot, crispy chicken on top, then add your lettuce, tomato, pickles, and finally, the top bun. The heat from the chicken will slightly melt any cheese if you add it, and the juices will mingle with the sauce – pure bliss!
Step 7: Bake
Okay, sorry, I got ahead of myself! We aren’t baking this chicken, we’re FRYING it! So, once the oil is at 350°F (175°C), carefully place a few chicken pieces into the hot oil, being careful not to overcrowd the pot. We want them to have space to cook evenly and stay crispy. Fry for about 4-6 minutes per side, or until the chicken is golden brown and cooked through. The internal temperature should reach 165°F (74°C). Use tongs or a slotted spoon to remove the chicken and place it on a clean wire rack set over a baking sheet to drain any excess oil. Don’t put them on paper towels, as this can make the bottom soggy!
Step 8: Cool & Glaze
This step isn’t really applicable here since we’re frying, not baking. But if you were to make a variation that required cooling, you’d let it cool slightly on a wire rack. For this sandwich, we want that chicken hot and juicy straight from the fryer!
Step 9: Slice & Serve
Assemble your glorious chicken sandwich on a toasted bun with your favorite toppings. I love a good smear of tangy mayo or aioli, some crisp lettuce, and maybe a few slices of ripe tomato and crunchy pickles. Slice it in half if you like, though I usually just dive right in! Serve immediately while the chicken is piping hot and unbelievably crispy. Enjoy every single bite!
What to Serve It With
This chicken sandwich recipe is practically a meal in itself, but it also loves to be paired with some fantastic sides. For a classic feel, you can’t go wrong with crispy french fries or Sweet Potato fries. They just *belong* together! If you’re looking for something a little lighter and fresher, a vibrant coleslaw with a creamy dressing is a fantastic contrast to the rich, fried chicken. I also adore serving it with a side of macaroni and cheese – pure comfort food indulgence! For a slightly healthier angle, a simple green salad with a bright vinaigrette or some roasted broccoli or green beans works beautifully to balance out the richness. And don’t forget the drinks! A cold, crisp lager or even a simple iced tea is perfect. My family also loves these with my homemade baked beans, which are a bit of a project, but oh-so-worth-it when we have the time.
Top Tips for Perfecting Your Crispy Chicken Sandwich
Okay, let’s talk about elevating this chicken sandwich recipe from great to absolutely legendary. First, for the chicken itself, I always swear by using thighs. They stay incredibly moist and flavorful even after frying. If you’re using breasts, be extra mindful of not overcooking them. The chicken prep is key: patting them *completely* dry is non-negotiable. Moisture is the enemy of crispiness! For the coating, the double-dip method I mentioned in the steps is a game-changer. It creates that super-thick, craggy crust that stays crisp. Don’t be afraid to really press that flour onto the chicken. When it comes to mixing advice, overmixing your wet batter can make it tough, and overmixing your flour coating can result in a dense crust. Mix just until combined. For frying, patience is your best friend. Let the oil get to the right temperature (350°F / 175°C) and don’t overcrowd the pan. This is crucial for even cooking and maintaining that high heat. If the oil temperature drops too much, you’ll end up with greasy chicken, and nobody wants that. I learned this the hard way early on! Also, let the chicken drain on a wire rack, not paper towels. This keeps the bottom crisp. And for the ultimate sandwich experience, make sure your buns are lightly toasted. A little butter or mayo in the pan gives them a lovely golden hue and an extra layer of flavor. My kids always go wild when I add a slice of sharp cheddar cheese to their sandwich while the chicken is still hot, letting it melt perfectly. It’s a simple addition that really elevates the whole thing!
Storing and Reheating Tips
If, by some miracle, you have leftovers of this amazing chicken sandwich recipe (which rarely happens in my house!), here’s how to best store and reheat them. For optimal freshness, it’s best to store the components separately. Store the fried chicken in an airtight container in the refrigerator for up to 2-3 days. The crispiness won’t be quite the same as fresh, but it’ll still be delicious. Store your assembled sandwich components (toppings, sauce) separately as well. When it comes to reheating, the oven is your best friend for trying to bring back some of that crunch. Place the leftover chicken on a wire rack set over a baking sheet and heat in a preheated oven at 375°F (190°C) for about 8-10 minutes, or until heated through and slightly re-crisped. You can also use an Air Fryer if you have one, which works wonderfully for this! For a quick fix, the microwave will heat it through, but it will soften the coating considerably. If you’re planning to eat these cold (which is surprisingly still tasty!), just keep them in the fridge. My tip for maximizing flavor when reheating is to give the chicken a quick brush with a little melted butter or a drizzle of hot honey before popping it into the oven. It adds a lovely sheen and an extra layer of taste!
Frequently Asked Questions
Final Thoughts
There you have it – my go-to chicken sandwich recipe that I truly believe is one of the best you’ll ever make. It’s the kind of meal that brings smiles to faces, a comforting crunch, and a burst of incredible flavor that just hits the spot every single time. It proves that you don’t need complicated steps or fancy ingredients to create something truly spectacular in your own kitchen. This recipe is about wholesome, delicious food that’s made with love. I hope you give it a try and love it as much as my family and I do. If you make it, please let me know in the comments below how it turned out! I’d love to hear about your favorite toppings or any fun twists you put on it. Happy cooking, and enjoy every mouthwatering bite!
Classic Chicken Sandwich
Ingredients
Chicken and Marinade
- 2 boneless, skinless chicken breasts Chicken Breasts
- 2 tablespoons Olive Oil
- 1 teaspoon Garlic Powder
- 0.5 teaspoon Paprika
- 0.25 teaspoon Salt
- 0.25 teaspoon Black Pepper
Sandwich Assembly
- 4 slices Bread Your favorite kind (e.g., brioche, sourdough)
- 4 tablespoons Mayonnaise
- 4 leaves Lettuce
- 8 slices Tomato
- 2 tablespoons Butter softened
Instructions
Preparation Steps
- In a bowl, combine olive oil, garlic powder, paprika, salt, and pepper. Add chicken breasts and toss to coat evenly. Let marinate for at least 10 minutes.
- Preheat a grill pan or outdoor grill to medium-high heat. Cook chicken breasts for 6-8 minutes per side, or until internal temperature reaches 165°F (74°C). Let rest for 5 minutes before slicing.
- Butter one side of each slice of bread and toast in a skillet or on the grill until golden brown.
- Assemble the sandwiches: Spread mayonnaise on the un-toasted side of the bread. Top with lettuce, sliced chicken, and tomato slices.
- Place the top slice of bread on each sandwich and serve immediately.
Notes
Featured Comments
“Impressed! Clear steps and crowd-pleaser results. Perfect for busy nights.”
“New favorite here — absolutely loved. crowd-pleaser was spot on.”
“Super easy and turned out amazing! My family asked for seconds. Saving this one.”
“This sweet treat was absolutely loved — the balanced really stands out. Thanks!”
“Made it tonight and wow — spot on! Will definitely make Chicken sandwich recipe again.”
“Packed with flavor and so simple. Exactly what I wanted from Chicken sandwich recipe.”


