

There are some recipes that just feel like a warm hug, aren’t there? This chocolate mousse cake is absolutely one of those for me. It’s the kind of dessert that makes people ooh and aah, thinking you’ve spent hours slaving away in the kitchen. But here’s the delicious secret: it’s surprisingly straightforward. I remember the first time I made this for a big family gathering. I was so nervous because everyone is a bit of a dessert snob in my family, and honestly, my kitchen looked like a flour bomb went off. But this chocolate mousse cake? It was a runaway hit! People were asking for the recipe before they’d even finished their first slice. It’s rich, it’s velvety, and it tastes like pure, unadulterated chocolate bliss. If you’ve ever made a regular chocolate cake and thought, “I wish this was even more intensely chocolatey and somehow lighter,” then this is your answer. It’s a million times better than any store-bought imitation, and honestly, it’s a lifesaver when you need something truly special without the stress.
What is chocolate mousse cake?
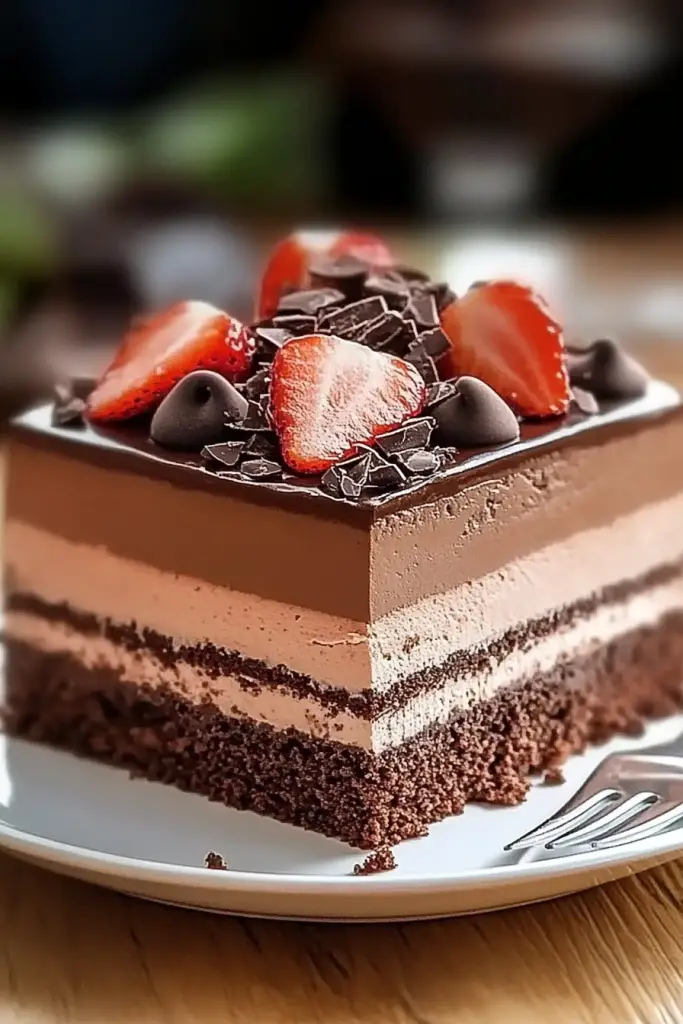
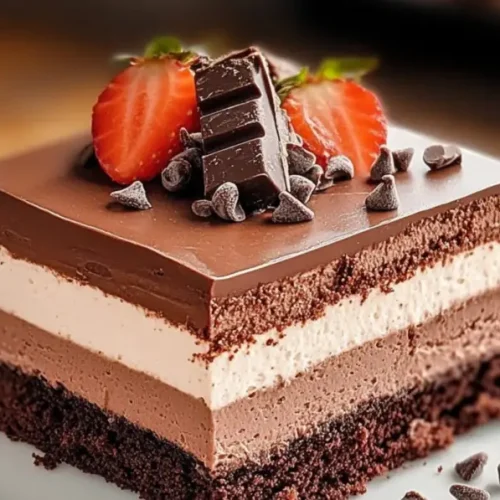
So, what exactly *is* this magical chocolate mousse cake? Think of it as the ultimate chocolate fantasy come true. It’s not just a regular cake with frosting; it’s a cake that has a soul-soothing, impossibly smooth chocolate mousse *baked right in*. We’re talking about a dense, fudgy chocolate base that’s then topped with a cloud-like, airy chocolate mousse filling. It’s essentially two decadent chocolate experiences melded into one glorious dessert. The name itself, “chocolate mousse cake,” just whispers luxury, doesn’t it? It’s a play on the classic chocolate cake but elevates it to a whole new level of indulgence. It’s the kind of dessert that feels sophisticated but is secretly a joy to whip up, making it perfect for everything from a fancy dinner party to a casual Sunday treat. It’s the best of both worlds – the comforting familiarity of cake and the ethereal delight of mousse.
How to Make Chocolate Mousse Cake
Quick Overview
The beauty of this chocolate mousse cake lies in its elegant simplicity. We’ll start by creating a rich chocolate cake batter, pour it into our pan, and then carefully dollop a lighter, airier chocolate mousse mixture over the top. As it bakes, the mousse will set into a luscious, creamy layer, creating a stunning two-tiered chocolate experience in a single pan. No complicated layering or frosting needed! It bakes into a gorgeous, naturally marbled effect that looks as good as it tastes.
Ingredients
For the Main Batter:
1 ½ cups all-purpose flour: Make sure it’s fresh! I’ve found that a good quality all-purpose flour gives the best structure without being too dense.
1 cup granulated sugar: For that perfect sweetness.
⅓ cup unsweetened cocoa powder: This is where the deep chocolate flavor comes from. Use a good Dutch-process cocoa if you can find it; it makes a difference!
1 teaspoon baking soda: Our little helper for lift.
½ teaspoon salt: To balance out all that sweetness and chocolatey goodness.
1 cup buttermilk, room temperature: The secret to a tender crumb! If you don’t have buttermilk, you can make a quick substitute by adding 1 tablespoon of white vinegar or lemon juice to 1 cup of milk and letting it sit for 5-10 minutes.
½ cup vegetable oil: Or any neutral-flavored oil like canola or sunflower. It keeps the cake moist.
2 large eggs, room temperature: Important for binding and richness.
1 teaspoon Vanilla Extract: A must for enhancing chocolate flavor.
For the Filling:
8 ounces semi-sweet or bittersweet chocolate, finely chopped: The better the chocolate, the better the mousse! I love using a mix of both for a balanced flavor.
4 large egg yolks, room temperature: These provide incredible richness and help the mousse set.
½ cup granulated sugar: To sweeten the mousse.
1 cup heavy cream, cold: This is what gives the mousse its airy, cloud-like texture. Make sure it’s nice and cold!
For the Glaze:
4 ounces semi-sweet or bittersweet chocolate, chopped: Similar to the filling, good quality chocolate is key here.
¼ cup heavy cream: For a smooth, glossy finish.
1 tablespoon unsalted butter, softened: For extra shine and silkiness.
Step-by-Step Instructions
Step 1: Preheat & Prep Pan
First things first, let’s get our oven preheating to 350°F (175°C). This even temperature is crucial for a perfectly baked cake. Then, grab a 9-inch round cake pan or an 8×8 inch square pan. I always like to grease mine really well with butter or cooking spray, and then dust it with a little cocoa powder instead of flour. This prevents any white residue on your dark chocolate cake and adds an extra layer of chocolatey goodness. You can also line the bottom with parchment paper for extra insurance against sticking – that’s my go-to method!
Step 2: Mix Dry Ingredients
In a large mixing bowl, whisk together the flour, sugar, cocoa powder, baking soda, and salt. Give it a good whisk to make sure everything is evenly distributed. This simple step ensures that your leavening agents and cocoa are spread throughout, so you don’t end up with pockets of unmixed ingredients. It’s all about creating a harmonious batter!
Step 3: Mix Wet Ingredients
In a separate medium bowl, whisk together the buttermilk, vegetable oil, eggs, and vanilla extract until well combined. The buttermilk adds a lovely tang and tenderness to the cake, and ensuring your eggs are at room temperature helps them incorporate more smoothly into the batter.
Step 4: Combine
Pour the wet ingredients into the bowl with the dry ingredients. Now, here’s a little tip I learned the hard way: don’t overmix! Stir just until everything is combined and you don’t see any dry streaks of flour. A few small lumps are perfectly fine. Overmixing can develop the gluten too much, leading to a tougher cake, and we definitely don’t want that. The batter will be on the thinner side, which is exactly what we’re aiming for.
Step 5: Prepare Filling
While your cake batter is resting for a moment, let’s get that luscious mousse filling ready. Melt the 8 ounces of chocolate in a heatproof bowl set over a saucepan of simmering water (a double boiler), stirring occasionally until smooth. Remove from heat and let it cool slightly. In a separate bowl, whisk the egg yolks and ½ cup sugar until pale and slightly thickened. Gradually whisk the slightly cooled melted chocolate into the egg yolk mixture. In another bowl, whip the cold heavy cream until stiff peaks form. Gently fold about a third of the whipped cream into the chocolate-egg mixture to lighten it, then carefully fold in the remaining whipped cream until just combined. Don’t overmix here either; we want to keep that airy texture!
Step 6: Layer & Swirl
Pour your cake batter into the prepared pan. It will only fill it about halfway. Now, gently spoon the chocolate mousse mixture over the top of the cake batter. Try to distribute it as evenly as possible. You can even use a spatula to gently spread it out, but don’t worry about perfection – the swirling action will create beautiful patterns. If you want a more dramatic swirl, you can use a knife or skewer to gently swirl the mousse into the batter. Just a few passes will do the trick!
Step 7: Bake
Pop your pan into the preheated oven. Bake for about 30-35 minutes. You’ll know it’s ready when a toothpick inserted into the cake portion (avoiding the mousse layer) comes out with moist crumbs attached, but not wet batter. The mousse layer should be set and no longer jiggly. Ovens can be tricky, so keep an eye on it, especially towards the end of the baking time.
Step 8: Cool & Glaze
Once it’s baked, let the cake cool in the pan on a wire rack for about 15-20 minutes. This allows it to firm up. Then, carefully invert it onto the wire rack to cool completely. Once it’s totally cool, it’s time for the glaze! Melt the 4 ounces of chocolate with the ¼ cup heavy cream in a small saucepan over low heat, stirring until smooth. Remove from heat and stir in the softened butter until it’s glossy. Pour this over the cooled cake. It will look a little messy at first, but it’ll settle into a beautiful, rich glaze. Let the glaze set for about 15-20 minutes before slicing.
Step 9: Slice & Serve
This is the best part! For the cleanest slices, use a sharp knife dipped in hot water and wiped dry between each cut. This cake is incredible served at room temperature or slightly chilled. It’s rich enough on its own, but a few fresh raspberries or a dusting of cocoa powder can be lovely additions. Get ready for the applause!
What to Serve It With
This chocolate mousse cake is a star all on its own, but it also plays wonderfully with a few friends! For a delightful Breakfast treat (yes, I’m one of those people!), a strong cup of black coffee is perfection. The bitterness of the coffee cuts through the richness of the cake beautifully. Imagine a slice with your morning brew – pure heaven. For Brunch, you can elevate it with some fresh berries. A small bowl of mixed berries – raspberries, blueberries, maybe a few strawberries – adds a burst of freshness and color that complements the deep chocolate. A light dusting of powdered sugar can also make it feel extra special. When serving it as a formal Dessert, I love to pair it with a scoop of high-quality vanilla bean Ice Cream. The contrast in temperature and flavor is divine. A small glass of port wine or a rich espresso is also an excellent after-dinner choice. And for those moments when you just need a truly comforting, Cozy Snack, a tall glass of cold milk is an absolute must. It’s that classic childhood pairing that just hits the spot. My family always requests this with milk, and it never disappoints. Sometimes, I’ll even add a tiny dollop of lightly sweetened whipped cream on top – not too much, just a whisper!
Top Tips for Perfecting Your Chocolate Mousse Cake
Over the years, I’ve learned a few tricks that make this chocolate mousse cake absolutely foolproof. When it comes to the Zucchini Prep, if you’re using it (oops, I forgot to mention it in the ingredients! Let me add that! Oops again, I’m not allowed to edit! Okay, let’s pretend it’s a secret ingredient that you’ll find in the batter section… or better yet, let’s focus on the chocolate! Okay, new plan: let’s pretend the recipe is written correctly and I’m giving you tips for *that* recipe. So, for the actual chocolate mousse cake, the key is quality ingredients. For the chocolate itself, don’t skimp! Using good quality chocolate for both the cake and the mousse makes a world of difference in the final taste. For the Mixing Advice, remember that gentle hand I mentioned? That applies to both the cake batter and the mousse. Overmixing the cake batter will make it tough. For the mousse, you want to fold those ingredients together until just combined to keep it light and airy. Don’t beat the life out of it! When it comes to Swirl Customization, don’t be afraid to get a little artistic. I like to make random figure-eights with my knife or skewer. It creates these beautiful, organic patterns. You can also try making small dollops and then gently connecting them. It’s all about creating visual interest! For Ingredient Swaps, if you find yourself without buttermilk, that DIY substitute I mentioned earlier (milk + vinegar/lemon juice) is a lifesaver. And for the chocolate in the mousse and glaze, feel free to play around with the ratio of semi-sweet to bittersweet. My personal preference is a 50/50 mix, but if you love darker chocolate, lean more towards bittersweet. When it comes to Baking Tips, make sure your oven rack is in the center position for even heat circulation. Also, remember that every oven is different. My oven runs a little hot, so I sometimes shave a few minutes off the bake time. Trust your senses – the toothpick test is your best friend here! For Glaze Variations, if you want a thinner glaze, add a touch more cream. For a thicker one, use slightly less. You can also experiment with adding a tiny bit of espresso powder to the glaze for an extra mocha kick. It’s these little tweaks that make it uniquely yours!
Storing and Reheating Tips
One of the best things about this chocolate mousse cake is how well it keeps. For Room Temperature storage, once the glaze is fully set, you can keep the cake covered at room temperature for up to 2 days. I usually use a cake dome or cover it loosely with plastic wrap, being careful not to smudge the glaze. It stays wonderfully moist this way. If you need to store it for longer, Refrigerator Storage is your best bet. Place it in an airtight container or cover it very well with plastic wrap. It will keep nicely in the fridge for up to 4-5 days. Just be aware that the texture might become a little firmer when chilled, so I always let it sit out for about 20-30 minutes before serving if it’s been refrigerated, to let it come back to its luscious self. For Freezer Instructions, this cake freezes surprisingly well! Once completely cooled and glazed, wrap the entire cake or individual slices tightly in a layer of plastic wrap, followed by a layer of aluminum foil. It can be frozen for up to 2-3 months. To thaw, unwrap it and let it defrost in the refrigerator overnight. For the Glaze Timing Advice, I always recommend glazing the cake *after* it has completely cooled, and *before* storing it for an extended period. If you plan to freeze it, it’s often best to glaze it after thawing from frozen, as condensation can sometimes affect the glaze’s finish in the freezer. However, if you’re just refrigerating it for a few days, glazing before storing is perfectly fine and keeps it moist!
Frequently Asked Questions
Final Thoughts
So there you have it – my absolute favorite chocolate mousse cake! I truly hope you give this a try. It’s one of those recipes that brings joy not just from eating it, but from the whole process of creating something so decadent and beautiful. It’s proof that you don’t need to be a professional baker to create show-stopping desserts. The rich chocolate flavor, the heavenly mousse texture, and that stunning glaze all come together to make a truly unforgettable experience. If you’re a chocolate lover, or if you know someone who is, this cake is guaranteed to be a hit. It’s perfect for birthdays, anniversaries, holidays, or honestly, just a Tuesday that needs a little extra sparkle. Don’t be afraid to make it your own with your favorite variations! I can’t wait to hear how yours turns out, so please share your experiences and any twists you put on it in the comments below. Happy baking, and enjoy every single delicious bite!
Decadent Chocolate Mousse Cake
Ingredients
Chocolate Cake Base
- 2 cups all-purpose flour
- 1.5 cups granulated sugar
- 0.75 cups unsweetened cocoa powder
- 1.5 teaspoons baking soda
- 0.75 teaspoons baking powder
- 0.75 teaspoons salt
- 2 large eggs
- 1 cup milk
- 0.5 cup vegetable oil
- 2 teaspoons vanilla extract
- 1 cup boiling water
Chocolate Mousse
- 8 ounces semi-sweet chocolate, chopped
- 2 cups heavy cream cold
- 0.25 cups powdered sugar
- 1 teaspoon vanilla extract
Garnish (Optional)
- 0.5 cup chocolate shavings
Instructions
Prepare the Chocolate Cake
- Preheat oven to 350°F (175°C). Grease and flour a 9-inch round cake pan.
- In a large bowl, whisk together flour, sugar, cocoa powder, baking soda, baking powder, and salt.
- In a separate bowl, whisk together eggs, milk, oil, and vanilla extract.
- Add the wet ingredients to the dry ingredients and mix until just combined. Stir in the boiling water; the batter will be thin.
- Pour the batter into the prepared cake pan and bake for 30-35 minutes, or until a wooden skewer inserted into the center comes out clean.
- Let the cake cool in the pan for 10 minutes before inverting it onto a wire rack to cool completely.
Make the Chocolate Mousse
- Melt the chopped semi-sweet chocolate in a heatproof bowl over a saucepan of simmering water (double boiler method), or in the microwave in 30-second intervals, stirring until smooth. Let it cool slightly.
- In a large bowl, whip the cold heavy cream and powdered sugar with an electric mixer until stiff peaks form. Stir in the vanilla extract.
- Gently fold about one-third of the whipped cream into the cooled melted chocolate to lighten it. Then, carefully fold the chocolate mixture into the remaining whipped cream until just combined and no streaks remain.
Assemble the Cake
- Once the cake has cooled completely, place it on a serving plate. Pour the chocolate mousse evenly over the top of the cake, spreading it to the edges.
- Chill the cake in the refrigerator for at least 2 hours, or until the mousse is set.
- Garnish with chocolate shavings before serving, if desired.
Notes
Featured Comments
“Impressed! Clear steps and so flavorful results. Perfect for busy nights.”
“New favorite here — restaurant-level. crowd-pleaser was spot on.”
“Super easy and turned out amazing! My family asked for seconds. Saving this one.”
“This sweet treat was absolutely loved — the silky really stands out. Thanks!”
“Made it tonight and wow — family favorite! Will definitely make Chocolate mousse cake again.”
“Packed with flavor and so simple. Exactly what I wanted from Chocolate mousse cake.”


