

Oh, where do I even begin with this Chocolate Raspberry cake? It’s one of those recipes that feels like a warm hug on a chilly day, or a spontaneous celebration on a Tuesday. I remember the first time I really nailed it – it was after a particularly rough week, and I just needed something comforting and delicious. The aroma that filled my kitchen as it baked was pure magic, and the first bite? Well, let’s just say it was love at first taste. This isn’t just any cake; it’s my go-to for birthdays, potlucks, or honestly, just when that chocolate craving hits hard. It’s got that perfect balance of deep, rich chocolate and the bright, slightly tart burst of raspberries. It’s like a sophisticated grown-up version of a childhood treat, and everyone who tries it asks for the recipe. Seriously, this chocolate raspberry cake is a lifesaver when you want something impressive without a whole lot of fuss.
What is a chocolate raspberry cake?
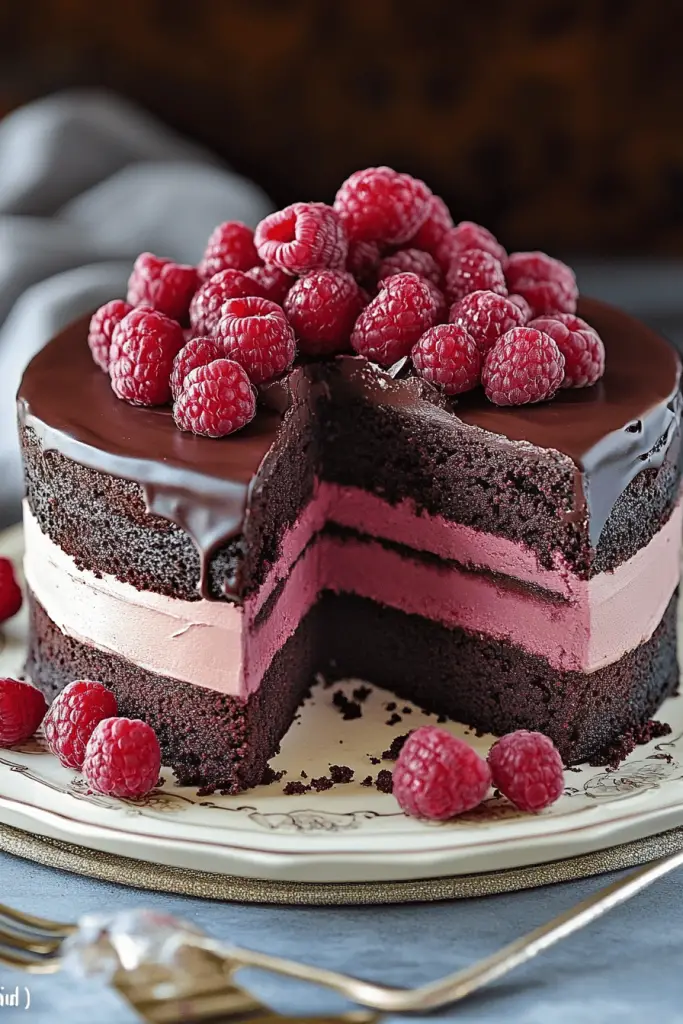
So, what exactly *is* this magical creation? Think of it as your ultimate chocolate cake, elevated. It’s a moist, decadent chocolate cake batter that’s infused with swirls of vibrant raspberry goodness. The “chocolate raspberry cake” name itself tells the whole story – it’s a harmonious marriage of two of the most beloved flavors. It’s not overly fussy; it’s essentially a really well-executed chocolate cake with the delightful surprise of fresh or preserved raspberries woven throughout. This isn’t a dense, heavy cake, nor is it light and airy to the point of being flimsy. It’s got that perfect middle ground – tender crumb, a rich chocolate flavor that isn’t bitter, and those little pockets of fruity bliss that cut through the richness. It’s the kind of cake that makes you close your eyes with the first bite and just savor it.
How to Make Chocolate Raspberry Cake
Quick Overview
This recipe breaks down the process into simple, manageable steps. You’ll mix up a rich chocolate cake batter, prepare a quick raspberry filling, then layer and swirl them together before baking to perfection. The beauty of this method is that it creates stunning visual appeal with minimal effort, and the result is a cake that’s incredibly moist and bursting with flavor. It’s designed to be foolproof, even for beginner bakers, ensuring you get a gorgeous, delicious chocolate raspberry cake every single time.
Ingredients
For the Main Batter:
- 2 cups all-purpose flour: I always opt for a good quality all-purpose flour. For a slightly richer crumb, you could try a cake flour, but all-purpose works beautifully here.
- 1 ¾ cups granulated sugar: This amount ensures the cake is sweet enough to balance the raspberries without being cloying.
- ¾ cup unsweetened cocoa powder: Use a good Dutch-processed cocoa if you can find it; it gives a deeper, darker chocolate flavor.
- 1 ½ teaspoons baking soda: This is what gives our cake its lovely lift.
- 1 teaspoon baking powder: Working with the baking soda for maximum fluffiness!
- ½ teaspoon salt: Essential for balancing the sweetness and enhancing the chocolate flavor.
- 2 large eggs: At room temperature, they incorporate much better into the batter.
- 1 cup buttermilk: This is my secret to an incredibly moist cake! If you don’t have buttermilk, you can make a substitute by adding 1 tablespoon of white vinegar or lemon juice to 1 cup of regular milk and letting it sit for 5-10 minutes.
- ½ cup vegetable oil (or other neutral oil): This keeps the cake wonderfully tender and moist.
- 1 teaspoon vanilla extract: Pure vanilla extract makes a world of difference!
- 1 cup hot water or hot brewed coffee: Coffee really deepens the chocolate flavor without making it taste like coffee. Trust me on this one!
For the Filling:
- 1 ½ cups fresh or frozen raspberries: If using frozen, no need to thaw them completely; their slightly icy texture helps create a lovely swirl.
- 2 tablespoons granulated sugar: Just to coax out the juices and a touch of sweetness.
- 1 tablespoon cornstarch: This will help thicken the raspberry juices so they don’t make the cake soggy.
For the Glaze:
- 1 cup powdered sugar, sifted: Sifting is key to avoiding lumps in your glaze!
- 2-3 tablespoons milk or heavy cream: Start with 2 tablespoons and add more until you reach your desired consistency.
- ½ teaspoon vanilla extract: For a hint of extra flavor.
Step-by-Step Instructions
Step 1: Preheat & Prep Pan
First things first, get that oven preheating to 350°F (175°C). Grab a 9-inch round cake pan – I prefer a springform pan because it makes removing the cake so much easier. Grease it really well with butter or cooking spray, then dust it with a little cocoa powder. Tap out any excess. This ensures your beautiful chocolate raspberry cake won’t stick!
Step 2: Mix Dry Ingredients
In a large mixing bowl, whisk together the flour, granulated sugar, cocoa powder, baking soda, baking powder, and salt. Make sure they’re all well combined. This step is super important for even distribution of the leavening agents, so you don’t get any weird pockets in your cake.
Step 3: Mix Wet Ingredients
In a separate medium bowl, whisk together the eggs, buttermilk, oil, and Vanilla Extract until everything is nice and smooth. Don’t over-whisk; just combine them well.
Step 4: Combine
Pour the wet ingredients into the dry ingredients. Mix on low speed (or with a spatula) until just combined. It will look thick at this point. Now, carefully pour in the hot water or hot coffee. Mix on low speed until the batter is smooth and pourable. Don’t be alarmed by how thin it looks; this is what makes the cake so incredibly moist!
Step 5: Prepare Filling
In a small bowl, gently toss the raspberries with the granulated sugar and cornstarch. If you’re using fresh raspberries, be extra gentle so they don’t totally break down. This little mixture will become a delightful, slightly thickened fruity swirl.
Step 6: Layer & Swirl
Pour about half of the chocolate cake batter into your prepared pan. Sprinkle about half of the raspberry mixture over the batter. Then, pour the remaining batter on top, followed by the rest of the raspberries. Now, here’s where the magic happens: take a knife or a skewer and gently swirl it through the batter, creating beautiful patterns. Don’t over-swirl, or you’ll end up with just pink batter!
Step 7: Bake
Bake for 30-40 minutes, or until a wooden skewer inserted into the center comes out clean or with just a few moist crumbs attached. Ovens can be finicky, so always check a little earlier than the minimum time.
Step 8: Cool & Glaze
Let the cake cool in the pan for about 10-15 minutes before inverting it onto a wire rack to cool completely. This is crucial! You want it fully cooled before glazing. While it’s cooling, whisk together the sifted powdered sugar, 2 tablespoons of milk/cream, and vanilla extract for the glaze. Add more liquid a teaspoon at a time until it’s a drizzle-able consistency. Once the cake is completely cool, drizzle the glaze over the top, letting it drip down the sides.
Step 9: Slice & Serve
Once the glaze has set a bit, slice your gorgeous chocolate raspberry cake and serve! It’s delicious at room temperature or slightly chilled.
What to Serve It With
This chocolate raspberry cake is pretty spectacular on its own, but there are definitely ways to make the experience even more delightful!
For Breakfast: Yep, I’m one of those people who thinks a slice of this cake is totally acceptable for breakfast, especially on a weekend. I love it with a strong cup of coffee – the bitterness of the coffee really cuts through the sweetness of the cake. Sometimes, I’ll even have a small dollop of Greek yogurt on the side for a little protein boost. It feels indulgent without being too heavy.
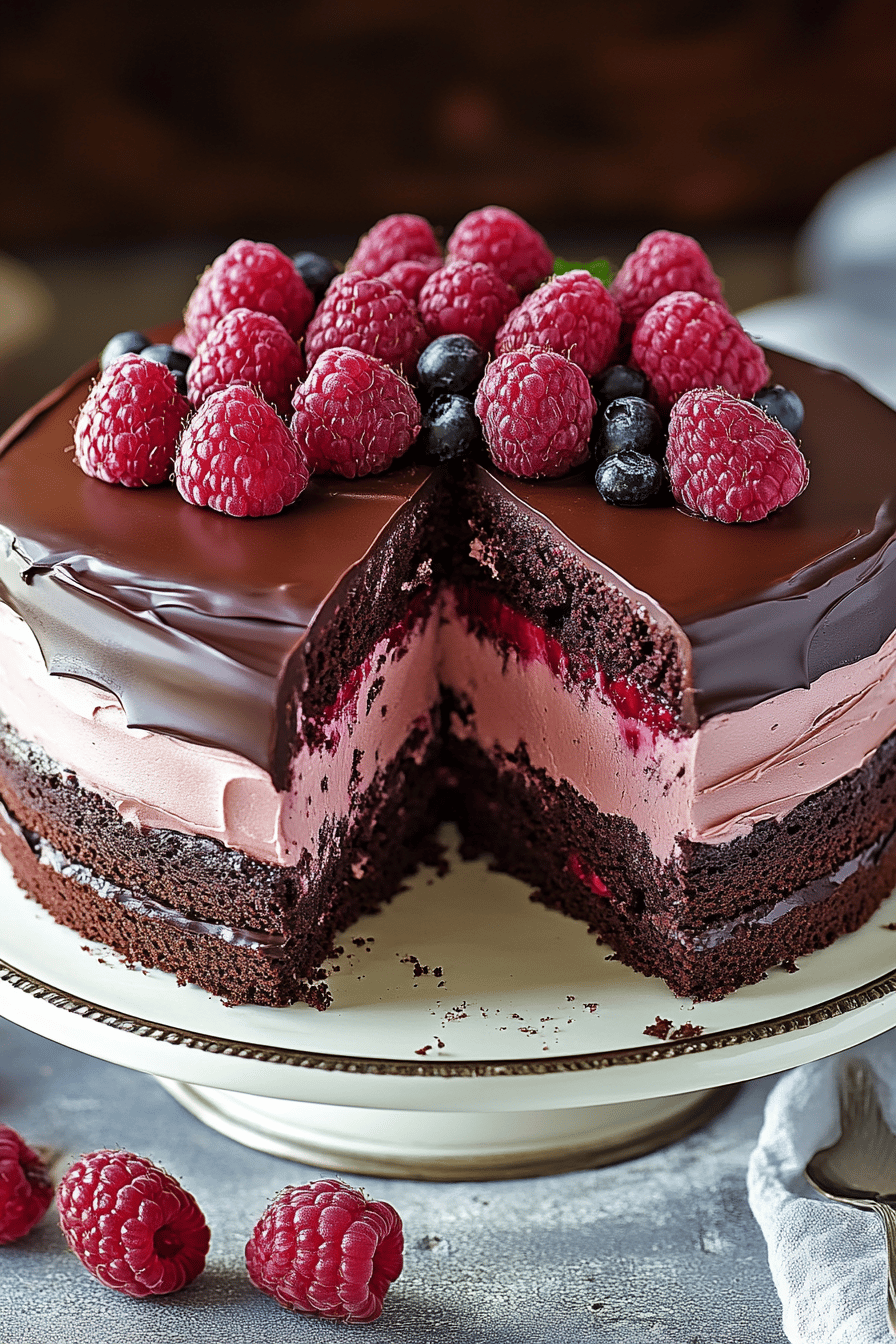
For Brunch: If you’re hosting a brunch, this cake is a showstopper. I like to present it with a few fresh raspberries scattered around the plate and maybe a dusting of powdered sugar. For drinks, a mimosa or a sparkling rosé pairs beautifully with the fruit notes in the cake. It’s a lovely way to add a touch of elegance to your spread.
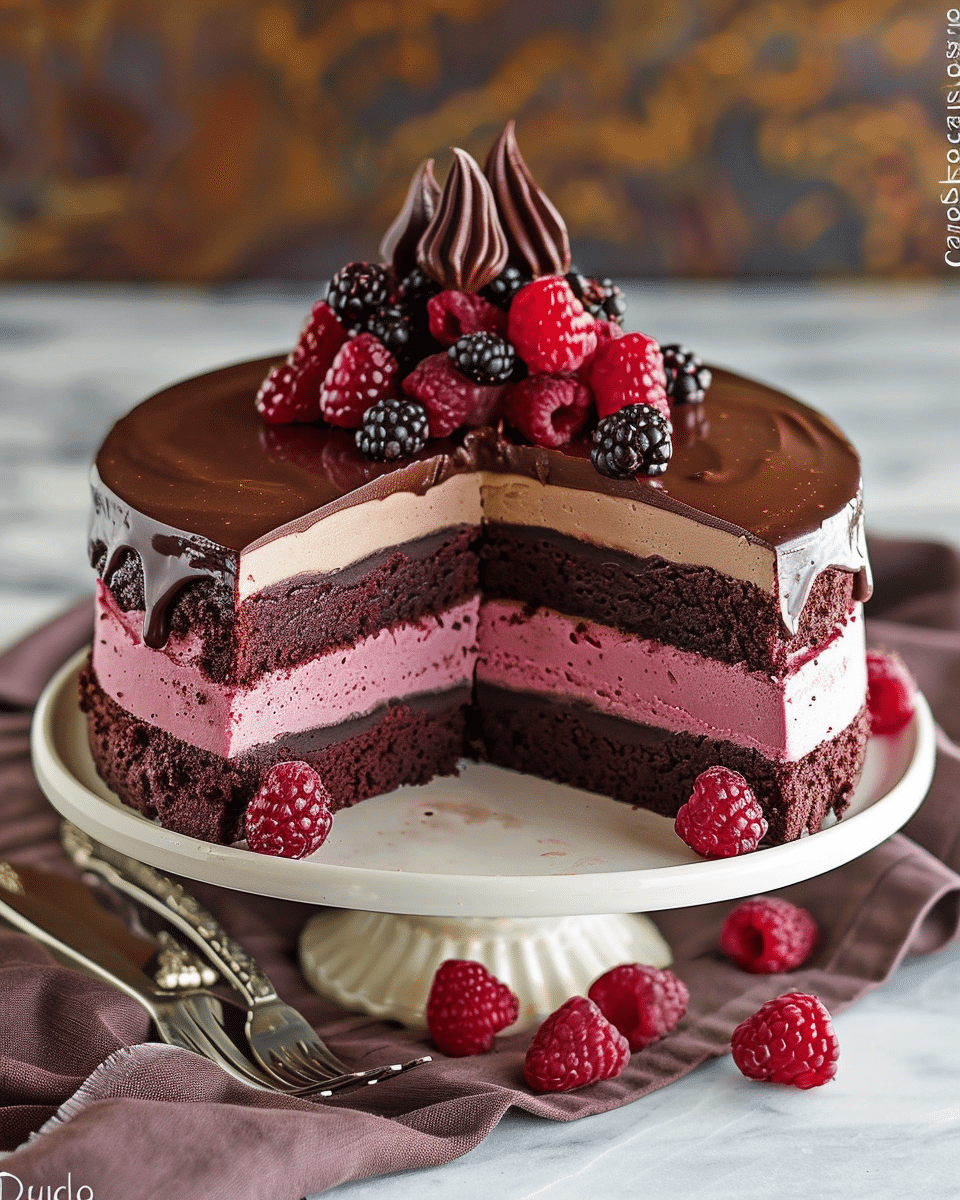
As Dessert: This is where the chocolate raspberry cake truly shines. Serve it slightly warm with a scoop of good quality vanilla bean Ice Cream – the contrast in temperature and texture is divine. Another favorite of mine is a dollop of freshly whipped cream infused with a little bit of raspberry liqueur, or even a light chocolate ganache drizzled over the top. If you’re feeling fancy, a few chocolate shavings or curls make for a beautiful garnish.
For Cozy Snacks: Sometimes, you just need a comforting treat with a cup of tea. This cake fits the bill perfectly. It’s satisfying and flavorful, and that hint of raspberry makes it feel a little special. My kids absolutely love it this way, often asking for a “chocolatey treat” after school, and this is always a winner. I’ve also found that a small glass of milk is the perfect accompaniment for a cozy evening snack.
Top Tips for Perfecting Your Chocolate Raspberry Cake
Over the years, I’ve learned a few things that make this chocolate raspberry cake turn out even better. These are the little nuggets of wisdom I’ve picked up through trial and error, and they really do make a difference!
Raspberry Prep: When you’re prepping the raspberries, whether fresh or frozen, be gentle. If you’re using fresh, you don’t want them to turn into complete mush before they even hit the oven. For frozen, I find they work great without a full thaw. The little bit of ice helps them maintain some shape as they cook. And the cornstarch is your best friend here; it prevents the raspberry juices from making the cake batter too wet, which can lead to a gummy texture.
Mixing Advice: The biggest pitfall with many cake recipes is overmixing. Once you add the wet ingredients to the dry, mix until *just* combined. A few small lumps are okay! Overmixing develops the gluten in the flour too much, resulting in a tough cake. The addition of hot liquid is key, but be sure to mix that in gently until the batter is smooth. That thin batter consistency is a good sign!
Swirl Customization: Don’t be afraid to get a little artistic with your swirl! You don’t need to be a professional baker to create beautiful patterns. Use a butter knife or a skewer and make zig-zag motions or gentle figure-eights through the batter. The goal is to create pockets of raspberry goodness, not to completely homogenize the two batters. Aim for distinct streaks of color and flavor.
Ingredient Swaps: While this recipe is wonderful as is, I’ve experimented a bit. For a dairy-free version, you can use almond milk or soy milk for the buttermilk substitute, and a neutral oil like canola or sunflower is perfect. I’ve even tested it with a bit of melted coconut oil, which added a subtle, delicious flavor. For the coffee, if you’re not a coffee drinker, hot water works just fine, but coffee really does make the chocolate flavor sing!
Baking Tips: Always, always trust your oven by doing the skewer test. Cakes can bake at different rates depending on your oven’s quirks and even the pan material. If you notice the top is browning too quickly before the center is cooked, you can loosely tent the cake with foil. Also, make sure your baking soda and baking powder are fresh; expired leaveners are a common reason for a flat cake.
Glaze Variations: The glaze is super simple, but you can get creative! For a darker chocolate flavor, add a tablespoon of cocoa powder to the glaze. For a raspberry-kissed glaze, you can mix in a teaspoon of raspberry jam or a splash of raspberry extract. If you prefer a crisper finish, you can skip the glaze altogether and just dust the cooled cake with powdered sugar. Or, for something truly decadent, a simple chocolate ganache is divine.
Storing and Reheating Tips
Knowing how to store your chocolate raspberry cake properly ensures it stays delicious for days. I’ve gotten pretty good at this, especially since it tends to disappear quickly in my house!
Room Temperature: Once the cake is completely cooled and the glaze has set a bit, you can store it at room temperature. I usually keep it in an airtight container. It should stay fresh and moist for about 2-3 days. Make sure it’s in a cool spot away from direct sunlight. If it’s really hot where you live, the fridge might be a better option.
Refrigerator Storage: For longer storage, the refrigerator is your best bet. Keep it in an airtight container or wrap it well in plastic wrap and then foil. It will stay good in the fridge for up to 5 days. The texture might firm up a little in the fridge, but don’t worry – it’s easily remedied.
Freezer Instructions: This cake freezes beautifully, which is great if you want to make it ahead of time for a special occasion. Let it cool completely, then wrap it very tightly in a couple of layers of plastic wrap, followed by a layer of aluminum foil. It can be stored in the freezer for up to 2-3 months. To thaw, unwrap it and let it come to room temperature on a wire rack for several hours, or overnight in the refrigerator.
Glaze Timing Advice: If you plan to freeze the cake, I recommend glazing it *after* it has thawed. Freezing and thawing can sometimes affect the texture of a poured glaze. For cakes stored at room temperature or in the fridge, glazing after cooling is perfect. If you’re storing it at room temperature and haven’t glazed it yet, you can apply the glaze just before serving.
Frequently Asked Questions
Final Thoughts
So there you have it – my beloved chocolate raspberry cake! It’s the recipe that always impresses, always comforts, and always brings a smile to people’s faces. It’s proof that you don’t need complicated techniques or exotic ingredients to create something truly special in your own kitchen. The combination of rich chocolate and bright, juicy raspberries is simply unbeatable, and the moist, tender crumb makes every bite a joy. I really hope you give this recipe a try. It’s become a staple in my baking repertoire, and I think it will for you too!

If you love this chocolate raspberry cake, you might also enjoy my Decadent Dark Chocolate Loaf Cake for another rich chocolate indulgence, or perhaps my Lemon Raspberry Scones for a brighter, fruitier breakfast treat. Let me know in the comments below how yours turns out! I’d absolutely love to hear about your successes, any fun variations you try, or even just what you thought of the taste. Happy baking, friends!
Chocolate Raspberry Cake
Ingredients
Chocolate Cake
- 2 cups all-purpose flour
- 0.75 cups unsweetened cocoa powder
- 1.5 teaspoons baking soda
- 0.5 teaspoons salt
- 2 cups granulated sugar
- 2 large eggs
- 1 cup buttermilk
- 0.5 cup vegetable oil
- 2 teaspoons vanilla extract
- 1 cup hot brewed coffee
Raspberry Filling
- 3 cups fresh raspberries
- 0.5 cup granulated sugar
- 2 tablespoons cornstarch
- 1 tablespoon lemon juice
Chocolate Ganache
- 8 ounces semi-sweet chocolate, chopped
- 1 cup heavy cream
Instructions
Prepare the Cake
- Preheat oven to 350°F (175°C). Grease and flour two 8-inch round cake pans.
- In a large bowl, whisk together flour, cocoa powder, baking soda, salt, and sugar.
- In a separate bowl, whisk together eggs, buttermilk, oil, and vanilla extract.
- Add the wet ingredients to the dry ingredients and mix until just combined. Gradually stir in the hot coffee until the batter is smooth.
- Pour batter evenly into the prepared cake pans.
- Bake for 30-35 minutes, or until a wooden skewer inserted into the center comes out clean. Let cool in pans for 10 minutes before inverting onto a wire rack to cool completely.
Make the Raspberry Filling
- In a medium saucepan, combine raspberries, sugar, cornstarch, and lemon juice.
- Cook over medium heat, stirring constantly, until the mixture thickens and bubbles. Remove from heat and let cool.
Prepare the Chocolate Ganache
- Place chopped chocolate in a heatproof bowl.
- Heat heavy cream in a small saucepan until simmering. Pour hot cream over the chocolate and let sit for 5 minutes.
- Whisk gently until smooth and glossy. Let cool slightly until spreadable.
Assemble the Cake
- Place one cooled cake layer on a serving plate. Spread the raspberry filling evenly over the cake layer.
- Top with the second cake layer. Pour the chocolate ganache over the cake, spreading to cover the top and sides.
- Chill the cake for at least 30 minutes before slicing and serving.
Notes
Featured Comments
“Impressed! Clear steps and comforting results. Perfect for busy nights.”
“New favorite here — so flavorful. crowd-pleaser was spot on.”
“Super easy and turned out amazing! My family asked for seconds. Saving this one.”
“This sweet treat was absolutely loved — the buttery really stands out. Thanks!”
“Made it tonight and wow — creamy! Will definitely make Chocolate raspberry cake again.”
“Packed with flavor and so simple. Exactly what I wanted from Chocolate raspberry cake.”


