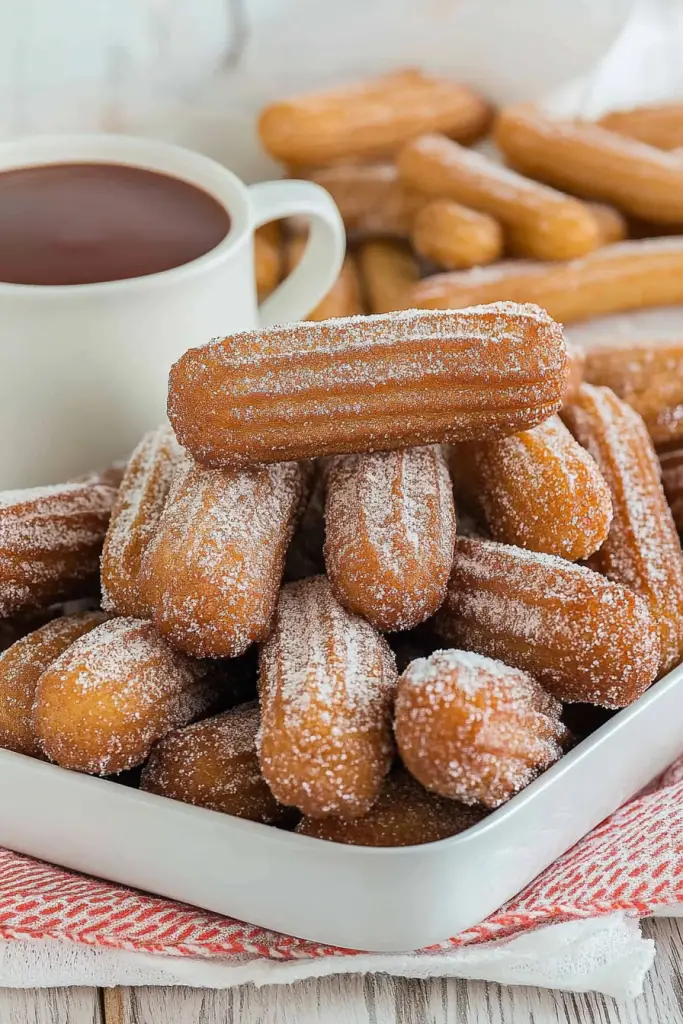
Oh, hello there! Come on in, grab a mug. I’ve been meaning to share this with you for ages. You know those days when you just *need* something sweet, something comforting, something that feels like a warm hug from the inside out? For me, that’s always been churros. Not just any churros, mind you, but the kind that are impossibly crispy on the outside, delightfully soft and airy on the inside, and just begging to be dipped in chocolate. My family practically lives on these. When my kids see me prepping the ingredients, they start doing a little happy dance in the kitchen, and honestly, it makes me so happy. This isn’t some complicated, intimidating recipe from a fancy bakery; this is a tried-and-true, “I can whip this up after a long day” kind of recipe that consistently delivers pure joy. If you’ve ever thought churros were too much work, trust me, this churros recipe is about to change your mind and become your new best friend. It’s way easier than it looks, and the payoff is HUGE!
What is Churro?
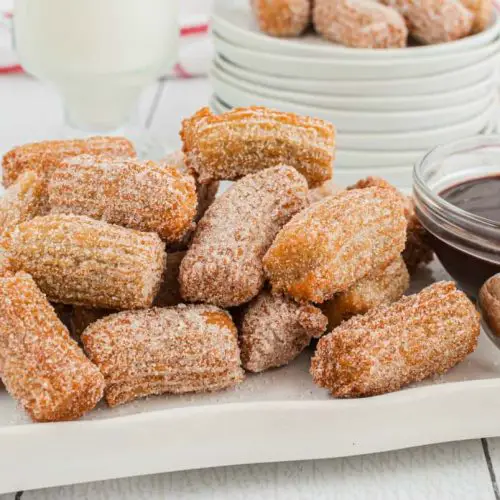
So, what exactly are these magical fried dough treats? At its heart, a churro is a type of fried dough pastry. Think of it like a long, ridged doughnut, but distinctively different in its preparation and taste. The dough itself is usually a simple water, flour, butter, and sugar mixture, often enriched with eggs, which gives it that wonderful structure. The characteristic ridges aren’t just for looks; they’re crucial for creating that incredible surface area that gets super crispy when fried. They’re often dusted with cinnamon sugar right after they come out of the hot oil, which adds another layer of deliciousness and that unmistakable aroma. It’s a treat with roots in Spanish and Portuguese cuisine, but it’s taken the world by storm, and for good reason! It’s simple, yet utterly irresistible.
Why you’ll love Churros?
Honestly, there are so many reasons why this churros recipe has earned a permanent spot in my recipe binder, and why I’m so excited to share it with you. First off, the flavor is just out of this world. That delicate crunch when you bite into it, followed by the warm, soft interior, all kissed with cinnamon and sugar – it’s pure bliss. And the aroma that fills your kitchen while these are frying? It’s like a siren song for your taste buds. Beyond the taste, though, is the sheer simplicity. I know fried dough can sound intimidating, but I promise you, this recipe breaks it down so well that even a beginner can achieve churro perfection. You don’t need any fancy equipment, just a few common pantry staples. Speaking of staples, this recipe is incredibly budget-friendly. You likely have most of the ingredients already, making it a perfect option for when you want a decadent treat without breaking the bank. And the versatility! While I adore them dusted in cinnamon sugar, you can totally play around with this. Dip them in chocolate, caramel, dulce de leche – the possibilities are endless! What I love most about this specific churros recipe, though, is its reliability. I’ve made it countless times, for parties, for weeknight cravings, for impressing guests, and it never, ever fails to deliver that perfect texture and taste. It’s truly a crowd-pleaser.
How do you make Churros?
Quick Overview
Making these amazing churros is surprisingly straightforward. You’ll start by making a simple dough on the stovetop, then piping it into hot oil to fry until golden brown. Once they’re perfectly crispy, you’ll give them a quick roll in cinnamon sugar and serve them warm. It’s a quick process from start to finish, especially once you get the hang of piping. The key is to have everything prepped and ready to go before you start frying, so you can work quickly and efficiently.
Ingredients
For the Main Batter:
* 1 cup water: This is the base of our dough. Make sure it’s fresh!
* 1/2 cup unsalted butter, cut into cubes: Using unsalted butter lets you control the saltiness. I find cubing it helps it melt evenly.
* 1 tablespoon granulated sugar: Just a touch of sweetness in the dough itself.
* 1/4 teaspoon salt: Crucial for balancing the flavors. Don’t skip it!
* 1 cup all-purpose flour: I always use unbleached flour for a better texture. Sifting it can help, but it’s not strictly necessary here.
* 2 large eggs: These bind everything together and give the churros their structure. Make sure they’re at room temperature; it helps them incorporate better.
For the Cinnamon Sugar Coating:
* 1/2 cup granulated sugar: The primary coating.
* 2 teaspoons ground cinnamon: The soul of the cinnamon sugar! Use a good quality cinnamon for the best flavor.
For Frying:
* Vegetable oil or Canola oil: You’ll need about 3-4 cups, enough to fill your pot about 2-3 inches deep. These oils have a high smoke point, which is essential for deep frying.
Optional for Serving:
* Chocolate sauce, dulce de leche, or caramel sauce: For dipping! This is non-negotiable in my house.
Step-by-Step Instructions
Step 1: Preheat & Prep Pan
First things first, let’s get our frying station ready. You’ll need a heavy-bottomed pot or Dutch oven for frying. Fill it with your chosen oil – about 3-4 cups should do it, making sure it’s at least 2-3 inches deep. We want to heat this oil to around 350°F (175°C). A kitchen thermometer is your best friend here; it makes a world of difference in getting perfectly cooked churros. While the oil heats up, prepare your cinnamon sugar. In a shallow dish or on a plate, mix together the 1/2 cup sugar and 2 teaspoons of cinnamon. Set this aside. Also, get your piping bag ready. You’ll need a large piping bag fitted with a large star tip – a Wilton 1M tip is perfect. Some people like to warm their tip slightly in hot water; I find it helps the dough pipe more smoothly.
Step 2: Mix Dry Ingredients
In a medium bowl, whisk together the 1 cup of all-purpose flour and the 1/4 teaspoon of salt. This is a simple step, but it ensures the salt is evenly distributed throughout the flour, which is important for the overall flavor balance. I usually just give it a quick whisk to combine. No need to overthink this part!
Step 3: Mix Wet Ingredients
Now, let’s make the base of our dough. In a medium saucepan, combine the 1 cup of water, 1/2 cup of butter, and 1 tablespoon of sugar. Place this over medium heat and stir occasionally until the butter is completely melted and the mixture just comes to a gentle boil. Once it’s boiling, immediately remove the saucepan from the heat.
Step 4: Combine
This is where the magic happens. Pour the flour mixture all at once into the hot liquid in the saucepan. Grab a sturdy wooden spoon or a heatproof spatula and start stirring vigorously. You want to mix it until a thick dough forms and pulls away cleanly from the sides of the pan. It will look a bit shaggy at first, but keep stirring! Cook this dough over low heat for about 1-2 minutes, stirring constantly. This cooks out some of the raw flour taste and helps create that lovely chewy texture. Then, transfer the dough to a mixing bowl (if you used a saucepan) and let it cool for about 5-10 minutes. It needs to cool down just enough so it doesn’t scramble the eggs. Once slightly cooled, add the 2 large eggs, one at a time, beating well after each addition until fully incorporated. The dough will look glossy and smooth. It should be thick but pipeable.
Step 5: Prepare Filling
While the dough is cooling slightly, this is a great time to get your dipping sauces ready if you’re using them. Gently warm up some chocolate sauce or dulce de leche in a small saucepan or in the microwave. If you’re feeling fancy, you can even make your own dulce de leche! I sometimes add a tiny pinch of sea salt to mine to enhance the sweetness.
Step 6: Layer & Swirl
Transfer your dough into the prepared piping bag fitted with the star tip. Once your oil has reached 350°F (175°C), it’s time to pipe. Carefully hold the piping bag about an inch or two above the hot oil and gently squeeze the dough out, cutting it off with kitchen scissors or a knife at your desired length (about 4-6 inches is good). Be careful not to crowd the pot; fry them in batches of 4-5 at a time so they don’t stick together and the oil temperature doesn’t drop too much. The star tip creates those beautiful ridges, which are essential for crispiness!
Step 7: Bake
Fry the churros for about 3-5 minutes per side, or until they are a deep golden brown and beautifully puffed up. Use a slotted spoon or spider strainer to gently turn them over so they cook evenly on all sides. Keep an eye on them; they can go from golden to burnt pretty quickly! The oil temperature is key here. If it’s too low, they’ll be greasy. If it’s too high, they’ll burn before cooking through. I usually test one first to get it just right.
Step 8: Cool & Glaze
As soon as the churros are done frying, use your slotted spoon to lift them out of the oil and place them on a plate lined with paper towels to drain any excess oil. While they are still warm and the oil is still clinging to them, immediately transfer them to the prepared cinnamon sugar mixture. Roll them around gently to coat them thoroughly. This is the step that really makes them sing! The warm, slightly oily surface helps the cinnamon sugar adhere perfectly.
Step 9: Slice & Serve
Serve these beauties immediately! Churros are best enjoyed warm, fresh out of the fryer. Arrange them on a platter and don’t forget to include those delicious dipping sauces. They’re perfect for sharing, but honestly, I won’t judge if you want to hoard a few for yourself. The smell alone is enough to make everyone gather in the kitchen!
What to Serve It With
These churros are honestly a celebration on a plate, but they pair wonderfully with so many things, depending on the occasion. For a relaxed weekday treat, I love serving them alongside a steaming mug of good quality coffee or hot chocolate. It’s my go-to when I’m craving something sweet at 10 pm but don’t want to bake a whole cake. For a more elegant brunch spread, I’ll arrange them artfully on a tiered stand with fresh berries and a dollop of Whipped Cream. They add a touch of fun and festivity to any gathering. As a dessert, they are simply divine. They’re a fantastic alternative to traditional cakes or pies, especially if you have guests with varying preferences. Serving them with a rich, dark chocolate ganache for dipping is a classic for a reason – the slight bitterness of the chocolate cuts through the sweetness of the churros beautifully. And for cozy movie nights or casual get-togethers, a big bowl of these, along with some caramel dip, is always a massive hit. My kids always request them for their birthday parties, and they disappear in minutes!
Top Tips for Perfecting Your Churros
I’ve made these churros more times than I can count, and over the years, I’ve picked up a few tricks that really elevate them from good to absolutely spectacular. First, when you’re making the dough, don’t skip cooking it for that minute or two over low heat after you add the flour. This step is crucial for achieving that signature chewy interior; it’s like tempering the flour. When you add the eggs, make sure the dough isn’t too hot, or you’ll end up with scrambled eggs in your dough, and nobody wants that! I learned that the hard way. Regarding piping, if your dough is too stiff, you might struggle to get it out of the bag. A slightly softer dough is easier to work with, but don’t make it too runny, or it won’t hold its shape. For frying, oil temperature is everything. I can’t stress that enough. If you don’t have a thermometer, watch for small bubbles forming around a wooden spoon handle when you dip it into the oil – that’s a good sign it’s ready. Don’t overcrowd the pot; frying in small batches ensures each churro gets perfectly crispy and evenly golden brown. For the cinnamon sugar coating, do it while the churros are still hot from the fryer. The residual oil on their surface helps the sugar stick beautifully. If they cool down too much, the coating won’t adhere as well. If you want to get creative with flavors, you can add a pinch of cardamom or even a tiny bit of espresso powder to the cinnamon sugar for a more complex flavor profile. And for that extra indulgence, I sometimes mix a little Vanilla Extract into my dulce de leche dip; it adds a lovely depth.
Storing and Reheating Tips
Churros are, without a doubt, best served immediately. That perfect crispy exterior is fleeting! However, if you happen to have any leftovers (which is rare in my house!), here’s how to handle them. At room temperature, they’ll start to lose their crispness within a few hours. If you do have a few left by the end of the day, store them in a paper bag rather than an airtight container; this allows some air circulation and helps prevent them from becoming too soft. They’ll still be tasty, just not *as* crispy. For longer storage, the refrigerator isn’t ideal, as it tends to make them soft and a bit chewy. If you absolutely must refrigerate them, keep them in an airtight container and try to eat them within a day or two. Reheating is key here. The best way to bring back some of that crispiness is in a preheated oven or a toaster oven. Arrange them in a single layer on a baking sheet at around 350°F (175°C) for about 5-7 minutes, or until they feel warm and slightly crisped up again. You can also try them in an Air Fryer for a few minutes on a low setting. For the glaze or dipping sauces, store them separately in airtight containers in the refrigerator. Reheat them gently before serving with your revived churros.
Frequently Asked Questions
Final Thoughts
So there you have it – my go-to churros recipe! I truly believe that everyone should have a foolproof recipe for something as delightful as churros in their repertoire. It’s one of those recipes that brings so much happiness with such simple ingredients and relatively little effort. The aroma alone is worth it, and the taste? Pure magic. I encourage you to give this churros recipe a try, especially if you’ve always shied away from making them at home. It’s the perfect way to impress your family and friends, or just to treat yourself because, honestly, you deserve it! If you love this recipe, you might also enjoy my classic Chocolate Chip Cookies or my easy no-bake cheesecake recipes. They’re all about bringing joy to your kitchen without a fuss. I can’t wait to hear how yours turn out! Please leave a comment below and let me know your favorite way to enjoy them, or any fun twists you added. Happy baking (and frying)!
Churros Recipe
Ingredients
Churros Dough
- 1 cup water
- 0.5 cup butter unsalted
- 0.25 teaspoon salt
- 1 cup all-purpose flour
- 2 large eggs
For Coating
- 0.75 cup granulated sugar
- 1.5 teaspoon ground cinnamon
For Frying
- 3 cups vegetable oil or other neutral oil
Instructions
Preparation Steps
- In a medium saucepan, combine water, butter, and salt. Bring to a boil over medium heat.
- Remove from heat and add the flour all at once. Stir vigorously with a wooden spoon until a smooth ball of dough forms and pulls away from the sides of the pan.
- Let the dough cool for about 5 minutes. Then, beat in the eggs one at a time until fully incorporated and the dough is smooth and glossy.
- Transfer the dough to a piping bag fitted with a large star tip.
- In a shallow dish, mix together the sugar and cinnamon for the coating.
- Heat the oil in a deep skillet or Dutch oven over medium-high heat to about 350°F (175°C).
- Carefully pipe about 4-6 inch strips of dough into the hot oil, cutting them off with kitchen scissors or a knife.
- Fry the churros in batches for about 2-3 minutes per side, or until golden brown and crispy.
- Remove the churros with a slotted spoon and drain on paper towels.
- Immediately toss the warm churros in the cinnamon-sugar mixture until evenly coated.
- Serve warm, optionally with chocolate sauce for dipping.
Notes
Featured Comments
“Impressed! Clear steps and creamy results. Perfect for busy nights.”
“New favorite here — spot on. crowd-pleaser was spot on.”
“Super easy and turned out amazing! My family asked for seconds. Saving this one.”
“This sweet treat was absolutely loved — the silky really stands out. Thanks!”
“Made it tonight and wow — family favorite! Will definitely make Churros recipe again.”
“Packed with flavor and so simple. Exactly what I wanted from Churros recipe.”